Search the Community
Showing results for tags 'jcb'.
Found 12 results
-

[MOC] JCB Fastrac 3185 & Oehler ZDK 180 trailer
eric trax posted a topic in LEGO Technic, Mindstorms, Model Team and Scale Modeling
It's time to show something agricultural. This time it will be a rather unusual JCB Fastrac 3185 tractor and an Oehler ZDK 180 trailer. The tractor model has been on my shelf for almost two years, so it's time to show it. For comparison, a photo of the original: JCB Fastrac 3185 I must admit that the Fastrac series are some of my favorite tractors. I remember being fascinated by them in agricultural newspapers as a child. What impressed me the most was the fact that they could accelerate up to 80 km/h. These tractors are loved or hated mainly because of their appearance. The 3185 is definitely my favorite. I started building it when it was already known that agricultural tires with a diameter of 81 mm would appear with the 42129 set. The frame was built quite quickly and is significantly different from my previous tractors. I removed the front three point hitch and added a front pendular suspension. The tractor is powered by an L-motor, turns using a servo-motor, and the lift and PTO operate two M-motors. Everything controlled by Sbrick. Then I started building the cabin, which has a rather specific shape. I managed to reproduce it quite well and I am fully satisfied with it. The cabin, of course, has an equipped interior with two seats. The biggest problem I had was with the design of the tractor's hood. It has a specific arch at the front with gille and thin frames on the sides. First, I made it with a sticker, but during one of the exhibitions I came up with the idea to use rounded 1x2 plates. It was a good decision. From the beginning, I didn't plan on making a building manual for it due to the complicated shape of the cabin. I finally changed my mind. This required further corrections, but they were implemented quite efficiently. My reluctance to follow the instructions was also caused by the printed fenders that @SaperPL made for me. Not wanting to cause problems for people who would buy the instructions, I built equivalents from Lego, which increased the number of elements by 130 bricks. The final effect, especially after using the stickers, is great and I must admit that it's probably my favorite tractor now :D OEHLER ZDK 180 Such a long delay in the publication of Fastrac was also caused by the lack of a machine to complete the set. I wanted to build a construction trailer, but I decided that it would be quite similar to my previous Krampe BigBody 550. I did not have traditional trailers in my collection. I kept thinking about an unusual color that would contrast nicely with the yellow tractor. I chose OEHLER ZDK 180. I decided to build the box with 23405 panels, which imitate the sides of the dump box well. Surprisingly, the dimensions of these elements matched the dimensions of the model quite well. The dump box had to be reinforced, of course, otherwise the load would burst it from the inside. I used additional strips so that it is now very stable. The visual effect well reflects the appearance of a real trailer. The dark turquise color is slightly different from the one used in Oehler trailers, and in the photos it looks much bluer than in reality. The dump box also has a side locking mechanism that works like in a real machine. The difference is double-side tipping.The real trailer box tilts in three directions. At the beginning of the construction process it also tilted backwards, but the use of a medium linear actuator made the whole thing very unstable. Finally, the box is lifted by two small linear actuators powered by the M-motor. The maximum load I tested was 4.5 kg. I must admit that this is quite an impressive result. Another interesting fact is that I used 67.8x27 tires, which are a bit larger than they should be, but because they are wider than the 62.4 mm tires, they significantly improve the overall appearance of the model. JCB Fastrac 3185 building instructions: https://reb.li/m/169365 Oehler ZDK 180 building instructions: https://reb.li/m/169574 Photo gallery and video presenting all the models' functions: -
 The project started long before the reveal of 42136 John Deere set, but I wanted to make the front steering with custom 3D printed parts initially and I got stuck on the 3-point hitch/PTO mechanisms, so it was sitting on the hard drive for few months. After figuring out how to make the 3-point hitch mechanism I realised I can make the virtual pivot steering and picked up the designs again around a week before the 42136 was revealed. The trailer however was clearly inspired and initially based on the trailer from the photo of 42136. The rotary rake uses PTO at the back which is integrated into 3-point hitch, but as there is not much room to fit a clutch anymore, the rotary rake is disconnected by folding it's sides up instead of disconnecting the PTO on the tractor's side. There is also a PTO at the front underneath the bumper, but I haven't figured out an attachment for it yet. Full gallery: https://imgur.com/a/dyCV5qL Video featuring speed builds of each part of the set and functions showcase: Instructions are coming, I just didn't make it with time as I didn't expect this project to grow this much with the implements. EDIT: Instructions for the tractor are online: https://rebrickable.com/mocs/MOC-97150 EDIT2: Instructions for rotary rake are online: https://rebrickable.com/mocs/MOC-97247 EDIT3: Instructions for the tipper trailer are online: https://rebrickable.com/mocs/MOC-97357
 -

Systems tractors and other machinery
1gor posted a topic in LEGO Technic, Mindstorms, Model Team and Scale Modeling
Ladies end Gentleman, I (miss)use a freedom to present you my version Unimog U423 in 1:17.5 scale to fit future models that I plan to built. (At the end I have decided to make models in 1:15 scale) Since introduction of new Unimog Implement carrier, I was very impressed with possibility to make my own LEGO Unimog Implement carrier that would fit my other models in proper scale. At that moment all my models were something in between 1:16 or 1:17 Scale and like @Bricksonwheels nicely said once truth is always somewhere in between. Then rumors about new tractor tire started to fill the comments here on Eurobricks abnd because most of my mocs are tractors some things got upside up. First question was - what can I do and make decision for future models and which scale to use...After a while i remembered my good friend Ingmar ( @2LegoOrNot2Lego... ) and his U.S. trucks since LEGO produces 62.4 x 20 Truck tires in some respected range of years so far, and set 42043 (one of my favorite) is still assembled. So I take a look around what was not so difficult, since I drive some 100 miles every day because of my daily job and started documenting trucks and tires on them. After seeing that some tire dimensions are always repeating I've decided to look at on-line brochure and ask tire sellers to see which is the most common tire dimension. The result (currently) for European built trucks was tire with approximately 1100 mm overall diameter ( mostly 315/80R22.5) and for U.S trucks this is 43.2" (which is also approximately 1100 mm for 11R24.5 tire). So when you want to calculate you would end up with following scale 17.5 (1100 / 62.4). So every truck can be represented with that tire which has very good steering capabilities and grip level is (for me) satisfying. Finally I can make Unimog that has all characteristic features for this vehicle; portal axles, all wheel drive with central differential...like on image ...and then the shock - I could not integrate hub reduction based on gear 16 tooth and gear 8 tooth partially inside wheel... well back to the drawing board and I felt like Wile E. Coyote After several month of brainstorming I've decided to buy this wheel (which is actually quite expensive) and what a pleasant surprise Portal axle hub fits nicely inside this wheel (wheel from set 5571). The only problem was that 68.8 X 24 tires are to soft for planned weight on Unimog, so I have to think about something in the future, but major problem was solved and development of Unimog for living room can start. My goal was to make something like this versions with some 175 mm wide mudguards which gives about 18 studs overall width for model. Currently you can see front axle which should probably be redesigned to make some 2-3 studs "gap" between tires and mudguard and a Wheel that will be used for Unimog. At the moment I did not decide to make short or long version (long version has enough space to use central differential). Model dimensions: - length 40 studs - wheelbase (probably) 26 studs - height 23 studs - width 18 studs Model should have this features: - all wheel drive - fully independent axles with 4 links suspension - portal hubs - front wheel steering - in - line 4 cylinder fake engine - cab tilting - hood opening - door opening - motorized front and rear pto - preparation for additional attachment or platform... (motorized) Current images are here (but due to free time I doubt that I'll be able to make a video) Please make your suggestions, comments, criticism and admins do not hesitate and correct or warn me for everything that is not correct with Eurobrics rules. (After few years of building this models, I have decided to make all models in compromise scale 1:15, of course if something new in term of tires does not come up from LEGO...) -

[MOC] JCB Fastrac Two (INSTRUCTIONS AVAILABLE)
JLiu15 posted a topic in LEGO Technic, Mindstorms, Model Team and Scale Modeling
Model of a modified JCB Fastrac. Features drive, steering with working steering wheel, 6-cylinder engine, opening hood, and custom stickers. Functions/features: Drive Steering Working steering wheel 6-cylinder engine Opening hood Instructions available on Rebrickable: https://rebrickable.com/mocs/MOC-118212/JLiu15/jcb-fastrac-two/#details After publishing instructions for two of my MOCs, I realized that both of them would cost a lot to build if you didn't have all the pieces. My Azure Racer XL, while simple with just over 600 pieces, had the expensive and hard-to-find RC motors. My large New Flyer XD60 Articulated Bus model mostly used currently available pieces, but 5000 pieces is still a lot. Furthermore, both models used third-party electronics: the Azure Racer XL used BuWizz and the articulated bus used SBrick. Because of this, I wanted to build a medium-sized MOC that is not only functional, but can be built without potentially spending a ton of money on LEGO pieces. I thought of making a model of the JCB Fastrac tractor, but then I found something that looked even cooler: the JCB Fastrac Two. I originally started designing the model in Stud.io back in February, but got bored of it after a few days. I did not make any updates to the model until May, which was when I got into designing the bodywork. I finished the digital model in early June, and built the physical model over the past few weeks. Thanks to already having worked on the instructions along the way, I was able to simply follow the instructions I made while building the physical model, allowing me to finish this model much faster than some of my other ones. Some information on the JCB Fastrac Two: it is a modified JCB Fastrac tractor that is built purely for speed. It is the world's fastest tractor, and more information on the original JCB Fastrac Two can be found in this video. While the real-life JCB Fastrac Two is the world's fastest tractor, my model was not intended to break any LEGO speed records. I decided to use the Control+ system for this model, as the system is widely available and I can keep the model 100% LEGO. The model is powered by two Control+ L motors sitting above the rear axle. The chassis essentially consists of two halves with the hub in between, with the whole structure reinforced with longitudinal beams. The placement of the hub allows for easy battery access, and the hub is turned on via a hidden switch by the driver's seat. Steering is controlled by a Control+ Large Angular Motor (the one from the 42114 set). I preferred it over using a L motor as it has more torque, and it just feels more suited for steering operations to me. The rack and pinion setup is placed sideways, with transverse reinforcement for the rack. My initial setup was prone to skipping at either end of rack's range of movement, but moving the transverse support closer helped eliminate this skipping. Additional gearing from the steering mechanism connects it to a working steering wheel in the cabin, and the drive motors are connected to a 6-cylinder fake engine in the front. My plan was for this MOC to be a primarily Technic build, with System pieces used where needed. However, the model still saw a fair amount of System detailing, and it has nearly 90 half pins (not including the new friction ones), which goes to show the amount of System pieces that went in to add additional detailing. The cabin area of the bodywork was largely straightforward, with most pieces connected at right angles with an occasional slanted or curved section. Modeling the hood and fenders were more challenging, as these parts have much more of a curvature. While I'm not totally satisfied with how some of these parts turned out, I was able to model the design digitally before physically building it thanks to Stud.io which eliminated the need for trial and error. After finishing the build, I designed custom stickers for the model which were printed on opaque sticker paper at Staples. The paper is very good quality (beats the label paper I started out making stickers with), and is easy to apply to LEGO pieces. As for the performance and functionality, the model is decently fast for a Control+ model. It isn't crazy fast (e.g. RC motor/BuWizz speeds), but is fast enough while not straining the drive motors. And while there are only two independent controls (drive and steering), I feel that the fake engine and working steering wheel really gave the model something extra. Mini piston engines (the ones made with half bushes) are always satisfying to watch, and the rattling noise when running is pretty nice too. I feel that there could've been a better way to open the hood that did not require a prop (e.g. a locking linkage), but there wasn't as much space to install a linkage mechanism especially with the fake engine occupying the space right under the hood. Overall, I'm pretty satisfied with this project. Although I quickly got bored of this project after starting the design in February, my interest quickly rebounded after I got back to working on the instructions in May. Some parts could've been better, such as the hood and fenders, and I feel that the model could've gone a little faster. Still, the model isn't exactly light, and achieving a higher speed probably would mean compromising on some parts of the build. Video: Photos: -
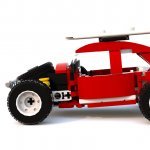
[WIP] JCB Fastrac Two
JLiu15 posted a topic in LEGO Technic, Mindstorms, Model Team and Scale Modeling
Here's a new project I'm working on. It is a model of the JCB Fastrac Two. https://www.autocar.co.uk/car-news/features/christmas-road-test-worlds-fastest-tractor A modified JCB Fastrac tractor, the JCB Fastrac Two is the fastest tractor in the world, and can reach 150mph. My model will feature drive, steering, an inline-6 fake engine, and a working steering wheel. The model uses the Control+ system and features 2 C+ L motors for drive and a large angular motor (from the 42114 set) for steering. So far, I have done some initial modeling in Stud.io. I've modeled the drivetrain and the front axle, and the C+ hub sits between them near the bottom for easy battery access. Photos: -
This thing - called world fastest tractor. World's Fastest Tractor (jcb.com) Was considering also large scale, but stopped for a moment on some midsize. At the end it has also some functions - fake engine, differential, HOG steering, openable hood. Also on original there are not much function - mainly high speed. Disclaimer - inside pics was better then in outside somehow (maybe because of winter) Fake engine - four working cylinders, but it is six studs long, so two really fake cylinders. In fact, to be in scale, this kind of fake engine with 6 working cylinders, would fit with Volvo loader wheels. Engine is at slight angle, just like on original This is how HOG steering crosses drive axle (red) Bonnet could have been better, but there is no 9x3 curved panel or similar. I tried idea with some angled connectors, but this straight solution seemed better. Also it would been good to have those rear fenders in yellow. They are available, but I don't have them. Rebrickable showed, that average price is 30EUR, but in fact, it appeared, that they are some few euros on bricklink. By form they are almost perfect. Maybe will continue with large scale on Volvo wheels. But who knows, when that will happen.
-

[MOC] JCB 1CXT- Mini RC+Pneumatics Tracked Loader
CalimeroLego posted a topic in LEGO Technic, Mindstorms, Model Team and Scale Modeling
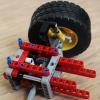
Hello everyone, Please let me introduce to you my first MOC on this website. I've been building for a while and finally I decided to share something; some of you that saw me in the Decreasing number of Mocs topic may be happy to see it. by Guilhem Martineau, on Flickr The 1CXT is a mini backhoe which particularity is to be driven by tracks and not wheels. As a mini backhoe it features a skid steer loader front and a rear mini excavator arm. The tracks allow for lower ground pressure, greater maneuverability and higher pushing or climbing power. Discover more about it here : JCB 1CXT This build has been almost 1.5 years in the making as i don't have much time in engineering school. I designed it using blueprints of the real machine and the scale of it is approximately 1:10. The model is 33 cm long without attachments and the rear arm folded, 78 cm long at maximum length with the fork, 22 cm high and 16 cm wide. by Guilhem Martineau, on Flickr This MOC is an hybrid of pneumatic and RC. I. RC : With the IR receiver you can control the drive with independent tracks control, and the movement of the front loader. The first receiver is for the tracks. They are driven by one L-Motor each. There is a 12:25 ratio so it's enough to move around. The tracks feature a tension system with one soft spring on each track. by Guilhem Martineau, on Flickr The second receiver is for the loader. One L-Motor controls the arm via a 20:12 ratio but I'm not happy with that, I can't figure how to fit a bigger ratio to gain some power. Because there are two big linear-actuators it's good enough. The attachment is tilted thanks to an M-Motor, directly hooked with two 12:12 90° transmission. then two mini linear actuators give the wanted movement. I am quite happy with the tilting range but not with the height, even tho I really can't do anything given the space that I have. by Guilhem Martineau, on Flickr II. Motorized : By turning the switch on the left side of the cab on, you start an XL-Motor and grant power to a second switch. The XL-Motor powers a pneumatic pump and a two way gearbox in the rear of the backhoe. With a red knob you can actuate the outriggers in either way without having to make the XL-motor run in the other direction. The two big outriggers are strong enough to lift the entire machine off the ground. The second switch is located in the roof of the cab. By turning the beacon left or right you rotate the excavator arm via an M-Motor and a worm gear setup. by Guilhem Martineau, on Flickr III. Pneumatics : The pump powered by the XL-Motor is hooked up to 4 switches that control the excavator arm. There are two of them in the cab and two sticking out of the roof. The one on the right hand side of the driver controls the first section of the arm and the one on the left the second section. The second section features an extension via a 1 stud thick cylinder controlled on the left when you are facing towards the arm. It takes the section from 15 to 20 cm to give the bucket, actuated by a 7 stud cylinder, a better reach. by Guilhem Martineau, on Flickr IV. Conclusion : Overall I am quite pleased with myself. The function setup might seem strange but there was no room for full RC and this was the best compromise I could find. The play-ability turned out to be great, my little brother loves it! You can find more pictures on my flickr account! Thank you for reading me and checking out my little loader! -

42108 JCB Roto Telehandler
mpj posted a topic in LEGO Technic, Mindstorms, Model Team and Scale Modeling
Hello! Recently I built an alternative model using only parts from set 42108. It is a roto-telehandler, mainly based on JCB Hydraload. All functions are manual: - boom raise/lower - fork tilt - turret rotation - 4 wheels steering - stabilizers There are 2 attachments: fork and hook. It is in the same scale as my other models (1.21) and instructions can be found here: https://rebrickable.com/mocs/MOC-43871/technicprojects/jcb-roto-telehandler/?inventory=1#comments Functions summary: I hope you like it! -

JCB 5CX Wastemaster pneumatic backhoe loader
Sariel posted a topic in LEGO Technic, Mindstorms, Model Team and Scale Modeling
Here's my first attempt at making a fully functional backhoe loader, with motorized functions controlled remotely using two SBricks and pneumatic functions controlled remotely using a wired external pneumatic remote, something I've been inspired to try by Jennifer Clark's models. All in all, the model has 9 motors in it (and 2 more in the remote) and 6 pneumatic circuits. Photos & reading: http://sariel.pl/2018/12/jcb-5cx-wastemaster/ -
Now 99% happy with this, my interpretation of a backhoe excavator, based originally on the red farm tractor by TLG and evolved from there, enjoy, hope you like it like me, comments feedback welcome.
-

[TC9] JCB Skid Steer & Front loader
lindr6 posted a topic in LEGO Technic, Mindstorms, Model Team and Scale Modeling
Here is my TC9 Entry. It is skid steer and front loader based on the real thing by JCB. A Model JCB Skid Steer: Functions: - Mini Linear Actuator Raise/Lower Boom - Manual Bucket Dump - Working Fake 3 Cylinder Diesel Engine - Four Wheel Drive (All wheels turn when any one wheel turns) - Left/Right wheels can turn in same or opposite directions to turn - Quick Detach Bucket Attachment Dimensions: - Length: 25 studs - Width: 11 studs - Height: 16 studs - Box Volume: 4400 studs B Model: JCB Front Loader: Functions: - Mini Linear Actuator To Raise/Lower Bucket - Manual Bucket Dump - Working Fake Three Cylinder Engine - Rear Wheel Drive With Differential - Rear Perpendicular Suspension - Articulated Steering Dimensions: - Length: 35 Studs - Width: 12 Studs - Height: 16 Studs - Box Volume: 6720 Studs Video: Parts left from A Model after building B Model: -

[TRIPLE] The Sod Farm
Thirdwigg posted a topic in LEGO Technic, Mindstorms, Model Team and Scale Modeling
I present my entry to the Eurobricks Technic Triple challenge. We are off to the sod farm. Ever wondered how they grew such nice grass on your local golf course or the town square? They probably ordered sod and used machines just like these. The MAN TGS has working doors, steering, and a three part crane. The JCB 150t has working tracks, lifting and tilting forks. The Brouwer 1576 has a working 2 cylinder motor and working steering. The harvesting arm features a high speed cutting blade, and a timed blade that cuts the sod pieces to length, and a conveyor to move the sod up to the back pallet. Finally, the pallet holder can be dropped to let the full sod pallet off the back. Read much more at thirdwigg.com. <iframe width="640" height="390" src="//www.youtube.com/embed/_DV_ed43IiU" frameborder="0" allowfullscreen></iframe>