Search the Community
Showing results for tags 'hypercar'.
Found 23 results
-

42161 Lamborghini Huracán Tecnica
R0Sch posted a topic in LEGO Technic, Mindstorms, Model Team and Scale Modeling
Discussion thread for the upcoming LEGO Technic 42161 Lamborghini Huracán Tecnica. Nr. of pieces: 806 Release date: 01.08.2023 Price: 52.99€ Lime again, how boring. -
Hello Lamborghini and Speed Champions fans, The Lamborghini Diablo is a high-performance mid-engine sports car built by Italian automobile manufacturer Lamborghini between 1990 and 2001. It is the first production Lamborghini capable of attaining a top speed in excess of 320 kilometres per hour (200 mph). Building instructions are available on the following links: It is a studless build in the new, 8 studs wide Speed Champions style. I wanted to create a clean model which is as accurate as possible in this small scale. I prefer the brick built solutions to keep the flexibility of the used parts in further builds, and therefore only one Lamborghini logo sticker and a standard vehicle registration plate sticker are used. My intent was to keep the width-length-height ratio of the real car and this size makes it possible. The model contains lots of details: for example the emblematic taillights, the side air intakes, the side view mirrors and rear details with the double exhausts etc... Maybe the most challenging one was the hood tilt and some half stud offsets in the inside structure. I tried to fill every unnecessary gaps and therefore some tricky build techniques are used. The model has space for two minifigures with helmets or small hairs. Thanks for visiting, _TLG_ Lamborghini Diablo - Instructions 1 by László Torma, on Flickr Lamborghini Diablo - Instructions 2 by László Torma, on Flickr Lamborghini Diablo - Instructions 3 by László Torma, on Flickr Lamborghini Diablo - Instructions 4 by László Torma, on Flickr Lamborghini Diablo - Instructions 5 by László Torma, on Flickr Lamborghini Diablo - Instructions 6 by László Torma, on Flickr Lamborghini Diablo - Instructions 7 by László Torma, on Flickr
-
Hello Lamborghini and Speed Champions fans, The Lamborghini Aventador LP700-4 is a mid-engine sportscar produced by the Italian automotive manufacturer Lamborghini. In keeping with Lamborghini tradition, the Aventador is named after a Spanish fighting bull that fought in Zaragoza, Aragón, in 1993. The Aventador is the successor for the Murciélago and was made by hand in Sant'Agata Bolognese, Italy. Building instructions are available on the following links: https://rebrickable.com/mocs/MOC-149528/_TLG_/lamborghini-aventador-lp700-4 It is a studless build in the new, 8 studs wide Speed Champions style. I wanted to create a clean model which is as accurate as possible in this small scale. I prefer the brick built solutions to keep the flexibility of the used parts in further builds, and therefore only two types of stickers are used: simple black ones to cover the visible parts of the headlights in the front air intakes, and the Lamborghini logo. My intent was to keep the width-length-height ratio of the real car and this size makes it possible. The model contains lots of details: for example the emblematic headlights, the front and side air intakes, the side view mirrors and rear details with the wide exhaust etc... Maybe the most challenging one was the hood tilt and some half stud offsets in the inside structure. I tried to fill every unnecessary gaps and therefore some tricky build techniques are used. The two trans-clear headlight parts "Slope, Inverted 45 2 x 1" (part 3665) are very rare, it never released in a set, but is available on Bricklink in some webshops. Of course they can be replaced for example by white, black, light bluish gray or dark bluish gray versions. The parts 86996 and 42446 are also rare, but the picture 7 shows an alternate side view mirror solution. It is a very low build, and can roll well only on flat surfaces. It is more of a display model then a toy for small children. The model has space for two minifigures: one with small hair or helmet in the driver's seat and one either without hair or withour leg. Thanks for visiting, _TLG_ Lamborghini Aventador - Instructions 1 by László Torma, on Flickr Lamborghini Aventador - Instructions 2 by László Torma, on Flickr Lamborghini Aventador - Instructions 3 by László Torma, on Flickr Lamborghini Aventador - Instructions 4 by László Torma, on Flickr Lamborghini Aventador - Instructions 5 by László Torma, on Flickr Lamborghini Aventador - Instructions 6 by László Torma, on Flickr Lamborghini Aventador - Instructions 7 by László Torma, on Flickr Lamborghini Aventador - Instructions 8 by László Torma, on Flickr Rear wing version added :), it is a free addition the original design: Lamborghini Aventador rear wing - Instructions 1 by László Torma, on Flickr Lamborghini Aventador rear wing - Instructions 2 by László Torma, on Flickr Lamborghini Aventador rear wing - Instructions 3 by László Torma, on Flickr
-
Hello Ferrari and Speed Champions fans, The Ferrari Daytona SP3 is a limited production mid-engine sports car produced by Italian automobile manufacturer Ferrari, unveiled on 20 November 2021 for the 2023 model year. The design references to 1960s race cars, it is a modernization of the 330 P4, with the body work consisting distinguished low driver's seating position, raised front and rear wheel arches, and the Targa top design. Building instructions are available on the following links: https://rebrickable.com/mocs/MOC-131689/_TLG_/ferrari-daytona-sp3 https://www.mocsmarket.com/lego-mocs/ferrari-daytona-sp3/ It is a studless build in the new, 8 studs wide Speed Champions style. I wanted to create a sleek model which is as accurate as possible in this small scale. I prefer the brick built solutions to keep the flexibility of the used parts in further builds, and therefore only Ferrari logo and simple light gray head lights stickers are used. My intent was to keep the width-length-height ratio of the real car and this size makes it possible. The model contains lots of details: for example the emblematic front and hood grilles, the side and rear intakes, the side view mirrors etc... Maybe the most challenging one was the brick built narrow black and red lines on the front. I tried to fill every unnecessary gaps and therefore some tricky build techniques are used. On the pictures the red grills on the front are connected only by half studs. However, if you prefer more sturdy models, then full connection is usable too, it is a bit less accurate, but looks decent too. It is a very low build, an can roll well only on flat surfaces. The model has space for two minifigures. I suggest to use helmets, or small hairs, and the upper part of the seats have to be removed in this case. Thanks for visiting, _TLG_ Ferrari Daytona SP3 - instructions 1 by László Torma, on Flickr Ferrari Daytona SP3 - instructions 2 by László Torma, on Flickr Ferrari Daytona SP3 - instructions 3 by László Torma, on Flickr Ferrari Daytona SP3 - instructions 4 by László Torma, on Flickr Ferrari Daytona SP3 - instructions 5 by László Torma, on Flickr Ferrari Daytona SP3 - instructions 6 by László Torma, on Flickr Ferrari Daytona SP3 - instructions 7 by László Torma, on Flickr
-
Hello Speed Champions fans, Black Arrow is a ficticious hypercar which was designed for a "Hypercar building contest" hosted by sfh_bricks on Instagram. I tried to design something really cool inspired by the cyberpunk culture. Building instructions are available on the following links: https://rebrickable.com/mocs/MOC-119144/_TLG_/black-arrow-hypercar-concept It is a studless build in the new, 8 studs wide Speed Champions style. Some rules had to be followed: only certain types of car bases, wheels, fenders and windscreen are allowed, cockpit have to be closed, fixed dimensions (wheelbase, width, and maximum length), build must fit a full minifig with helmet. I prefer the brick built solutions to keep the flexibility of the used parts in further builds, and therefore stickers are not used. My intent was to keep the build smooth and to add lots of details: for example the air intakes, the rear wing, the side view mirrors etc. . Maybe the most challenging one was the double headlight. I tried to fill every unnecessary gaps and therefore some tricky build techniques are used. There are two versions of the front assembly : 1) the double headlight version which is a bit more extreme and 2) the simple headlight version which is more solid and sturdy. The model has space for one minifigure. I suggest to use a helmet or small hair. Thanks for visiting, _TLG_ Black Arrow 01 by László Torma, on Flickr Black Arrow 02 by László Torma, on Flickr Black Arrow 03 by László Torma, on Flickr Black Arrow 04 by László Torma, on Flickr Black Arrow 05 by László Torma, on Flickr Black Arrow 06 by László Torma, on Flickr Black Arrow 08 by László Torma, on Flickr Black Arrow 07 by László Torma, on Flickr
-
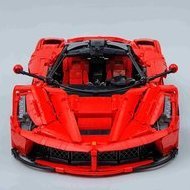 The LaFerrari represents Ferrari’s most ambitious project yet to push the boundaries of technology on a road car. Only 499 units were produced, and each cost more than 1 million US dollars since its release back in 2013. My replica had to be as authentic as possible to the real masterpiece when it comes to both functionality and aesthetics. Therefore I chose for the classis manual chassis rather than a remote controlled version instead. Off coarse I used Sariel’s model scaler to get all proportions right Specifications: -Length: 53 Studs (42 cm); Width 21 Studs (17 cm); height: 12.5 Studs (9.5 cm) -Weight: 1100 g -Parts count: 1566 pcs Features: -RWD -Front and rear independent suspension -Working fake mini V12 engine (by crowkillers) -Steering with HOG control and positive Caster angle -Working diffuser flaps which deploy when steered (Brunojj1’s idea) -Modular bodywork (easily detachable to reveal chassis) -Openable butterfly doors with HOG control -Openable engine bay with knee joint mechanism Considering it’s scale, the parameters I wanted to include were not easy to achieve at all, resulting in many headaches throughout the design process. The doors are a perfect example: their opening movement had as realistic as possible whilst not interfering with any of the other bodywork or front wheels, as they are part of the fender. When fully opened, the doors also needed to lock into place and they had to be operated using HOGs. The engine bay was a nightmare to design too. Very complicated curves had to be replicated with limited space for connectors to put the panels at the right angles. It Interfering with the chassis was a big bottleneck as well. I am quite satisfied with the result of my dream hypercar replication, therefore I took the opportunity to make high quality renders building instructions using Stud.io. Building instructions and parts list are available here: https://rebrickable.com/mocs/MOC-29075/T-Lego/ferrari-laferrari/#admin More pictures at my bricksafe: https://bricksafe.com/pages/T_Antonie/ferrari-laferrari Constructive critics, feedback and questions are as always appreciated! Enjoy your day
 -

[42125 Alternate] Ferrari Daytona SP3
paave posted a topic in LEGO Technic, Mindstorms, Model Team and Scale Modeling
Here's my replication of the Ferrari Daytona SP3 made with the 42125 parts. Not perfect shaping, but the best panel configuration, to my mind. Coming with the free instruction Features: - Opening doors, bonnet, trunk- Independent suspension- Fake engine- Working steering wheel Video (including instruction): More images: Rebrickable page: https://rebrickable.com/mocs/MOC-108295/paave/ferrari-daytona-sp3 -
Hello Ferrari and Speed Champions fans, the Ferrari F40 (tipo F120) is a mid-engine, rear-wheel drive sports car engineered by Nicola Materazzi with styling by Pininfarina. It was built from 1987 to 1992, with the LM and GTE race car versions continuing production until 1994 and 1996 respectively. As the successor to the 288 GTO (also engineered by Materazzi), it was designed to celebrate Ferrari's 40th anniversary and was the last Ferrari automobile personally approved by Enzo Ferrari. At the time it was Ferrari's fastest, most powerful, and most expensive car for sale. Building instructions are available on the following links: https://rebrickable.com/mocs/MOC-99799/_TLG_/ferrari-f40 https://www.mocsmarket.com/lego-mocs/ferrari-f40-building-instructions/ It is a studless build in the new, 8 studs wide Speed Champions style. I wanted to create a sleek model which is as accurate as possible in this small scale. I prefer the brick built solutions to keep the flexibility of the used parts in further builds, and therefore only Ferrari logo stickers are used. (If you preferred a better shaping instead of a real rear side grill, then 2pcs of parts 61409 could replaced by 2pcs of tiles and some additional stickers, see the picture 3.) My intent was to keep the width-length-height ratio of the real car and this size makes it possible. The model contains lots of details: for example the emblematic front, hood , side and rear intakes, the narrow black line on the front and sides, the front turn signals, the side view mirrors etc... Maybe the most challenging one was the iconic rear side with the vehicle registration plate and the rear spoiler, here there is a half stud offset. I tried to fill every unnecessary gaps and therefore some tricky build techniques are used. The model has space for one minifigure. I suggest to use small or middle sized hair. Thanks for visiting, _TLG_ Ferrari F40 - instructions 1 by László Torma, on Flickr Ferrari F40 - instructions 2 by László Torma, on Flickr Ferrari F40 - instructions 3 by László Torma, on Flickr Ferrari F40 - instructions 4 by László Torma, on Flickr Ferrari F40 - instructions 5 by László Torma, on Flickr Ferrari F40 - instructions 6 by László Torma, on Flickr Ferrari F40 - instructions 7 by László Torma, on Flickr Ferrari F40 - instructions 8 by László Torma, on Flickr Ferrari F40 - instructions 9 by László Torma, on Flickr
-
Hello Lamborghini and Speed Champions fans, The Lamborghini Countach 2021: the supercar is reborn 50 years after the 1970s original. It is futuristic while also paying homage to the legendary 1971 design. The engine, a 12-cylinder hybrid with a staggering 769bhp, growls in a way only a 12 cylinder can do, while an electric motor adds another 34bhp to the output: a glimpse into the future of hybrid and fully electric Lamborghinis. Building instructions are available on the following link: https://rebrickable.com/mocs/MOC-93056/_TLG_/lamborghini-countach-2021 ( 20% off coupon on the first week: COUNTACH-FIRSTWEEK :) ) It is a studless model in the new, 8 studs wide Speed Champions style. I have minimized the use of stickers to keep the flexibility of the used parts in further builds, therefore only two ones are used: the Lamborghini logo and a solid black one for the narrow front grill. My intent was to keep the width-length-height ratio of the real car and this size makes it possible. I wanted to build the model as accurate as possible in this small scale, therefore it contains lots of details: for example the side grills, the front ligths, the front grills, the side view mirrors, the exhaust details etc... Maybe the most challenging one was the emblematic polygonal side opening. I tried to fill every unnecessary gaps and therefore some tricky build techniques are used. The model has space for one minifigure. I suggest to use small or middle sized hair. Thanks for visiting, _TLG_ Countach 2021 - Instructions 1 by László Torma, on Flickr Countach 2021 - Instructions 2 by László Torma, on Flickr Countach 2021 - Instructions 3 by László Torma, on Flickr Countach 2021 - Instructions 4 by László Torma, on Flickr Countach 2021 - Instructions 5 by László Torma, on Flickr Countach 2021 - Instructions 6 by László Torma, on Flickr Countach 2021 - Instructions 7 by László Torma, on Flickr
-

[MOC] 1:8 Spania GTA Spano motorized hypercar
Zerobricks posted a topic in LEGO Technic, Mindstorms, Model Team and Scale Modeling
I present you the most accurate, functional and highest performing supercar I've ever made, the BuWizz GTA Spano: The main goal behind this scale version was to be as faithful to the design and configuration of the real GTA Spano as possible while maintaining a high degree of performance and functionality. This 1:8 scale model car has been designed, developed and manufactured in close collaboration with Spania GTA and has a total of 3,880 LEGO pieces, ten BuWizz Motors for propulsion, five motors for other functions and five BuWizz 3.0 Pro controllers, which allow it to reach a maximum speed of 36.5 km/h, a new world record for such a heavy and accurate model. It features the following functions: 10 BuWizz motors used for the rear wheel drive with vector control 1 PU L motor used for steering and rotating the steering wheel 1 PU M motor used to lift and tilt the rear spoiler 1 PU M motor used for the fake V10 engine 2 PU M motors used to open the doors Full independent suspension on all wheels Opening hood, engine cover and the rear trunk Today I’m going to go a bit deeper into the design process and technical details of the model. First in order to achieve the required level of realism I imported the manufacturer’s 3D file of the car's body in LDD and used it as a reference, here in blue: As mentioned before, the power is supplied by 10 BuWizz motors which use the outer outputs geared up using 40 and 24 tooth gears giving a 1.67x gear ratio on the rear drive wheels. Without load, the wheels can spin with up to 50 km/h. Power is transmitted to the rear drive wheels using the new heavy duty CV joints. To support so many motors and BuWizz bricks, the rear axle was designed to support a weight of over 2,5 kilograms. Here the shape of the BuWizz motors was of a high advantage, since you can easily stack them on the same drive axle. As you can see on the following image, the rear axle is one of the densest; most interconnected and complicated parts of the whole car. The front axle is designed to feature a positive caster angle, which gives the model additional stability when driving at high speeds. The steering uses double steering links in order to reduce the play of the system. A single PU L motor steers the wheels and the steering wheel. Along with the 3D model of the exterior, I also used the 3D model of the interior to design…well, the interior. I took great care to model the seats so they are in proper scale and very detailed using a combination of studless and studded bricks. For highly accurate details, custom stickers were used for the gauges, central console and of course the logo: As with the interior, the engine bay also uses a combination of studded and studless parts in order to match the real one as close as possible. I also used tiles in Light Bright Orange color to represent the space grade gold foil heat shield of the real car: The wheels are custom elements which I personally designed and 3D printed. A big challenge was to design them in a way to be accurate to the original source, yet strong enough to support this 4+ kg model at speeds over 35 km/h. With all the mechanical and functional parts completed, it was time to create an accurate representation of the bodywork. As mentioned before, using the 3D CAD model came really handy in capturing all the organic shapes and curves of the original model. Here are some highlights: Analog to the real car, this representation also features a lot of opening surfaces. The doors and the rear spoiler are motorized while the front boot, rear engine cover and the rear trunk can be opened manually: To summarize, the whole project took some 6 months to complete from receiving the 3D files to the speed-breaking final version of the model. For me, this was a really nice learning experience and I’m proud to say it’s one of the best models I’ve designed so far. If you are interested to know more about not just the model, but also the cooperation between BuWizz and Spania GTA, please check the following video: -
Hello everyone, this is my first post here! I have been working on this car for at least a week in Stud.io which I plan to make in real life soon and I wanted to get some people's thoughts on it before I ordered the parts, this is my 1:16 scale Pagani Huayra I decided to build the Huayra after discussing what to build next with a friend over Instagram, and he pointed out that there wasn't really any Huayra models out there that weren't technic, so here it is. It features a fully detailed interior and engine bay with the 6.0L AMG Twin-Turbocharged V12 covered in gold. It also has opening doors, back and front compartments (I don't know what to call them since you cant store anything in the front part) as well as opening storage boxes behind the doors and flaps on the front and back that open at high speed. I built this car from scratch only using some images and the blueprints to work out how big it needed to be. I spent around 20 hours over 3 days building and designing it and I don't want to release any instructions until I have it built in real life so I can make sure everything opens and closes properly. Things I know need to be improved and what will be changed: - Wheel covers don't come in that colour, will probably paint them - Doors on the real car include the door + some of the roof, which is really difficult to design, so I will wait till I have it IRL so its easier - Wheels with T-Bars colliding in the engine bay will eventually be connected with a pneumatic hose to make the turbos I had a real challenge designing this and I really want your feedback so I know what I'm doing. I have also made the Huayra BC version just for fun. *The render with the flaps open was with an older version of the front end, just ignore it*
-

[MOC] My first hypercar
MortalFlesh posted a topic in LEGO Technic, Mindstorms, Model Team and Scale Modeling
Hello everyone. Since this is my first topic here, I’d like to introduce myself a bit first (but for those who don't care, I will put it to the spoiler :) ) My dream is to build my own hypercar, powered by EV3 and controlled by XBox-Controller. For now, I have almost nothing but my dream. But I’d like to share my way here (hope it is not a problem :) ). I have some features and stuff I’d like to at least try. As I see it now, it has a three main parts. Build a chassis Create a program to run it Make it look great I will update this message as my progress goes. Photos and .io files (for Studio) of my progress - bricksafe Videos - Youtube Playlist Changelog Building a chassis Progress: I’m trying different gearboxes and building a base chassis. Motors: 2 large motors for movement 1 medium motor to control steering 1 medium motor to control transmission Transmission and Gearbox: I’ve tried 2 large motors at HammerHead chassis by @Didumos69 and it worked, but not great, but I guess it was because of the gearbox is not meant to be used by motors. so I’m thinking about a more heavy-duty gearbox with a max 4 speeds (maybe I don't even need that many speeds) - but I’d need a strong 1st gear to make it move, then gear up to make it faster I don't need a reverse, since it is done by motors themselves but I’d like to have a neutral, which will have a running motors, but not the car (as it is in normal cars) - it is just a feature I’d like to make - you will start a car, so motors will go to ~5 % of speed but a car will be still until a 1st speed is set Create a program to run it Progress: I have a prototype which can run a car forward/backward by X-box controller. I had quite a good experience with https://github.com/BrianPeek/legoev3 library. I'm using F# on Mac with .netcore (which is not that common as I've noticed :D ) and I'm trying to control my EV3 brick with Xbox-Controller (connected to PC with Windows 10, where I run a program) - here is the source code. For now, I still need the computer to communicate with the EV3 brick and the XBox-Controller (which I guess wont change, since the XBox-Controller wont communicate with EV3 brick in any way) Example is here: Make it look great Progress: None so far. I don't want this car to be any specific replica. But I really love look of the Mercedes Maybach 6 concept car. So I will try it to look alike. ------------------------------------------------------------------------------------------------------------------------------------------------------------------------ I'm very open to any questions, suggestions and ideas or any other comments. And to be honest, I think it could be quite a long journey to go :) . -
Hello, let's start the race! It is my own hypercar concept with a minifigure. I reused some details of my earlier idea called "Hypercar concept 1", but I wanted to build this car even more dynamic. It is a studless model built from standard LEGO elements. The overall size is similar to the Speed Champions sets, but the wheels are from City sets as I wanted to keep the height to length ratio closer to the real sports cars. If you like this car, please share and support it on Lego Ideas: https://ideas.lego.com/projects/146d40fc-49de-4af5-8173-4c73892a003e Many thanks! Street racer 01 by László Torma, on Flickr Street racer 04 by László Torma, on Flickr
-
Hello Speed Champions fans, my son asked me to build a white Audi R8. Both of us like the Speed Champions sets, therefore I choosen this scale. If you like it, you can support it on Lego Ideas: https://ideas.lego.com/projects/ead4242e-8bae-440d-930d-0c840d86ce5f It is a studless build from standard lego elements and modified City wheels are used instead of Speed Champions ones to keep the height to length ratio more realistic similarly to my earlier ideas. The front of this car is iconic and it was a real challenge to recreate it in this small size. I made lots of versions and I think the actual one with a tricky solution is the best. I tried more solutions to the black side blades too, the actual one was inspired by "LEGO Audi R8 instructions (MOC #96)" by "Jerry Builds Bricks" on Youtube, however I modifed it a bit as I wanted tilted blades similarly to the real ones. Only one sticker is used which is the Audi logo on the front as I'm generally not a fan of the parts with stickers, because of the lack of flexibility in using them with other builds. The set includes the minifigure shown on the main picture on the Lego Ideas. It comes form the set 75873 but with red helmet. I have added a rear wing to make the car more dynamic. It differs from the custom Audi wings, but I think it fits to the style of the car and to the side mirrors. Audi_R8-04 by László Torma, on Flickr Audi_R8-05 by László Torma, on Flickr Audi_R8-02 by László Torma, on Flickr Audi_R8-03 by László Torma, on Flickr
-
Hello, feel the speed! It is my own hypercar concept inspired by real hyper and supercars. It is a 6 studs wide, studless model built from standard LEGO elements. The overall size is similar to the Speed Champions sets, but the wheels are from City sets as I wanted to keep the height to length ratio closer to the real sports cars. It can be combined with my other MOC Hybrid Truck which will be available on LEGO IDEAS soon too. If you like this car, please share and support the it on LEGO IDEAS: https://ideas.lego.com/projects/44e6dbbf-734f-4b38-84c7-2075b09495bb Many thanks! LEGO Hypercar concept1-02 by László Torma, on Flickr LEGO Hypercar concept1-01 by László Torma, on Flickr LEGO Hypercar concept1-03 by László Torma, on Flickr
-
[MOD] RC Koenigsegg Agera RS1 Megacar 1:10
T Lego posted a topic in LEGO Technic, Mindstorms, Model Team and Scale Modeling
Hello everyone, I'd like to share my latest MOD: Koenigsegg Agera RS1 This car is one of my favorite road-going super/hyper/megacars, and therefore I decided to build it. To me and many others, Koenigsegg is a very special car manufacturer: It was founded in the nineties by Cristian von Koenigsegg, a man without any engineering education background and budget. On top of that, all Koenigseggs are handcrafted and are produced in limited quantities. I like the RS in particular, beceause it is IMO the most beautifull Koenigsegg and it holds the top speed world record. This car is not fully designed by me. @Pvdb build the Koenigsegg one:1 more than two years ago. The RS1 and One:1 have very similar Bodyworks and since Pvdb nailed that on his One:1, i decided to use his bodywork as a shell around my disigned chassis. In addition to that, I also used his door meganism, beceause I could not imagine me designing a better one Specifications: Dimensions 59x27x15 Studs Weight: 2600 g Estimated parts quantity: 2500 parts Powerfuntion elements: 2x PF AAA batteries, 2x PF V2 reciever ,4x PF L motor, 1x PF Servo motor, 1x PF M motor, 2x PF 50 cm wire The RS1 is basically the same as any other RS, but it has the one MegaWatt engine upgrade. The RS1 is specced in white with a black center stripe and it has many blue accents such as the interior, skirts, spoiler, diffuser and front splitter. Many of those parts of the RS1 have just a very thin stripe of blue painted on it. This means you can not replicate that with regulare LEGO parts. Stickers seemed like the only solution, but at some point the idea to use rubber bands for some accents popped in my mind. I only used this trick in the front splitter. Features: Easily removable Roof, like the real car Openable front trunk and engine bay Motorized dihedral synchro-helix actuation doors, Powered by a PF M motor Front double wishbone suspension with negative caster angle Rear triplex suspension with double wishbones Steering with working steering wheel, powered by a PF Servo motor Propulsion with working V8 engine, powered by 4x PF L motor I wanted both doors to be opeable by just one motor. This meant I had to make selector for wich door is connected to the motor. I had some free space in the center tunnel, so I decided to use the handbrake as a selector. Just behind the front wheels there is a driving ring wich can engage in two different clutch gears. Both clutch gears are connected to different doors. The motor and this meganism is placed underneath the trim. Here is the full 'transformer mode'. The front trunk and engine cover can be opened manually. If you look closely, you can see the battery and The L motors behind the seats. The recievers are placed behind the rear axle. Replicating the triplex suspension was for me a 'must have' on this car. It consists of two inclined shock absorbers and a horizontally placed pneumatic cilinder. The pneumatic cilinder is definately the most realistic looking way to make the central shock, but it is not practical. It offers resistance when extending and retracting, so I mounted some springs behind it to ensure that the model doesn't sag. In addition to all of that I also put some links on the suspension system. They are only there for an aesthetic reason though. finally, a video demonstration. Enjoy! Comments and questions are welcome! -

Lamborghini Veneno - Instructions + Jaap sticker pack
Lox Lego posted a topic in LEGO Technic, Mindstorms, Model Team and Scale Modeling
The Lamborghini Veneno Roadster takes the aerodynamic efficiency of a racing prototype onto everyday roads. This super sports car is characterized by optimal aerodynamics in order to guarantee stability in fast curves and a behavior like a racing prototype. Flickr Album: https://flic.kr/s/aHsm53decD The Lego Car Blog: https://thelegocarblog.com/2017/07/23/veneno-2/ The roadster version is even more rare, as 3 versions were built for a hefty 4.2 million $ price tag. Top secret new build by lachlan cameron, on Flickr When my good friend @Kalps1811 suggested to build this car, I was worried. It looked like the craziest, most wild "concept" style car Lamborghini has even made. Black from the future by lachlan cameron, on Flickr But as I got further into the build, everything fell into place. One mean stance... by lachlan cameron, on Flickr This hypercar has been a absolute joy to build. Top secret top view ? by lachlan cameron, on Flickr The car features super easy access battery from the bottom, a button between the seats to turn on the power, 2 XL for drive, 1 servo built between the front suspension, m-motor for doors, Custom V12 engine (made by my bro) Motorized doors with the shifter acting as selector for each door, removable engine cover, hood opens, front suspension with torsion bar and shocks built in (designed by @DugaldIC) rear suspension - horizontal coil overs, Sbrick plus, front lights (2x) and rear lights (4x). Lamborghini Veneno by lachlan cameron, on Flickr I have put my heart and soul into this build. Each day, I'd reference the build to the real car and assess which features looked correct and to scale, and which didn't. Lamborghini Veneno by lachlan cameron, on Flickr Some difficult thing I came across on this build were the doors on an upward, inward angle (allowing the car to drive when doors are open) and the hood being 4 stud off the ground. Lamborghini Veneno by lachlan cameron, on Flickr I will be working with @Thorsten50 on instructions for this build. There will be a small price to the instructions this time, to cover some of the time and effort put into acquiring all these pieces to time spent making the build. Lamborghini Veneno by lachlan cameron, on Flickr SO stay tuned, but in the meantime, enjoy the video and photos on the Lamborghini Veneno!! -
My moc of the Aston Martin Vulcan, at the moment it's my favourite moc. First saw the car while watching Grand Tour and loved it. The front of the car isn't very accurate but overall this is a satisfactory build. Hope you guys like it ! Regards, KMP FB : www.facebook.com/kmpmocs Flickr : www.flickr.com/photos/149274215@N03/
-

[MOC] EV3 Koenigsegg Regera (1:10)
TheMindGarage posted a topic in LEGO Technic, Mindstorms, Model Team and Scale Modeling
Well, I didn't update the WIP, and I ended up nearly two months behind my prediction, but I've finally finished it! And as far as I know, this is the first large-scale TECHNIC model of this car published online! The real Koenigsegg Regera is a groundbreaking "megacar" featuring a 5-litre V8 and three electric motors for a combined 1,479hp (1500PS). But it has no gearbox. Instead, there is one electric motor for each wheel, plus another electric motor coupled to the V8. The electric motors have instant torque and so the car doesn't need a gearbox to reach 250mph in 20 seconds! So, the full list of features: Remote-controlled drive - top speed is around 8mph Model of the real car's drivetrain Full independent suspension Castor angle on front axle (this is really important - you'll see why later) Triplex anti-squat bar on rear axle Adjustable camber angle and suspension stiffness for all four wheels - each wheel can be adjusted independently Synchro-dihedral doors Raisable rear wing Opening rear hatch to reveal "engine" bay Cabin with two seats, floor and steering wheel The drivetrain starts with a Large motor and a Medium motors (using different gearing). They are hard-coupled, but the gear ratios match very well and the EV3 can control the power it sends to each motor to make sure they aren't forcing each other to speed up/slow down. These motors drive a differential, with one Large motor on each side of the diff, just like in the real car. Then each output is geared up 1:9 to give the required speed - it's kind of a reverse portal-axle. Since the car isn't too heavy (it's about 1.4kg), the bevel gears aren't stressed that much, even with all this gearing up. I made a simulated dyno graph showing wheel torque and power with wheel speed in mph. This uses the official LEGO specifications of the motors and assumes no drivetrain losses: The front suspension is rather complex. All the adjustment controls are shown here: Now, you may have noticed there is NO steering rack. This is deliberate because it allows me to have an extra motor for driving. Instead, the motors on either side of the differential run at different speeds to steer, rather like a tank or castorbot. This is why it's so important that the castor angle is high. The top wishbones are able to slide in and out by 1 stud to change the camber angle. Just in case you wanted to put stance on your £1.9m megacar. The suspension uses both a torsion bar and a conventional shock absorber. The torsion bar's attachment point can be adjusted with a worm gear, allowing the suspension's stiffness to be changed. The rear suspension uses the same shock/torsion bar setup, but with an extra shock absorber between the wheels. This is what Koenigsegg calls Triplex, and it allows softer anti-roll-bars to be used (on this model there are none). The rear opens up to reveal the rear suspension. You can see the 24-tooth clutch gears here - those are to keep the rear wing in position. The doors are one of the most fun parts of this build. The doors slide forwards, outwards and rotate, all at the same time. They reveal the cabin. Unlike my previous models where the cabin is made a little smaller, the cabin in this model is proper-size. The aesthetics were very difficult. Because the front was so low, I decided to incorporate the suspension wishbones into the bodywork. I decided to exaggerate the front bumper, since to me that part of the real car stands out. I don't have any flexible axles, so I used pneumatic hoses for the windscreen. Since the roof's dome shape is very awkward to build, I decided to build it without a roof (all Regeras have removable roofs)! The side air vents don't widen enough towards the rear wheel - they look more like those on the Agera and CCX. Unfortunately, I don't have the right shapes of panels to make the vents properly, so I had to use a little artistic license. The air intakes on top of the car (behind the seats) stood out to me, so I made those prominent. Some have said it looks a bit like a 918 or Carrera GT. I also decided to exaggerate the rear diffuser - it looks almost Lamborghini-like to me (maybe a Veneno). And for some reason, the whole thing conjures up images of a McLaren F1 Longtail - I'm not sure why. But I guess if you combine the F1's speed, the 918's hybrid innovation and the Lambo's flair and doors, you pretty much have a Regera. Wow, that wasn't intended :P. Finally, here's a video I made. You can see a time-lapse of the building process, the suspension in action and the door mechanism exposed! I compose all my own music for videos - I hope you like it! -

[MOC] Porsche 918 Spyder
Jonfensu posted a topic in LEGO Technic, Mindstorms, Model Team and Scale Modeling
HI This is my dream Porsche for the Lego Rebrick Contest a LUG contest  It was built in one month Features - 1:10 Scale - Working steering wheel and HOG steering - Independent suspension - RWD and 3+R gearbox (the same of Lipko's Simple Supercar, though with a different structure) - Openable doors and trunk - Adjustable spoiler with a knob I just wanted to share it with you to know your opinions and what could be improved, because it's not the final version.- let's call it Ver. 1.0 - Initially I wanted to create a sequential gearbox with paddle shifters using shock absorbers. I built it, but it didn't work well. Also, I wanted to build a similar suspension setup as the Carrera GT, but again I failed. So I ran out of time and patience and build a simple mechanism. Anyway, my initial plans are still up and if is possible include RND and AWD though right now (to me) seems very hard to do in such scale. About bodywork.... There are some sections (like the headlights) including color scheme that I could improve but I have to buy the parts first (my inventory is really small compared with many of you hehe). Here are more pics More pics here -
[WIP] Koenigsegg Regera EV3
TheMindGarage posted a topic in LEGO Technic, Mindstorms, Model Team and Scale Modeling
At the moment, this is just an idea - since I have two cars currently half-build, I will finish them before doing this. Expect this sometime in October (knowing me, near the end of it ). This will be about 1:10 scale with 68.8x36ZR tyres. As with all my cars, this won't be a strict scale model - I just want the car to be recognisable, functional and fast. These are my plans: Power will come from my entire EV3 arsenal - 3 EV3 Large motors and one EV3 Medium motor. These will be connected in a very strange way. The Large motor and Medium motor (geared down 5:3) are combined with an adder. This output will go into a second differential with one Large motor on each side. Each side will then be geared up (hopefully 1:9) before going to the wheels. I haven't tested this setup - I really hope the diffs are strong enough . I might need to gear up the motors 1:3 before the diff and 1:3 after the diff, but I'd rather avoid this if I can since it would mean more sets of gears. When turning, the Large/Medium combo (representing the ICE) will have to slow down a little bit, as will the Large motor on the inside of the turn. Steering will not be motorised - my plan is for the front wheels to be able to steer freely (maybe with a rubber band to provide a little self-centering) but have a high castor angle. When the motors on each side of the diff turn at different speeds, the front wheels will steer automatically. Essentially the fastest castorbot ever! Suspension is still undecided. Depending on the layout of the drivetrain and my chosen width (the math says 26 studs - I have a choice of 25 or 27), the rear suspension may either be independent or an independent trailing-arm type. Whatever I go for, I would like something that replicates the triplex suspension in the real car. Front will be regular independent, with the wheels free to pivot. Making the ride height adjustable would be a bonus. I'm also hoping to make proper Koenigsegg doors and have some space for a cabin. -
Hello! I'm new on Eurobricks, so I wanted to show you what I do, LEGO cars, Specially my Mclaren P1. :wink:For more (and better) pictures, you can go to: http://www.moc-pages.../moc.php/432020
-
[PORSCHE] Porsche 919 hybrid (Hypercar)
Zerobricks posted a topic in LEGO Technic, Mindstorms, Model Team and Scale Modeling
As soon as I heard about the competition I started working in LDD to make the most functional and realistic representation of the legendary Le Mans racing car. Here's what I wanted to encorporate: - Pushrod suspension - 6 speed sequential gerbox driven by rear wheels - KERS with front wheel drive - Working steering wheel - Detailed V4 engine - Realistic dimensions and looks And this is what I managed to create with my limited amount of bricks: All the functions I wanted to incorporate have been squeezed in this small 1:10 scale 47x18x12 cm model and more! The additional features are: - Opening doors and engine covers - Working lights - Double dual speed KERS gearboxes Here's a gif to give you an idea, just how crammed everything is inside (for some odd reason the battery box and steering M motor were not rendered): And a still picture with various color coded modules: Getting back to the real model at hand, notice the eight working lights: The rear covers can open, exposing the V4 engine and the KERS generator unit: Here you can see the rear suspension and the massive spoiler with integrated lights: I even managed to make some room for the driver's seat and the detailed working steering wheel. The orange arms with towballs are the switching paddles. The yellow handle switches the KERS powered front FWD's gears: Just like in the real one, the batteries are where the co-driver is suppose to sit: And this is how the model would look like if I had all the pieces in correct colors and some custom stickers: Oops, I meant like this And finally here's a short 1 minute video of the model in action: To finish up, this has to be one of my more crammed and densest models to date. Even though its smaller than the 42039 it uses almost twice the number of pieces. This makes the car really stiff and heavy, so driving in the high speed is a bit demanding from the 2 L motors. I also had to use a different than usual approach in the rear suspension, since I wanted the car to be in 1:10 scale. This meant I had to find a way to bring wheels closer together, yet still have drive on both axles. The rear axle uses a live-axle driveline, but the wheels are independently suspended. The front wheel drive uses two 90° gearboxes to power the individual hubs. All in all I am quite happy with it, even though it uses a bit too many different colors. It's one of my prettier models, though it may not be as pretty as the competition. But one thing is sure. It doesnt get more technical and functional than this Oh and before I forget : Oh and one more thing. If you are intrested the LDD file, than please wait for a few days for me to make a video on how-to use LDD in developer mode. The model was made in that mode and cannot be correctly opened in normal mode due to all the collisions.

.thumb.jpg.69dc426e508989709aa3466e9e556651.jpg)