Search the Community
Showing results for tags 'caterpillar'.
Found 16 results
-

[MOC] CAT 627K Scraper - 42114 MOD / ALTERNATE
eric trax posted a topic in LEGO Technic, Mindstorms, Model Team and Scale Modeling
Hi! I just finished working on an alternative model of the 42114 set. I add large 107mm agricultural wheels to make the model look better but its possible to build it only with bricks from the set. Below are a few words about the model CAT 627K! Dimensions: Length 69cm, width 19cm, height 21cm Number of bricks: 1901 Photo of real machine for comparison: The idea to build a scraper was born almost a year ago. The project failed then, but I came back to it this year. I started the construction with a "boul" to make sure that the Volvo A60 - 42114 set has enough panels and liftarms. The next stage was the modification of the gearbox. I wanted the model to work with the official Control+ application profile. The scraper tractor has very little space for mechanics, so I split the gearbox in half and built a front axle into it. The real challenge was the bowl lifting mechanism. After a whole day of testing, I managed to build a linkage mechanism that imitates this function very well, even though it uses only one actuator. I used the second actuator to control the ejector. There is a second manually operated gearbox in the rear of the vehicle. In the first mode, the ejector moves while driving so you can empty the bowl automatically. In the second mode, the ejector is controlled manually. To change this, you just need to move the z16 sprocket. At the beginning, I was worried about whether I would have enough bricks to build all the details. So I was initially working on a scraper number 621K which does not have an engine at the back. However, it quickly turned out that I would be able to build all the details of the 627K model, such as the dummy engine or fuel tanks above the rear axle. I was very surprised that the available bricks managed to create a very nice looking cabin and front wheel mudguards. Building Instructions: https://reb.li/m/171046 Custom sticker pack: https://forwartsticker.com/termek/fws98-moc-171046/ Gallery: Video: -

bulldozer Caterpillar D6N LEGO Model Team
amon161 posted a topic in LEGO Technic, Mindstorms, Model Team and Scale Modeling
This is a model of a bulldozer CAT D6N the famous American manufacturer. The model is made in the style of Model Team and Lego creator expert. The inner part consists of Lego technic parts. This model uses the following system Power Functions. The chassis of the bulldozer has an active suspension like the original model. The control of the bulldozer knife is carried out in two directions. The operator's cabin is fully detailed. The model uses four motors, two L motors for turning the chassis, one M motor for lifting and lowering the knife, and a train motor is used to turn the knife. -
 Hello everyone: I am glad to share this project, the mining excavator, based on Cat 6090. Phisycal Configuration: The Lego Cat6090 is a motorized digger on tracked wheels, 2 XL motors provided enough torque. On the track frame is placed the main structure, and a heavy duty turntable allows good rotations, without fricctions. The turntable is rotated by means of 1 XL motor. The main structure contains: the XL motor for turntable, the air compressor, 4 servos for pneumatic valves and the controller. The design is ultra compact in order to meet the requierement of size/scale. The tracked whell is ultra rigid structure, designed to resist extreme load. The air compressor has 4 XL motor and 2 pneumatic pumps, in order to provide a constant air flow and high pressure, both pumps are de-phased 180° in order to reduce vibrations. 4 PF-servos open/close 2 way air valves, to command all pneumatic actuators. The boom has 2 large pneumatic actuator. Due to heavy height of the boom, 4 spring supply extra force during the elevation. 2 large pneumatics actuators push/pull the arm, those actuators are placed below the arm. 2 large penumatics actuators dedicate to rotate the bucket. 1 medium pneumatic actuator, open/close the bucket. Electrical configuration: Three 18650 batteries provide an average of 11.1 V, the compressor are suplied with 11.1 V, and the servos, lights and turntable motor are suplied with 9V. A BMS (Battery Managment System) manages the charge and the discharge durgin the operation. The tracked frame is steering by the use of 11.1 V, and as well is manage by the use of a BMS. On Board System (OBS): The name given to the controller. There are two systems, one for the main structure, and the secund is used to move the tracked well. The main controller, is a server TCP/IP protocol. The controller has a ESP8266 microcontroller with a TCP/IP stack, this controller is able to be programmed in arduino languaje (also micropython) - Teh ESP8266 is used as a sever, Motor driver: used to control the compressor The 4 PF servos are controlled by means of digital outputs, and the lights. ld293d, this is a H-bridge used to control the turntable motor. The second controller, is a ESP8266 as a client, and controls the speed of the tracks. Also, it has a BMS in order to regulates the charges/discharge of the batteries Accessories: 1) Josyticks: Two joysticks, with 4 dof (degrees of freedom) each of one plus a on/off button, are connected to the server module. 2) App: An application developmented under Android studio is used to visualizate the air pressure and electrical current, this app is WIP (work in progress). Conectivity: The comunication used is socket TCP/IP- Main features: maximun pressure reached: 52 psi (358 Kpa) Voltage bus: 11.1 V Compressor electrical consuption: 23 W Weight: 6 kg Length: 30 cm width: 20 cm height: 30 cm Here some pictures, during the construction and commissioning Note: my apologies for my primitive english
 -
[MOC] Caterpillar 226B Skid steer loader
johncarpenter posted a topic in LEGO Technic, Mindstorms, Model Team and Scale Modeling
This is the skid steer loader that I built last year. It was my second build after my long dark ages. I selected the Caterpillar 226B as a reference and selected the 62.4 wheels for this build. I realized only much later that the scale (especially the width) was very challenging. If I were to build this again, I would probably compromise and make it 2 studs wider. However, the biggest challenge on this build was something unexpected: the center of gravity. I started off with the power functions battery box. Due to the size of the model, the only place to put it was at the very back. With the first mockup, it was already clear, front wheels were never going to touch the ground. To fix this, I switched to the AAA battery box, as the AAA batteries weigh much less. This improved the balance, at least it sat still on all 4 wheels. However, it still did a wheelie every time it started to drive. My final card to play was replacing the two IR receivers with an Sbrick, to have less weight at the back. This improved things to the point where I thought that the whole model could work. It was still a wheelie monster, but there was hope. After that, I revisited each part of the model and redesigned to have as much weight as possible at the front. The bucket was brick built to have more weight at the front. The forward chassis had all empty spaces possible filled with liftarms. All empty holes were filled with pins, axles. I could see that I was getting there, but had to take some more extreme measures. In some places I used two thin liftarms instead of a normal liftarm. The cabin was designed to have smaller bricks at the front and so on... It was ridiculous, but in the end, it all helped, and the balance was fixed. Here are some more pictures of the finished model: The arms and the bucket work really well and quick enough. The drive is the weak point on this model, as it is only with M motors. Driving full speed is fine, no problems there. However, they have issues starting to drive with only part throttle, especially with 1.2v rechargable batteries. Due to the balance issue, I considered abandoning this project at several points along the way. However, I'm glad that I kept going, and I'm really happy about the result. Technical details Length: 30 cm Width: 13 cm Height: 17.5 cm Weight: 1.16 kg Power functions 2 x Power Functions M motor for skid steer drive PF L motor for arm lift PF L motor for bucket tilt PF AAA Battery Box Sbrick for control Here is the video with the model in action: -
.thumb.jpg.2335d10c31c9ffa7029728589340e12f.jpg)
[MOC] Caterpillar D11 Minifig Scale
efferman posted a topic in LEGO Technic, Mindstorms, Model Team and Scale Modeling
Very unhappy with the 42028 tracked dozer, it was planned to make some modifications to let it look like the Iconic Caterpillar D11. But unfortunately every dimension of 42028 seems to be wrong and it became a moc. Because there are only two types of wide tracks available and the bigger ones need larger sprocket gears than available, i have chosen the old and small wide tracks. This results surprisingly in a nearly exact minifig scale of 1:30 -1:32. the fake engine looks even in 42028 much to large so i have skipped it and added a adjustable tooth at the back The Bogie suspension of the Caterpillar D11 is working in minifig scale too the shield in front of my D11 is mostly from 42028 because i have not had a better idea for it. for people who want build it is a LDD file available. Many thanks to Zblj for pulling the tracks on the gears! feel free to make critics and suggestions -

Caterpillar 990
jorgeopesi posted a topic in LEGO Technic, Mindstorms, Model Team and Scale Modeling
Like I said in this topic Z-bar linkage help, I am building another wheel loader. This time is the Caterpillar 990 which is the biggest one I can build because the bigger ones like the 992, 993 or 994 have two cylinders for the bucket and it would be impossible keep the width in scale. It uses the Class tyres and in the beginning it had to be manual but I have so many room that I am thinking on a complete pneumatic RC loader. I hope you like the WIP process every advice is wellcome. I am trying wheels, should I have to buy the yellow ones?. -
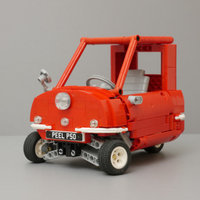
Caterpillar CT660 tractor unit
Technivor posted a topic in LEGO Technic, Mindstorms, Model Team and Scale Modeling
Hi guys! Today I'm happy to show you my finished Cat ct660 truck. It have all-Wheel-drive chassis, mobular cab and Hood and it can be easily changed into a dump truck by removing the fifth Wheel to place a m motor. The truck use one servo motor for steering and two XL motor for propulsion. More pictures can be found here:https://www.flickr.com/photos/145703305@N06/albums It took me a while but the instructions are done and I will put the link soon! Link for the instructions:http://rebrickable.com/mocs/Technivor/caterpillar-ct660 Thanks for tking the time to read and any comments are welcome! -
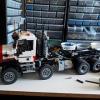
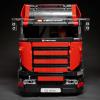
Cat Ct660 tractor unit
Technivor posted a topic in LEGO Technic, Mindstorms, Model Team and Scale Modeling
Hi guys, I start this new topic to show you my caterpillar truck in his final form. It took me about five months to finish it! It's powered by one BB, two XL motors and one m motor for steering. The frame is based on Ingmar's mack granite frame but only the rear part. I've changed the front because off the hood's attaches that limits me. The cab, Hood and bumper are all removable. Here's some photos of the truck: Thanks for reading! Do not hesitate to comment! -
Caterpillar 390F + Tow Haul
shineyu posted a topic in LEGO Technic, Mindstorms, Model Team and Scale Modeling
Hello Everyone, Let’s me introduce my new MOC Caterpillar 390F Fully RC with Tow Haul. Do you remember my First MOC??? Extremely Large Mining Dump Truck, Now I will make it from dump truck to tow truck, it just for transporting caterpillar 390F. please take a look the photos and video. Video: https://www.facebook.com/shineYucorner/videos'>https://www.facebook.com/shineYucorner/videos i have other great moc, please visit my fans page: https://www.facebook.com/shineYucorner/ -
Caterpillar 973 track loaders - Lego 42043 buddy
shineyu posted a topic in LEGO Technic, Mindstorms, Model Team and Scale Modeling
SPEC: 1XL Motor 3M Motor 2IR Receiver 1 3A Battery Speed:70mm/s weight: Pieces:around 1,100 Hello everyone, Let me introduce my new MOC Caterpillar 973D Track Loader, It's a buddy or working partner for Lego 42043, I don't like 42043 arm, so I get a idea to do a machine for more easy to collect 1x1 bricks. It has 1 XL motor, and 3 M motor, I have more Interesting own creation, Please visit my fans page: https://www.facebook.com/shineYucorner video: -

[MOC] CAT 586C Site Prep Tractor
Thirdwigg posted a topic in LEGO Technic, Mindstorms, Model Team and Scale Modeling
It has been a little quiet in Thirdwiggville for the past couple of months, but some projects are finally being completed. I present my next MOC the CAT 586C Site Prep Tractor. More information can be found at thirdwigg.com. The MOC features: Four wheel Drive Steering Rear Pendular Suspension I3 Fake Motor Cooling Fans Working Mulcher Drum Mulcher Lift and Tilt Mulcher Guide Bar Mulcher Entry Gate Rear Winch Opening Engine Hatches Opening Driver Doors See video .The driveline is here. And a view of that rump. Two more MOC coming in July stay tuned. -
[MOC] Autonomous Caterpillar
martijnnab posted a topic in LEGO Technic, Mindstorms, Model Team and Scale Modeling
I want to share with you a model of a Caterpillar. Not of the yellow colored Machinery Brand but of a more natural kind. I started with the idea of the "wentelteefje" by Escher but as that proved to complex regarding the feet movement, it evolved into a more classic Caterpillar. It is operating autonomous with an XL-motor, a switch and a winch/rope mechanisms to operate it. Best way to see it's real operation it by viewing the youtube video. More information and free instructions on how to build it can be found on rebrickable: http://www.rebrickab...ous-caterpillar Hope you like the model! Martijn -
Caterpillar Challenger
jorgeopesi posted a topic in LEGO Technic, Mindstorms, Model Team and Scale Modeling
A small Caterpillar Challenger with just 4 functions, towing hitch, hood and tracks (left and right ) . -

Caterpillar 365C Demolition Excavator
German Luigi posted a topic in LEGO Technic, Mindstorms, Model Team and Scale Modeling
Hello, after years of only reading occasionally at Eurobricks it is time to present my latest MOC at Eurobricks: A caterpillar 365C ultra high demolition excavator. (If the youtube video disappeared: )It started with excavator 8043. But I did not like the bucket, because playing with this bucket is difficult. In most cases LEGO bricks will not get into the bucket but will just be pushed away. So I searched for alternatives and I came across demolition excavators. A LEGO demolition excavator would be great. And this demolition excavator should be able to demolish a LEGO house, this would be incredible. But is this possible? I realized quickly: this is not just a 8043 modification, this requires a complete new design. I started with the jaw. This has to be very small. If the jaw is too long, it will be impossible to breakaway Lego bricks. And the jaw must be turnable about 180° to demolish ceilings and walls at different heights. The clamping force should not depend on the angle position of the jaw, bricks should not drop from the jaw when the jaw is moved. After some trials I found a solution using a string (well visible in the video). I built a prototype with this string solution and made a trial: will the clamping force be high enough to enable the jaw disassembling a 1x8 brick? Yes! The clamping force is just enough. So I could answer the question of principle: it is possible to demolish a LEGO house with a LEGO excavator. As the next step I designed the bucket arm. This should contain two power function M-motors and friction clutches for closing the jaw and for moving the jaw. For both functions maximum power is required without overstressing the M-motors. The bucket arm should not be wider than 5 studs. I took some time, but the design of the bucket arm was not so difficult. Then I designed the undercarriage. I adopted the design principle of Jurgen Krooshoops 8043 modification and put the gear reduction into the undercarriage. In comparison with the undercarriage of the 8043 I designed a considerable longer undercarriage. Now the most difficult part: the upper structure. Main task: lifting the boom. As a first trial I used three linear actuators parallel. The upper structure was made mainly of liftarms. During the first trial I heard a lot of clicks, but the boom did not lift a little bit. I enforced the gear box, but all subsequent trials just ended up with ugly noises. The required force for lifting the boom was just too high. So I increased the distance between the lower linear actuator bearing point and the boom bearing point. So there is less force necessary for lifting the boom. But now the adjustment range of the linear actuators is not sufficient for lifting the boom vertically. So I added two additional linear actuators to archive the required adjustment range. In total I use now 4 linear actuators for lifting the boom. I designed the gearbox inside the upper structure following these principles: - use of technic bricks instead of liftarms wherever possible - bearing of gears on both sides of the gears, it must be impossible for gears to move apart Next trial: the XL-motor is moaning a little bit, but the boom is lifting. Hip, Hip, Hooray! Now I started with detailed design of the upper structure, finally 2 XL-motors, 4 M-motors, 4 IR receiver and 2 battery boxes have to be placed inside the upper structure. Two battery boxes? Yes, I need the weight of two battery boxes as counterweight and the electric power should last for at least one day during an exhibition. As I did not have all required parts in yellow I built the excavator with available parts. So right now the excavator design was finished, but the excavator was multicoloured. As next step I built the excavator in ML Cad. During this step some improvements were implemented. After finishing this I knew exactly which parts I needed and I bought them. And then I did something I really like: building a MOC following a building instruction I created on my own. Last I created stickers and then my demolition excavator was complete. This demolition excavator was designed for demolishing a LEGO house, so I needed a house for demolishing. Of course not a single family house, I needed a tower building. Based on pictures of real tower buildings and a reasonable floor plan I built a tower house in ML Cad. And then I bought the worst available parts, the house must not look like new, it should look like ready for demolishing. Building the tower building according to the ML Cad building instruction was not difficulty, it just took quite a lot of time as 11,000 parts had to be assembled. At the end tower building and excavator were ready just in time for the LEGO FanWelt Exhibition. Kind Regards Ludger PS: Demolishing the tower building with the excavator is fun for hours. -
6090 Rebuild for LDD
jorgeopesi posted a topic in LEGO Technic, Mindstorms, Model Team and Scale Modeling
Still a lot of work to do but it works better than the old one. http://youtu.be/19fsEcU6KCA '>http://www.youtube.com/watch?v=qjj9hrUFYGc&list=UU0D6ectQCy7IVGlKE6rnqIQ -

[MOC] CAT D7R LGP Bulldozer (with PF)
Dennis Bosman posted a topic in LEGO Technic, Mindstorms, Model Team and Scale Modeling
This is not one of my most recent builds but I never published a video of it. Now I took some more indoor shots as well. I started to build this dozer back in 2006 to be laden onto a Renault Magnum. First the model was driven by a RC unit, from set 8366. It ran OK but I didn't like the receiver and it took to much space in the model. Later I made my own control unit but that one was wired to make it possible to get the dozer blade operated by pneumatics. Later I decided to build in some PF stuff. My mate Barman helped me out with designing a compressor which is combined with the switch. I needed two of those and they just fit in the frame. I built in some PF receivers and gave the 9V RC motors another position in the frame. They're now put vertically. The looks are still the same as I was satisfied with it's appearance. Please check the videos: https://www.flickr.com/photos/51102529@N07/13354349433/in/photostream/ https://www.flickr.com/photos/51102529@N07/13354279655/in/photostream/ And the other pics I put in my Flickr stream: https://www.flickr.com/photos/51102529@N07/sets/72157642793053164/with/13354279655/