Search the Community
Showing results for tags 'carriage'.
Found 19 results
-
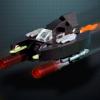
Hi all, In advance, sorry for my english... For the 10th edition of Fana'briques exhibition which took place near Strasbourg - France, 26 to 28 June 2015, my friends Jerome (Kloou), Sweetsha (Florian), Eric (N3rik68) and myself, had the idea of a collaborative display presenting different ©Disney worlds and iconic characters. In this project, we wanted at least one piece attracts the visitor's eye ,from a distance. And I had this "wonderful" idea to propose the building of this castle, almost 1 m high and 90 cm wide and 55 cm deep, and more than 8,600 pieces, for a little more than 450 hours work. If you have not noticed, or if you don't know, it closely resembles that found in Disneyland Paris. It is unfortunately still in WIP and will be presented complete in the coming weeks. It lacks even two towers and the roof of the ballroom. The approach of this kind of project must meet minimum targets to be usable on exhibition, including the main criteria: modularity and size retention. We didn't want to exceed a depth of one meter, so you can chat with visitors . The castle has necessarily been "compressed", ie shallower than the true. But I wanted a maximum of items are present: almost every round towers - it definitely miss one, the ballroom , the various buildings, ... It is built in two modules of 48 x 48,to be more easily carried. He must be as light as possible : hollow structure, technic beams and various BURPs bear most of the buildings. It must then take into account all the constraints and there is one that I had forgotten when I launched the idea : color. Yes Yes! the castle is pink! And when I started to see the catalog of this color on Bricklink , there I somewhat disillusioned. There is extremely limited, and round parts are almost nonexistent. Argh, the castle has got many rounded towers ! Especially the parts are expensive ... To limit weight and costs to a minimum, I went on a strong operation of SNOT. Because the bright pink tile 1 x 2, for example, is very affordable. Another constraint : roofs. After some tests, the classic blue was not a nice rendering . So I turned to the dark blue. And you know what? Although this time the rounded parts exist, they are expensive too... And given the number of roofs to build... At the top, of course, there are decorations in pearl gold color. A beautiful selection of parts, including minifigs accessories that allow the NPU very easily, but few plates and expensive cost. In short, you'll understand that this creation has exploded the budget I had set myself. Fortunately in these cases, the service "Bricks & Pieces" from Lego is a great help for significantly cheaper than what you can find on BrickLink on many references of rare colors. And it also gives access to all parts of the new year, as the new golden gates of the range Elves. I worked on documenting myself on the Internet. There are many pictures of the castle, but which often represent the front and left side of the castle - when you're facing him. Nothing for the right side. Closer research work took me on the blog of a railway modeler who integrated the castle in his diorama. So I went to his pictures - the representation is more simplistic - to assemble the missing side pictures "official", with which I have taken some liberties like to remove the bottom of the tower and incorporate a small balcony worked to make it a little more airy visually. How did we build rounded towers when we haven't got adapted round parts ? Many thanks to the cheese slopes ! This is the part that allows for a round with the most "facilities" possible. So I imposed this constraint with light bluish gray towers, to keep some overall harmony. I deliberately kept the simplistic style of the rocky parts to respect the style of the amusement park. Reliefs kept to a minimum, without major frills. From the front, I tried to respect the style . Few SNOT, except at the top - to save bricks, worked a little kick - and some angles formed by the wedges. But I am allowed total freedom with the small water fall and vegetation as it allows to highlight other skits in a different setting. In terms of adjustments between buildings, there will be some pieces to pick up. Just having finished for the exhibition has not helped to refine, and while working on half stud is like something easier, working on third or fourth stud, that's another story... But the castle had to be presentable for exhibition. Ultimately, what makes me most proud of in this project, is not so much having to present it in time for Fana'briques exhibition, and celebrate as it should be 10 years with friends - it was a pleasure - that have is a tribute to my daughters. Just seeing the look of my great daughter, every day watching the build changes, and see his eyes shining, to tell me that, that's it the more present I could have back. And if you ask yourself the question, the answer is yes, it will stand and above this is my gift to them. More photos on my Flickr stream ;) I really hope you'll enjoy it :)
-
[COR-FB] Primitive Accommodations, Elizabethville
evancelt posted a topic in Brethren of the Brick Seas
The Duke of Hargyll had heard of the lush vegetation and good hunting surrounding Elizabethville on the island of Lacryma, and he endeavored to experience their wildness. As nobles with quite sufficient means, he and the duchess set out from Belson for the colonies. Upon arrival in Elizabethville, the Duke hired a carriage and guide to take them to the forest beyond the edge of the settlement. Around dusk they arrived at a small stone hunting shelter nestled among aspen trees. They would spend the night there and then set out away from the road on foot in the morning. A closer shot: ------- OOC: To be licensed as medium commerce in Elizabethville. BTS: -
Hi everyone, i'm back again with more MOCs based on the Waterford and Tramore Railway, which was a small seaside branchline in Ireland that ran for over a hundred years! (1853 - 1960) Today I'm sharing some simple coaches I've designed for this ongoing project to one day recreate the railway as a layout. I've previously shared the engine itself in this topic; it's only had minor updates since then, the main one being it's now self powered with a circuit cube motor! The W & TR featured a plethora of coaches from the many different eras it ran through, though I've mainly based these off of the six-wheeled compartment coaches, which were the main carriage the train hauled in the 1920s-30s era I'm basing it on. Although, for impossibility on curves reasons, I've kept them to four wheels.😁 As the carriages are twins, I'll only include the one from here out. The decals you see on the side are just temporary ones I made using yellow electrical tape, and green sharpie. It looks fine from a distance, but when I have the means to, I'd like to use some proper decals I've designed myself. Despite the long wheelbase, they seem to pull fine by the little engine on curves! The actual train only had functioning doors on one side of each carraige (the hinges and bolts being taken off the unused side), because there were only two stations on the line (or more specifically, a platform at one side), with a turntable and siding for the engine to get back around to the front of the train. I've included doors, although, they're a little less than conventional and functional, as they're either open or closed, which requires removing their section. I don't mind though, as I've made these on a budget and the fact they open at all is a bonus to me 😅 Each carriage dissassembles like this, easy access to put minifigs inside. I haven't furnished the inside yet - that'll be something I'll tackle much further down the road, but it'll be fairly simple seats. Here's the actual carriage itself for comparison's sake, taken from The 5-Minute Bell by Frank O'Donoghue: I know its not as detailed as many of the other amazing train MOCs I see here are compared to their real counterparts, but for me, I enjoy the more simpler Lego aesthetics of trains like 7710 (which helps when building on the cheap!) So in general I would try to strike a balance between aesthetics and details, leaning on the aesthetic side. What's next for me in this project though? That'll be The Hearse! But its not as grim a coach as it sounds, in fact, its ironically near its opposite's namesake in function - but I'll save that story for when I share the MOC! 😁 I've designed it in Studio, just a matter of tweaking it a bit, and saving up for the pieces. It'll fit nicely as the last carriage on the train. And after that? I've mentioned above that the train pulled coaches from all sorts of era's across its life time, so I may take a stab at some open Victorian era carriages, which were blue in colour in their heyday, long before the CIE Green i've emulated above. Maybe technically arachronistic, but variety is the spice of life! 😁 Way down the line is designing the large station which still stands today, but in the meantime I may design something smaller that I can afford 😅 And if you're still here, thanks for reading, and let me know what you think! 🙂 Also, don't know if I'm alone in this, but I quite like the look of using the 5-link chains to connect trains. Anyone else??
-
Mod of set 75951 Grindelwald's Escape given a gothic makeover.
-
LIFE IN THE SLOW LANE... Gypsy wagons have been around for a very long time, having primarily been seen with travelling circuses, before being adopted by gypsies. The "Horse drawn, painted, one roomed house on wheels with a stove" is believed to originate in France in the early 19th Century. Gypsies themselves adopted them around 170 years ago. Its Romanesque characteristics, its baroque carvings and bright colours are likely to have been picked up from wanderings in Central and Eastern Europe. The Gypsyes' name for their wagons is a "Vardo", from the Iranian name vurton, that means cart. There were six main types of wagons and they were made of oak, ash, elm, walnut and pine. Most caravans were pulled by draft horses. I've always been intrigued by Gypsies Wagons and in the past few weeks I built a couple of them. Inspiration come mainly from a coffee table book my wife gifted me, "Les Roulottes, une invitation au voyage", a big source of colourful and funny caravans. It was very funny designing and building these caravans and also choose the right Minifigures from old sets and Collectionable Series. If you are wondering why Jack Sparrow is in the MOC the answer is that I think he has the perfect look of a yesteryear Gypsy :) A few pictures below Below the Wagons pulled by horses... And the back views... Hope you like it. More info and pictures on my Flickr. Thanks for stopping by!
-
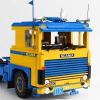
To get familiar with Stud.io 2.0 (I have always used MLCAD for my designs in the past), I decided to build a custom carriage for my Hogwarts Express. I intend to build at least 3 of these, with different window/door configurations (possibly including a brake van end). I took my inspiration from this Hornby model: So far, my work is a Work In Progress. Couple of notes: 1. I wanted the coach to be shorter in length to better negotiate LEGO R40 curves. The current iteration is 32 studs wide (across the body), but needs to be extended by 4 studs as the bogies are currently hitting the undercarriage details. 2. The idea was to allow close coupling. As such, I made the cushion between the train carriages out of part 45590 Technic Axle Connector Double Flexible (Rubber). I will need to do some IRL experiments to see if this actually works, and if it does, I might extend the body by another 2 or 4 studs to set the couplings further back. 3. The bottom bars on the bogies might be too low. I am considering moving them up by one plate. 4. I wanted a realistic interior, but didn't want to go 8 wide. So for now the model sits at 7 wide, with a "creative" solution to create compartment walls. 5. The benches in the compartments are too narrow for the "normal" seating of minifigs, but I think I have devised a way to seat at least 2 minifigs per compartment - hopefully a future iteration of this WIP will showcase this method. 6. There is room for more greebling under the carriage - still WIP. 7. I am also still working on a door design to fit in the opening between carriages. 8. Yes, this model uses the old train windows. I have recently gotten my hand on about 40 of them, so that won't be a problem for my build. With that said, I am looking for your feedback so I can further improve this model. Here is my progress so far:
-
After I created my 4-4-0 American loco, I set about designing some rolling stock. So far I have designed and built two passenger cars and a caboose. I'm probably going to work on a baggage or combination car next. Which of the two passenger cars do you like more (just the windows are different, both have seven rows of seats inside)? Below are some pics and also a link to my brick shelf where you can download the LDD file for each. Feel free to borrow, make or modify my design. Hope you like! https://bricksafe.com/pages/sed6
-
Hi all I've created the discontinued Passenger Train 60051 in a dark green and orange livery. I had to put colour coordinated stickers on the train front to give it a smoother look. Riz (Sorry - problems with previous attempt to start this topic) The interior of the carriage: It needed colour coordinated stickers on the train front to give it a smoother look: The carriage:
-
Hello there! Sharing my latest Moc ~ Medieval Batman & Bat carriage. I always want to MOC a batman not in modern time but medieval. Simply just because batman is so "gradiator' to me. Hope you like this crazy idea. Thanks and BRICK ON!
-
I know I've had a bit of a hiatus from building, but I can't believe it's four years since I posted anything on Eurobricks! I'm trying to slowly ramp up my building again. Here's my latest model: a Victorian Railways AE passenger car. There are more photos in my Flickr album. These passenger cars were found mainly on longer distance intrastate passes. AE 51 was air conditioned around 1962, was recoded to BE 51, and then in 1983 was recoded back to AE. This model was built for BMR's OcTRAINber competition. It's built in O-scale (1:45), which ends up being 8 studs wide and 63 studs long (coupler to coupler). The model contains 120 yellow flags. I have a love-hate relationship with flags - I love the thin line they produce and the building challenges they introduce (getting them into the doors was particularly challenging), but I hate the extra weight due to the extra parts needed to incorporate them in a build. Same goes for the modified plate with handles (this model uses 60 of those in rare dark blue). Purity Declaration: This is a pure LEGO build apart from the use of bearings for the wheels, vinyl for the yellow lettering and printed labels for the white lettering. The integrity of the model does not rely on any of these non-LEGO elements.
-
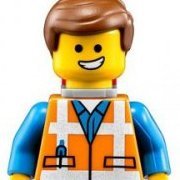
I feel between a rock and a hard place selecting this set because it is my first Nexo Knights to review. Could this be the last? Let's find out in my 7th RA review, set number 70349 - Ruina's Lock & Roller. Overview Name: 70349 - Ruina's Lock and Roller Theme: LEGO System / NEXO Knights / Season 3 Year: 2017 (1H) Pieces: 208 Minifigures: 3 Price: USD 19.99 / EUR 19.99 / GBP 14.99 / SGD 34.99 / MYR 89.90 Resources: Brickset and Bricklink Introduction We are on a rocky start because I have to admit I am more of a Ninjago and Star Wars fan. However, I do appreciate the villains in Nexo Knights. Now before anyone cries foul, there were only 2 things I expected from this set when I bought it - (1) the minifigs must be great and (2) the parts should be serviceable for MOCs in order to give it a decent rating. Now join me as I pick this set apart starting from the packaging. The front panel of the box shows Ruina riding a rock creature pulling a carriage, prison carriage or tumbrel. Whatever you want to call it, that's how the set got it's name "Lock & Roller" if that wasn't obvious enough. Btw, the rock creature is called GargoBike but I will just call it the rock creature because it does not look like a gargoyle enough to me. At the back of the box, we see Ruina fighting against Aaron and it shows the play feature of the prison carriage. At the side panel, we see the minifigures included -- Ruina, Queen Halbert and Aaron. At the side flaps of the box, you'll see the name of the forbidden power as "Wrecking Wrath" and the power up as "Gorilla Roar". Inside, we get 3 clear plastic bags without numbers, 2 dark bluish grey wheels and a stapled instruction booklet. I'm very glad to report there is no sticker in this set. Build As there is no numbered bags in this set, all I needed to do was arrange all these parts in one go before I built the entire set. In order to judge this set fair and square, I watched a couple of NEXO Knights episodes to appreciate the character of Ruina Stoneheart more, as well as understand how her Lock & Roller prison carriage was used in the series. The first thing I immediately noticed while watching the TV show was the absence of pole holding the forbidden power shield. It is not on the carriage at all; there is no "target" per se. It's possible that the designer added this play feature for the sake of adding play feature because it is not integral in the episode's story. Unless you watch the TV show you will not care about the difference. Depending on how you appreciate or dislike NEXO Knights, not caring about the TV show could be a good thing or a bad thing. Pick your poison. Moving on, I like to add that I am not a fan of medium blue as contrasting colour or highlight for the build, especially the one on top of the roof of the carriage. In the show, the carriage has a roof with spiky rocks that look like fangs or stalagmites rising at each corner of the roof. It did not translate well on the set or perhaps the designer was trying to achieve a different design altogether. Those medium blue cheese slopes just look like meaningless greebles. Best-angle-view The use of trans-light blue looks good on the wheels and on the claws of the rock creature pulling the carriage, representing the flowing current of electricity. However, I have to nitpick on the use of trans-light blue rock panel in front of the carriage. It is supposed to be a current of electric field serving as the windshield of the carriage. The problem is -- I associate this colour of rock panel with ice or glacier. It does not help that I also own Elsa's Castle so it is just hard to imagine it an electric field covering the carriage. Frankly, I prefer if it is just a panel, not a rock panel. Maybe it was a mistake watching the TV show after all because this makes me compare the version of the rock creature in the TV show. The beak of the rock monster should have been just dark bluish grey and not this fancy medium blue. I think that the use of medium blue colour is unnecessary when the animated version looks fine (arguable better) without a different coloured beak. Back view (ugly view) If you think it is narrow, it's because it is. This is comparable to the several old-school Castle carriage that I own since they are also 4-studs wide inside. I guess the standard accommodation inside LEGO carriages has not changed since then. Not the best place to be in As shown at the box front panel, the carriage has a mechanism to open the floor when you hit the shield holder. I will discuss more about this play feature in great detail later. Side view The carriage has a slight tilt and you can see the shadow of the 3rd wheel in front of the carriage to keep it from tipping over. When you detach the stone creature, the carriage will still keep its balance. Front view The front view is decent. I'm still not a fan of the medium blue colour but I do like the use of purple cylinder as bike wheels because even without the carriage, the stone creature can balance on two wheels and it can be played independently of the carriage. The creature's head can also tilt up and down apart from swivelling sideways. Hit me baby one more time! I want to address the most frustrating thing about this set: the play feature that won't work most of the time! Hear me out. This is the single feature that was unnecessarily added in the carriage so that you can target something and yet it does not function well enough. I'm not a Physicist but I found out that the shield piece works so well in deflecting the towball "bullet/arrow" so much that the force is greatly reduced when it hits the target. This renders the stud shooter useless. A simple solution to make this play feature work more effectively -- just remove the freaking shield. The shield holder will catch the towball easier because the recessed area is exposed without the shield. This will force the shield holder to push the mechanism so much easier. To be fair with this set, the official description mentioned that you have to "push" the Forbidden Power shield holder to open the cage doors, not hit with the stud shooter. Wait... what? Open the cage doors? Even the official description is wrong! Pushing the forbidden power shield does not open the cage doors. It opens the cage floor. The cage door can swing open but it does not open when you hit the shield holder. It's a poor description to a poor play feature that is poorly executed. I honestly wish that I was posing a horse, not a stone creature, when I took this picture above. To wrap things up in this section, here are the extra parts not used on the build after following the instruction booklet thoroughly. Parts This set contains some new parts (new moulds) as well as new colours of existing LEGO elements. Unlike the previous sets that I reviewed, I am not really excited with the new parts selection here. I still like the new parts included but there is nothing fancy about any of these, in my humble opinion. Just to highlight what I like the most -- I already mentioned the excellent purple cylinder piece. You get 2 of these in the set. The rock claw/fingers piece was also introduced in NEXO Knights in this set along with Jestro's Headquarters so this is also a new part. Getting this set is the cheapest way to get them at the time of my purchase. You get 3 of these. The blunt spear head, which looks cool as an ornament but looks ridiculous as a weapon, was also introduced in Season 3 wave of NEXO Knights sets. You get 3 of these and they are used as limbs in Aaron's bow (1 spare). If you don't believe it's ridiculous as a weapon, just look up an image of 70366 Battle Suit Lance. Minifigures I am very glad to share that I enjoy the minifigures in this set. It is odd that when I bought this set, I was looking forward to Ruina the most. However, when I already opened the set and had a chance to stare and take pictures of the minifigures for a couple of days, I now like Queen Halbert minifigure the most. Many people raved about Ruina's hairpiece and it is one of the reasons why I was looking forward to getting Ruina. In a lot of ways, getting Ruina from this set had paid off my excitement, but with diminishing return. Apart from the hairpiece, there is nothing to be excited about the minifigure. Her appeal to me is shortlived and that's why I appreciate the Queen Halbert minifigure more lately. Queen Halbert's torso is printed with metallic gold and silver patterns which match the design of King Halbert armour from set 70327 - The King's Mech. All the minifigures have excellent printing on torso and legs. All have dual face printing. How I wish that all LEGO minifigures always come with dual face printing. If they can do it in NEXO Knights they can certainly do this in other themes. In comparison to the Season 1 armour, the new armour looks sharper and it covers less area of the torso. It is supposed to be an upgrade to the season 1 suit because but I guess more is less? The trans-neon orange parts are good but I think it's a little overdone. I prefer the non-transparent visor though I won't mind using the trans-neon orange visor to upgrade my Ice Planet minifigures. Conclusion I am glad that my opinion about this set did not hit rock bottom. It has some good things that I can appreciate even if the non-functioning play feature had frustrated me. I normally don't allow my son to use stud's shooter because it's hard to look for missing round plates or towballs so imaginary arrows will. I also observed that even if he does not like NEXO Knights villains in general, he played the GargoBike. I detached the bike so that Ruina can rock and roll really well without the weight of the carriage. The thing about NEXO Knights -- the story and character development is so poor in the TV show that even if I take the time to learn more about the characters, I don't get the same level of empathy or interest at all when compared to Ninjago and Friends. Most of the villains in NEXO Knights are disposable. Perhaps it was meant to be that way. Don't you know it's rude to stare? Somehow, removing the medium blue piece at the tip makes this stone creature look more fierce. Let me make up to you dear If I will weigh the reason to buy this set, the biggest factor is getting the minifigures only. If you have King Halbert, Queen Halbert in her gold armour matches very well with King's Halbert armour. IMHO, the royal Halbert family is probably the best thing in NEXO Knights because the family dynamics is funny and quite different than what LEGO has done before. Queen Halbert can win her own battles and Macy is one of the more interesting characters LEGO had developed in recent years. Enough of the Halbert family. Let me reveal the final verdict. Review summary Playability: 6/10 - The poorly executed play feature ruined it. Yeah right. Ruined Lock & Roller. Design / Building Experience: 7/10 - Design follows typical carriage design. Rock creature looks good. Use of medium blue pieces in this set is questionable. Minifigures: 9/10 - Awesome looking minifigures and probably the best reason to get this set. Price / Value for money: 8/10 - An average value for am average set. Parts selection is okay. Overall: 7.5/10 - An okay set if you're getting the minifigures; however, it leaves a lot to be desired.
-
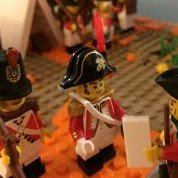
My fifth entry to the CCC XIV, for the ‘Pit of Despair’ category. The landscape was largely influenced by Dubbadgrim’s builds. The majority of this build was built in two days, as I wanted to take it to a LUG event. The castle features a working drawbridge, and a full interior in the tower. The doors of the prison carriage can open as well. After some forestmen were captured by crusader knights, their compatriots hatched a clever plan to free them from the dungeon: disguise themselves as crusader knights, bring more ‘captured forestmen’ to the castle, and then break the others free! But will they be successful, and slip through the castle guard un-hindered? Or will their clever plan backfire? Lots more pictures on Brickbuilt Thanks for looking, C&C welcome!
-
Hi everyone! A little while since I completed and posted my creations. Winter is here, and Christmas is coming, and I think it is time to do something for my winter village. Here is my first try on making a train MOC, and it is an interesting building journey. I have looked at different beautiful locomotive engines online and created my version with a little seasonal deco. I don't want this to be a funny, cartoon Christmas tree, but a formal and decent express train going between the city and the winter village. The engine is the part that took me most time to create. I had the basic form in my head, but the mechanism and details actually required quite some understanding of the actual old locomotives. Luckily, the green Emerald Train gave me much hint and so I ended up with this: I added some interesting details to the front bumper part, using the claw pieces. I also tried a "tilted bottle" arrangement for the chimney part. The engine probably runs on diesel as there is no coal section. The wagon car follows the engine, and that is how you get your presents at the winter village! Freshly delivered from the city center! The passenger car is a simple one with all you need: doors and windows, and a streamlined profile. It looks like it has warm air supply already for your long journey through the winter: The last car is a mail car. Of course, you need to deliver a lot of parcels and Christmas cards to the villagers from the city. So, have we arrived yet? Yes, this is it! Hope you guys like it! :D Have a merry Christmas! ;)
-
Hello, I would like to present my latest train MOC: a German steam engine. Steam engines appeal different from country to country. In Germany most steam engines had a red wheel undercarriage, steam engines in some other European countries too. For those who like steam engines completely black: all parts for this engine are already available. For those who like a red undercarriage: please support this set on LEGO IDEAS (https://ideas.lego.com/projects/133465). The steam engine bases on the steam engine https://en.wikipedia...i/Prussian_G_12. This steam engine was a goods train locomotive, and as goods train locomotives have small wheels for high traction force I used small LEGO train wheels. I did not like the plain, high gloss surface of the tender, so I decided to take bricks with studs on sides. These studs symbolize oversized rivets. I watched LEGO sets like freight train 60052. This set does not contain only a freight train, it also contains a truck and a fork lift. So you can transport something with the truck to the station, load it on the freight car and take it to the next station. At 1925 there were only a few trucks and no fork lifts, so I decided to add a horse carriage. Now you can play as you can play with freight train 60052: you can transport something to the station, load it into the freight car and transport it to the next station. Ludger
-
Hi All, I have building question which I am hoping that you great train builders can help me with. I have decided to make my 6 wide carriages into 7 wide This is great as I can now have two rows of seats in the carriages. BUT, I can seem to me the ends work. I need an end door that is 3 studs wide. I have tried some snot techniques including a 1x1 brick and 5 plates to make up the remaining 2 stud width and have dabbled with all vertical plates but have a 1/2 plate width left each side. Any help appreciated. Thanks in advance Yogi
-
Stop Motion review (presentation) 6044 King's Cariage Année: 1995 Pieces: 124 Minifigures: 3 Price: 16,50$
-
Hi All, I've finished (and also renamed) my old WIP (http://www.eurobrick...howtopic=108092) Azure Blue - Model T *Edit* Adding a photo of the finished model Renders: And (thanks to my wife) it's now been approved on LEGO Ideas! https://ideas.lego.com/projects/102261 As it seems there is no Creator Train coming soon, I want to show that there is demand for LEGO trains. I'd appreciate any support. I've been a bit sneaky and added a carriage which is very similar to the Emerald Night one: If it ever made it into a set, then it would be easy to modify to get it back to the Emerald night ones! I missed out on the LEGO set, but have bricklinked a carriage, so I'll build it in the original colours. I've got all the bricks now and will be building and updating with real world pics over the weekend! Have a good one Cheers Dylan
-
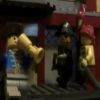
This was my entry for the Merry Band category of the CCC XII. This is a scene from Walt Disney's version of Robin Hood. Robin Hood and Little John dress up as"fortune tellers", and make away with Prince John's gold and royal robes: All C&C appreciated
-
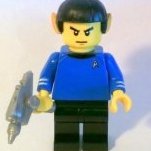
Because of work and school, I do not have a lot of time to build. Between semesters, I had a two week break to build, and this carriage was the product of that vacation. It is a minifig-scale representation of the Gold State Coach. The real one was built in England in 1762 as the ultimate ride for the Royal Family and has been used in every coronation ceremony since King George III. It has also been used for special events like royal weddings. The real carriage is beautifully ornate and gilt in gold. It's so heavy that it takes a team of eight horses to pull it! I was inspired to build this model after seeing the carousel horses in set 10235, Winter Village Market. They reminded me of the horses pulling the royal carriage. From the beginning, I wanted to build the carriage out of pearl gold and metallic gold parts. This created a big challenge because pearl gold is usually only used as an accent color in sets. As far as I know, basic bricks and plates are not available in pearl gold. A few years back, Sir Nadroj proved pearl gold could make for a stunning carriage with his "Bavarian Autumn." Since then, the number of parts in pearl gold has expanded to include the wagon wheels, minifigures, etc. The build was definitely not easy, but it was fun to see how a limited range of parts could be configured to make something recognizable. Questions, comments and criticism are welcome. For those who are interested in this project, it is on Lego CUUSOO via the following link: http://lego.cuusoo.c...deas/view/52291 More pictures can be found via my flickr account: http://www.flickr.com/photos/29934333@N02/sets/72157637177950964/with/10602636545/ This build is intended to represent the coronation of Queen Elizabeth II in 1953. She is represented by the minifig in the front. I chose this period because I used to collect toy soldiers, and one of my favorite toy soldier sets was the Britains coronation carriage released in 1953. Here is a side view of the carriage. Here is a rear-view image of the carriage. The rubber-bands on the wagon wheels are a nod to Sir Nadroj. They also give the wheels some traction! Instead of using the new carousel horses, I used rubber bands and gold coins to cover the horses heads. Pearl gold clips and rings from Lord of the Rings sets helped for decorating the horses even further. There are four Tritons (mermen) on the carriage in real-life. Fortunately, the Atlantis sets offered up the appropriate minifigure. For the Tritons in the front, the pearl gold cobra and axe-head are designed to serve as their tails. Lego doesn't make pearl gold hair, so I had to paint some. The top of the carriage features micro-minifigs, used to represent the cherubim on top of the real carriage (though the real carriage only has 3, not 4). The interior of the carriage features dark red plates to represent velvet, and it can seat one minifigure. The four ornate corners of the carriage were built using Prince of Persia helmets, pauldrons and crowns. The Tritons on the back feature "angel wings," and the bottom portion of their bodies was built using a scorpion and robot arm and 2 teeth for the tail. If you would like to learn more about the real Gold State Coach, there is an excellent video on .Thanks for taking a look, and happy building!
.thumb.JPG.f2c49c5668024694cf41ad94ee8842c2.JPG)