Search the Community
Showing results for tags 'brickstuff'.
Found 7 results
-
MOC: 1:22.5 Bulgarian 2-10-2T narrow gauge steam engine (class 600.76)
Sven J posted a topic in LEGO Train Tech
Dear AFOL trainheads, After almost six months of designing work, another five months of construction, countless bursts of temper, and being relieved of a small fortune, I am very proud to present my latest locomotive MOC. This time, it’s a 2-10-2T narrow gauge (760 mm) steam locomotive, class 600.76, of the Bulgarian State Railways (Balgarski darzhavni zheleznitsi, BDŽ). Basically an enlarged version of the German DRG Baureihe 99.73, the first five locomotives of the class were built in 1940 by BMAG (formerly L. Schwartzkopff) in Berlin for hauling all kinds of trains on the mountainous Rhodope railway from Septemvri to Dobrinishte. Delivering about 850 hp, the engines were extraordinarily powerful by the time’s standards for single-frame narrow gauge locomotives. They were so successful that the BDŽ were keen to acquire more, but after the Bulgarian Tsardom had turned into a communist republic at the end of WW II, it became almost impossible to buy industrial goods from German manufacturers. Thus another 10 engines were delivered in 1949 by Fablok in Chrzanów, Poland. These Polish-built locomotives were technically identical to the original Schwartzkopff ones, but could easily be distinguished from the first series by the combined steam/sand dome casing and the odd-looking smoke deflectors, which seem quite ridiculous on an engine with a top speed of no more than 45 km/h! From 1966 on, after new diesel locomotives had arrived at Septemvri, all class 600.76 locomotives were relocated to Cherven Bryag in northern Bulgaria. Several have survived until today, albeit most of them in desperate condition. One engine – No. 609.76, however, is in operational state (now stationed in Septemvri again) and regularly used for excursion trains. My model portrays a locomotive from the second series as it ran in the late 1960s, some years after the whole class had been equipped with compressed-air brake and supplementary oil firing. As opposed to the drawing, it therefore has a shortened right side tank (to make room for the air compressor), air reservoirs below the rear tank and an extended coal/oil bunker. The model is in accurate 1:22.5 scale except for the track gauge, which according to G-scale standard is always 45 mm regardless of the prototype’s actual value (as mentioned before, class 600.76 has 760 mm, or 33.8 mm in 1:22.5). Therefore, it matches LGB garden railway track and rolling stock. Dimensions and height of the coupling bars are designed in a way that they work with LGB link-and-pin couplers. Three PF L-motors working on the central driving axle are responsible for propulsion, with the other drivers (BBB XL) being coupled by the side rods, just as in the real thing. One BuWizz brick allows to remote-control running direction as well as speed, and serves as a power supply for the lights (separately switchable front/rear headlights, combined cab & running gear lights). The LED equipment was purchased from Brickstuff; valve gear parts and main rods were supplied by zephyr1934. The running gear layout proved to be quite a challenge. The leading and trailing axle are of the Bissell type and can swing out by 9°. Of the driving axles, the second and third one are blind, while the fourth one is slidable laterally by +/- ½ stud. With this configuration, the engine is running stably on straight track, yet also able to negotiate LGB R3 curves and switches (1195 mm radius). The model consists of more than 3200 parts and weighs about 2.2 kg. Enough said – enjoy the pictures! Some views of the engine frame. For reasons of stability, I had to fill the prototypic cutouts with trans-clear plates and bricks. You can see the steam inlet pipes running to the cylinders on the outside, as well as the exhaust pipes inside the frame, leading steam to the exhaust nozzle in the smokebox. Underneath, the brake rigging is also reproduced: The leading/trailing trucks. The tongue connecting the truck to the main frame is free from load, which means that it could be kept prototypically thin; the engine weight is supported by the axle bearings via the 4x4 tile on top. Fully detailed cab interior, including a tiltable ”Marcotty“ type firebox door and functional folding seats: Complete smokebox interior as well. The exhaust nozzle, spark arrestor, smoke stack bottom, boiler tube openings and superheater tubes are visible: Plenty of water in the side tanks: Some boiler details, among others showing the generator hidden behind the smoke deflectors: The combined oil/coal bunker can be removed to give access to the power button and the charging socket: The three magnetic switches for the lights are hidden in the rear toolbox: Posing in front of a historic BDŽ crest: The cab lettering: The lights: Some matching, albeit non-purist decoration (1:24 GAZ M20 Pobeda by Yatming, 1:22 [sic!] VAZ/Lada 2106 by Avtoprom)… A short video, showing the valve gear in motion. Note that unlike many conventional model locomotives, the valve stem is really pushed back and forth. A video of the engine pulling an LGB G-scale train will follow as soon as possible. As always, you can download the lxf file here. Also, more and much larger pictures can be found in my Bricksafe folder. Finally, I’d like to say special thanks to Sergio Monai, who with his fruitful feedback and proposals kept me stimulated to achieve the best possible result! Comments are of course most appreciated – thanks for stopping by! Best regards, Sven Edit: New video here! -
MOC: Just a humble 0-8-0T... (Flensburger Kreisbahn No. 1 in 1:22.5 scale)
Sven J posted a topic in LEGO Train Tech
Dear train lovers, It's time for another locomotive MOC! As a tribute to my favourite holiday region (where in fact I am right now, writing this), I chose the Flensburger Kreisbahn's No. 1, a 0-8-0T narrow gauge locomotive, as a prototype. The Flensburger Kreisbahn ("Flensburg county railway") was a 1000 mm gauge railway in Germany's extreme North, with two lines (94 km in total) running through the hills of Anglia close to the Danish border. When the railway's older, saturated-steam locomotives became too weak to handle increased train loads, two new superheated-steam engines were ordered from AEG in Berlin - yes, there was a time when AEG, famous for its electrical devices, also built steam locomotives! Delivered in 1926, these 0-8-0T engines, numbered 1 and 2, were an immediate success. With approx. 300 hp and a permitted speed of 40 km/h, they were suited for both freight and heavy passenger trains and remained in service until the railway's closure in 1953. Sadly, both locomotives were scrapped. A substantial problem while designing the model was the almost complete lack of reliable sources. All technical information had to be derived from a short description, some b/w photos and a single small drawing in just one book (Schöning/Kupfer: Die Flensburger Kreisbahnen. Verlag Kenning, Nordhorn, 2004; the drawing is reproduced below with kind permission by Mr Kenning). Nevertheless, I'm confident that my model comes as close as possible to the real engines. The MOC consists of approx. 2,200 parts and weighs just under 1.5 kg. It is held in accurate 1:22.5 scale, therefore compatible with conventional garden railway equipment (45 mm G-scale track), and can be coupled to rolling stock fitted out with LGB link-and-pin couplers. My layout uses the LGB R3 radius (1195 mm), so the locomotive has to be able to negotiate these curves. However, as I wanted to avoid the use of blind drivers for aesthetical reasons, this required two little tricks: The last axle is slidable sideways by +/- 1/2 stud, and the second axle's wheels are slightly set inwards, resulting in an increased lateral track play. Although this arrangement causes some drag while negotiating curves, it nevertheless works. The locomotive is driven by two L-motors. A BuWizz functions as both a battery pack and remote control receiver. The lighting equipment was bought from Brickstuff, while the wheels are BBB XL drivers, as usual. Purists may kindly ignore the two following scenes... Of course, the engine crew was proud to pose for a souvenir photo. Even the local grocer came to have a look at the new locomotive. The engine frame: While my previous BDZ 606.76 had its focus on exploring the possible level of detailing for a LEGO model, this time the goal was to design a simple locomotive for uncomplicated operation. Above all, the new model had to overcome the 606.76's proneness to tipping over. Thus, the frame houses two weight bricks for improved traction and a lower centre of gravity (highlighted in blue): Some views of the brake rigging and the two large vacuum-brake cylinders: All drivetrain components, including the BuWizz, are tightly packed and positioned as low and as close to the engine's centre as possible, again with the aim of optimizing the COG: The power button and the charging socket are accessible by removing part of the boiler top: The cylinders, closed-type feedwater heater (system "Knorr"), and generator: The upper part of the cab. While looking quite simple, the task to model the roof's half-stud offset and the vent hole in the cab front almost drove me nuts... But I think I found a satisfying solution: Cab interior and lights: This time there was no space for magnetic switches to control the headlights; so the coal bunker contains two small separate battery packs (with built-in switches) for front and rear lights. The cab is illuminated, too, when any of the two circuits is turned on. Realistic Winterthur valve gear. The basic dimensions are the same as on my BDZ 606.76: Originally, I had used zephyr1934's rods and valve gear parts again. But then I found them to be looking too massive , considering the rather delicate rods of the prototype. Besides, during the first functional testing sessions of the near-completed model, the flex elements which I originally used for the side rods proved too large by just a fraction of a millimetre - the cable connectors collided with the rear mounting of the crosshead guide, something which could not be foreseen in LDD. So I knuckled down to get used to Tinkercad and designed my own rods, including thinner, slightly tapezoidal main rods as well (both subsequently made by Shapeways). And for the first time - SMOKE (using a Seuthe No. 99 smoke generator, powered by the BuWizz via a modified PF cable): I finished the model just in time before going on holiday, so I had no time to shoot a video on track. Of course, I'll do this when I'm back home again. In the meantime, your feedback, comments and criticism are most welcome! As usual, high-resolution images can be found in my Bricksafe folder. If someone should be interested in the LDD file, please contact me by PM. Thanks for stopping by! Best regards, Sven Edit: Now with on-track video - see here! -
MOC: 1/22.5 scale Kitson-Meyer - Ferrocarril de Taltal. UPDATE: Now with video!
Sven J posted a topic in LEGO Train Tech
Dear trainheads, Finally, my new locomotive is ready! This time, I chose a prototype from quite a distant edge of the world - an articulated narrow-gauge (1067 mm) 0-6-6-0T "Kitson-Meyer" engine belonging to the Chilean "Ferrocarril de Taltal" (FCT; written as "Ferro Carril Taltal“ on locomotive number plates), or "Taltal Railway". Ten of these locomotives were delivered to the FCT by Kitson & Co. (Leeds, UK) between 1904 and 1907, and further eight engines later acquired second-hand. Over the years, several modifications were carried out: For example, all engines were converted to burn oil soon. Water and fuel capacity of some locomotives (including No. 50, the prototype for my model) were increased by adding welded enlargements on top of the side and rear tanks. "The Railway Magazine" gives a short description of the FCT (Vol. 90. No. 551, May-June, 1944, pp.158—159): More detailed information can be found in the books "The Taltal Railway" and "Kitson Meyer Articulated Locomotives", both by Donald Binns, which were my two principal sources. In general, very few technical information about the FCT locomotives can be traced. Despite searching for months, I wasn't able to find a detailed drawing. So I had to largely rely on taking measures from photos and on one single, distorted sketch on a data sheet describing the near-identical engines from the "Ferrocarril Tocopilla al Toco" - see below. (While there are numerous photos of the sole surviving FCT Kitson-Meyer, no. 59, nearly all of them were taken during the engine's last years in service, when it was already in a very poor state of maintenance, or since it has been on display as a monument. Because of that, it's difficult to conclude how it looked in better days. Nevertheless, I hope - and believe - that the model's overall impression comes close enough to the real locomotive's appearance.) The model is held in accurate 1/22.5 scale. It consists of quite exactly 3,000 parts and weighs in at 2.4 kg. The engine is powered by two L-motors (one mounted vertically in each bogie); each motor has its own BuWizz as a power supply and R/C unit (technically, one BuWizz would suffice, but this configuration allows for longer running times). The wheels come from BBB and the lighting equipment was purchased from Brickstuff, as usual, while the rods are 3D-printed parts of my own design. Enough said – enjoy the photos! Data sheet for the similar engines (though with different brake equipment and cab) of the "Ferrocarril Tocopilla al Toco": Detailed cab... ... and also smokebox interior, showing the exhaust nozzle, the base of the chimney and the boiler tubes: The cab roof is detachable. The ventilation flap really opens, you can see the lever for the steam whistle through the hole: The top of the Belpaire firebox is also detachable, giving access to the charging sockets and the power buttons: The lower part of the cab ladder is attached to the bogie and turns with it. Note also the chain which prevents the bogie from jackknifing in case of a derailment. Advanced lighting functions, controlled via two BuWizz channels: Before starting their daily trip into the Andes, engineer and fireman still have enough time to pose for a photo with their trusty old lady... ... while one of the brakemen uses the unexpected spare time in a different way. Well, but not for long. Soon "El Jefe" arrives in his flashy Chevrolet and critically watches his employees' activities... A few shots from the building phase, showing further details. First, the bogies with the motors. You can see the leaf springs underneath, as well as the brakes and (as on the real thing) only one single sanding pipe in front of the first wheel: The firebox once again: The main frame. The ashpan contains two weight bricks, which help to keep the centre of gravity low and thus to prevent the model from tipping over. And a view of the complete technical layout with batteries and motors. The multi-coloured bricks underneath are just the building stand. Full-resolution images can be found in my Bricksafe folder. At the moment, it’s too hot in my attic for filming, and I’ll go on holiday next week; but when I’m back, of course I'll shoot a video of the locomotive and its train, so stay tuned! Last but not least, I'd like to give my heartfelt thanks to all those AFOLs who attended the development of this model with their feedback and encouragement; and especially (though we've never met in person) to my dear "pen-friend" Sergio Monai @monai, whose multilingualism and commitment were an invaluable help during the research phase. Comments and criticism are of course most welcome! Thanks for stopping by! Best regards, Sven Edit: Video now available here! -
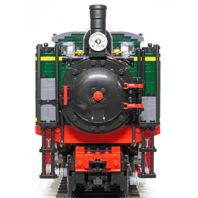
[MOC] Ferrovia Eritrea Gruppo R.202 0-4-0T in 1/22.5 - now with track video
Sven J posted a topic in LEGO Train Tech
Edit: New video here. Dear trainheads, Some time ago EB member @Plastic_Goth presented his digital model of Ferrovia Eritrea's Gruppo R.202 shunter. I immediately fell in love with that cute little prototype, and I knew I had to build a model myself, in slightly larger scale for 45 mm garden railway track. Well, here it is! The prototype was built in 1927 by Breda in Milan, Italy, for shunting service on the 950 mm narrow gauge lines in Eritrea (which was an Italian colony at that time). In total, eleven class R.202 engines were built; several lococomotives are still in operation today (the „R“ stands for „scartamento ridotto“, narrow gauge). My MOC represents a R.202 locomotive in ca. 1936, after the original lifting injectors (inside the cab) had been exchanged for non-lifting ones (below the cab), but before a new numbering scheme was introduced, dropping the „R“ in the class designation. The model is held in accurate 1/22.5 scale and driven by a single L-motor working on the second axle. It features front and rear lights (from Brickstuff; separately controllable for the left and right engine side) and a Seuthe no. 99 smoke generator. All funcions are powered and remote-controlled by a BuWizz 2.0. The rods and valve gear parts are 3D-printed parts of my own design. The model consists of approx. 1,400 parts and weighs just over 1 kg. Compared to my previous models, it is much easier to handle and maintain, due to its "small" size, but still has amazing pulling power (10 four-axle LGB cars are no problem). So I think it will become my standard "everyday" engine... And here are the pictures: Prototype data sheet (drawing not accurate and not to scale): While the fireman is carrying out a minor repair on the smokebox door, an administrative officer arrives in his brand new Fiat Topolino (modified design by Peter Blackert): Two tiny Italians... Some views of the cab interior. As the BuWizz is located in the position of the firebox, the roof and the boiler backhead can be removed for access to the power button and to the charging socket: The frame: Three weight bricks are installed inside the frame and boiler, thus increasing traction: The half-plate offset in radius between smokebox and boiler required some unusual (but surprisingly sturdy) SNOT-work. A video of the model on track will follow. For now, here is a short sequence of the engine on the roller test bed: More and high-resolution photos can be found in my Flickr album. Comments and criticism are most welcome. Thanks for your interest! Best regards, Sven -

42069 RC mod with advanced lighting
Oupin88 posted a topic in LEGO Technic, Mindstorms, Model Team and Scale Modeling
Hello! The 42069 was the first set I’ve bought for about 15 years, and despite my initial intention to play with it together with my 4-year-old son, I soon got into modding it quite heavily, and he went back to his City and 42023. :) So here’s what I’ve done to it so far. ADDED COMPONENTS List of motors and electronic components added to the model: 4x PF L motors 1x PF XL motor 2x PF M motors 2x PF Servo motors 1x PF switch 24x Brickstuff LEDs 2x BuWizz 1x sBrick some PF & Brickstuff wires DRIVE The drivetrain/axle design is mostly RacingBrick’s design with 4x PF L motors (one for each track/wheel connected directly) and a Servo for steering, with some cosmetic changes to avoid self-disassembly of the suspension on rough terrain. ORIGINAL FUNCTIONS Both side compartments now house BuWizz units, the walls separating them from the middle section have been removed, and the space itself no longer exists, taken by a single sBrick and quite a lot of wires (more about the setup later). The fire extinguishers now sit right next to the seats, ready to use. The shovel drawer remained in place and functional, now also containing the first-aid kit. Pretty much all of the truck’s functions have been motorised, similarly to RacingBrick’s version. I left the rising door mechanism unchanged, I think it’s really cool as it is. WINCH The winch mechanism has been completely ripped out and rebuilt. To provide greater momentum, I used the more powerful XL motor, which I installed right behind and below the front bumper. The first version of the winch was geared 1:1 using three consecutive 32072 knob wheels for extra durability over standard gears, but since they kept getting stuck, I replaced them with regular 16 tooth gears. I considered an alternative setup involving a worm screw, but I wanted to maintain decent speed of the winch. The whole mechanism fitted inside the original bumper design which I modified later (it looked a bit thin to me), so if you like the big motor but not the puffed up front bumper, you should still be able to employ it. Since I didn’t use a clutch gear (which would have ruined the performance), to protect the XL motor from being turned on accidentally a safety-valve was installed in the form of a PF switch, activated with a turn of the gear/knob originally used for the winch. The original tiny hook has been replaced with the 70644 metal hook for extra durability. Alternatively, I sometimes attach the 95354 anchor - it looks a bit freaky, but so does the whole model, and it’s the best solution for hooking the winch up. OTHER There are also two PF M motors: one powering the fake V8 engine, geared up 5:3, and the other one raising the roof. LIGHTING I put a lot of work into the light system of the model with the use of Brickstuff LEDs. Without the additional lights on the interchangeable roof racks the lighting comprises of 24 LEDs: two for each of the main headlights, one for each bullbar light, six blinking turn signals (including one light on each of the wing mirrors), two lights on the original roof rack below the antennae, two taillights (white LEDs under trans-red tiles), four stop lights (similar as taillights next to the reverse lights plus red LEDs under trans-clear round tiles on the trunk door) and two reverse lights. The LEDs are powered from one of the BuWizz outputs via a Brickstuff PF power source with variable outputs. This certain piece deserves a few more words, especially for the readers unfamiliar with Brickstuff. One of its three outputs is always on (thus, all LEDs except for the turn signals, stop lights and reverse lights light up the moment BuWizz connects with the controlling device) and the other two outputs depend on the PF channel activation; in this case the BuWizz output for the lights is synchronised with the steering Servo, resulting in lighting up the corresponding blinkers. Lastly, the stop and reverse lights system involves another Brickstuff gimmick: magnetic switches. The circuit is closed when a small magnet (which fits inside a Technic axle hole) approaches the switch. I put the magnet inside a 1x2 thin liftarm, connected to a Servo, controlled in sync with the track motors. When the Servo is in neutral (with the model stationary), the magnet closes the circuit powering the stop lights. In reverse it approaches another switch, closing the reverse lights circuit, and in forward position it opens both circuits, cutting out the LEDs. (I know it’s a bit much to add a heavy motor just to control some lights, but I couldn’t think of a better solution - any ideas?) An extra bit of lighting comes in the form of two interchangeable roof racks, installed roughly in the location of the original HOG steering knob. I was curious about Brickstuff High-Power LEDs, so I put two of them behind some trans-clear 24116 curved panels and on the roof. The other version of the roof rack includes four regular LEDs similar to those put on the bullbar. The lights are connected to the main grid through Brickstuff vertical connector, which eliminates the need of connecting and disconnecting the fragile wires with every change of the racks or their complete removal. Since the complex lighting system tends to consume a considerable amount of BuWizz’s battery juice, I used another vertical connector to put together an additional master switch, disguised as a red toolbox and located between the dark green jerrycans on the roof rack. BRIDGING LADDERS The last modification, or rather some additional equipment is a pair of bridging ladders, which can be folded and stored on the original roof rack. Fully extended, they’re 49 studs long each (just a bit longer than the truck itself) and, although a bit flimsy, manage to support the weight of the model while crossing gaps or climbing obstacles. There’s also a removable, extendable ladder added to the rear door. CONTROLS As for the double BuWizz-sBrick setup and controlling the model: the BuWizz unit in the right side compartment powers both right L motors, the steering Servo and the winch, and the left unit powers the left L motors, the fake V8 and the sBrick. The raising roof, the LEDs and the Servo controlling the stop and reverse lights are all powered through the sBrick. That leaves one last sBrick output free for some other uses, i.e. motorising the doors. The whole setup is controlled through BrickController2 with the use of a physical controller (a bluetooth gamepad). The app works great with virtually no lag and allows for quick profile changes; I created two profiles: one for regular driving and one for tank driving. Obviously, all the extra elements made the model quite heavy - it now weighs 2700 grams on tracks and 2575 grams on Unimog wheels. However, 2x BuWizz units manage the weight rather effortlessly, especially in Ludicrous mode. OVERALL LOOK Having modified an already sticker-heavy model, I decided to go a little bit further and add some BuWizz & sBrick stickers and Brickstuff printed tiles (three of those came as bonus with consecutive shipments from Brickstuff). The front of the model now looks a bit bulkier with the new bumper, and the addition of the bridging ladders to the roof rack gave it an even more adventure-ready look. I replaced the 2654 trans-clear round tiles on the bull bar and roof rack lights with a trans-yellow variant - I like the look of yellow headlights on vintage race cars. Additionally, the 3069b trans-clear 1x2 tiles on wing mirrors have been replaced with trans-orange ones, because of their newly acquired function of blinkers. Ling to the gallery: https://drive.google.com/open?id=1jUqAZh1uowBBGpubQmRs6vS1ASuVkIBU -
We have a family tradition of creating a Lego Christmas Village with our family. This year we took it to the next level with hundreds of lights from Brickstuff and thousands and thousands of bricks. The only official set we used is the train from the 2016 Holiday Train set to which we added a battery pack, lights and the remote control upgrade. You can visit a detailed video here: https://www.youtube.com/watch?v=lRMYJzjSvjg PC152254 by Nolphi Plays, on Flickr PC152230 by Nolphi Plays, on Flickr PC152260 by Nolphi Plays, on Flickr IMG_2241 by Nolphi Plays, on Flickr IMG_2237 by Nolphi Plays, on Flickr IMG_2238 by Nolphi Plays, on Flickr IMG_2242 by Nolphi Plays, on Flickr PC152238 by Nolphi Plays, on Flickr PC152256 by Nolphi Plays, on Flickr PC152265 by Nolphi Plays, on Flickr
-

[MOC] Peterbilt 379 & Polar Tanker (1:13)
Bricksonwheels posted a topic in LEGO Technic, Mindstorms, Model Team and Scale Modeling
Well, it is great to see a forum dedicated to scale modeling, so its not more then fitting to put my latest work here: A Peterbilt 379 with Polar tanktrailer. A large (1:13) scale Lego tanker combo had been on my list for a long time. I made a small 1:22 Kenworth cabover with milktrailer in the past, and had plans for a 1:16, but in the end started work on a full 1:13 scaled combo. My 2012 dumper combo was getting old, and I wanted something new to bring to shows as well. Now I wouldn’t be myself not to take a new build a bit further again, and this one should be extremely detailed, coloful, and fitted with lights. Once more I hooked up with my good friend Rob from Brickstuff.com, and this time we didn’t make compromises. We even added a custom controller/effect board, powered by a USB Varta 10400 mAh powerpack that is located in the sleeper! There are lights everywhere including over 60 driving / contour lights, but as a special feature the underside of the chassis of both tractor and trailer are equiped with over 180 RGB LEDs to simulate the glow effect seen on showtrucks. This really gives amazing effects. A custom remote control is split into two channels that control the contour lights and the underside seperatly. Effects include color changing and strobes. It took me 5 months to build this truck and some 9000 bricks went into this, including electro-plated chromed bricks by Bricks4all.nl. My buddy Jaap Kroon (Jaap Technic) printed the stickers for me, a job well done! And a shot in the dark: A video is on my flickr stream: https://www.flickr.com/photos/bricksonwheels/