Search the Community
Showing results for tags 'big ben bricks'.
Found 3 results
-

Big Ben Bricks Injection Molded Steam Driver Wheels with Traction Bands Review
ALCO posted a topic in LEGO Train Tech
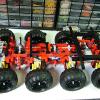
Hello all, I am here with NAOLTC (North American Online Lego Train Club) to provide a review of Big Ben Bricks #11 size steam driver wheels WITH traction band grooves. These would be XL size under the old name scheme. Being size 11, this means these wheels are 11.5 plates in diameter measured on the rolling surface. Here is a size chart for comparison. This review is on-going in that I have already done some testing and playing with these wheels but as I sit here writing the review, new and different tests, views, needs for photos are occurring to me so I will be updating this review as time permits. Please check back for updates. Below is the current wheel size chart. Ben has had #11 wheels available for quite some time now and only recently has added traction band grooves. He asked me to provide a review on these wheels and so here goes: 1. Look and Feel These wheels arrived in a pack of 8. 4 flanged drivers and 4 blind drivers. This will allow for a steam locomotive wheel arrangement of x-8-x. They arrived with the traction bands already in place. Here are the wheels with the bands and without. As you can see, these are injection molded and have a superior finish to 3d printed wheels. On the back, you can hardly tell where the injection points are located. These wheels do not quite have the same glossy shine as the #9 wheels produced by LEGO®. (See size chart for reference) The photo below has the BBB #11 on the left and the LEGO(R) #9 on the right. 2. Pin and Axle Fit The pin fit is perfect. I tested this with different types of pins and they all easily snap in with a good little click. There is no lateral movement meaning the pins do not slide around but are secure yet have complete freedom for rotation. The axle holes also have just the right amount of friction to rival that of LEGO® equivalent connections. The tolerances on all eight wheels are very precise. 3. Traction Band Grooves The new great feature of this product is the size of wheel with traction band grooves. These appear to be built in the mold, so there is no evidence these were machined into he wheels after coming out of the mold. The grooves are pronounced enough to snugly hold a traction band, allowing just enough of the band to be exposed on the rolling surface to give the wheel traction, but not so much so as to raise the wheel off the rail head by a noticeable amount. I noticed that even the blind driver wheels have the traction band groove. At first I was confused by this, but I have come to realize that by putting traction bands on blind drivers, one could power an axle of blind drivers and still run your locomotive. (As of this writing, this is un-tested but I plan to add this to my future testing. Check again for updates) 4. The “Brumm” Test The name of this test comes from the sound one makes with their voice as they push a toy car along in play. So I quickly threw together a little frame and with make-shift side-rods to test “brumming” these wheels along the track with my hand. As I expected in the F-B-B-F arrangement r40 curves were no good. The flanges rubbed on the rails very hard and caused too much friction. Also, since the conical shape of the rolling surface is too fine to really be of any use in properly negotiating a curve of such proportions it really does not make sense to measure this. The traction bands on both sides of my frame also contributed to the additional friction but it was mostly the wheel flanges. This is the conclusion that I came to because when I changed the wheel arrangement to x-6-x or F-B-F I had no issues with r40 curves. You can see this in the powered test video in section 5 The Powered Tests. in my push test I did notice that the inside of the wheels seemed to get caught on the frame of my “locomotive” in the video below, you can see how I am attempting to push the locomotive along but the wheels are getting caught and causing it to stick. After closer inspection it appears that some of the injection points are ever so slightly rough enough to get caught on the technic brick frame. This did not seem to be a noticeable issue in my powered tests in section 5. Video of Brumm Test I removed the wheels to try to see what was causing the sticking and my only conclusion is that one of the injection points on one of the wheels was causing this. When I put some sideways pressure on the opposite side, the sticking sensation seemed to vanish. So this must be a one-off on one of the wheels. It is nothing a little sandpaper cannot fix though. 5. The Powered Test This is the test I was most excited for. I could not wait to throw down some track and get some cars out. I made a quick point-to-point layout so I could do some testing in both directions and through some BrickTracks r104 switches. I was very impressed with the grip this wheels and traction bands offer. While only using three cars, I feel this is a pretty good test. I’m not a PoweredUp expert so when I connected my hub to hand-held it somehow got set on all-or-nothing so my locomotive is quite jerky. I think this is actually creates a more difficult testing environment because of the sudden movements. On a model this situation might only happen if an emergency stop button were used….which would certainly cause the train to jack-knife. Anyway, great grip, really good stopping and starting. Check out the videos below. Video of Powered Test in x-8-x wheel arrangement Wheels are F-B-B-F Video of Powered Test in x-6-x wheel arrangement Wheels are F-B-F 6. (Intentionally left blank) Conclusion. I still have some more tests to run and I would like to get some more and better photos which I will add to the OP as time permits. But so far I have to say that I am really excited for these wheels and they will be very useful. I have a couple locomotives planned that will require these wheels and I am excited to use them in my building. This is a great product and greatly needed in this market place. Well done Ben. I would be happy to try to answer any questions and take suggestions for tests or photos or observations that anyone may have as time permits. Thank you for reading this review. -
Hello I like to share the result of Spark Industries' new side project. The company produces modern locos and cars, but wants to salute the old times. So designed a steam engine with enthusiasm and love. She is a 4-6-4 Hudson type loco: There wasn't a particular real loco for modelling, but the main shape based on Canadian Pacific 2816 and Union Pacific 844. She looks best on bigger turning radius, but deals with the standart lego curve and switch. The built width is 7..8 studs. The loco is 54 long, and with the tender it's 83. The Big Ben Bricks' XL wheels fitted mostly for the desired scale. Some curiosity: The steam valve is a built in little pneumatic cylinder. PF cable used for pipeline imitation: The handrails on the boiler's two side made of the very old technic flex system's inner cable. Electric side: 2 PF train motor 1 PF L motor 1 PF IR receiver (v2) 1 PF battery box 1 PF extension cable (50cm) 1 PF polarity switch The tender contains all the PF elements, except the L motor and the extension cable. Two train motors are attached to one output of the IR receiver (of course, one of them with the polarity switch). The L motor is in the loco, connected to the other IR receiver out. That way, it's possibble to start the loco with full voltage, the big wheels slipping, and then turn on the main drivers in the tender. Some more pics: Hope You like it!
-
Some time ago this thread appeared, talking about a substance called "Bullfrog SNOT": After some initial confusion (is this some sort of new building technique?), I learned it was some sort of substance model railroaders could "paint" onto their wheels to add traction. I was pretty sure that it would just be worse than an actual traction tire, and forum posts reviewing the substance seemed to agree with me. The train wheels Lego makes both feature a groove for traction tires already anyway. However, I had been considering a couple things I wanted to model where the correct wheel size is closer to a Big Ben Bricks medium wheel. I didn't trust myself to cut a groove into the wheels without access to proper machine tools, so I thought I'd try the "painted on" traction tires. One key issue, however: I'm kind of a cheapskate, and didn't want to spend $25 on a tiny container of stuff to find out how well it worked. Furthermore, if it did work, and I posted about it, forum members who aren't from the only country to put men on the moon might have difficulty accessing the substance (although Tenderlok seems to have managed somehow). Time to find a substitute. Whatever I found needed to have the following properties: Increase friction (adds traction). Can be applied in a uniform layer. Transparent, so it doesn't affect the appearance of the wheel it's applied to. What has these properties, and is readily available? Urethane caulk from a hardware store! However, caulk is far too thick to apply evenly in a thin layer. The packaging bears the words "easy soap and water clean up"; I took this to mean that I could thin it by adding a small amount of water: I then used a small brush to apply this onto a clean spinning wheel to get an even coating: I left the wheel spinning for about half an hour for the thinned caulk to dry. Here's what it looked like afterwards: I built a small test vehicle and ran it on a figure-eight for about half an hour (so as to test it going around turns both ways). This was the result: legoman666 is remarkably prescient... Pressing down on the test vehicle suggested that the painted-on tire had a bit less traction than an actual traction tire, but traction seemed to remain reasonable after a half hour of running. I wanted a more thorough test though, so Commander Wolf installed the modified wheels on his QJ and had it pull some long cars for most of a BayLUG meeting. The result: This stress-testing caused the tires to wear off. I'm not sure if that's a property of the substance (did I thin it too much?), or perhaps the underlying surface being too smooth for the caulk to adhere well. More testing is in order...