Search the Community
Showing results for tags 'b-model'.
Found 21 results
-
.thumb.png.116032e930e483fb4ebbfdc62183bd34.png)
[MOC] Rocky 42099 B model
Didumos69 posted a topic in LEGO Technic, Mindstorms, Model Team and Scale Modeling
Rocky - 4WD Rock crawler buggy I would like to present to you 'Rocky', a rock crawler buggy with a body tilting angle that averages the angles made by the front and rear axles. My shot at a 42099 B-model. Instructions are available on Rebrickable. When I saw the first images of 42099, I noticed that the amount the body tilts sideways, is mostly defined by the rear axles angle, because that axle's suspension is the hardest - it carries the battery/control unit - and it's not pendular. That got me thinking; wouldn't it be nice to make a setup in which the body tilting angle averages the angles made by the front and rear axles? Just like how a Mars Rover averages it's body angle between it's rocker bogies - with a differential - but now sideways, not lengthwise. That way it should be possible to mimic the character of 4-link suspension, which is often seen in rock crawlers. So that was my objective with this B-model and the nice thing is that this model contains exactly the parts needed to build something like that. Axle articulation Here is the setup that interconnects front and rear axles. Like in rocker bogie suspension, you should regard the body as the differential house. The body tilting angle is defined by the two axles that point sideways. I used 4 gears in the differential itself to minimize slack in the system. There is some rotational slack of course, but this is even further reduced by 1:3 given the 20:60 gear ratio with the turntables. Center of gravity Besides the differential, the center module also houses the battery/control unit, because that unit includes the tilting sensor and I wanted the tilting sensor to show the tilting angle of the body. I also wanted to keep the center of gravity low and centered. However, putting the unit in this central spot did cause issues later on... The battery/control unit - not depicted here - plays an essential role in form-locking the whole center module. The battery/control unit can be slided out sideways after removing a few pins and parts. Spring suspension Besides axle articulation, I of course also wanted to include actual spring suspension, so I attached two main suspension arms to the turntables, one for the front axles and one for the rear axles. I suspended the main suspension arms with springs placed between the turntables and suspension arms. The springs are mounted differently to the front and rear suspension arms, giving the car a little more lift in the back, which adds to a nice inclination, or rake angle, of the whole model. The whole model nicely sinks into the spring suspension under its own weight up to about 40% percent of the overall spring travel. Drivetrain I wanted to have the most simple drive train possible, so the motors are directly attached to the frames holding the differentials. This is a crawler and with the new portal hubs, there is no need for any up or down gearing. The motors add to the stiffness of the main suspension arms. I also wanted to have a track width that is two studs wider than the stock 42099 build. After some playing around I found out I could use the new CV-joints the other way around to make that possible. Steering For steering I wanted minimal slack and double sided steering rods like in the stock 42099. I limited the steering angle to make sure the maximum angle the CV-joints make, does not cause any damage. I noticed the CV-joints start wobbling when the angle they make is too big. The steering rack assembly - as well as its back side counterpart - use a trick to minimize unintended movement (slack): The assemblies are 3 studs deep and incorporate 3L axles with end-stop. The end-stops are sticking out of the assemblies and make them slightly deeper than 3 studs. For this to work the end-stops need to slide along a smooth surface. This trick makes for a very nice fit with little play and still allows the assemblies to move very smoothly. Ground clearance To increase ground clearance I used a double wishbone setup, not suspended, to take advantage of the extra lift provided by the inclined wishbones. The rear wishbones are inclined more than the front wishbones, because there the CV-joints don't need to deal with the steering angle. At this stage I also added a set of minimalistic fenders ;-). Bodywork Finally, bodywork. This was the most challenging part for me. It needed to be removable, to provide access to the battery/control unit and I wanted it to live up to my foolproof standards. The whole model can be lifted by the roof or by the A(?)-pillars. At this stage I practically used all the pins that came with the set, so I had to do a lot of backtracking to get some pins available. I ended up using all pins, including the ones that came as spare parts. Interior RC don't have interior . When I wanted to test drive with a first bodywork attempt, I found out the hard way that I could not reach the on/off button of the battery/control unit. I had not taken that into account. Eventually I found a solution in making the roof openable, as if it were a hood, just by releasing two pins. The red 10L axle in the back can then be used to turn the controller on. After opening the roof, it can be removed easily, after which the sides of the body can be removed separately to access the battery/control unit. All together this has been a great experience. Especially the limited and pre-defined set of parts made it a real challenge. It forced me to revisit all constructions over and over again, and leave in only what is essential, without making concessions to my self-imposed building standards. I ended up using 828 of the 958 parts. -

John Deere 8RX Tractor - 42168 alternate build with tracks
Timorzelorzworz posted a topic in LEGO Technic, Mindstorms, Model Team and Scale Modeling
Hello Community, I want to share a cool idea and model I came up with - using relative new 28T gears as sprockets for a tracked vehicle. When I first saw the inventory for the new 42168 John Deere 9700 Forage Harvester, I was impressed on how many gears are packed inside this small model so I decided to use as much as possible of them for a tracked Tractor. But can all that gears are used as sprockets for driving small tracks? Lets find it out. The new 28T gear fits literally perfect as sprocket and thanks to the soft tooths of that bevel gear, tracks are running surprisingly smooth. Every second tooth fits inside the gaps of the track links, where the other tooths fits inside the gaps of the track part itself and so on. With such a setup it might be possible to build a tracked vehicle and I tested alot on the tracks and the sprocket setup. Available gears from the 42168 Forage Harvester are not enough, so I decided to use the yellow gears only for the visible side of the model and to use other parts provided with the set to prevent the additional tracks from slipping... The model I ended up is a John Deere 8RX Tractor as alternate build for the 42168 John Deere Forage Harvester that requires 124 additional widely used track links (part 3873). Something odd, a model that requires additional tracks and let you the tires left over for some other cool stuff. The Tractor comes with steering and a working piston engine. Only parts from donor set 42168 are needed and all functions are working even without the additional track pieces. Lets take a look how smooth the tracks are running. The model is steered with wheel from the back (shown in blue) while the rear tracks are running the piston engine (shown in green) by driving the model smoothly over rough ground. Let the piston engine run by driving the tracks or by rotating the rear sprocket manually. Some impressions: If you like what you see and want to build your own John Deere 8RX Tractor Unit, feel free to support me on rebrickable. Happy Building. -
I decided after two years to tear apart my 10295 Alt Build Countach by Firas Abu-Jaber and use these pieces to graduate to Rastacoco's Countach. Before I get to tearing it apart I wanted to share some photos, because a little over a year ago I upgraded the Countach to make it look more authentic. Among these upgrades include more accurate headlights and front area, white rims that used to be on my Volkswagen Beetle set (made it a Fuchs Beetle!) mirrors, new bonnet and trunk, new scoops, the iconic Countach wing, new taillights, more accurate cleaned-up interior and trunk space (plus removing their "color vomit"), a beautiful engine bay, and custom stickers. There's probably more I haven't listed, it was a heavy revision!
-

Caterham 7 (42154)
CrazyKreations posted a topic in LEGO Technic, Mindstorms, Model Team and Scale Modeling
Hey everyone, I just released one of my newest alternate builds on rebrickable. However, I'd like to know your thoughts on the model itself. Please keep in mind the following limitations of the build. I redesigned the Ford GT from the set 42154 into a classic Caterham 7! This surprisingly was a tough build that I wasn't anticipating. Here are the instruction links https://reb.li/m/160562 - The Ford GT doesn't come with many beams or long-ish panels that can be used to fill out the outer body -It doesn't come with clear lights -Just limitations all around colour as the Ford GT had a lot of gaps this was a factor in the model. As with any alternate builds these issues are not uncommon, so please also see the features that I have tried to implement in the model: Realistic opening hood Fenders move with Steering Steering Working Steering wheel Working Inline 4-piston engine Independent Front Suspension Independent Rear Suspension Detailed interior Realistic Caterham 7 looks Please take a moment to watch the video and tell me what you think of the model! -
42156 Volvo: The Iron Knight - alternate build
Timorzelorzworz posted a topic in LEGO Technic, Mindstorms, Model Team and Scale Modeling
Hi Folks, let me allow to share a new creation. This replica of famous Volvo Iron Knight Race-Truck is completely built with parts only from set 42156 Peugeot 9x8 Hypercar as an alternate model (B-model). Only a copy of donor set 42156 is needed to build this iconic truck. You can buy the instructions for this model here if you're interested in building. Features & Functions openable doors on both sides HoG-steering with removable knob independent push rod suspension in front and back V6-engine with moving pistons connected to rear differential openable lid in back to see suspension working Volvo brand with no sticker detailed design and interior lights that are glowing in the dark modular building with splitted premium PDF-instructions measures 44cm x 20cm x 18cm Impressions Headlights Lights in front are made with fluorescent bars from donor set to represent instantly recognizable headlights. A Lego addicted heart beats higher for the first time when the iconic V-shaped lights are glowing in the dark. No custom sticker Thanks to the inventory I'm happy to share my first model with a completely brick built front to recognize Volvo's brand only with pieces from 42156 and without any need for custom sticker. Suspension The model uses a soft push rod suspension in front and back. Due the fact that this truck is two studs shorter in wide than its base model, the suspension design is not only a simple copy, but an own approach with a way different building instead. Through an openable lid in the back, the suspension can be watched working. Steering Driving and steering the truck works directly with a steering knob on top of the cabin. This steering knob is removable and can be easily pulled out for better displaying the model. Engine The real Iron Knight uses a straight 6 piston engine instead of V6. Due limited inventory and missing crankshaft parts, it was not possible to form a straight working engine out of V6. Some compromises are made here and as a result, this alternate model uses a working V6-engine with moving pistons. Instructions & building process Premium instructions for this model comes in two separate PDF-files with high quality images and building steps very close to the original Lego Technic ones to ensure a satisfying building experience. Building this Iron Knight alternate model starts with the 249 pages long main PDF to finish the rear end first with differential and suspension included. The second instruction file takes over to assemble the entire front section together with a suspension and steering system you never built before. After 132 pages the front section becomes married with the rear end. Frames and structural elements are added to make the model solid. The working V6-engine becomes attached and connected to the rear differential through drivetrain. More parts are added to form characteristic lines and shapes, getting closer to a real looking Volvo Iron Knight. Some parts of the cabin are attached and the drivers seat and doors take place at their final spot of the model. After 381 pages of joyful building in total, this Volvo Iron Knight alternate model is finished in all glory and ready to drive on your shelf or desk. Grab instructions here Crafted in Sweden. Rebricked with passion in germany. Have fun with this 42156 Volvo Iron Knight alternate build. Follow me on Instagram -

[MOC] 42131 alternate: snow groomer
jyd80 posted a topic in LEGO Technic, Mindstorms, Model Team and Scale Modeling
Dear all, I would like to present my latest MOC, a one-set MOC for the Cat D-11. It was my first experience with the Powered-Up system, which I have to admit, was a bit painful :p Yet here it comes: The snow groomer is fully functional, featuring a configuration similar to the D11: two independent angular motors for the tracks, and two large motors to control a gearbox distributing four functions: raising/lowering the blade, opening/closing the blade, turning the blade, raising/lowering the tiler. By construction, the four functions cannot be operated simultaneously. The model also features a working L6 engine and tiler. They are both linked to a central differential, so that they will not move if the two tracks operate in opposite directions, but I guess snow groomers do not really turn on site like excavators or bulldozers, do they? The hood can be opened to show the engine, and the cab can be tilt to access the battery box. And here is a video: Instructions (of a further improved version) are available at rebrickable! -

Projects finished 2022
gvo25 posted a topic in LEGO Technic, Mindstorms, Model Team and Scale Modeling
Hello all, Because I'm starting on a new project I will disassemble a few models and I wanted to share them here as a summary of my builds this year. Here are the models which will be disassembled. First of all my crawler crane. I'm more or less proud of this model, as it represents very good a real crane (in my opinion) and I think it was a really good build. Second we have the unimog, it was a build that stretched over various months/years with additions along the way. The last addition was the blue knuckleboom crane. It was full pneumatic, including the outriggers. The swinging of the crane was not good due to the many hoses going through the turntable. also the crane resulted to small for the height of the unimog. But folded it looked quite good proportion wise. Next Is the batmobile, I bought the 42127 set just to build the unofficial b-model, and i must say it really looks good. The model is also a good parts pack for black components, which I'll need for my next project. My son also liked the model and he built a model of his own with system bricks. Last is a model that I will not take apart but further modify and that is the iconic lego heli set 9396. I won't bump the original MOD pages so I'll post the foto's here. I'm planning to build it like the new airbus helicopter with a AA battery box instead a AAA box, I want to make another gear box so the rotor spins faster. Maybe I put the rotorhead of the airbus in this one when I acquire the set. This MOD of the 9396 has in total 4 motors 2 L-motors for the rotor, 1 m-motor for the landing gear (including 2 mini LA's) and 1 m-motor for the whinch. The cargo ramp is omitted in my mod. Also the tail boom was revised, and some minor visual changes behind and in front of the rotor assembly. Also the nose section was revised a bit. Also the winch was revised. My next project will be a full pneumatic, non-rc material handler based on this crane I hope you liked the post, comments are always welcome -
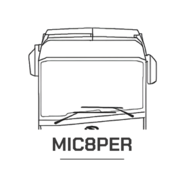
[MOC] Trial Truck - LEGO 42122 B-model | +instructions
mic8per_ posted a topic in LEGO Technic, Mindstorms, Model Team and Scale Modeling
A trial truck with HOG steering, suspension and winch.The suspension and the steering is the same principle as the A-model's one but the chassis is two studs narrower.The winch has a knob on the side and it's easy to use, also it can hold the whole truck.No openable doors but the truck has full interior, and some detailing. 42122 Alternate. -

[MOC] Jose's Inn at Skull Rock (31109 B-model enclosed tavern building MOD) now finished in real life!
Murdoch17 posted a topic in Pirate MOCs
Ahoy there, and welcome to Jose's Inn, located on the scenic Skull Rock boardwalk just a stone throws away from the pirate port itself! This Inn has all amenities of (both ship-or-land-based) home, such as five cozy beds and a large wine cellar stocked with all best ale's, beers, wines and spirits. The food served is guaranteed by our cook Dan "Dysentery" McGee to be the best served in all the world's navies, with no-maggots* crackers a staple of the pre-dinner meal! We are also proud to feature twice-a-week amusements by "Davy Jones and the Cursed Immortals" as our house band on Monday and Friday nights. Come around for such hearty songs such as "Point of Know Return", "Wooden Ships", "Octopus's Garden", with "Hotel in Tortuga" as their usual closer. The rear of the tavern, with the crow's nest-like lookout on top. Inside and upstairs are the (cost is per night) beds. Downstairs is the tavern area. So come on down to Jose's Inn, where our famous waitstaff (Manfred the waiter on left, Rosemary the barkeep on right) will treat you like old friends! (*Crackers may or may not contain maggots. Resulting disease may vary; Check with your local barber for more details on whether the crackers may be safe for you!) Davy Jones and the Undead Immortals Band are, from left to right: - Cpt. Vanderdecken, on drums (cursed God on a trip round the horn of Africa, so God cursed him) - Corporal Punishment, on guitar (from a Spanish expedition to El Dorado) - Major Paine, on bass guitar (officer from the English Civil War) - Davy Jones, on vocals (made a deal with goddess Calypso to ferry souls to underworld) NOTE: Their instruments are made from ectoplasm and not visible to living beings, thus they are not visible here. MODEL NOTES: This tavern idea came to me in early February, and was built in late May, and is based off set 31109's B-model with the printed sign from set Pirates of Barracuda Bay (from the Ideas set 21332 number . I thought I should build accommodations for my pirate crews upon arriving at Skull Rock, and it will hook into the boardwalk via clips on both sides of the model's dock easily. The song list is the one I thought long and hard about... thinking of REAL songs with pirate or ship themes, however slight, was hard! However, the easiest one to add was because of @Professor Thaum and his awesome pirate-y rendition of Hotel California, as seen in the post linked to above in the actual song list and again here, because I love it so much. Comments, questions, suggestions, and complaints welcome! -

[MOC] Classic Roadster - McLaren Senna 75892 Alternative Model (Building Instructions)
makushima posted a topic in LEGO Town
Classic Roadster - McLaren Senna 75892 Alternative Model Building Instructions: 75892 Alternative Models - Apps on Google Play Lego McLaren Senna 75892 MOC - Classic Roadster (Building Instructions) by makushima Lego McLaren Senna 75892 MOC - Classic Roadster (Building Instructions) by makushima -
Hello! I created this alternative build for X-Wing set 75218. Instructions available at Rebricable. https://rebrickable.com/users/A_Great_Builder/mocs/ And yes! It's a TIE fighter made out of an X-wing... 75218 B-model and Box by AGreat Builder, on Flickr 75218 B-model Back Right by AGreat Builder, on Flickr 75218 B-model Front Right by AGreat Builder, on Flickr
-
Hey everyone, I'm back with another alternate model, this time for the latest modular - 10264 Corner Garage. I posted the exterior in the set's thread back in February and had to put the project on hold for a bit. I came back to it this month to finish the interior and you can see the result below. It uses 2190+ pieces, so about 85% of the original set. A lot of the very specialized pieces and Technic pins left over. Initially I wanted to make 3 fully furnished floors but it soon became apparent that I wouldn't have enough pieces for everything. The floor would have to be compromised a lot due to a lack of plates (since the original has an unusual floor shape) and there also weren't enough pieces left for furniture, without combining colors willy-nilly. So I settled for a store on the ground floor and an appartment on the top. Building these alternates, I'm starting to realize why Lego hasn't produced a classic straight modular for a while. The latest ones we had were DD, DO and PR - and while DD's and PR's sidewalks are straight, the buildings themselves are more corner-y. Having only one exposed side makes the building looks less interesting standalone. I think I will go back to corner modulars or adapt Lego's philosophy of "straight-but-corner" for the future. Seems like more fun. Enjoy the pictures below. You can get the instructions here.
-
2019 8865 B Model Homage
Legotyres posted a topic in LEGO Technic, Mindstorms, Model Team and Scale Modeling
Here is another variation of my long endeavour to create proper homage to the b-model of 8865 which has to be my most favourite technic model. Even this model has gone through a few changes, although I feel Its complete. This model has an identical wheelbase and track as the original, the seating area is a little larger to fit in the 5+r gearbox in plus its a proper 4x4 model unlike the original. It has a fake V8 plus a tiny fan at the front taken from Legos boat propeller. The live axle at the rear is both compact and has a larger movement than the original. I'm still using a macpherson struts at the front which seem to work very well. Enjoy the photos anyway -

[MOC] Sydney Opera House 10234 alternate model - The Robotics Lab modular
Huaojozu posted a topic in LEGO Town
Rebuild the Sydney Opera house as The Robotics Lab, the new high-tech institute in town, specializing at mech prototyping and AI. Take a sneak peek at the latest robot the folks at the lab are building - and if you want, use more parts to finish it! Transforming this set into a 32w modular was certainly a challenge. As opposed to the Big Ben, which has a lot of small parts that lend themselves nicely to decorations, the Sydney Opera House has a large amount of specialized pieces and technic parts that don't really fit well with a standard modular. When I saw the amount of ball joints included, I immediately remembered my Bionicle MOCing days and thought about making a mech out of them. But I still wanted a modular to add to my city as well, which presented an interesting dilemma. I wanted to use the white roof pieces as armor plates, but their scale meant that the mech would be several feet tall if built like that. And there was no way the modular would be able to house it. I thought about making a scene where the mech was destroying a half-damaged building, but that seemed hard to incorporate into people's towns making it look out of place. So in the end I went with a solution of a Robotics Lab, where pieces of the Mech are being constructed and assembled. That way there is a nice scene in the modular, but it's tucked away and not clashing with the standard town aesthetic. And in case anyone wants to finish the design, they only need to add a body and an arm to have the finished product. The large amount of dark windows are well suited to a "secret" project, keeping it away from prying eyes. With no doors in the set at all, I had to make due with brick-built ones using hinge pieces from the set. I am especially proud of the tilted roof windows that ended up being perfectly LDD legal, which is something that's always a worry when you design with real bricks first. The first floor has the legs mounted on a wall, ready to be attached to the final body, as well as an arm being worked on by a group of engineers. There's also the AI sign, just in case it wasn't clear to everyone what's going on here. The second floor (and the roof) have no floor, accentuating the verticality of the building, leaving enough space for the Mech to be assembled (though they will probably have to airlift it out when it's done). There is an engineer doing final checks on the head of the Mech, using a platform and some adjustable lights. In the end, I am really hope as to how this project turned out. I may go and use the remaining parts to actually build the body and recreate the destruction scene described above, though that will probably take me some time. I hope Lego will release a new large scale Creator Expert set soon so that I can try rebuilding it as well (the Roller Coaster isn't really a modular material :D). The instructions are available on my rebrickable page, where you can also check out some other cool alternate models. https://rebrickable.com/users/Huaojozu/mocs/ -
Have you ever wondered how to end a row of modulars in a natural way? One of the available options is to introduce a water feature, be it a beach, lake or a river and then use that for a nice natural progression. In this case, I took the Big Ben set and rebuilt it as a 32w modular that's meant to sit at the end of your street and transition into a beach, bay or a similar feature. I wanted it to evoke the placement often found at beach resorts with a walkway "onto" the sea. It's kind of a faux corner building, as it has 2 adjacent sides of the facade exposed, but only one pavement. Since 10253 doesn't contain a baseplate, it sits on standard plates included in the set, making it slightly higher than other modulars. You can easily solve it by putting everything on a 32x32 baseplate and adjusting the pieces slightly to allow for modular connections. If you like it, you can get instructions here: https://rebrickable.com/mocs/MOC-14123/Huaojozu/the-lounge-10253-big-ben-alternate-model-modular/ Since there are no doors in the set, I solved it by making a sliding door as commonly seen in malls for example. That also determined what kind of building it's going to be - a store, hotel, casino or a similar high-end establishment would fit best with such pronounced doors. The Big Ben ski pole decorations also serve well to give the appearence of rich-ness. It was a bit of a struggle to make the interior, as the 10253 set contains an awful lot of tan bricks and not much else. But in the end I am happy with how it turned out. There was only enough plates to make floors for two sections, so the roof is just that - a roof. I've at least made the statue on the second floor a bit higher to justify the space. It was a lot of fun to do this and I am already looking forward to my next project, which will be an alternate model for the Sydney Opera House 10234. It's going to be interesting to see how so many curved white pieces can be used. And since it also has lots of blue, it will make a nice complement to The Lounge - sitting opposite of it and ending with the sea as well.
-

[VIDEO REVIEW] 42068-B: Fire rescue vehicle
Sariel posted a topic in LEGO Technic, Mindstorms, Model Team and Scale Modeling
Third B-model of the 2H2017 is yet another "vehicle" (so helpful of LEGO to tell us that, now nobody will mistake it for a building ;) ). While it's the smallest of the three, I think it's quite interesting and good-looking, even if many of A-model's pieces are left unused and the functions are largely similar to those of the A-model. -
[VIDEO REVIEW] 42069-B: Mobile based vehicle
Sariel posted a topic in LEGO Technic, Mindstorms, Model Team and Scale Modeling
As could be expected, the 42069's B-model is way more interesting than the 42070's one, even if it's not too pretty: -

Review: 42008 Service Truck B-Model
mostlytechnic posted a topic in LEGO Technic, Mindstorms, Model Team and Scale Modeling
Lego 42008 Service Truck (B-Model) Thanks to EuroBricks for making this review possible! As I looked at the recent Technic sets, this was one that I thought looked interesting, but not enough to buy. So when the opportunity to review it came up, I jumped! The main model is a European-style heavy tow truck with pneumatics and motors, so that's pretty cool. But what about the B-model? It's a claw truck with a trailer. We've seen similar models from Lego before (we had the 9397 Logging Truck [though no trailer on that one], 8049 Tractor with Trailer, and we could stretch to the 8110 Unimog and 8258 Crane Truck as well). So how does this compare, since it's a B Model? (If you'd like to see my review of the main model, it's right over here) Name: Service Truck Set Number: 42008 Pieces: 1276 Price: $129.99 Minifigs: n/a Theme: Technic Year of Release: 2013 Links: Bricklink Peeron Brickset The Back of the Box The back of the box shows the B model for us. The instructions are online only, not printed, but that's normal. It seems to have a lot of functionality for a B model but is very similar to many other Technic sets with a claw arm and trailer. The Build, 1 Following the instructions on screen (not my preferred way to build, although at least the quality was decent on this set) we get the frame of the truck to start. The Build, 2 Now the back wall of the cab is partially installed, as well as most of the steering system in place. It's simpler than the main model, since there's only 1 steered axle this time. You can also see some of the weird design bits due to it being a B model, such as the exposed pin on the connector being used to brace the right angle in the steering. You can't see it, but actually BOTH pins of that connector are unused. The Build, 3 The cab's made a lot of progress. You can see a few more oddities, like the white license plate stickered beam that's mostly hidden. I probably should have turned it around, but oh well. (the manual doesn't show stickers on the B model). (and yes, I hadn't found one of the grey grill pieces, but I was tired of digging through the parts. I found it later and put it on) The Build, 4 Now the cab is done. It's ok. Not great, but ok. There's weird color things going on due to the part limitations, and the doors feel too recessed, and the "winch" on the front is just an excuse to use those pieces up. (and yes, I did it backwards in this photo. The cable should hang down the inside rather than the outside to make the ratchet work correctly) The Build, 5 The chassis has also been extended backwards. The rear axles are visible, as are the starting points for the crane, rear stabilizers, and lots of other pins waiting to be built upon. The Build, 6 Time for a gearbox. Looks like we'll have the central input shaft going to 3 outputs. The Build, 7 The gearbox slips into the frame and we get to connect up the outputs. As in the main model, we have a powered air compressor (the black and grey cylinder right in the center) plus, so far, an output going back through a couple u-joints to that vertical crane connection we saw in the last photo. The third output hasn't been used yet. The Build, 8 A whole layer has been added to the back of the truck. The third output from the gearbox now runs back to the outriggers. The colors all seem haphazard. It's understandable, but does make it obvious this wasn't the main model. The Build, 9 Those "wings" sticking out behind the cab turned out to be the battery mounts. Simple and effective, and it's unusual to see a horizontal battery box behind the cab like that. Also unusual, there's that mini-LA at an angle to rotate the crane. Lego has used linear methods (LAs or pneumatics) to rotate things before, but it's unusual. Since the main model didn't have a turntable, this is an alternate way of making a "powered" swiveling base. The Build, 10 That's a very unusual boom setup there. And seriously, an axle with a bush on it as a manual control for rotation? The whole setup is just weird and slapdash. I hope it at least works well... The Truck, Finished Here's the final truck. It functions, but it's got some issues. The pneumatic hoses are too stiff and since they come horizontally across the red beam, they keep the claw from hanging as freely as it should. And again, the controls are awkward. There's the manual rotation control on the left, the pneumatic control on top, and the gearbox controls on both sides. Too many levers in too many places. The the rear outriggers... they're there, but barely. The Truck, Reaching Out Here's the full reach of the crane. It'll reach the ground barely, and can rotate to the sides. It's not really enough to reach into the trailer though, if the trailer is connected behind the truck. To do any work, you need to park the truck between the load and the trailer. There are a bunch of beams left over you could use as a load, but the claw doesn't grab them very well. The Build, 11 Time for the trailer. A basic frame to start - axles for the single set of wheels, a "hitch" up front, and a manual leg that can come down. The Build, 12 Here's the start of the tipping setup. That is a weird linkage from the mini-LA to make the trailer tip sideways. And again, a bush as a knob to manually control it. The Trailer, Finished The previous frame mounts to the trailer and a bunch of panels fill out the trailer. Too bad there's random stickers all over. Guess it gives it a "distressed" look? The Trailer, Tipped That's as far as it tips, but it's enough to get the job done. The Conclusion So, what's my conclusion on this model? It's meh. The build is ok, the functions are ok, but the final thing feels definitely B and not main model material. The colors are random, the stickers are in the way, and the functions just feel haphazard.I'd recommend building it first so there's no stickers and you can see it for a day or two, and then take it apart and build the main model and leave that one built. It's much better than the B. The Ratings Value: 10/10 - It's so close to the famous 10 cents a part mark, and there's so many useful parts. Lots of panels, PF, pneumatics, so it's solid. Design: 4/10 - Haphazard colors, stickers from the main model, etc. Minifigs: n/a - Playability: 6/10 - It's got some functionality, but the controls are awkward and it doesn't actually pick things up well. The reach of the boom is short as well. Parts: 10/10 - It's got both pneumatics and PF, plus if you want green Technic, it's the only place to go. It's the only source of 1x7 beams, the best source for 1x9 and 1x13 beams, and the only current(ish) source for green panels. Overall: 5/10 - Ok to make once, but then build the main model since it's much better. -
WHAT ARE "B-MODELS"? This term was used by Bjarne Panduro Tveskov (senior LEGO Space designer in mid-80's/early-90's) in THIS interview, describing models pictured mainly on rear side of LEGO boxes in 80's/90's, which are basically some different possible builds (without building instructions!) from the exactly the same pack of bricks as the main model set (or in principle: "Let's see what else we can build from the sets bricks only"). So that said below are some of my interpretations of those...all the LXF are, of course, mine...
-
Your appriciation for B-models?
Cumulonimbus posted a topic in LEGO Technic, Mindstorms, Model Team and Scale Modeling
After an overenthusiastic bid on an auction site, I had a spare 42009 crane, so I decided to build the B-model. The container reach-stacker isn't a machine I usually consider recreating, but I gave it a try anyway. During the build, I improved some small things: The colour scheme which is typically suffering form the restriction of the available parts of the A-model, was made more uniform and similar to the a real Hyster. Additionally, I modified the chassis so the steering rear wheels could make the huge steering angles the real one can. I was impressed with the functions, strength and complexity of the model. It really has been thought through well and, in my opinion, could have been a worthy A-model any year. This makes me wonder, how many B-models do you have as permanent members of your collection? Do you value some of them as high as A-models or are they just a nice bonus? It really is an amazing feat that the Lego designers come up with B-models for all the Technic sets each year, but I imagine they get a lot less credit for them compared to the A-models. -

42006 remake into 8043 B-model?
Commander Smith posted a topic in LEGO Technic, Mindstorms, Model Team and Scale Modeling
I'm wondering if 42006 has the right parts to build the 8043 B-model. I'm not including the PF and two missing LA's or the bucket in this assessment.