Search the Community
Showing results for tags 'Tutorial Tracks 12v'.
Found 1 result
-
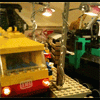
Was checking out clone brands recently for any useful train parts not made by Lego and noticed that Ausini have made fully compatible RC track but in light grey rather than bley or brown like the Enlighten track. Another difference is the sleepers are spaced differently. This got me thinking it would be perfect for working with 12v grey era power rails as not only is the colour very similar to the power rails but it might be possible to fit the 12v curved power rails onto the track without modification due to the sleeper difference. Would be great to properly update the grey era rails seeing as the old ones discolour easily, are bad for traction and get brittle with age. Note, as recently mentioned in another topic, only grey era straight power rails fit RC track without modification, curved grey and blue era straight and curved power rails need to be modified at the bottom by filing away extra bits of plastic that get in the way, not that difficult but a bit of a tedious... hopefully the Ausini idea provides a way around this colour dilema without having the hassle of filing. Anyway, so I went ahead and ordered two loops of the grey Ausini track (just track from aliexpress.com, not the Ausini trains themselves) to see how this craziness would pan out... So the track arrived without issue, again, like Lego RC track, the straight power rails fit fine, the curved rails didn't fit exactly but I found that if I offset the power rails by one stud than I could easily fit them nice and snug and without tedious modification. This is the result : Looks pretty good! So what to do about the one stud mismatch? Either you can carry it all the way around a closed loop, just use Ausini straights to avoid the issue, or you have to deal with the offset for a pure 12v solution. (Neither is this a problem if you just want the power rails to surve as a battery recharge station. ) So for the end missing a stud, perhaps a ready made track isolation piece, like with this modified blue on bley piece? : Thinking maybe the light grey for the intercity and the blue on bley as the cargo track The added cheese slices are important to prevent the 12v pickups from slipping on the hard edges of the power rails. Surely the over one stud is more of a problem, so what to do about this? Even here there is an answer, to operate 12v switch points, or if we needed more track, we may need to convert back to the old track system. There are converters that have been 3D printed available from Shapeways, one is the size of a flex track piece, and the other smaller one still extends the track length by two studs, so both too long... luckily there is a converter on Thingiverse (at http://www.thingiverse.com/thing:832183) which only extends the the track length by one stud! So I downloaded the stl file from Thingiverse and uploaded it to Shapeways and got a couple printed in polished metalic (the closest thing they had to light grey) : And here it is giving us the extra stud (looks a bit more glittery than average due to the camera light) : Now to put it to use with some classic switch tracks : Hopefully this tutorial helps extend your track options, happy track mix'in... The transition between track styles is smoother than on the other conversion piece I've used. If you look very carefully at the picture above you'll see the join to the Ausini track is tighter at the top compared to the bottom, this is the fault of the Ausini track rather than the converter, it gives that very slight gap against Lego RC track also, but not with two bits of Ausini track. Only other thing to mention is Ausini don't seem to do a switch point set of their own in case anybody was wondering. There are however left turning switch points in some sets, but no right turning switch points anywhere as far as I can tell. However all reports on these left turning ones show that they are missing the actual centre piece to turn the track, so maybe best avoided... There are also tantalising pictures of other colours for the track in some sets but haven't been able to confirm those.