Search the Community
Showing results for tags 'Tunnels'.
Found 5 results
-
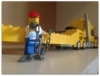
Hi all It's been a while since I posted last but as you'll see I've been busy working on a new layout and storage. I was sick of having to pack up at the end of the day so decided I needed something permanent. But it was catch 22 with our Lego room being in our cars home too. After some research I came up with this and I hope you all enjoy. Trains on the cold concrete floor are no more. The new large table so I can now have a permanent display. But what about the car? After a few rough layouts and a bit of paint we now have a base to start our township. But what about the Car? Well, I hooked up a winch, added some cable and pulleys and now the car can park underneath while I get to enjoy a permanent layout (when down of course!). Here's a link to a few more pictures of the lifting design. It's still a work in progress in regards to the layout but it's getting there and I'll post a few updates soon. and done...! Hope you enjoyed it. Cheers Brendan
-
A free-build for the Guilds of Historica and a continuation of the story of Adira Magdeburg. Check here: http://www.eurobricks.com/forum/index.php?showtopic=111919 and the ones before for backstory. “AAAAAAAGGGH!!!!” The sound of the Mummy's screaming echoed through the tunnels of the abandoned mine, as bone-chilling and terrifying as the Mummy himself. His pale skin was rent in places, and his face held a snarl terrifying enough to make a gargoyle swoon in fright. And his voice, a hollow hiss of a sound, now rent the air in brain-rending screaches. Adira almost would have preferred to have him gagged, if not for the purpose of their torture, namely; information. Adira leaned toward, everything in her wanting to throw up at the smell that assaulted her nose. But she kept her face impassive, staring into the Mummy's eyes, twin wells of death. His hatred and agony smote her almost harder then the smell, but she refused to look away. “Do not think we will stop for fear of any threats you make, we are your masters now, and we will not stop until you tell us what we want to know. Who is the Dark Mummy Lord? How do the Desert King forces know the mountain passes? Who told them?” The Mummy let out a shriek, nearly defeaning her. Adira leaned back, taking a breath of the slightly fresher air, and motioned toward the village drunkard, the only person they could get to caryout the torture. The man giggled, stone-deaf to the horror in front of him, and lifted a bottle he had been drinking out of a moment before. “Want some more drink, buddy?” The Mummy shrieked again as the whiskey burn over his leg. Adira winced, looking away from the creature's bulging eyes and wide open mouth toward where Havers stood near the door, watching the mummy intently. The drunk paused to take a sip, and Adira leaned forward again. “Give us a name. Who is the traitor?” The drunkard finished his prolonged sip and lifted the bottle again. The Mummy stared at it, terror in his eyes. His eyes diluted and he gasped out one word. “Sirhaaaaaaaaaaaan.” Adira raised a hand and the Drunkard paused, staring at the hand. Slowly Adira's mind wrapped around the word. Sirhan. Was he referring to the Mummy Lord, or the traitor? It can't be... Adira glanced up at Havers, who was now staring at her. His eyes showed some surpirse, but mostly anger. Adira's palms began to sweat and she slowly let out a breath. Sirhan is a common name, couldn't it be someone else? A villager they didn't know about? But Adira already knew. Only the Sirhan she knew could tell the Desert King everything he had learned about their plans. Adira leaped into action. Grabbing her sword she bolted towad the door. Havers started after her then stopped. “Wait. We must search this out first. What if the Mummy lied to us?” “What if he didn't?” Adira shot back, her hand wrapping around the key in her pocket. She turned toward the door and deftly unlocked it. “We have no time to lose.” Then she was out of the door, sprintinting down the tunnel. There was a pause, then uneven footsteps bounded behind her, Havers trying his best on his peg leg to keep up with her. The light at the end of the tunnel grew brighter and brighter, and she had to squint, even if it was only moonlight. One thought pounded through her head, burrowing deeper into her consciousness with every foot-fall. It was Sirhan all along. It was Sirhan. To be continued... Da build. I know this might a stretch to call this an abandoned mine, but I hope it suffices. And a parting shot of the drunkard... in front of an empty table. o_0 Expect the next episode in a few days. Oh, and sorry for the blurry second Picture and any spelling or grammatical errors I might have overlooked. Soli Deo Gloria & Sola Gracia!
-
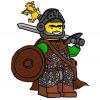
Here's my Category A entry for the Men's side. Glorfindel needed definite proof that the dwarves were planning to march into Avalonia, and he needed details about their plans. Already he had been brought messages confirming that the dwarves were readying for war, but he still needed specific information about when, where, and which of the dwarven clans would move out. To gain this information he turned to Jonathan, a trustworthy boy who served as a page under Glorfindel's command. Jonathan disguised himself as a dwarve and then infiltrated some of their meetings: Then he reported back to Glorfindel: C&C welcome
-
Here are a bunch of my models in one post than in six different topics. First, here is my Western Railroad Tunnel - Version 2 I have revamped my Modular Western tunnel by combining it with my father's older stand-alone tunnel design. This design makes the interior walls more realistic, while still preserving the rough rock-work outside. The modular bit comes in when you disconnect the tunnel into it's three components, 2 identical end-caps and 1 middle section. This is for ease of transport and making the tunnel shorter or longer depending on your needs. As an added bonus, the flat roof lets you put a small Native American village or a small US Cavalry outpost. If you are not into Wild West models, the tunnel easily recolors with the Dark Tan to dark bluish gray and the regular tan to light bluish gray via the LDD file below. (It's not that hard to recolor it in the program, so only the tan version of the tunnel is included.) Two of these are missing from this model: http://www.bricklink...asp?P=14309pb01 The inside looks like this. It connects the the other sections via the four Technic pins. tunnel LDD file: http://www.mocpages....1412007044m.lxf Next up is two refueling towers: My father built the Water Tower way back in the 1990's, back when 9V was king. Fast forward 15+ years, and I realize that it needed a companion coaling tower. I made my first attempt at a much larger size than this using pictures from LGauge.com, a website of older Lego train models. Please note, some parts are of the tower have been modified in the digital realm, (such as the water spout) so it's not "entirely" accurate. The corner walls also are printed with the part seen here: http://www.bricklink....asp?P=2345pb06 Here is the rear view. LDD file: http://www.mocpages....1411953429m.lxf The next two models are locomotive sheds: First the Classic Brick Railway Systems shed, This model was built by my father around 2005 / 2006 for an old-style MOC steam engine we built together based off set 7722. Anyway, the years roll by, and my engines get bigger and bigger. I realized in late 2013 that I needed to enlarge the shed to fit more than just that one engine type. I haven't done it real life yet, but here is what it will look like. I have added one track's length of shed and one more smoke vent on the roof. Here are the statistics for the shed when it's finished: Building type: single track locomotive shed Track length: 3 ½ tracks (60 studs) Maximum side clearance: 10 studs total Maximum height clearance: 12 bricks total The rear view of the shed. The trans light blue windows were some of the first things my father bought off BrickLink, and as such they are staying on there... even though trans-black might looks better. LDD file: http://www.mocpages....1411655710m.lxf The final model is this Modern Locomotive Shed This model (in red instead of black and white instead of tan) was originally designed back in the late 1990's by my Father for his 9V locomotives. After completion, It sat in the Basement alongside his other custom models including his tunnel, grain elevator, bridge, and water tower. Fast Forward a decade to 2006. I had played with his models all my childhood, using them for my own trains until he built me my own smaller single track version in black & red around 2006. I longed to figure out how to build my own, and in in 2005, I discovered Bricklink & LEGO Digital Designer. I didn't really use them together until 2010, when the first version of my dad's shed was built. It wasn't very good, but it led to this model back in 2012. (Link to that mess: http://www.mocpages.com/moc.php/335344 ) From there I made the roof removable, and then I added newer windows, and a less expensive color scheme. By mid 2013, it was compete, at least in digital format. I remains to be seen if I will build it in real life. By the way,the roof is removable. A base-plate will need to be cut If I build this, as it's four studs longer than two XL base-plates. LDD file: http://www.mocpages....1411407373m.lxf Western Caboose This caboose was originally from set 79111, Constitution Train Chase, a part of The Lone Ranger theme. At first it was a prison car, but I turned it into a caboose. I added a regular door and roof top cupola for the conductor while retaining the side doors and exploding back wall. I don't know if there is any real world prototype with a design like this caboose. (minus the exploding wall of course!) Here we see the rear of the caboose, with two red lanterns and the exploding back wall with dynamite attached. This is the first MOC in a long time that I built in real life before building it in LDD. The only changes from real to digital are that I have a 1x4 Technic brick on the back wall with three printed 1x1 letters spelling out BRS. LDD file: http://www.mocpages....1412105087m.lxf The LDD file groups the 79111 stock parts together, with remaining bricks being extra ones not found in the set. Official-Style Freight cars (Part 1) The first car is an automobile carrier like the one in set 2126. ( http://www.bricklink...em.asp?S=2126-1 )It carries two modern re-imagined versions of the Classic cars from that set. The second and third cars are Boxcars, slightly modified from set 3677. ( http://www.bricklink...em.asp?S=3677-1 ) Next up is the fourth car is a water tanker, while the fifth is a tree carrier, and the sixth car is a rock gondola. They are all inspired by set 2126. (The link to that set is above) The seventh car is a modified version of set 3225's general freight car. ( http://www.bricklink...em.asp?S=3225-1 ) Finally, the eighth car is a caboose inspired by set 10014. ( http://www.bricklink...m.asp?S=10014-1 ) All of these cars are modifed to bring them almost 100% in line with modern parts and colors, the only exception being the yellow tipper parts on the gondola. (Those parts were last used in 2000.) LDD file: http://www.mocpages....1411686540m.lxf Notes: Personally, I have the original cars from set 2126, and made the two boxcars from my parts bins. The brown cargo car and caboose are not needed, as I already have a general flatcar and the Western Caboose from post #6 above. Official-Style Freight cars (Part 2) These train cars are inspired by official sets & techniques used by LEGO. The first car is a depressed center flatcar, and it carries a re-imagined and updated set 5920 Island Racer from the Adventurers "Dino Island" Theme. ( http://www.bricklink...em.asp?S=5920-1 ) The second car is a gondola carrying three huge boulders. It was inspired by set 4434, Tipper Truck. ( http://www.bricklink...em.asp?S=4434-1 ) The third car is a gasoline / oil tanker in OCTAN colors. The tanker was inspired by set 7939, Cargo Train. ( http://www.bricklink...em.asp?S=7939-1 ) This model also needs two printed 1x4 tile pieces like this: http://www.bricklink...m.asp?P=2431px9 LDD file: http://www.mocpages....1413560515m.lxf By the way, here is the front of the green automobile: Lego City Passenger Station This station was designed first by LEGO as set 2150, Train Station. It was recreated by someone on Eurobricks, but had an added "street side", that was almost identical as the track side. I downloaded and added: a expanded platform, made a clock with sign for both sides, and made the sections removable. (Yes, the roof for both levels come off.) I modernized the look of the station by adding a pizza oven with opening door like in set 7641, (City Corner) and adding a safe on the second floor for the station master. Street side of the station. The studs on the wall beside of the clock on both sides of the station are supposed to spell LEGO CITY in printed 1x1 tiles. The first floor features the ticket counter, pizzeria with bar seating and the oven taken from City Corner, while the second floor features the Station master's office, with three chairs, a desk, open-able safe, rotary telephone and several cabinets with drawers. This floor and the roof above it are held on by just a few studs, making them 100% removable, while the platform is a attached via Technic pins. LDD file: http://www.mocpages....1412010310m.lxf Grain Elevator Built originally by my father in 1999, this elevator was never completed. As my Dad did not discover Bricklink until 2006, it lacked several crucial parts, and remains uncompleted to this day... just another thing on the to-do list! I have faithfully recreated the elevator and added some parts that did not exist in '99, such as the red windscreens used a funnel, and a conveyor belt with handle. I also did some major goofs, such as making the building one stud too thin, (it should be 16 studs wide at the base), but I hope I compensated enough by making the funnel tall enough to let the tallest official train car I could think of go through without problems. This view shows the conveyor and handle. LDD file for the grain elevator: http://www.mocpages....1398708090m.lxf Modern Truss Bridge Designed using 24 of these parts, ( http://www.bricklink...tem.asp?P=15706 ) this bridge fits even my tallest trains. It can fit up to 10-stud-wide locomotives, leaving 1 stud on each side for clearance. It also can fit 12 2/3 bricks tall train cars, but only barely: the clearance is less that a third of a brick in difference. The tallest train car I own is this one: a caboose based on the prison car from the Lone Ranger "Constitution Train Chase". (set 79111). This car fits the bridge by a hair less than a third of a brick. LDD file (bridge only): http://www.mocpages....1414539136m.lxf Signal Tower 22 Inspired by Whoward69's signal tower, (link: https://www.flickr.c...s-55973205@N08/ ) this enlarged version features two removable sections (the roof and second floor) and a staircase to the second floor. There are studs on the front of the building to spell out TOWER 22 (Or whatever two digit number you want to.) using printed 1x1 tiles. The tower also has two computers on the second floor for train signal / switch direction control, while the first floor is empty. (except for the staircase) LDD file: http://www.mocpages....1417547843m.lxf Wide Vision Caboose This model was originally Model number 30 from the 2007 set "Hobby Train". I redid the whole model from the ground up, replacing old windows and updating the style. The caboose features removable cupola and cupola roof, along with the two regular roof sections. The Inside features a bed, stove, table and two chairs, while the cupola features two more chairs. I'm going to use this piece ( http://www.bricklink...sp?P=87079pb006 ) for the sides of the caboose, and one of these ( http://www.bricklink....asp?P=3039px20 ) for the bed for the conductor. Here is the LDD file:http://www.mocpages....1418063886m.lxf All comments are welcome, and more MOCs / MODs are coming!
-
The main focus of this build was the large waterfall, which features a new waterfall technique (more info on that later in this post). The small tower doesn't have an interior as there wasn't space for one with the SNOT design, but the larger towers do and the whole build opens up to reveal tunnels, rooms, and a stairway created by the dwarves. Credit for the snow on the bushes design goes to Brother Steven. Credit for the slope corners of the lower tower goes to Daniel Church. The Fossgard Falls are some of the most famous waterfalls in Historica. The dwarves of Fossgard have many tunnels and fortresses built around these falls, but are willing to allow sightseers from any of the guilds to come enjoy the falls' splendour: Left tower interior: Right tower interior: The waterfall design is quite simple, it uses mainly 3 pieces: clear 1x2 bricks, clear 1x2 plates, and clear 1x1 round plates. Using those pieces you build a wall 2 studs thick in front of white bricks. You use the white bricks to define the shape of the fall, for mine I used 6 studs as the width for the center of the fall, then stepped back a stud and did 4 studs wide on either side of the 6 studs, then stepped back another stud and did 2 studs wide on the outside edges of the 4 stud sections. While building the wall of clear, you attach 1x2 plates so that they stick out one stud from the rest of the wall every so often, and you put 1x1 round plates or cheese slopes on top of the protruding edge of the 1x2 plate. Also as you build the wall every three or four brick layers, you step the whole fall back a stud by moving the white bricks back one stud then keeping the clear wall in front only two studs thick. These two pictures should help show what I mean. This one shows the use of 1x2 plates and 1x1 round plates or cheese slopes in the waterfall: This picture shows how the fall steps back: Hopefully that long-winded description makes sense There are more pictures here: link Any Comments/Criticism greatly appreciated