Search the Community
Showing results for tags 'Small'.
Found 55 results
-

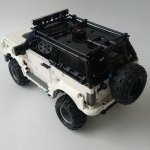
[MOC] Off-road truck Gaz 66[instructions available]
keymaker posted a topic in LEGO Technic, Mindstorms, Model Team and Scale Modeling
Hi, I would like to present my newest creation – off-road truck Gaz 66. It is my interpretation of small, old and very popular truck, which has a lot of off-road capability. Someone can ask why next similar small scale off road truck? I would say I like this type of vehicles, the scale and challenges they bring. And with every build I try to test something new, which I wasn't try before. Here the main goal was to go below standard for those wheels width of the model - 15 studs and prepare narrower axles than standard - 11 studs ones. Which I did. Gaz 66 has 13 studs width body with 9 studs (from rim to rim) front axle - stereed and driven. Thanks to that size of the body is more proportional to used wheels. And you can also use tractor tires provided with cargo for even better effect (you can see such modification in real Gaz 66 on one of polish off-road YT channel - LINK). I also tried to add as many details related to real truck as possible, in this scale, I hope there are here some fan of original Gaz 66 and they will recognise some elements I added. Below you can find video and list of features and details. Enjoy. Instructions: LINK General details scale: 1:20 dimensions LxWxH: 30x10,5x12,5cm weight: 946g Features: RC front axle steering (C+ L motor) RC 4x4 drive (C+ L motor) RC winch with place to lock the hook (C+ L motor) 4-link live axle suspension for all 4 wheels three studs ground clearance (with "KrAZ" tires) openable doors and easy access to spare tire working V8 engine with fan located in cabin, plus grill via which working engine can be watched detailed two seats cabin powered by Buwizz 3.0 but also prepared to be powered by standard C+ Hub can operate with "KrAZ" tires included in cargo Photos: LINK My Gaz 66 is powered by Buwizz 3.0, but there is no problem to use standard C+ Lego battery box: Internals of the MOC, so drivetrain connected with V8 engine, steering and the winch: -

[MOC] Full Lego Technic locomotive - in 1:22,5 scale
Paperinik77pk posted a topic in LEGO Train Tech
Hi all, these days I'm working a lot with Lego Technic, since I've bought some parts to experiment a bit this new world. I'm used to build old Lego Technic from the 80's and 90's...but these new sets are very very complex, and require a lot of time to figure out where and how to put a certain part. So , back to the Stud.io I started designing again...and came out with this thing: It's similar to old steam trams, to the GE 2/2 and HGE 2/2 locomotives, to some service railway cars...to the alternate 7720 model. Oh, well...it's a box and it's similar to all those boxy things! Dimensions are 13/14 stu...holes, units? for width and 25 for body lenght. Both buffers add an additional 6 studs to overall lenght. I'd say it is a small 1:22,5 locomotive, like my old yellow shunter with PuP. Since I'm still not so much able to recreate details such as doors and ladders...I simply avoided them. Pantograph is designed to use a rubber band for the moment - it could be nice to make it foldable with some gears! At least the body is self-consistent and can easily be removed. The battery is fixed on the central upper part of the body, right in the middle to increase weight on all 4 traction wheels. Rods are somewhat triangular and quite strange, but they're strong! Other kinds of rod arrangements can be done. Using a normal gear transmission could also avoid rods at all. The boxy body gives me the internal space to experiment for transmissions and motors. This chassis probably will change a zillion of times like the one of my XXL locomotives. In the picture above, you can see the possibility to have the double gauge solution (left axle is L-Gauge and right axle is configured for 45mm G-Gauge track). The gear you can see in the middle of left axle shows the possibility to implement a cog railway system using Lego flexible track. I sincerely do not know if the 45mm cog tracks could work with a Lego gear - so let's limit the cog solution to original Lego track It can become also a fancy Tram locomotive, like the "Gamba De Legn" ("Wooden Leg") used in Milan for many, many years. But for this one - I'm still struggling to create a proper, working engine. I've seen few full Technic locomotives, but it's really fun to build them! I hope you like it!!! Ciao, Davide -
If you're familiar with this one of a kind band I probably don't need to introduce this mini build to you... Added also the missiles that can be folded out for some serious 'moose action'. Intro to 19/2000 (minus logo, of course) A blatant crossover attempt - just for fun & giggles... Nothing huge or complex but still a fun little build for fans of the band. Free instructions available @ rebrickable.com Thanks & have fun!
-
[MOC] Ford Bronco 2020
LoMaC posted a topic in LEGO Technic, Mindstorms, Model Team and Scale Modeling
Designed model is based on the Ford Bronco revealed in 2020. During creation of this model, modular build concept is used to simplify the building process by splitting the overall process on three stages. Follow me on Instagram @anton.kablash Instruction you can download here: Ford Bronco InstructionDimensions: 16 x 38 x 19 studWeight: 738 gFunctions: HoG (detachable) Working steering wheel in the cab Front independent suspension Rear 3 link suspension Working engine Openable doors, hood, trunk Detailed exterior and interior Adjustable seats Modular building More photos in the Ford Bronco Album -
Small 4x4 off roader
piterx posted a topic in LEGO Technic, Mindstorms, Model Team and Scale Modeling
Hi guys! I'd start saying this thread is more to ask you some suggestions than to show you the model itself :P I think i already told you that the shop wich is sponsoring me http://www.mangiobricks.com asked me to build something that they can sell as a custom model right? At first, they wanted the fiat panda i made last year but i wasn't satisfied by it due to its untidyness... so i made something that i think it's better and wich performs better than every expectations i had As it's made to be sold (hopefully) i couldn't call it with the real counterpart name....but i think it should be quite clear where i took inspiration from :P it's really simple and it's made trying to use the less amount of pieces possible to keep everything clean and tidy performances are really good, even if the most of the weight is in the back of it, it crawls really good having some nice ground clearance and good speed as well! i don't know how many of you could be interested in buying something like this as many of you are great reverse engineers :P but let's say you have the chance to buy a custom model, how would you prefer it? i mean, do you think i should make it with motors or just ready to be motorized? what else could i change to make it more attractive? should i add more functions or just stay on "less is more" concept? ill wait for your suggestions guys! in the meanwhile have a look at some pictures of it! hope you'll like it :) -

Two very small steering mechanisms
blueShinyApple posted a topic in LEGO Technic, Mindstorms, Model Team and Scale Modeling
About two black ages ago I came up with a mechanism to add steering to very small models, and I worked on two models based on it. I have never been able to finish them to my satisfaction, and I'm realizing the current black age I'm in will probably last until retirement, or at least until I get a bigger living space, so I'm posting what I have now. I should probably have posted about the mechanisms years ago, but I wanted to have some neat models to show off with it too so I never did. Last time I searched around the web for anyone else who had shown the mechanism off I didn't find anything, so I don't think it's a well known thing. Here's an album with pictures it this post: https://imgur.com/a/ixZOK0s Overview of the two mechanisms. Vertical and horizontal variants of the small mechanism on the left and bigger one on the right: Small mechanism with vertical axle: Same mechanism with horizontal axle: Here's the bigger mechanism with vertical axle: Here's a WIP wheeled excavator based on the smaller mechanism. The bottom right picture is another control scheme I was exploring. I'm mostly satisfied with the model, it's only the arm and bucket I don't like. Here's a bigger WIP model. This one uses very tightly packed pneumatics. It's missing the cab and arm, but I'm otherwise pretty happy with what I've got. I was never satisfied with the arms I managed to build. They were either too bulky or too fragile. This model feels very nice to roll around on the desk, it has some a weight and grounding that the smaller one lacks, and the turning is pretty satisfying too, even though it can't exactly turn on a dime. Lastly, here's a half scale model of the 8049. Lacking fenders, seat, lights and the trailer. I would like to get the two excavators finished one day so I can have them hanging out under my monitor, but my hobbies have shifted to electronics and plants, and I'm lacking in desk space anyway. Maybe one day though :-) Hopefully these mechanisms can help you in your builds! As a bonus, here's my collection of all technic excavators, except for the Liebherr, which I'm hoping to find used for cheap. Note the blue excavator from the 8888 idea book! If imgur decides to stop hosting the pictures, contact me on BL where I have the same username and I'll get them hosted somewhere else. -
Hi there, I'd like to present a MOC I've been working on from time to time since a few months: It's a small RC buggy, something I'm missing from Lego: Pictures show the V2 model. An interactive 360° view of the V1 model (with different rear axle) is available here: http://pub.clusterd.net/lego/technic/mocs/buggy/ Steering: PF Servo motor Propulsion: PF L motor (geared up 28z => 20z => 12z which is good enough to drive on office carpet and short distances on thicker carpets with fresh batteries, it works great on smooth surfaces; 36z => 12z => 12z also works, but requires more power and works best on a smooth surface; RWD) I initially used it with a AAA battery box and V2 IR receiver (not shown in the V2 pictures above, where it will be fixed to the rear spoiler, the V1 model had it at a slightly different location), but the AA battery box also fits - though it looks not as good due to different mount points, and it will also be heavier then. I assume it will also work with the LiPo box and SBrick and I can - since a few weeks - confirm that it also works with a BuWizz, but then it's more something for outdoor areas, as it gets pretty quick in fast and ludicrous modes. I created the main chassis of the V1 model of this buggy during a long evening/night and added most of the body parts the following day or days, don't remember exactly. The stickers are from the 8048 set and IMO fit the buggy theme great. Steering is also from 8048. It's fun to drive around and it can also take some hits. I took inspiration (mainly for the rear shock mounting and general setup) and motivation (I wanted to have something about as small as this) mainly from this video on YT: ...and some other videos about small RC buggies. The creator's buggy itself is also roughly based on the MOC (video and instructions for V1 model) of someone else. Instead of (re)building this one, I created my own - also because I didn't have a Buggy motor at that time. I also created a V3 model. It's slightly bigger, has front lights (using PF LEDs) and uses bigger wheels but shows some deficiencies of the design: The rear axle tends to tear itself apart in this model on rough surfaces, making the gears slip. I assume this is due to the bigger wheels used in the V3 model. I use some additional axles with stop and bushes now to hold the rear axle together for a longer time. I assume this maybe could be fixed by using a frame around the two axle holes that shouldn't move apart. When doing tight turns the V3 also lifts one of the front wheels - the one on the same side as the gear that sits on the drive axle. If someone has a good explanation for this, I'd be grateful. I suspect the softer shocks compared to V2.
-

[MOC] RC Small Red Roadster
syclone posted a topic in LEGO Technic, Mindstorms, Model Team and Scale Modeling
Welp, back onto 1/15 scale Made this little thingy in about 12 hours after Madoca's small supercar popped up in my YT recommended. BRICKSHELF (whenever uploaded) As with my Mini Nitro Menace, this year's Corvette wheelbase was taken as a base - should be compatible with the transporter truck - and so the build began. Of course, drive&steering has been done a million times already so this needed a cherry on top - the roof was what I was looking for. Making a chassis was dead easy with the slim wheels and by motorising each rear wheel independently, the need for a differential was eliminated. Thanks to the placement of the BuWizz in between the rear wheels, steering and roof motors could now populate the central tunnel and be hidden under the black 3x11 curved panels giving the interior a "cleaner" look. Now, bodywork ain't my strongest point, but I wanted it to be ferrari RED. This meant working with a very small inventory (for me) most of which you can see on the car Of course ricer butterfly doors were made to make it look cooler than it is. Have a nice weekend, Cya) -
Good day! Sometimes I make MOCs that don't deserve a topic, or simply have WIP concepts that I don't publish . This will serve as a place where I post my WIP creations that may end being a MOC , and small sized MOCs which are too simple to post a video or create a topic.
-
My second MOC :) Nano transformer from human type to crab robot
-
Transformable combat robot - tiny one. This is my first MOC :)
-
Hi all, this time I'd like to show you something that is a bit different. It is more a study, or an experiment than a real model. It's is a very small narrow gauge locomotive, inspired by an hand-made creation of Mr. Akio Inoue (who is a famous live steam builder in Japan). The locomotive is depicted on Mr. Mori Iroshi site, which is of great inspiration to me. There's also a Youtube channel (simply search AKUBI LR on Google, you''l find it immediately). Let's say it is a mix between a DEKI-3 and a Rhatische-Bahn GE 2/2 162. Once it was yellow, now it has RhB colors. It's a bit "Japanese" since it has a super-deformed body, it is more tall than long. "Power" (HA HA HA ) is coming from a 9v micromotor mounted upside-down, and there's a working headlight. It needs a battery car to work. I use it on black narrow-gauge Lego curved track, but I recently discovered that LEMAX track has the same gauge and offers straight tracks (no switches, sorry ). It is sloooooooooooooooooooow! I hope you like this little,nerdish thing! It's name is PKZIP (like the file compression archiver for DOS PCs of the past)
-
DEAR LEGO STAR WARS FANS!!!! If you have found your way to this account, you are either interested in the world of LEGO Micro-building... or you just clicked on a wrong link somewhere and are now very surprised to be surrounded by these tiny marvels of creations... or not. If the former is true then, welcome. In 2011 I received my first STAR WARS Advent Calendar for Christmas, and was blown away by the sheer ingenuity and accuracy capturing the looks of iconic ships in truly micro form. Naturally, I had to have a go myself! I built a few... I was pleased... I built some more... and here we are nearly 6 years later, and I am still building them. I began by reading my first LEGO STAR WARS Visual Dictionary (DK) and building a micro of EVERY SINGLE SET IN THE BOOK! With that now exhausted, I moved onto the 2014 edition with more sets... I built all of those too. So now I just build a micro of every new star wars set that has, is, or will come out since 2014, amongst other iconic and less well-known ships from STAR WARS 'non-canon' such as the Old Republic, Freemaker Adventures, Yoda chronicles to name but a few. With a back catalogue of over 270 mini micros and counting, this truly is the World's largest Encyclopaedia of STAR WARS micro kits. Enjoy! -- JamesArts It would mean a lot to me as a budding MOC builder if you checked out my flickr: https://www.flickr.com/photos/151467275@N04/albums and my YouTube Channel (JamesArts Bricks UK): https://www.youtube.com/channel/UCmYOMZz6DyvM1euY2qrRfpA/featured?disable_polymer=1
-

Fire Department turntable ladder - micro scale
Timewhatistime posted a topic in LEGO Technic, Mindstorms, Model Team and Scale Modeling
While working on another fire department truck, which I will present you soon, the idea for a neat small vehicle came to my mind. So I interrupted the other building process for ten minutes and created this fire department turntable ladder. http://www.brickshelf.com/cgi-bin/gallery.cgi?f=572608 I consists of 24 parts (26 parts with nozzle and "water" as shown on Picture above). Maybe we can renounce the mandatory video this time... The picture with the bottom view will reveal all the intricate mechanisms ;-) -
Small vintage car building instructions Parts list
-

1/43 Small Scale Cars
Ron Dayes posted a topic in LEGO Technic, Mindstorms, Model Team and Scale Modeling
Hey there, just noticed the scaleres finally got their own forum which is great news When it came to my small scale of 1/43 its always been kind of on the edge of being somewhat "good with minifigs" yet not really made for them, so i mainly posted into town forum despite them not being the standard town cars apporach. The figs mainly serve as a size relevance here. 6 studs is 2m. A minifig is 1,7 m high. Now onto some pictures of my recent ones, i hope you enjoy :) Ferrari on model stand by Ron Dayes, auf Flickr Ford Speed Champions by Ron Dayes, auf Flickr Familia Lamborghini by Ron Dayes, auf Flickr ambulance US by Ron Dayes, auf Flickr Vintage Racing Porsche by Ron Dayes, auf Flickr Sports SUV by Ron Dayes, auf Flickr T3 German Ambulance by Ron Dayes, auf Flickr A Smart choice 1 by Ron Dayes, auf Flickr VW T1 redesigns by Ron Dayes, auf Flickr -

[Epic Fail] Small Ring Crane
Saberwing40k posted a topic in LEGO Technic, Mindstorms, Model Team and Scale Modeling
Good grief, this thing has been sitting on my desk for over a year now, and I just now got around to taking pictures of it. tsk tsk. Anyway, this is a failed attempt at making a ring crane using a hailfire droid wheel as a base. It is loosely based upon a Sarens SGC-120, and uses a 3 way reversable distribution gearbox, much like 42042. Each selector controls one function, forward and reverse. The crane features 3 winches, controlling the boom luffing, the luffing jib, and the hook. The winches are run by one M motor. The counterweight is 5 PF AA battery boxes, plus some old train weights, and some ball bearings. Now, I mentioned that this is a failed attempt, and there are a good number of reasons for that. Firstly, the gearbox connecting the M motor to the distribution box was very weak and overly complex. Then, this model had several critical structural flaws. The main boom wasn't nearly stiff enough, and would warp with the slighted provocation. The individual sections were strong enough, but the connections to get them in a triangular shape were not. Then, the main frame of the crane was very weak, and bent a lot under the weight of the main boom. Same thing goes for the rollers on the base ring. They were not structurally sound at all, and due to that, motorized slewing was not possible. Lastly, the hook was not heavy enough to put tension on the hook line, and so the lines of rope going to the hook would jump at the slightest provocation. Still, even if this did fail, it looked impressive, and I learned from it. IMG_20170813_202442189 by Saberwing007, on Flickr The crane, in all of its glory. Ring Crane 002 by Saberwing007, on Flickr The gearbox. Each selector controls a winch. Ring Crane 003 by Saberwing007, on Flickr The M motor. This was one of the weak points of the model. Not the motor, but the gearbox it is attached to. Ring Crane 004 by Saberwing007, on Flickr The rollers. Not stable enough. Ring Crane 005 by Saberwing007, on Flickr The counterweights. There were two more battery boxes, but they got used for something else. IMG_20170813_202804340 by Saberwing007, on Flickr The crane base, without the booms or counterweight. Ring Crane 007 by Saberwing007, on Flickr The winches. Ring Crane 008 by Saberwing007, on Flickr The frame bending. IMG_20170813_210407144 by Saberwing007, on Flickr The gearbox extracted. Ring Crane 010 by Saberwing007, on Flickr The underside of the gearbox. It's dead simple, aside from the connection to the M motor, which was more complex than it needed to be, and would fail with minimal provocation. Well, that's it. There will be no video, as this got demolished for my TC12 entry. Enjoy, as much as you can enjoy a train wreck like this. -
Just a little thing. Mashed the Sebulba's Podracer planet series set with some other parts lying around to create a custom swoop for him, so he's not lying around going unused. :P
-
[MOC] "Ximos" mini race car
syclone posted a topic in LEGO Technic, Mindstorms, Model Team and Scale Modeling
Good day. This used to be one of my prototypes for the e formula competition. But after making the chassis I decided to put a BuWizz in . Backstory: "This is one of the best known racing cars on Xalax , developed by Axos Industries. Stabilized Zirum Crystals' energy is used to power it , obtaining constant and (almost) infinitely lasting power. It has a turbo system to increase the output speed." Real statistics: -2x m-motors for drive , with a 3:1 gear ratio -1x m-motor for return to center steering -BuWizz Using (underestimated now) m-motors , it picks up quite high speeds and is a lot of fun to drive around ,even in normal BuWizz mode. Here is a LDD model -> download A quick preview of what to expect whe the full video is finished: https://www.youtube.com/watch?v=GaVM6J2oFvI -
Emile Perreault told William to wait outside. The Corrie-turned-Oleonder agreed, putting on a mean mug to discourage anyone from disturbing his captain. "It doesn't even have a table," Elise protested. "The bed looks big enough for one." "Elise, it's only temporary, you know that," Emile returned. "Before you know it, we'll have the large house I promised you we'll get. You need to trust me." Elise pursed her lips. "Where are you to sleep?" This was going to be the hard part, Emile knew. "I'm not going to be here oft-" "Emile..." "I know, I know." Emile took a breath before continuing. "Being a privateer is the best way for me to make money right now. And I can't take you on The Athena. It's too dangerous right now. Once I get a bigger, stronger vessel you can come along. But not before. On the brightside, you have a better oven than back home. You'll always stay warm in a house as small as this. It's temporary. I promise." After a moment, Elise nodded in acceptance.
-
In the Settlement of Astrapi, a new statue has been erected for those too busy to get to the Temple of Zeus that day. If passing this statue, the faithful can pray or stop to have a chat. If it's a lovely day, why not? Some old peddlers even may stop by telling you a secret, if you the coin of course. They say that Zeus faces the direction of the secret relic, but nobody has been able to locate it, at this point at least. Those peddlers seem strangly like Eslandolers...
-
done with these projects, maybe putting them on vignettes, if I have the time. CS Small Car Classic Space Motorcycle
-
Hey Guys, I have been working on a very small set-up that would both allow a number of modulars and some city prices as well as my TRAINS! While I have all the trains powered at this point many will not see any action but I am very happy with how it has turned out and already planning my next modular buy! Lego Train/Town Set Up by Ernie Darby, on Flickr Lego Train/Town Set Up (Left) by Ernie Darby, on Flickr Lego Train/Town Set Up (Right) by Ernie Darby, on Flickr
-

Mini Rally Racer
z3_2drive posted a topic in LEGO Technic, Mindstorms, Model Team and Scale Modeling
Hello Everyone! I'm back with a nice little MOC that i built a couple days ago. I actually first built it last year but never had the time for pictures, so I rebuilt it from my memory. It has rear wheel drive via one buggy motor and 20t/diff gear combo. It has all wheel independent suspension-since I wanted the front and rear width to be the same, the rear isnt double wishbone. It's extremely light and has servo steering. All powered by one of my 10 volt batteries. I had to use some interesting bracing techniques in order to connect and strengthen the whole car with as little pieces as possible, but I couldnt find a simple enough way to brace the front suspension to the chassis so in a hard crash the front axle may come off. Pics: ^it gets quite dirty after prolonged outdoor use the front bull bar (same one from the 8048 buggy set) bends inward during a front end hit, so it definitely helps protect the car if it loses signal from IR receiver: In order for weight saving I used flex axles, which give a nice tight grip around the battery: Money shot suspension showcase ^when resting the rear suspension has neutral camber, when it is raised it has slight positive camber, but when leaning into a turn and it compresses, it has negative camber, which can actually help handling a bit: overall it has good ground clearance for its size, which allows for good performance on bumpy asphalt and light offroading, but for offoading it relies on wheel speed rather than low speed torque driving outdoors and through fresh rainwater puddles eventually collects dirt and water, which can get into places where you don't want it... ^but luckily dirt will fall of after a good shake once it has dried and water, as long as it is fresh rain/streamwater won't ruin motors/connectors, only pool/saltwater/grimy water will mess up motors, but I made sure the battery stayed dry And here's some burnout/drift shots: my new desktop background: ENJOY! -

[MOC] Small excavator truck
TomasHubik posted a topic in LEGO Technic, Mindstorms, Model Team and Scale Modeling
Hi Guys! I would like to present you my latest build. Not usual small excavator truck. The target was to create small excavator truck with as many functions as possible. I wanted to build truck with 8 functions, to use all IR ports, but in this small scale, I only manage to put 5 and I put 3 functions to Dump truck in same scale. It was quite hard to put all functionality to such a small body, but the result is worth it. It has 5 PF controlled functions: 4x2 driving, steering with great steering radius, rotating platform, controlling beam and controlling bucket. Is very well playable and It can dig a sand/brick and it is enough powerful to take itself out of the ground. It's robust enough to survive young child play. More info about Dump truck can be found on my blog lego.tomashubik.com Some photos: More photos and indo are here: Excavator truck Dump truck VIDEO COMMING SOON...