Search the Community
Showing results for tags 'Modification'.
Found 37 results
-
Hello, long time lurker but never contributed anything. I been considering ideas to let my 12v trains also use the 9v/RC tracks and one of the problems was to make the 12v curved rails fit I guess other people have tried this to, but I realize by removing in total 4 stud I would get a snug fit and also a more convenient way to build track layouts. I also modified some straight tracks to be able to connect them with 12v rails switch points etc... I made as short video showing the process using cheap RC tracks and the next step would be using copper tape (and I need a extra set of 9v contact points) for the 9v system, not sure if I want to tape the 12v switch track but I guess I can test it out on a "broken" track. I thought that traction could be a problem but it seems to handle it well (test drive at the end of the video), there is some spinning when starting the train with "high" voltage but at soon as it moves it's coping quite well.
-
I made several changes to the school and the school bus. Added some walls to the right side of the school building and a roof. For the school bus, I removed the wheelchair lift as it made the bus look weird. Don't get me wrong, I have great respect and support for the handicapped. I just feel that it wasn't executed properly there. There was barely any room for the students. I decided to add an extra seat there instead. I also changed the wheel arches and recolored the sign to yellow and bumpers to black to closely resembled an American styles school bus. I customized it with my favorite school bus model, the Chevrolet B-Series with a Blue Bird bus body, in mind. Those things had power to spare. My sigfig drives the bus in this set.
-

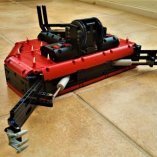
[MOD] 'Rusty Bucket' buggy
SilenWin posted a topic in LEGO Technic, Mindstorms, Model Team and Scale Modeling
Greetings, ladies and gentlemen! I'm glad to introduce you a modification of @Didumos69 Greyhound buggy Yeah, "Mad Max" inspired vehicle again First idea was just "increase durability and add some crawler abilities", but result exceed all my expectations. Adding planetary gear reduction 4:1 to all wheels increase offroad capabilities to sky high (keeping in mind perfectly working suspension of original) And final step - I decide to prepare for summer offroad Lego event in Moscow and for future festival, so I reworked exterior in postapocalyptic style. Other photos Here is LDD model of front hub with planetary gear reduction I used in my modification. Rear hub is done similarly, except for black connectors to suspension arms and without U-joint. Bonus: video from "King of the Hammers" race event in Moscow and photo from "Summer Brick" Lego festival in Taganrog, Russia Thanks to @Didumos69 for his amazing buggy and instructions, and also to @Shurik & @VerSen for cool photos! Hope you like this rusty piece of metal! -
Hi all! my new project is ready: Luke Skywalker's X-Wing Fighterreferring to the final episode of Season 2 of The Mandalorian. I wanted the X-Wing in my collection, but the 75301 is average for me, and the 75218 is already very expensive.This is my MOC/MOD based on a set of 75218 and a bit of a 75301. I think the design from Lego (75218) is very good, so I just wanted to improve a few things and build it from easy available elements. The full presentation is now available on my youtube channel - EDGE OF BRICKS PDF Instructions is available: https://rebrickable.com/mocs/MOC-76703/EDGE OF BRICKS/xwing-fighter/#details
-
Hello together, after the ulysses space probe was released, i wanted to build my own version. Forr me personallyl, the ulysseus spacecraft lacked details, a lot of things were simply left out. The MOC was only made using Bricklink Stud.io, free instructions can be found here: https://rebrickable.com/mocs/MOC-74025/JBs Brick Creations/ulysses-space-probe-more-detailed/#details So here is my version of the famous space probe, I hope you enjoy it. Greetings Jakob
-
...maybe no one has modified yet, so I'll be first ;) Hi I've prepared for you a modifications of the new Lego set - 75288 AT-AT I think that many of you have or plan to buy this set, so I decided to make modifications, improving as much as possible, but not changing the construction and features of the set. After modifications AT-AT have 1499 parts! Compare all with 75288 set. What I changed: - I improved the armor, added tile and details, - I corrected the head, changed the top cover and details, added a red visor, - I added more tile on the legs, - the feet have been increased by one plate layer, - top covers have been improved, - the inside of the head slightly changed, I slightly changed the way the head is fixed, - main interior slightly changed, I added a few tiles, - I covered the blue pins on my legs, - I changed some colors (brown, black) to light bluish gray. File to download from my YouTube channel - link in the description, Stud.io file, so knowledge of this program is recommended. I would be very grateful if you leave a comment, a thumbs up, and a subscription!:) It's very important for me, and you can say "thanks" for free downloading the file! You can download file from this movie, link in the description. I would be very grateful if you leave a comment, a thumbs up, and a subscription!:) In this way you can say "thanks" for free file!
-
Hallo Eurobricks! Because of my dark ages I missed the great Milano 76021 set. So I bought the second Milano 76081 and rebuild it like the first Milano. I also did some modifications like the color theme, used the new canopy and the small wings are in brick build because of the missing panels. I hope you like it and comments are welcome. MAG85 Milano_1 by MAG85, on Flickr Milano_2 by MAG85, on Flickr Milano_5 by MAG85, on Flickr Milano_3 by MAG85, on Flickr Milano_4 by MAG85, on Flickr
-

42069 - Extreme Adventure - MODs and Improvements
Imanol BB posted a topic in LEGO Technic, Mindstorms, Model Team and Scale Modeling
Hello everyone, as i didn't see any Mods topic for this set, i decided to start it myself, and to start, i would like to share with you the LDD file for the official set (not sure if there was one already), there are some parts missing and some pieces are not fully connected (could i have used developer mode to solve this? yes, but for some reason i decided just to place apart the pieces i couldn't fit in), here is the model: Missing parts: -x4 24118 Panels in Dark Purple (Brick-built and grouped in the model) -x11 6167281 (I didn't add any substitute) -x1 6187734 (The rope) LDD file:http://bricksafe.com/files/imanol/42069/42069.lxf And next is my modifications for this set so far, the first thing that i wanted to do was to put wheels and tires, and because this is an snow-themed set, i decided to put tumbler tires, and i knew that these tires didn't look good in those very wide axles, with these tires the vehicle would look silly, but after narrowing the axle a little bit, i think it is looking like an authentic snow expedition vehicle (it even looks like an JLTV from the sides), i also changed some colors, but is just a test (the model is still WIP): The goal is XL-Motor for drive, Servo Motor for steering and M or L-Motor for the winch (and possibly some lights): I hope you like it, i will try to make more improvements, and i am looking forward to see more modifications by any other member, have happy modding. -
Imanol BB´s MOCs and MODs (And possibly good ideas)
Imanol BB posted a topic in LEGO Technic, Mindstorms, Model Team and Scale Modeling
Hello people, as i have seen some topics made by some members were they share their creations, modifications and ideas, i thought it was a good idea to start my own topic about that, this way i can avoid filling other topics with too many information by saving all that information here and just posting small texts in those other topics. To start, i would like to share some creations which i worked on: Model Team Nissan Frontier. This is one of my oldest models, i made it even before i knew about Eurobricks, and i would like to share it with you because you might like it or modified it: This model features front independent suspension, rear leaf spring suspension using 5.5 axles, HOG steering, working doors, bonnet and tailgate, 5 seats and a towing hitch; its very possible that some parts are with wrong colors or there could be outdated building techniques, but i think that is not too bad for one of my first LDD models (i am no sure, but if i have enough time and inspiration i could make it in real Technic parts), The LXF: http://bricksafe.com/files/imanol/nissan-frontier/Nissan Frontier.lxf. Model Team Paramount Group Marauder MRAP. Again, one of my oldest models, it is made at a pretty small scale but it could still be considered as "model team" (i think), it has pendular suspension in both axles which are damped by cross-axles which act as leaf springs, it has HOG steering, working winch and doors, a spare tire and 2 turrets that can be mounted on the roof: The LXF: http://bricksafe.com/files/imanol/paramount-marauder/Paramount Group Marauder.lxf Technic Unimog U500 Long Chassis (I have called it UNI-MOC) You might have seen it in the latest posts at 8110´s Mods topic ( http://www.eurobricks.com/forum/index.php?/topic/57543-8110-unimog-mods-and-improvements/&page=78 ), it is a 64 studs long and 24 studs wide model which i started to make because the modifications in the 8110 got to a too high level and i wasn´t satisfied with the whole model, i created this new model to hold all of my wanted functions and details, this model has some designs from other builders: Madoca´s Tatra 2-speeds gearbox (slightly modified to fit in this new chassis), Efferman´s planetary rims, a modified version of Didumos knob gear driven axle and a 3-side dumping system and dropping sides inspired by Kumbbl´s modifications, it was also made by some help and inspiration by Pat-Ard: This Unimog has 4 M-Motors, 2 L-Motors, 2 XL-Motors, 3 IR RC Receivers, 2 AAA Battery Boxes and 3 PF Switches (brick-built with ugly colors), why so many motors? well, as you might know, the 8110 had only one M-Motor inside it, which was meant to drive the 3 main functions of the set (front PTO, rear PTO and the pneumatic pump) the problem was that the functions couldn't be used simultaneously, you couldn't power front and rear PTO´s at the same time or with the pneumatic pump and because this system uses a gearbox and axles to engage and transmit the power to the different parts, this results in a lot of friction and power losing (other of the reasons of why i started this MOC), other thing that bother me about the 8110 was the proportions of it, it was very tall with lifted wide axles, but very thin cab and bed which made it look silly, the chassis had no space for all the functions that i wanted, i couldn't place enough motors or functions on it, and the axles were another problem, the steering pivot and angle was a disappointing, the tires couldn't steer too much with the half pins, and if you removed them, the mudguards and the surrounding elements needed to be placed far away from the tires to avoid them from colliding, these are few of the reasons of why i started to make my own version of this UGN class of Unimog (which are U300, U400 and U500). Some of the good features of this model are: Improved steering pivot (2 studs closer to the wheels compared to standard portal hubs) Wheels and portal hubs can handle more torque without jamming parts The axles are more compact (less tall), so the chassis can move even lower for a more realistic performance Front steering by L-Motor Rear steering (By M-Motor) with the same axle design as the front one Anti-roll bars in both axles, which help a lot to handle with weight and give a lot of stability, and they can be easily removed for serious offroading Remotely shifted 2-speeds gearbox by M-Motor Directly driven pneumatic pump (L-Motor) and PTO´s (M-Motors) for less power losing 3-side tipping 37 studs long 23 studs wide dump bed with dropping sides using a V2 large pneumatic cylinder Drive by 2 XL-Motors So, these are some of my models, i hope you like them, and i hope to upload more of them, i will try to do my best with all them, let me know what you think about this topic and the models, and any suggestion is well received Thanks. -
Hello everyone, Today I want show you new set from April 2019 wave - 75236 Duel on Starkiller Base. Release date - April 2019 Number of parts - 191 Price - £19.99, $19.99 or 19.99€ Minifigures - Kylo Ren, Rey I present to you a new set that I bought a few days ago, in my local store - Carrefour, to my surprise, the new sets were already available! I think it's a small interesting set, I rate it around 8/10. It has several disadvantages that I fixed with my modification. All review with speedbuilding and modification here: [ENG Subtitles]
-
OK, so I have never made any secret that I think Emerald Night is crap. Odd proportions, terrible tender, complete lack of understanding of what several parts actually represent, looking *nothing* like the source material,.... I also know (from bitter experience) how difficult (and expensive) making a decent replacement is. After having built some really nice Pullmans, and building a disappointing pacific (which was miles better than EN), taking it apart, starting again, running out of inspiration, then getting made jobless so I couldn't afford to buy bits had I come up with an improved design, I decided to finally do something about my Emerald Night that had been sat in a corner with no wheels for at least 2 years. Things that I wanted to change: Give the front a footplate. Use the cylinder fix. Do something about that god awful (lack of) dome. Raise the cab so it doesn't look too daft with my coaches. Build a completely new tender (seriously, f**k that tender, that city cattle wagon was less lazy). Add lights and S Brick (which I had done a long while ago). So here are the results: Loco The new footplate, added tiles to the front bogie, replaced the green 1x6 plate with a black one, and the improved cylinder innards. New dome with S Brick underneath. Slightly raised cab. Tender The tender was a complete rebuild, but used basically the same chassis. It was however, a little lazy, and relied heavily on what I happened to already have. New Tender Completed Engine with Train. I intend to replace it with an actually good loco one day, but until inspiration and funds allow, this is a vast improvement.
-

Wizarding World - Modification for the Thestral (Horse from Grindelwald´s Escape)
badchriss posted a topic in LEGO Licensed
Admit it,we all were filled with joy when the news droped that 2018 will see new "Wizarding World/Harry Potter" sets. One set that caught my attention was that amazing black coach from the second "Fantastic Beasts..." movie with the introduction of a new mold for the Thestral,those creepy and cool horses with bat wings. Lego did a nice job,but i thought the Thestral could need a bit more articulation for the wings.Usually,they only move up and down,which looks okay and fits when dragging a victorian era coach through the air... IMG_20180906_230841 IMG_20180906_230826 But what if you want to have the Thestral in a MOC or just want to depict a wild Thestral?They don´t always run around with heir wings spread out left and right... How about folding them to the back IMG_20180906_231207 Or unfold them at an angle? IMG_20180906_230900 With the use of 5 additional bricks,you can do this as well... IMG_20180906_231011 IMG_20180906_231016 IMG_20180906_231049 I hope you like this neat little modification. -
This is a build I have been wanting to do for a while, and thought I'd share with you guys on the forum. In this build I'll be combining one of my favourite sets with one of my least favourite sets. The 7900 heavy loader set is one of my favourite sets of all time. I love the cab-over design and the three axle chassis, and although its big, I think it looks perfectly proportional for what it is, and hasn't dated as much as other sets I own from the same release year. The truck looks awesome and beefy on its own, but the bridge that came with the set is too large to be sitting on the back of it all the time, and without a trailer or implement to tow it isn't of much use. There are no other semi-trailers that are compatible with the truck, and any custom trailer or implement that I've made has doubled up on what I own already. In this build I will be combining the 7900 heavy loader with the 60060 auto transporter, one of my most hated sets. I'll be making a new dual-axle chassis for the semi-truck and putting the car transportation bed on the back. I've already tried a test fit of the parts and it looks great. The 60060 auto transporter is very minimalist, and looks silly when it isn't trucking anything around my town. The proportions are just wrong, and with such a small puny cabin, anything that I pose on the back that's wider than 4 studs looks silly. The 7900 cabin would be a nice touch, and allow me to pose some bigger vehicles on the back without it looking dumb. I'll post changes here, but all photos will be uploaded to an album on google drive: https://drive.google.com/drive/folders/1XzrzH4sKs5NiD6B9WTDTMNCHkkoMG5xk?usp=sharing
-
 Hello everybody! A long time ago I got my 41999 and decided to turn the hull back to the car that it was initially - a classic American muscle car. Initially it was just the same car with a lower chassis, but I preferred to make it more authentic and more detailed MOD (and a bit MOC ) saving as much as possible original solutions and parts. There were a lot of speculations of the exact model (41999-question), but I like Dodge Charger R/T 2nd generation ('68-70), so it's the final target and magic has been started... First of all, I started with modifications of 41999 Crawler. It's a great model and I was just happy to see how Egor turned the car shapes into the curved panels, but Boss Crawler was too high, so lowered the chassis by 4 studs (removing the bottom section with Servo and two 5x7 frames), added a front axle with an independent suspension and a rear live axle. Both of them uses a shorter shock absorbers, meanwhile the front axles has a torsion suspension in the real live. I've made a draft of it and will add to the model some later... So, the result is following: v1. The chassis. Muscle Car 41999 MOC v1 Chassis.lxf v1. A road version. Muscle Car 41999 MOC v1 Road.lxf I's a default hull with some minor visual modifications, mounted on a lower chassis. However it's still too high, in my opinion. v1. An off-road version. Muscle Car 41999 MOC v1 Offroad.lxf I liked @efferman's Station Wagon and @NOS_Dylan's modification, that better meets a lower chassis. v2. A major modification. And finally the better version that I've made so far: even more lower than version 1, wider by 2L and now has a Big Block - fake V8 engine. To be continued...
 -
Hello everybody and let me present my version of a modified 42005 Monster Truck. It was my second set after my "dark age", that I've bought many years ago, after 42029 as supplementary set with a lot of useful pieces and planned to use for a live axle suspension and some other features for 42029 model. However, I liked the set as a simple and functional model and re-assembled it several times. Here is the model and later I'll provide the all details: A month ago, when I tired of infinite attempts to turn 41999 into a Muscle Car (the chassis isn't rigid enough, but I already did a great progress and hopefully will share it once) I returned to this model and set the task to motorize it adding 4WD, but keeping 4 wheels steering and current suspension (keep the original construction as possible as I can). First, I've analyzed the all existing attempts that I could find over EB, Rebrickable and YouTube and it happens that there were several MODs by different authors: First of all, it's @Splat’s MOD with all steered and driven axles (see topic here). I see no reason to duplicate its description, so let me just note that he saved the necessary features with adding Servo + L-Motor mounted under the hood and trunk. The chassis configuration is 4x4/4 or 4WD-4WS. It’s the best motorized model, I think, because of amazing simplicity and performance, but unfortunately it has a kind of “articulated” steering that isn't real, so was trying to made a "real" 4WD-4WS version, using this model as reference. Another one is Jan Dvorak’s (is he on EB?) MOD with all original features supplemented by on-axle L-Motor that drives the rear wheels and Servo for the 4WS. He added an additional 5X7 frame with differential that provided a necessary rigidness. The chassis configuration is 4x2/4 or RWD-4WS. Personally I don't like such a long axle sub-frame. However I've found a good idea of vertical gears inside the central shaft. The third one is @codefox421's MOD, inspired by Splat’s version, with the original front axle and non-steered custom rear axle with on-axle L-Motor. His custom rear axle, based on two portal hubs, is a quite compact and simple, but has no steering. The chassis configuration is 4x2/2 or RWD-FWS. It looks trial-ready with the portal hubs, but it's nearly impossible to add the steering here, so I got nothing from this model. An unusual @Tommy Styrvoky's MOD with an interesting feature: he modified the front axle, not the rear one, by adding a solid drivetrain with worm gear and on-axle M-Motor, so result is a front-wheels driven Monster Truck with oversized fake engine. The chassis configuration is 4x2/4 or FWD-4WS. Very aggressive! WRRRRR Daniel Wirasantosa’s (is he on EB?) MOD that differs from the previous ones by using of chassis-mounted L-Motor that drives the rear axle (that has a bit low ground clearance due to the 5x7 frame) and, moreover, he used a custom steering shaft that comes directly to the steering rack. The chassis configuration is 4x2/2 or RWD-FWS. Starting this version, I got a more or less defined plan: 4WD with off-axle (chassis-mounted) L-Motor that drives the both axles through the existing “drivetrain” (former steering shaft) and the off-axle Servo that steers the both axles through the custom steering shaft above the driveshaft. There were two more versions: Michael M’s stretched one and LEGOTechnic360’s solid-chassis version with no suspension, but they didn't help me with any new ideas. Nothing personal, guys, if you're reading it, I just had a full and consistent vision of my further MOD: Hull - the original with no changes. Axles geometry - original. I tried to save the all things like the wheels location, suspension mounting points, ground clearance, steering angles (that are even bigger a bit now)… And I still can't believe that made it, after a thousand tries! Suspension - original, with no changes. However I put the hard shock absorbers in the rear end, as the default ones were too weak to keep the BuWizz battery. Wheels - original. I decided to keep the original wheels and tires with no giant crawler ones or even Claas, that are too big even for a Monster Truck. Frame - mostly original, but possibly modified since it will have an L-Motor and Servo mounted above the axles (right under the cargo platform and hood). Drivetrain - it must be the ex-steering shaft that comes through the cardans inside the "big" ball joints to the both axles, connected to the L-Motor via the set of normal and clutch gears. Steering - for the all wheels, like in the original model, but the steering shaft comes above the drive shaft, in parallel with it and can slide a bit while the suspension moves. Enough the words...The most interesting part starts here. Following my plan, the bigger challenge was to modify the original axles - I tried several options, even trial-like with solid axles, but 4WS provides an amazing maneuverability due to big steering angles, so axle diffs are likely vital for such model (solid axles were making a permanent clicking noise in the transmission even with motor stalling sometimes) and I decided to make a fast Monster truck, not a slow crawler with a high torque. The drive train. There you can see how I did it: L-Motor rotates a set of 8T and 16T normal and clutch (required for the steering shaft) gears and then the main horizontal shaft, that were used for steering in the original model. After that the shaft rotates the 12T double bevel gears (ex-pinon gears from the original model), than 20T gears below, single-bevel 20T and the differentials. As result, the gearing ratio is 1:1.667 X 1:1.4 = 1.2334, and provides about ~100 RPM with 15.12 N.cm torque. The wheels connected by a wheel hubs, since I wasn't able to use the universal and CV joints with affordable steering angles, wheels position (I kept exactly the same position as in 42005) and rigidness. The steering. Here you can see the servo (mounted upside down in order to provide more space for the battery block above, steering shaft that goes above the driveshaft, 12T gears (pinions) and 13L racks joined to the wheel hubs. In order to allow the suspension travel, the gears has 1/2L offset from the racks and slides together with the shafts along the mounting points when the suspension compresses. It's a fully legal, but still allowed in LDD and works like a charm! The only mistake that the hubs must be from Claas, but they aren't presented in LDD unfortunately: Just to explain why I used the clutch gears (but with no gearbox actually, ha-ha ), the drive and steering systems intersects so hard, so followed TLG way and used the same solution that they did in the official models (42029, for example) - passed the one through the other. Green is a drive subsystem, blue - steering. The Axles. Here you can see how the steering shaft slides by 0.5L (notice the gap between the 12T black gear and LBG liftarm) - it provides about 1L suspension travel for the both axles. Other images, the story of a modified hull (by Phil), LDD file and instruction in PDF are coming soon...
-

[MOD] 42005 Monster Truck
Splat posted a topic in LEGO Technic, Mindstorms, Model Team and Scale Modeling
A few years ago I created a modification to the 42005 Monster Truck set, where I motorized it and made it RC (IR), but tried to keep the geometry as close to the original set as possible (see topic here). I always liked the design and size of the body of this truck, so I have used it again, but this time I have completely removed the chassis and the drivetrain, and inserted a new one. This truck uses: the Lego Power Functions Rechargeable Battery (8878) to power an SBrick which controls a 9V Buggy Motor (5292) for drive and a Power Functions Servo Motor (88004) for steering. The truck is controlled remotely using Bluetooth via the SBrick and SBrick Android App on my mobile phone. This truck features: large suspension travel Ackermann Steering and positive caster steering geometry. The tires (56908c03) are the tires that were first seen in the Batman Tumbler set (76023). Even though the wheels are so far apart the truck has a short wheelbase, and thanks to the Ackermann steering geometry and differential in the rear it has a fairly tight turning circle. The front suspension uses a single shock absorber (731c05) with a setup similar to the 8081 Extreme Cruiser set from 2011. The rear independent suspension uses two hard shock absorbers (731c04), one each side. Here's a video to see it in action: Although the Monster truck uses a Buggy Motor, I couldn't give it full power without the battery and/or SBrick cutting power to it. I could only go at about 70% of max speed. I didn't have much space for gear reduction (apart from a 20-tooth gear to 28-tooth differential), so the output doesn't have much torque when using such large tires. Because of this, the truck takes a while to get to full speed, and slows down when hitting an incline or going off-road, which kind of makes the large suspension travel a bit pointless. I might see if I can gear it down some time in the future. I still continue to have a lot of trouble with the SBrick too. I finally have a version of the SBrick Android App that seems to work ok, but despite being only a few feet away and with nothing else around to interfere with it, it would still lose connection with my SBrick regularly. Hopefully BuWizz will be better, and be able to power the Buggy Motor better too. My BrickShelf Gallery with larger images (once moderated) Any constructive feedback/comments/questions are welcome. -
[MOD][AMS1] 8258-B Crawler
JTS posted a topic in LEGO Technic, Mindstorms, Model Team and Scale Modeling
Presenting the 8258-B Crawler, Designed and built as an entry for the 'Crawlify your set' contest [AMS1] I'm a huge fan of b-models in general, but the 8258-B has always been one of my favourites due to great looks and an easy to modify. Or so I thought... In the end, I reckon about 85% of the chassis has been custom built. There are two L motors situated just below the cabin. One powers the front axle, one powers the rear. Both axles have differentials because, being independently powered, loss of traction is a lot less likely and it saves my poor pieces from becoming mangled. Because the 8258-B is rather small (read: narrow) I had a lot of trouble designing a front axle that could house a servo motor without limiting the range of suspension travel. Eventually I gave up and ended up modifying this axle to accommodate a differential (well deserved credit to the amazing @Madoca 1977). However with that said, I have made sure the bodywork stays almost 100% true to the original. The only alteration I had to made was to the rear wheelarches to make room for the balloon tyres: Original wheelarch Modified wheelarch: Also, the front winch kept scraping on obstacles I was trying to climb over so I switched this out for a bullbar, however the two are easily interchangeable. Anyways, here's a video of this thing in action. As always, please let me know what you think. Whether it's praise, criticism or telling me off for building ANOTHER red and black model (I have other colours, I swear!!), I'd love to hear it. More images can be found in this bricksafe folder. Enjoy =) -
 Hi guys, 8043 was THE SET that ended my dark ages and, until now, I was very reluctant to make any modifications to it. But, like many of you, I’ve just received my BuWizz and decided to use 8043 to get my first impressions of BuWizz:
 -
After getting my third set i went on with the XXL version of the Assembly Square.. so far i ended up with this! The turret building is looking pretty good to me now!
-
[MOD] 9398 Limited slip diff (friction)
Void_S posted a topic in LEGO Technic, Mindstorms, Model Team and Scale Modeling
Hello everybody! I'm a newbie here, but Lego Technic was a part of my live many years ago. Recently it turns that that we meet again and I'm ready to discover or invent something new for me. About several months ago I got the well-known 9398 Crawler - amazing flagman model with a lot of pro and cons (I believe that many spears and axes were broken, so I'll skip the long list). The main disadvantage is differentials (also known as diffs) that makes the off-road or crawling ability so close to zero. A common recommendation is to get rid of them by replacing by the knobs. It works, but I faced another issue then: now it can't go on a flat surfaces. Really, now the rear axle tries to pull the vehicle ignoring the forward one and broke the axels or suspension. As solution I remembered the limited slip differential based on the 20-tooth clutch gears: add the one more axle between the left and right wheels that has one (or two if necessary) clutch gear. It allows to have some difference between the wheels rotation angle, but in the same time provides some friction that prevents the free rotation. I remember that I saw it at somebody's MOC, so I will add the credits a bit later. Let me don't bush around and provide the my receipt (sorry for the quality, it was a phone): 1. The additional axle. 9L axle with two 20t gears, normal one and clutch, and connectors. Plus 2L beam to reinforce the connection (you'll see it later). 2. Place where to mount it. You'll need to remove the 11L beam from the steering arms add this assembly. 3. Mounted. 4. Now let's move the 2L red beam to lock the connection. 5. The result! Completely mounted and covered by two 3x5 Bent beams (instead of two 3L beams at the original model). As summary, I have to say that now it works fine everywhere (limited only by Crawler's design) and requires a minor changes for the original model. That's all so far, hope that it still actual since the model is relatively old. -

RC Tires Mods for Lego Technic Axles
Boxerlego posted a topic in LEGO Technic, Mindstorms, Model Team and Scale Modeling
Now not to be confused with this thread here (Third Party Tires for Lego Technic Rims by Efferman), This Thread is Different in the Sense that I developed LEGO Modification instead of just wheel swapping. Now it is RC Tires Mods for Lego Technic Axles. Here below is a Rubber RC Tire. The Wheel does not fit over Lego Axles to begin with. Its hard to tell from picture but trust me the hole on the RC wheel is too small to fit around the LEGO Axle. And that is where the First Modification begins. In this picture Below is the aftermath of the first Wheel Modification. Now because I live in U.S and measurements are defined in standard I'm using a 3/16 drill bit to make this hole which is 4.7 mm for those who know metric.I used a Drill Press for a center and aligned hole for it. Just take Note that the Drilled Hole is little smaller from the patented LEGO Technic Hole so the Lego Axle will have nice tight fit with it naturally if you use a Standard drill bit to do this. Now Once the hole was drilled my next step was attaching it to LEGO Axle Bushing. This is where the Challenge is because I needed to somehow fix this Axle Bushing inline with the Hole. Now I made this LEGO Wheel Stand here to fix the Lego Bushing inline with the RC Tire. I placed the busing on top of the Axle to show you what it looks like with out the tire. With the Tire sitting level on the Lego Part, I used Super Glue for a quick bond between the LEGO Bushing and the RC tire. Now the Super glue is just there to make a nice initial bond. The real Holding bond will be done with JB weld filling in the 12mm Hexnut wheel mount. Take note that the Pictures Below are with out the Lego Bushing and only relying upon the natural hold between the tire and the axle. I took these pictures because there will be plenty of pictures when the RC Lego Tire Mod is finished. -

[Mod] Spider-Man Ghost Rider set - can you spot the modifications?
AmperZand posted a topic in LEGO Licensed
J. Jonah Jameson here. That dastardly villain AmperZand has been modding LEGO sets again! This time, he's gone too far. He's changed set 76058 Spider-Man Ghost Rider Team Up and we want to undo what he's done. Can you spot the differences between the set designed by LEGO and AmperZand's version? Readers of the Daily Bugle would sure appreciate your help. Note that both pictures below show AmperZand's version. LEGO's original can be seen here: http://brickset.com/...t-Rider-Team-Up Pictures © Peter Parker 2016 -
This is basically a stock CITY set (specifically set number 60119, "Ferry") The catch is it features about 27 more parts which make the ship look a lot better. I added some height to the walls to keep the imaginary water (as the boat does NOT really float) out and extended the bridge's length by two studs to make it a little less cramped, and Ii even put in a seat for the Captain. The additional wall height makes the loading ramps a bit more in tune to the rest of boat, as they now line up nicely with the walls when folded up. These are all the parts needed to modify set 60119 to be more sea worthy with the higher walls and extended bridge. Here is the original model to compare mine to. (image taken from BrickLink) I hope you like my model, you can make the modifications yourself, courtesy of this handy LDD file: http://www.moc-pages...1465332822m.lxf NOTE: The stock parts are grouped separately in the LDD file, while the remaining pieces are the extras. Comments, Questions and complaints are always welcome!
-
[MOC] Master Wu's dragon and ghosts - minor modifications
AmperZand posted a topic in LEGO Action and Adventure Themes
I got Master Wu's Dragon (70734) a while back. It's a cool set but there were a few aspects of the dragon that I felt could do with tweaking so I modded it as follows: reconfigured the neck block to increase the angle of articulation (not easy to see in the picture) removed the clip and flagpole assembly from the dragon's back made the tail more substantial by doubling it and changed the finials to katanas. I also altered the ghosts/spirit warriors: I'm into fantastic, mythological and historical LEGO generally and, as you may have guessed, not a devotee of the Ninjago story-line set out by TLG. Apologies to any Ninjagoers who were expecting canonical representations. -

Modding a Dino Attack T-Rex for animation
Bricksmith posted a topic in LEGO Action and Adventure Themes
Hi all! I have recently bought a Dino-Attack T-rex for an animation i'm planning on doing in the near future. It's such a beautiful and underrated model that i really want to do it justice onscreen. However, my issue with the model is the articulation; with the legs, arms and head all being on exo-force style ratchet joints. (NOT my image. Belongs to -R8- on Flickr. For demonstration purposes only) Would anyone know a way to mod the creature so that the legs retain their strength but enable smoother motion? I'm considering sanding down the ratchets to a point where there is still friction but no places for the leg to 'snap' into. My only worry with this is that the friction will be lost and the legs will become loose. Any suggestions? They would be much appreciated! Many thanks :)