Search the Community
Showing results for tags 'IR'.
Found 21 results
-

Can i control my rcx with a smartphone (has an ir blaster)
AI toothbrush posted a topic in LEGO Technic, Mindstorms, Model Team and Scale Modeling
I have an android smartphone with an ir blaster and the rcx uses ir so can I control it with my smartphone? If I have to use some specific tools or need to do something complicated so it'll work I can. -

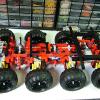
[WIP] Trophy Truck V.1
Ashfall posted a topic in LEGO Technic, Mindstorms, Model Team and Scale Modeling
Built this Trophy Truck Yesterday. Inspired by @Zerobricks Epic Rolug Trophy Truck, I built this truck with the same idea/principle in mind. Powered By 2xL motors & a Servo for steering. Features (So Far) -Full Body Suspension Front: Soft Double Wishbone Suspension Rear: Hard 360 Live Axle Suspension -Positive Caster Angling -Working Steering Wheel (controlled by servo) I may add a Light kit on my V.2 Design..... I don't know. I do plan, however, to add a working V6 or V8 under the hood. Because of the way it the suspension works, it is quite flexible..... .....ando you can fit five of these under one wheel with the other 3 wheels still touching the ground. Underside: Here's a video of it: Hope you like it! Have fun building! -
[MOC] Offroad Buggy V.2
Ashfall posted a topic in LEGO Technic, Mindstorms, Model Team and Scale Modeling
So recently I redesigned my Offroad Buggy, making it more compact with full suspension & better body design. It took about 1-1.5 hours to build. The car is powered by a single buggy motor (slow output), and steered by a servo. It is 39 studs long, 21 studs wide, and 15 studs high. The front hood opens up to make suspension change easier and to reveal the fan (I had hoped to add a V6 & more pipes/tubes from the fan, but I ran out of room) Here's A cutaway of the side- I used soft wishbone suspension in the front and hard suspension in the back, but both can be swapped for fully hard or soft. The rear drive is straight motor to axle, so no differential. And here's the underside: Here's a short video of it in action: Hope you like it! Have fun building! -
Hey all, this is my first post! I built this car roughly in an hour. It is based off of the Baja Buggies that are pretty awesome, and inspired a bit by the Class 1 Unlimited Buggy by Agrof. This car is powered by a Buggy Motor to a differential, and steered by a Servo. I think I will try to add Long Travel suspension to it, but for now it has no suspension. Let me know what you think- I would love advice! :) (Edit) Here's the Underside of the Car
-
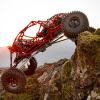
 Hello All! It is winter time, so I am bit more busy on Legoing. After seeing, that @Didumos69 started his 4x4 buggy project, I looked into a bit deeper the Ultra 4 racing, and the rigs been driven in this extreme events. Finally the video, what I linked to his topic, triggered the work on another MOC: the Ultra 4 buggy. Here is another video to see the interesting bits of independent suspension system on this beast: Still, I might end up with IFS (independent front suspension) and solid axle with torque bar for the rear, but the body is heavily inspired by the Lasernut buggy. Parameters: 2x L motors 1x servo motor AAA battery box - in order to be replace ability with BuWizz in case IR control Let's look at into the progress a bit, maybe it is interesting to read. I started on 28. november with LDD model. To set the proportions, and the body ideas, I usually place the essential parts free in space first. Check the real inspiration thing and the very first sketch: After that I added the electronic parts, to check the necessary minimum space. (Unfortunately Stud.io has corrupt models, so some cover parts of the motors are just not present.) At this stage, I built the front axle, to see how can I integrate the steering. The answer is: massive fail. So back to drawing table, I deleted the 5x7 frame, and started to figure out, how to connect the needed fixation points for swingarms, servo. Due to this, the model gets more complex than I thought, but buildability is always first! I recommend to check meanwhile IRL building too, or at least stop by and thinking about how to add the related parts. I was hopeing for a simple MOC, but I ended up already a pretty complex assembly, so I made each step with double check. Later on, I will try to add groups in LDD to represent the buildability order too. So far the front module with steering and IFS is ready, the middle module is almost done, I am wondering about interchangable solid axle or independent solution for the rear - not sure yet. Also the color is to be decided yet, as the springs type as well (soft or hard). I think if soft ones will be OK, than I go for white body, as it presents the "rollcage" better. In case the yellow hard shock absorbers will be needed, of course the only choice is: full MEAN black body. This picture shows the advantage of the white body, and also a comparison for tyre types: 3740 on the left, 45982 on the right, both on 56908 wheels. So far 407 parts, and I guess it is about 70-75% ready. I need to figure out how to fix the roof, and create a solid, but easily disconnectable rear module. Necessary parts are ordered, so real build pics might come in couple weeks first. And how is the road presence? I guess it will be pretty much like a punch in the face. p.s.: Yet another WIP, I hope for long winter nights, to finish at least some of my unfinished projects...
 -

I need help with a sliding mechanism for a Thunderbirds Mole MOC
Tracytron54321 posted a topic in General LEGO Discussion
Hey I'm working on a MOC of The Mole from Thunderbirds in LDD and I need help with a few parts of it like a sliding mechanism for the drill itself and to make the hull round. I've seen a lot of great cylinder techniques that I could use for the hull but all of them were either too fragile, you couldn't make gaps in them for the tracks and sliding mechanism (yes there are tracks on the base as well, take another look) or not hollowed out, which is a problem for me cause I want it to have an interior. also I could use some help with the frames of the chassis and base, not to mention the part with all the crossbars which carries the drill. if you're unfamiliar with what this thing even is then here http://thunderbirds.wikia.com/wiki/The_Mole EDIT: Also I need help with a sliding door for the interior of The Firefly (another vehicle from Thunderbirds), the wall needs to be like 3 plates thick with the studs hanging off the sides and for the door itself to be 1 plate thick -
[MOC] Volvo excavator [video online]
steph77 posted a topic in LEGO Technic, Mindstorms, Model Team and Scale Modeling
Here I am again. This time the subject is one of the very usual kind: one PFS IR commanded excavator. They are many exemples of perfect excavator on the web...but I just wanted mine, of my own design. So I study it from A to Z and I had to answer many of the questions that many people answer before.Surprisingly, I do not answer the same at some of them :) But first this is what we are talking about: This model as been design in one only goal : a maximum of fun to play with it. In order to match that goal, each and every motor Is directly connected to each function. No mechanics in there. The function are ultra classical : drive, steer, rotate and the 3 movements of the arm. I make use of L motor for the tracks and lifting main arm. Other are medium size motors. I also choose to keep it as compact as possible. The main issue I find on many creation on the web is a too big body resulting in a too big arm. Too big arm need lots of power and often be very slow to move. I try to get what I think is the best compromise in size and use of existing motors. (No pipa I do not have RC ones :) ) The tracks gives the global scale. As you see the BB is in the lower part of the structure. This is due to compactness of the upper part but also for better design of this last spoken upper part. As the excavator rolls only on flat surfaces, no use of any suspension in it... view from the downside the tracks are well integrated, and even with the BB there is a good ground clearance of 3T wich is very good. I also try to implement good action range at the arm: And also small details that makes it looks good, like 3 sets of lights, toolbox, ... Back view, easy acces to the BB to swictch on/off and replace (often:) ) batteries The top part is designed so replacing M motor by Large one is easy (I do command two of them, awaiting arrival) So here it is, not the Moc of the year for sure, but sometimes it's good to achieve some simple goals. As expected and designed for, this one is very fun to play with. Hope you'll enjoy it Steph. -

What's The EV3 Motor Power in IR Control Mode?
StudRobotics posted a topic in LEGO Technic, Mindstorms, Model Team and Scale Modeling
Not really, but I found out that the motors in my GX EV3 peform better in IR Control mode than how they do in my program, and I believe that it is because the motor power is different. Each block in the EV3 programming software that moves the motors has a digit for how much power each motor should have. I'm wondering what this digit is in IR Control mode, because the motors act much better in this mode than how the do in the program. If anyone here knows the power of the motors when the EV3 brick is in this mode, please reply as soon as possible. It would be very appreciated. -
I was thinking about what I could do with the newly acquired bucket wheel excavator parts. Something that I couldn't build without these big yellow circles. That's how this strange idea came to be. The arms are motorized: they grab or drill and retract into the wheels. The compact and functional hand is my favourite part of the robot The two-wheel design makes it wobble a lot. Someone on youtube commented that it's headbanging to the music - genius!!! I might try making one with adjustable wheel angles next! Any suggestions? Check it out on LEGO Ideas!!!
-
Help With EV3 Remote Control Program
StudRobotics posted a topic in LEGO Technic, Mindstorms, Model Team and Scale Modeling
I'm programming my EV3 vehicle to be operated by an IR beacon remote. I've successfully got the car to be able to move, but I'm stuck on something else. My vehicle has a 4-speed transmission, and a medium motor shifts the gears. I used the remote's topmost button (the one that turns on the green light on the remote) for shifting the gearbox. But when I press it, something goes off. It's really hard to say, but what I know is that the topmost button isn't acting like a normal button. So the motor keeps on moving until the IR sensor realizes the green light is off. I really need help with the program because I just want the topmost button to act like a normal button so I can press it to make the medium motor shift one gear with a one second wait before shifting to the next one. I would love a very helpful response from someone that knows how to program the IR remote and if there is no way to get the topmost button to get the result I want, an alternative would be nice so I can be able to shift gears with the push of a button on the remote. -
Prologue: I must admit, I’ve never thought to be able to reveal a proper entry that soon, but all the sparks came so suddenly and all of those fitted into the concept in my head, that the first digital model was ready in 1 night. Some fine tuning was done during another night, and now it sits beside me in it’s Brick Built Beauty. Excuse me for presenting via digital pictures for now, but this way I can give You nicer overview (according to my actual skills), live pictures and video will be done, of course. As it is basically ready, I decided to share it as inspiration to the community, I hope to see many awesome and fun creatures! Let me introduce my entry for the TC11 contest: Name: Bison - my robot is chubby, robust, has lot of power to push and for butting heads, and has biungulate heels to kick all around – just like a bison. My main objectives were to use 2 motors only (for intuitive control, which is essential in the battle arena), and to build a double sided robot, which is functional upside-down as well. Also, I wanted to follow the regular MOCing rules: ease of build, BB access must be simple, legal techniques (LDD compatibility). Parameters: Skid steering 4x4 drive via friction gears Motorized kick-heels via friction gears (signature move) Massive dozer blade (? signature move ?) Very robust structure (to survive rough beating) Modular build 439 parts (without batteries) 37x26x9 studs 1070 gramms (with Ansmann rechargable batteries) 0 gears The 2995 tyre works here very well, as it is more grippy than the average LEGO tires, and so is the 55978 too, as result I got a nice combo for my friction gear set-up. This can provide quite a lot power, but also works as clutch in extreme situations (motor protection). The only deviance what I had to apply (with staff approval): to fit the 2995 tyre to the inside of the 2996 rim lip (Click for picture - on the right), so I could fit them perfectly on the wheel hubs, without building those in offset with the housing. As here can be seen, it is pretty crowded in the inside, which I am very pleased with. After some minutes of test, I am satisfied with the result, it can easily push 3 kgs (milk cans), quite fast, and really works like I imagined. Let’s get to pictures, update will come! EDIT: video is ready, see post below.
-
 Hello everybody! It is no secret that the Power Functions system allows smooth control of motor power and regulation of the angle movement of servo motor. I have studied this issue and developed a proportional remote control system which was first designed for the management of wheeled and tracked models. But in fact it is a universal device, which can control any Lego models with PF IR Receivers. The system is not a control panel by itself. It represents a set of sensors, control unit and an infrared transmitter module which are made in the form factor compatible with Lego Technic. Here's how it looks Сontrol unit: Sensors of various types: IR transmitter: All this is connected together by wires and must be installed in the transmitter model made from Lego Technic. The device can be fully configured using the front panel buttons but a lot of functions and menu system are difficult to obtain. I wrote a manual, but did not translate it into English yet. Here is a short video showing the basic idea. I'm sorry, my comments are in Russian. At the beginning of the video I configure my system for a specific console design (the system remembers the maximum deviation of controls in this design). At the end of the video I run track model with the remote control, which is shown at the beginning of the video. To manage such a model i have made a special control mode, which converts the signals of throttle and steering into the power of left and right caterpillar motors. I want to find out, whether it can be interesting to someone?
 -

LEGO 42043 LED Lighting Kit
sives1 posted a topic in LEGO Technic, Mindstorms, Model Team and Scale Modeling
Hi All. I want introduce You our project. It's Lego Led kit prepared to 42043 Mercedes Actros, just watch what the result is and what I will introduce: As You can see it's controlled by LEGO Power Functions IR Remote Control (item no. 8885). It's supplied by Lego PF Battery Box. There are used two channels, 1ch is used for driving, lights will turn on automatic. 4ch is used to turn on and off programmed Led lights. First I will explain what is happen when you modify your model to be driving by lego PF. 1CHANNEL: When You first time move Your model the parking lights turn on automatic. 1. If You want to turn on right side You have just tu move control button right up to blinked for right. After You turn it blink 3 times and turn off automatic. For the left is, right channel down. 2. For moving forward You move left control button up, when leave it stop lights will turn on for few seconds (imitation car brake) 3. For moving backwards You move left control button down, reversing lights turn on, when leave it stop lights will turn on for few seconds (imitation car brake) 4 CHANNEL: 1. First time left control button up: Parking lights on; Second time left up: Xenon headlights on; Third time left up: Xenon headlights off; Next time: Xenon headlights on (program is running in loop until reset all 4th function) 2. First time left control button down: Beacon lights 1 program; Second time left down: Beacon lights 2 program; Third time left down: Beacon lights 3 program; Fourth time left up: Beacon lights 4 program; Fifth time left down: Beacon lights off; Next time left down: Beacon lights 1 program (program is running in loop until reset all 4th function) 3. First time right control button up: Hazard lights on: Second time right up: Hazard lights off; Next time: Hazard lights on (program is running in loop until reset all 4th function) 4. One time right down: ALL RESET. This is just my idea about what channel, which control button is responsible for some functions. It could be programmed differently, it depends on our mind :D It's not finished, We have to put it in small box, finish the connectors and produce some parts like PF connector. Remember it is IR so the range is not long. Sorry if I made some English Mistakes. -

Lego Technic 8258 Alternative Model: Tow Truck MOC IR
MrTekneex posted a topic in LEGO Technic, Mindstorms, Model Team and Scale Modeling
Hello to all! This is an alternate of set 8258 Crane Truck 1800 pieces Size: 61x17x21 cm Weight: 2,1 Kg Gearbox for operating motorized functions - Outriggers - Third lift axle - Crane (raise) - Crane (extension) Other functions: - HOG steering - Towfork - Fake v8 engine - Winch - Opening hood - Opening doors Hope you like it Building instructions available here. http://mrtekneex.alt...ilding8258.html -
[MOC] Night Phoenix
SevenStuds posted a topic in LEGO Technic, Mindstorms, Model Team and Scale Modeling
Hi Everyone, Just want to share a video and some photos of a MOC I recently finished. The aim was to make a compact studless chassis with a studded body over it. The result is that the bodywork can be easily taken off and the chassis can be reused for other models. More photos and instructions can be seen on Rebrickable: http://rebrickable.c...s/night-phoenix Thanks! -

[HELP] Motorising model 8880
JohnBS posted a topic in LEGO Technic, Mindstorms, Model Team and Scale Modeling
Hello everyone, Has anyone successfully motorised model 8880 Supercar? I am looking for a design which has an XL (or L) motor for driving and a M motor for steering, with one IR sensor and any battery box. If necessary, I could sacrifice (or simplify) the gearbox. John -
Hello! Let’s start with a little introduction. About one and a half years ago, - thank to my growing daughter, who started to play with Lego – my dark age ended. Bought the 9395. I was amazed. New parts, interesting building technics... at least for me. The journey begun... I’m rather ’reader’ type, so not posting too much, but reading the forum almost every day. Working on a project, since last autumn, and when this contest came, I decided to build something (something different) Simply I could not choose, what to build. Another super car/excavator/ truck/tank/crane? No. There will be a lot of them. This train of thought led to the idea, that I should build something, what not going anywhere. Still not easy, but fortunately it came into my mind. Let it be a whirligig. Decided. So, my contest entry is a technic whirligig. Functions: 1. Rotating superstructure. (L motor, speed control with train remote a) 2. Main arm rising/lowering (XL motor - standart remote a) 3. Secondary arm moving ( L motor, - standart remote b) 4. Basket rotating (M motor - speed control with train remote b) It's still in progress. I received the last parts today. Hope that willl be ready till the deadline. Pictures at the weekend.
-
Howdy folks :) With the help of my children, I got back to Lego about a year ago, started to buy massively and then found my true purpose in life, Technic! ROLUG was a great help to me and I began to build various cars for local TT contests, then I found Eurobricks and I participated in the Bionicle contest, as well. Now, I consider myself a newbie in Technic and I mostly adapt existing models to my liking, but since recently I started to build my own MOCs from scratch. What I want to show you guys is my latest creation, an arctic exploration vehicle based on the famous Thunderbirds show, namely The Mole, in my own interpretation. This is my 2nd attempt at this, my first was ok for showing-off but could not actually move well on snow (lol), so now I am rebuilding it, with performance in mind. I am basically building a high-profile tank with a huge drill in the front and another cool function which I prefer to keep secret, until it's working as I want. My personal goal is to drive it head on into a snow bank and to pass through it like butter! (we can all dream, no?) See the photos below and let me know what you think. Any suggestion or comment is welcomed, thank you all for watching. If you are curious to see more photos and also what I have built so far, feel free to head over to my Flickr page. Enjoy :) https://www.flickr.c...th/16439896211/
-
Hi guys, finally, after 4 months, i got back to lego (so much work). I wanted to build smallest 4x4 jeep that will looks and drive good. I started to build smallest suspensioned 4x4 chassis. I was afraid of driving characteristics, becouse there were no space for differencials. However, i was really suprisend how good jeep drives. The turning radius is little bigger on carpet, but on floor, or ground it´s perfect! Jeep is driven by one XL motor witch gave a lot of strenght and speed (do not expect juping :D), but it´s a total snale. Both axle has supsnesions. (no springs only rubbers). However it´s greate to take it to the nature. Even snow is not problem for this beast :D The body is build as jeep, but not as any existing one. It´s just some jeep :). The body can bee easyly removed and replace by another one. So, what do you think? I will upload only 1 photos, but you can find more here: http://www.kostky.or...p?topic=43677.0 or here: http://tomashubik.cz/temp/lego_jeep/001.jpg http://tomashubik.cz/temp/lego_jeep/002.jpg http://tomashubik.cz/temp/lego_jeep/003.jpg http://tomashubik.cz/temp/lego_jeep/004.jpg http://tomashubik.cz/temp/lego_jeep/005.jpg http://tomashubik.cz/temp/lego_jeep/006.jpg I hope i will make some video soon. PS: Sorry for my english. Not nativ language for me.
-

Websites to buy motors, IR sets and other parts
Pheonix posted a topic in LEGO Technic, Mindstorms, Model Team and Scale Modeling
Hi I am looking at doing some MOC's but I first need ot purchase some more IR kits and motors (all sizes) and other parts. Can anyone point me in the direction of good websites to purchase from. -
Hi all, I've finally bought a 7897 Passenger Train, which I want to run alongside my PF setup. I haven't received it yet, but I'm interested if it's possible to route the power from the included: "white train chassis 6x30 with IR Receivers integrated battery (6xAA)" (see below pic from LEGO/toysperiod). through to a PF IR receiver, then to either the included motor or a PF train motor (preferably without a (permanent) physical modification). From what little I know about IR, the unit may have to be receiving an "ON" IR signal from the remote by 'line of sight', to work....so I guess my question is: Is there a logical/natural/clear/obvious/sensible way to bypass this? Thanks, LLL