Search the Community
Showing results for tags 'Flyer'.
Found 11 results
-
The most versatile unit on the Blacktron arsenal. It becomes a one vehicle army The front turns into an armored unit. The sides into track bikes Gets air support with an exploration drone The main cabin can become airborn. The turret unit deploys droid troops The Cyber Bounty Hunters are heavy armed robotic troopers. Finally, The Enforcer is a small Space Police armed vehicle. Please help me with your support to make this proyect epic! https://ideas.lego.com/projects/fa6d0fe0-4b07-4eec-a375-ad7638975418 Also check all my other Lego Ideas projects.
-
 Model of a New Flyer XD40 transit bus in MTA livery. The model has roughly 3800 pieces. Features motorized drive, steering with working steering wheel, passenger doors, and a removable Cummins engine model with moving pistons. Functions/features: Drive Steering with working steering wheel Remotely controlled doors Removable Cummins engine model with moving pistons Instructions available on Rebrickable: https://rebrickable.com/mocs/MOC-153565/JLiu15/2015-new-flyer-xd40-mta-bus/#details Because my NJ Transit New Flyer XD60 model was a huge success, I decided to reuse my design and make another Xcelsior model - this time a XD40 in MTA colors. Unlike my NJT XD60 model which has the livery done entirely using stickers, the blue stripe livery MTA used prior to 2016 is easy to design with blue LEGO pieces. As a result, the model is recognizable as a MTA bus even without stickers, which is why I specifically included "MTA Bus" in the name. The model is not simply my XD60 model cut shorter. The chassis is redesigned from scratch. The front and rear axles are placed at a half-stud offset to allow for smaller wheel arches. The XL motor for drive is placed in front of the rear axle instead of behind it to allow space for the Cummins engine model. The battery is placed much higher and is accessible by removing the upper rear body panel. I added a switch on the roof to allow the battery to be turned on without removing the body panel, so it only needs to be removed for charging. There are also no supports in the chassis for the rear door as the rear door on MTA Xcelsiors open outwards, and the front of the chassis is redesigned to accommodate both the mini linear actuator for the front door and the connection from the steering wheel to the Servo motor for a working steering wheel. Lastly, the chassis is also designed to specifically accommodate for MTA's seating layout, most notably with only a single seat per row on one side in the low floor section. Like my XD60 model, there is also a roof frame that holds both motors for the doors as well as the rear door mechanism (which uses the same general principle as the inward-opening front door despite opening outwards). The roof frame is attached to the chassis using beams, making for a robust "skeleton" that the body is built around. The bodywork has also been redesigned in several places. The wheel arches are now smaller due to the half stud offset of the front and rear axles, although I had to use inverted slope pieces instead of arch pieces to allow the blue stripe to be built entirely in LEGO. This means the wheel arches are not perfectly curved here, but I found it to be a fair compromise for making the entire blue stripe in LEGO. The front lower body panel is one stud higher here compared to my XD60 model, although it kind of makes it look like the front of a MTA Orion VII NG (MTA Xcelsiors in the blue stripe livery have the bottom edge of the front windshield curve downward slightly, and such a curve would be very difficult to model in LEGO at this scale. The rear body panels use a simpler and more robust design, the front roofline curves are angled slightly outward (the space between them was increased by 2 studs), and the side body panels are attached to the chassis/roof frame using white 1x1 Technic bricks with axle hole and part 27940 in white. This allows for a seamless body without pins showing; part 27940 in white was not yet available while my XD60 model was being built. The roof is primarily built using 6x6 tiles this time instead of 5x11 Technic panels - because MTA's 2015 XD40s do not feature a full roofline, the transition from the side body panels to the roof is much more noticeable here which is why I went with the tiles. The model's functions all worked well. The single XL motor was more than enough to power the model, especially considering this model is lighter than my XD60 model. Although the moving pistons on the Cummins engine model are not easily visible (there's one piston visible under the last row of seats), I am happy that I was able to add some additional functionality to this model. And because the pistons are made using half bushes, the engine makes a nice sound while the drive motor is running. While designing my XD60 model I thought there was too little space in the front to incorporate a working steering wheel without compromising the rigidity of the chassis, but I was able to connect the steering wheel to the Servo motor just fine here. There is less reinforcement immediately in front of the front wheels so they don't collide with anything when steering, but the side body panels keep everything robust. I did not test the rear door mechanism before installing it on the model so I was concerned how well it will perform, but it is usually able to open the rear door fully with each door panel rotating 90 degrees. Sometimes the mechanism gets stuck while opening the door, but reinforcing the pieces a little usually solves the problem. While at first glance this MOC looks like my XD60 model shortened and without an articulation joint, it was really a new MOC from scratch. The chassis is completely redesigned and has little resemblance to the chassis of my XD60 model even without accounting for the lack of the articulation joint and a third axle. The bodywork was also improved in several places. All of the functions performed as expected, and the finished model is easily recognizable as a MTA XD40 even without stickers. Speaking of which, I decided to make my model bus 7225 operating out of Grand Avenue Depot in Brooklyn signed for route B62. Overall I am very satisfied with how my second bus MOC turned out, and I plan to continue making bus MOCs in the future, with one already in progress. Video: Photos: Brickworld Chicago Photos:
 -
[WIP] 2015 New Flyer XD40 MTA Bus
JLiu15 posted a topic in LEGO Technic, Mindstorms, Model Team and Scale Modeling
Following the success of my New Flyer XD60 model, I decided to take the existing design and remake it into an XD40 in Metropolitan Transportation Authority (MTA) livery. I am doing the 2015 model since newer ones have the new blue livery which will be much harder to build in LEGO due to the availability of dark blue pieces. The design uses my previous XD60 model as a base, but this model is more than simply my XD60 model cut down by 20 scaled feet. The chassis is redesigned from scratch, with the front and rear axles at a half-stud offset to allow for smaller and thus more realistically sized wheel arches. The body panels are also attached to the chassis using white Technic bricks with axle hole connected to a white Technic piece with axle, allowing for a seamless finish with no visible pins. A number of details have been polished up since my XD60 model, but perhaps the biggest difference is that the livery won't be sticker-dependent on this model. The simple blue stripe livery means I can easily model it with LEGO pieces, and stickers will only be used for the bus numbers/lettering. I've only modeled it in Stud.io so far, but I largely know what to expect since my XD60 model so the actually building process should be pretty straightforward once the model is finished in Stud.io. Photos: -
Model of New Jersey Transit's 2020 New Flyer XD60 articulated bus. The model has roughly 5200 pieces. Features drive, steering, independently controlled doors, and custom stickers matching the real-life NJT XD60. Functions/features: Drive Steering Remotely controlled doors Custom stickers Instructions available on Rebrickable: https://rebrickable.com/mocs/MOC-100374/JLiu15/new-flyer-xd60-articulated-bus/#details In early 2020, the first New Flyer XD60 articulated buses began hitting the streets of New Jersey. The 3rd generation of New Jersey Transit's articulated buses, these buses replaced the aging Neoplan articulated buses that NJ Transit operated since 2004. A total of 110 buses, these buses are a common sight in the Newark area, as well as in Hudson County on routes to New York City. They are commonly used on routes 1, 13, 25, 39, and 70 in the Newark area, and routes 123, 125, 126, 128, 154, 156, 158, and 159 to NYC. The buses are assigned to four garages, with buses 20801-20828 at Hilton, 20829-20848 at Big Tree, 20849-20891 at Fairview and 20892-20910 at Meadowlands at the time of writing. The idea to model NJ Transit's New Flyer XD60 started when the buses were still under delivery in 2020. Work on the model started with the Stud.io model in December 2020, and the physical model in January 2021. The plan was for a 1:20 scale model using 49.5x20 tires. The functions are drive with a PF XL Motor, steering with a PF Servo Motor, and remotely controlled doors with 1 PF Medium Motor each. I initially thought of including a kneeling mechanism, but seeing as the bus kneels on its front axle, the mechanism was difficult to re-create in LEGO due to there being 3 axles, so I abandoned the idea. The seating layout on my model is identical to that of the real bus - thanks to photos posted in a NJ Transit Facebook group, I was able to accurately model the interior with all 59 seats. I wanted to make a bike rack for the model as well, but seeing as the bike rack on the real NJT XD60 has plenty of complex curves that would be very difficult to replicate while keeping it robust at this scale, I decided against it. In fact, on real NJT XD60s that have the bike rack removed (which is most of them), you can still see the holes in the bumper where it is attached. The bumper on my model has connectors where you can theoretically attach a bike rack, so I guess this is accurate. The model is built with a Technic chassis/frame and a System finish. I initially wanted to make it all Technic with some System details, but seeing as System gives a cleaner and more detailed finish, I decided to go with all System for the bodywork. In fact, this is my first model to have a System finish - all my previous MOCs were at least 80% Technic. The Technic chassis has a frame sitting above it to support the roof, as well as the motors for the door opening mechanisms. The doors are opened with mini linear actuators (1 in the front door, 2 in the rear door). The mechanism for the rear door is located in the upper frame, but because the front panel on the front door curves inward a little, as well as space taken up by the front destination sign, I had to place the mechanism for the front door in the floor, with the motor transferring drive to it via a vertical axle. I initially expected the bellows to be difficult to make and take plenty of trial and error, but after just a few tries I was able to come up with a well-working setup. The bellows are supported by a central section that keep the front/rear halves of the bellows symmetrical at all times, and rubber bands help the bellows maintain their shape, In fact, no matter how I touch the bellows, they will always fold smoothly. It added no extra friction to the model turning, and overall I consider this part to be a huge success. Prior to building this model I did not have many white System pieces, so thanks to Stud.io I was able to design the model digitally and be satisfied with everything before I ordered any pieces. Thanks to the NJ Transit Facebook group, I was able to get an image of the roof of the bus to accurately model the roof. The hardest part to model was the front roofline curve - the complex shaping is quite difficult to model with LEGO pieces. However, my final design turned out pretty well, and looks pretty much seamless. Because I'm using System pieces for the body, I had concerns of structural integrity as this is something I'm not able to accurately test on Stud.io, but after building it on my physical model it actually turned out to be very robust. Once the building process was finished, I created custom stickers based on the real NJT New Flyer XD60's details. In fact, most of the stickers were made from photos of the real bus's decals. The stickers are printed on clear glossy sticker paper, except for the destination sign stickers as the details on a clear sticker paper barely show up on a black surface. I initially wanted to replicate bus 20801, the first bus of the series, but that bus was later retrofitted with a grille in the rear so I decided to model bus 20818 with route 39 in the destination sign, as the real 20818 is a Hilton garage bus that operates route 39. I acquired a gray paper backdrop for the photos and video as taking photos on a white backdrop would not allow me to clear the background in GIMP due to this being a white model. I'm really satisfied with how the photos turned out, and there's no editing necessary so I expect the gray backdrop to become the norm for MOC photos from now on. I recently got a GoPro as well, and thanks to its small size, I was able to put it through the rear door to film the model driving from the interior, making you feel like a LEGO passenger on a LEGO bus. Overall, this has been by far my largest project to date. While it's not the most advanced, as it only has 4 motors, it has nearly 5200 pieces and is a revolutionary MOC for me as this is my first model with a System finish. The model took about a year to finish, much longer than any of my previous MOCs. I had lots of fun working on this project, the looks are accurate, and the functions all work smoothly. Given how well this model turned out and being a busfan myself, I definitely see myself making more bus MOCs in the future. Video: Photos:
-
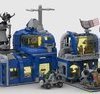
Greetings! Let me present my newest Lego Ideas project. This is an homage to the droids included in Classic Space sets on the late 80s. The robot comes with a flyer and a rover which can be hold inside the unit's body. Also, the head serves as the cockpit. If you like it, Please support on IDEAS: https://ideas.lego.com/.../30c1323e-08cf-47a3-98e5...
-
[WIP] New Flyer XD60 Articulated Bus
JLiu15 posted a topic in LEGO Technic, Mindstorms, Model Team and Scale Modeling
Hey guys, here is a long-anticipated project of mine that I'm finally starting. It is a model of NJ Transit's 2020 New Flyer XD60 articulated bus. My model will be fully motorized, with remote-controlled drive, steering, and opening doors. It'll be either controlled by the PF IR system or by SBrick. The model will be propelled by a PF XL motor, which is already in place. The power source is a PF 8878 battery sitting in the very rear of the chassis. So far I have the rear portion of the chassis built - just missing most of the seats. I've already been building the model digitally on Stud.io for about a month, mostly working on the chassis, so this part should be done relatively soon. However, this is not taking into consideration any potential issues that may arise as I build the chassis in real life. I also have prototypes for the doors' and bellows' mechanisms ready (not pictured), and they seem to work pretty well. So overall, it'll just be a matter of putting these mechanisms together into a coherent chassis. Aesthetics wise, my model will mostly be about the outside appearance, which means I'll focus much more on the bodywork than the interior details-wise. However, the seating layout will still be identical to the original bus, with a total of 59 seats. This is definitely a project I'm really looking forward to. It'll be the first time I model a particular real-life vehicle. I'm a huge fan of NJ Transit's buses and buses in general, and these artics IMO are some of the best buses they've ordered in recent years. And because I'm doing a digital build while simultaneously building in real life, I plan on publishing instructions for this MOC when it's finished. Photo: -
Hello Eurobricks! Today I present you the review of an unusual, very playable and exciting old LEGO set - the Aero Tube Hangar. 01 by Farseer Eldar, on Flickr Set Name: Aero Tube Hangar Set Number: 7317 Year of Release: 2001 Number of Pieces: 706 Number of Minifigures: 5 (all Martian) Price: $ 90.00 ($ 0.13 per brick) Life on Mars was a short-lived, but interesting LEGO Space theme. It explored the world of Martians, who are surprisingly friendly to human astronauts, which is rather unusual for LEGO and science fiction in general. The Aero Tube Hangar is the main base of the Martians. It was the dream of my childhood, but I got this set only in 2013, when I was already an AFOL. So, let's get started. Box The main box is large, what fits this set. The front side depicts the Aero Tube Hangar in all its glory: 02 by Farseer Eldar, on Flickr On the back side the functions of the set are shown: 03 by Farseer Eldar, on Flickr Old-type boxes with flip covers are great for storage: Box by Farseer Eldar, on Flickr Different parts of the set were sorted into three additional boxes which are not cool as the main one, but useful: 04 by Farseer Eldar, on Flickr Instruction Booklet The instructions start with the same image as seen on the box: 05 by Farseer Eldar, on Flickr Next there are the minifigures (note the misspelling of Arcturus) and the hypersleds with a warning: 06 by Farseer Eldar, on Flickr The first model to assemble is the mech: 07 by Farseer Eldar, on Flickr Note that this is an old instruction, and there is no list of required parts on each step. The last pages show how to connect the tubes and how to use them and some ads (I will put them under a spoiler): This set also has a small advertising booklet: 13 by Farseer Eldar, on Flickr There are sets from other series on another side: 14 by Farseer Eldar, on Flickr Unfortunately, almost all that themes (Alpha Team, Studios and LoM itself) didn't live to this day. Only Star Wars do. Minifigures This set includes five minifigures. All of them are Martians, and there are no humans: 15 by Farseer Eldar, on Flickr These Martians are, very much like Blacks from Harry Potter, named after different stars and constellations. Perhaps their names sound differently in Martian language, and here the human equivalents are given. Riegel (note the misspelling - the star is called Rigel) is the leader of Martian people and the general of the Aero Tube Hangar. He does not like laziness and disorder. His favourite food is space slugs. Unlike other Martians, he has a different skin tone and wears some sign (maybe honorific) on his chest. Cassiopeia is the daughter of Riegel. She does not look like her father, but very likely looks like her mother. Later she visited Earth with the austronauts. Mizar is a Martian technician. He wears something like a gas mask. Vega is a scientist who specializes in excavation. He likes sandwiches. Arcturus is a spy from another tribe of Martians which tries to still energy-rich biodium ore from the Hangar. In 1930s he was the leader of Martians, and his invasion of Earth and subsequent defeat were described by Orson Welles. All these figures are exclusive except Vega (who also appeared in 7316, 1195 and 7320) and Mizar (who also appeared in 7321). The Martians have the same bodies and hands with Trade Federation battle droids: 16 by Farseer Eldar, on Flickr Except they are sturdier due to different legs and (in my case) shorter use. The Martians move through the aero tubes using hypersleds molded especially for them: 17 by Farseer Eldar, on Flickr The white hypersled glows in the dark. Mech This small mech is used for scouting and defense: 47 by Farseer Eldar, on Flickr The mech's limbs are very mobile, which is rather good for early LEGO walkers: 48 by Farseer Eldar, on Flickr The only flaw is the lack of knee joints: 49 by Farseer Eldar, on Flickr The right hand holds a cannon to repel enemies, and the left hand has a hook to lift meteorites: 50 by Farseer Eldar, on Flickr The cockpit is open and has a holder for a Martian pilot, and a printed control panel: 51 by Farseer Eldar, on Flickr Flyer Another vehicle in this set is a flyer (or convertiplane, to be precise). It looks similar to Scorpion from James Cameron's Avatar and Banshee from Starcraft II. 55 by Farseer Eldar, on Flickr The propeller engines rotate freely: 53 by Farseer Eldar, on Flickr The pilot is interestingly attached to the cockpit - only their arm is attached to a lever which is connected to one of the flyer's cannons: 52 by Farseer Eldar, on Flickr Transportation Now it's the time to review the most noteworthy feature of this set. The Martians can be transported through aero tubes using this pump: 42 by Farseer Eldar, on Flickr The pump is one very big part with some adjustments. It looks like some futuristic storage house or power plant. The black upper part, which is made of rubber, can be rotated to shange the direction of air flow. The aero tubes are flexible, transparent and not perfectly round. They should be plugged into purple solid connectors very tightly, so they will be disconnected with a click: 43 by Farseer Eldar, on Flickr This system was used again in two sets from Mars Mission line (7690 and 7691), but there the tubes were orange and human-built. And the aliens were hostile and didn't come from Mars, so this was a completely different theme. Unfortunately, humans (or other non-Martian minifigures) cannot ride or even get into the tubes - their arms are too large: 44 by Farseer Eldar, on Flickr Mizar needs to get to the red mech bay. He lies in a hypersled at the main station: 18 by Farseer Eldar, on Flickr To suck him into the tube, we should rotate the upper part of the pump counterclockwise until it stops and then squeeze it: 19 by Farseer Eldar, on Flickr Now the Martian can be seen within the tube: 20 by Farseer Eldar, on Flickr Then, we remove a stopper and place the tube in the required direction using gears and the steering wheel: 21 by Farseer Eldar, on Flickr 22 by Farseer Eldar, on Flickr There is another fork on Mizar's way, and here we also should set a course by moving the tubes: 23 by Farseer Eldar, on Flickr The stopper is removed: 24 by Farseer Eldar, on Flickr And then the tube can be moved on rails: 25 by Farseer Eldar, on Flickr The drawback of this process is that the supports are constantly shifting and can hang in air. Next we rotate the pump clockwise and slam it. Now the air pushes the hypersled from the rube, and Mizar rides to his destination. 26 by Farseer Eldar, on Flickr 27 by Farseer Eldar, on Flickr That's it! Mizar has arrived and is ready to work! 28 by Farseer Eldar, on Flickr 29 by Farseer Eldar, on Flickr Now Riegel must lead an excavation expedition, and he prepares to depart: 30 by Farseer Eldar, on Flickr But wait... He is stuck within the tube - probably due to his medal: 31 by Farseer Eldar, on Flickr In reality there is nothing to do with the medal. Sometimes Martians get stuck in tubes and cannot be launched. Nevertheless, the construction is made very soundly. We turn the pump counterclockwise, suck Riegel into the tube and place it to the left side: 32 by Farseer Eldar, on Flickr Next we turn the pump clockwise, push the Martian ruler forward, and he is now ready to lead the expedition: 33 by Farseer Eldar, on Flickr Buildings Let's take a closer look at the hangar buildings. Here is the biggest one: 34 by Farseer Eldar, on Flickr The "umbrellas" with tools and control panels are attached to the sides via bridges: 35 by Farseer Eldar, on Flickr At the top there is a tower from which Riegel oversees his domain: 36 by Farseer Eldar, on Flickr The flyer can be hung on axles: 54 by Farseer Eldar, on Flickr The tower holds a turning crane which is used to put meteorites to the site for further dissection and processing: 37 by Farseer Eldar, on Flickr This meteorite contains biodium - a substance used by Martians as energy source. They collect meteorites especially to obtain biodium: 38 by Farseer Eldar, on Flickr One purple "umbrella" (or "mushroom" if you like it more) has some control panels: 39 by Farseer Eldar, on Flickr These Martians should be really cold resistant - they walk bare-handed and bare-headed in the open air at -50 degrees Celsius (or -58 Fahrenheit). Under the second "umbrella" they store their equipment, which unfortunately does not suit their hands at all: 40 by Farseer Eldar, on Flickr 41 by Farseer Eldar, on Flickr Walkie-talkies (there are two of them!) and circular saws are common, but the grey wrench is a valuable acquisition. The aero tubes lead to mech bays: 45 by Farseer Eldar, on Flickr Each is painted in colors of different Martian mechs. The blue one corresponds to the heavily weaponized Red Planet Protector (7313), and the pinkish-red one - to the Recon Mech RP (7314). The light-grey studs are used to connect the mechs. It should be noted that the entire Life on Mars theme is rich in colors and non-standard parts. It had the first appearances of rare "sand" colors, such as sand purple, sand red, sand green and sand blue. Unfortunately, only two last colors are still produced nowadays. The bays can be disconnected from the tube ports: 46 by Farseer Eldar, on Flickr This set has only two bays, but three ports. The third port is supposed to be connected with a tan bay coming in 7316 - the Excavation Searcher. In conclusion, I will show the extra parts of the set: differently colored droid arms (both Martian and mechanic), another Riegel's medal and transparent studs: 56 by Farseer Eldar, on Flickr Pros/Cons Pros: + Tubes + Tubes + TUBES!!! + Rare colors + Non-standard parts + Martians + Mech and flyer + No stickers! Cons: - Martians sometimes get stuck in tubes - Supports not always stand firm - Tubes are not compatible with traditional minifigures - Primitive build - Not so many Martians - No humans Thank you for reading! And what can you say about this set?
-

Futuron Flyer hover car - 7133 MOD (real life MOC) - with alien driver mini-figure
Murdoch17 posted a topic in LEGO Sci-Fi
This ship is an advanced type that was built for the Futuron Corp. However, only one out of the hundreds built was ever painted green, as it was for the CEO of the company. This specific one was nicknamed the Futuron Flyer, and was used by the CEO and two of his successors, until the Blacktron III wiped out most of the Futuron forces off the galactic map. The rest of the fleet and it's personnel were put into cryo-sleep years ago and sent randomly jumping around the galaxy until such time the Blacktron menace was eradicated. The CEO at that time sent his ship with him on-board to the Galactic Council to let them have the secret call signal for the eventual return of the fleet when needed. Unfortunately, Haley's Comet intervened, crashing into the Flyer and killing the CEO, but not before he gave the code and a mission to deliver it to a local alien inhabitant. Only time will tell if it is ever delivered to it's proper destination.... This ship is actually a MOD of set 7133, Bounty Hunter Pursuit from the 2002 Star wars line. It has been repainted green and white with a Jack Stone piece used as a canopy. I lack proper Futuron figures (especially the recent green one!), so this Star wars alien fills in. I've been dying to build this ship with this cockpit piece since the Jack Stone set came out in 2003. Thanks to LDD, I have finally built it.... 15 years later! The rear of the ship has large jets on it.... why, you may ask? The ship needed an obvious means of propulsion and these spare parts fit the bill. The cockpit (which is from Jack Stone set 4653, Dump truck) opens up to reveal the ship's controls. This enigmatic figure is a native of Haley's Comet and was entrusted with the signal to retrieve the Futuron forces from hyper space after the death of the original ship's owner, the CEO of Futuron Corp. As usual, comments, questions, complaints, and suggestions are always welcome! -
Sector: A04 Tags: Military, Vehicle, Spaceship, Land Vehicle Begin Log: I travel over the surface of Mynderis in the new M.A.N.T.I.S. Fly Class Flyer, searching for the "special package" I'm supposed to pick up. I've found it! Switching from Fly mode to Raven mode for landing. Secured the M.A.N.T.I.S. Tank. I'll drill around the perimeter until a driver reports in. Some back and front detailing. I've found a quiet lava spring to drill into. Group shot: End Log This was my first attempt at more detailed vehicles and landscapes. I'm very happy with how the tank's cockpit function turned out, how much detail I packed in, and how complicated a build it was. It's hard to see them, but I've even added a few car fenders/bumpers to the tank. Comments welcome!
-
Hey! - I've just built something some time ago and I want to show it to you! - I've created a mix of a helicopter and a spaceship. I just wanted to build something futuristic. Something 'spacey'. - Hope you like it!
-
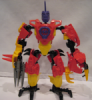
The biggest Beast seen yet, this Hydra Beast is not one to take lightly! With four heads that spew knockout gas, corrosive liquid, molten lava, and electricity enough to shut down a Hero, this proves that four heads are tougher than one!