Search the Community
Showing results for tags 'Expert'.
Found 28 results
-
(Putting this together rather hastily) There has been very brief mention in the Creator thread of a new 18+ Titanic model for 2021, rumours having been leaked in the last 24 hours. Considering that the last ship LEGO made in an expert style was the Maersk one, which I missed, I'm particularly excited about this one. Thanks to @VanIslandLego for this one. No other info is known. Discuss below.
-

[MOC]◄Ford Bronco 1968►[2022]
Michael217 posted a topic in LEGO Technic, Mindstorms, Model Team and Scale Modeling
Welcome to my garage LEGO!!! Hello! My name is Michael. I'm a Builder from Russia, I love muscle cars! Ford Bronco 1968 This time I present to you the legendary American Ford SUV! Description: - Drive - 2L motors - Steering - Servo - Power Supply - Small BB - The steering wheel turns with the wheels - Steering with Ackerman angle - Open the doors, hood... - Well-designed interior and space under the hood Instagram: https://www.instagram.com/lego_muscle_garage/ Join my group in VK: https://vk.com/legomusclegarage All photos on the link: https://bricksafe.com/pages/Michael217/ford-bronco-1968 Enjoy your viewing! Rate, comment! Thanks!) -
Hi, the Mediterranean Villa is now on LEGO Ideas, hope you like it and vote for it!! thanks!! LEGO IDEAS - Mediterranean Villa
-
10290 sadly won't be a Delorean Time Machine, instead it's a lovely vintage pickup truck. From Promobricks: https://www.promobricks.de/lego-10290-pick-up-truck-offiziell-bild/126707/ "A perfect escape from modern life! Get ready to travel back to the 1950s with this LEGO® Pickup Truck (10290) building project. Packed with details, this true-to-life model recreates the vintage pickup truck shape with its rounded lines. Explore the model to discover realistic pickup truck features like a stepside bed, opening doors and tailgate and removable wooden side railings. Celebrate the seasons This truck is hard at work all year round, delivering produce from Green Farm. Create a seasonal display with the many accessories included. There’s a wheelbarrow with flowers and a watering can for spring. For summer there are 2 wooden crates, tomatoes, carrots and a milk bucket. Autumn brings a crate of pumpkins, while for winter there is a wreath and a festive gift. Love the journey This set is part of a collectible series of LEGO buildable models for adults who appreciate beautiful design. It offers an immersive build and will make a top gift for any fan of vintage pickup truck models. Build a faithful LEGO® model version of a vintage 1950s farm pickup truck. Explore all its realistic features then place your truck on display to admire this classic collectible model. This LEGO® Pickup Truck 10290 buildable model set offers a rewarding building project for adults as you recreate the iconic rounded pickup truck shape from a classic era in vehicle design. Explore the model to discover its many realistic pickup truck features like a stepside bed, opening doors and tailgate and removable wooden side railings. Fresh from the farm! Discover lots of seasonal accessories including a wheelbarrow and watering can, vegetables and a milk bucket, a crate of pumpkins, plus a festive wreath and gift. Steer the truck then open the doors to inspect the interior. The bonnet also opens to reveal the engine. Designed especially for adult LEGO® builders, this set offers a rewarding build with a collectible display piece to cherish. It’s also a great gift idea for anyone who loves vintage 1950s pickup trucks. Measures over 5.5 in. (14 cm) high, 13 in. (33 cm) long and 5.5 in. (14 cm) wide. This LEGO® 1950s vintage pickup truck set is part of a range of creative building sets designed for adult building fans who love stunning design, intricate details and elegant architecture. LEGO® building bricks are manufactured from high-quality materials. They’re consistent, compatible and connect and pull apart easily every time – it’s been that way since 1958. With LEGO® pieces, safety and quality come first. That’s why they’re rigorously tested so you can be sure that the model is as robust as it is beautiful."
-
[MOC] ◄Dodge Challenger 1970► [2021]
Michael217 posted a topic in LEGO Technic, Mindstorms, Model Team and Scale Modeling
Welcome to my garage LEGO!!! Hello! My name is Michael. I'm a Builder from Russia, I love muscle cars! Dodge Challenger 1970 This time, I collected an opponent for the Barracuda, in real life, both cars were assembled on the same base, outwardly they differ only in front and rear) I did not copy, but made a completely new model from the chassis to the body and developed it to more recognizable features, the design became more complicated, and with this the number of parts increased hundreds of times! Because of the large tilt of the whole car, it has got a castor, maneuverability is very good, as well as speed, because under the "hood" is a Buggy engine) Description: - Length 46 cm, weight 1550 g, 2013 details! - Drive - 1 Buggy motor -- Steering - Servotronic - Power supply-Small BB -The steering wheel turns the wheels -Open doors, hood... - Fashion salon -Nitrous oxide! - The receiver is hidden under the torpedo - Roomy trunk ( two PF remote controls go into the light one) - Front independent suspension with positive castor -Rear axle with Panar traction is installed - A lot of system Instructions are available for purchase! 9$ - https://rebrickable.com/mocs/MOC-66388 Instagram: https://www.instagram.com/lego_muscle_garage/ Join my group in VK: https://vk.com/legomusclegarage All photos on the link: https://bricksafe.com/pages/Michael217/dodge-challenger-1970 -
Octan Avenue, the newest addition to the modular street! I promised myself I would complete a new modular in less than the year it took to complete my previous: Baseplate Alley, but here we are. Exactly another year since my previous model, here’s my eleventh modular: Octan Avenue (yes, I'm simply using a well-known Lego brand as a street name, despite the building having nothing to do with it!) The design of this modular began in Autumn of 2019. On my way to university, every day I would go past a building in Les Rambles in Barcelona that just seemed quite fitting to turn into a modular. While in no way a stunning piece of architecture, the entrance to the Plaça Reial is orthogonal enough for it not to be a nightmare in Lego bricks but has quite an interesting mix of porticos, asymmetrical façades and clearly marked centrepieces in the corners to the middle street. This building reminded me of another similar building from Palma de Mallorca. Again, mirrored façades with an alley in-between. This one, though, with much more adorned Art Nouveau flair. For my model, I kept aspects of both sources of inspiration plus a bit of my own magic. My building has the alley over on one side, simpler window designs and the running portico (like the building in Barcelona) but much more pronounced tower-like elements protruding with very prominent designs on top (like the building in Palma). Building the tops of the towers was remarkably difficult. Because the yellow building naturally has more presence as it has more volume, I needed a spire that would draw attention and finalise the design effectively but not overshadow the blue building. This is why the tower top in the blue building is wider and a tiny bit taller. Hand on heart, I was stuck doing all kinds of spires for both buildings for a good month and a half until the combination of these two worked well. A simple 360º view: ============ Interiors: My focus is always on exteriors and nailing those. Interiors are always the second half of the job. I like coming up with original quirky shops to fill my modular and in this case, they are: Yellow Building: Model Store This one was quite fun to do. The ground level has models of two airplanes: 10226 Sopwith Camel and the one the kid in 10270 Bookshop is playing with (he had to buy it somewhere didn’t he?) The middle level has a model of the recent 10277 Crocodile Locomotive and of my three first modular: Magic Shop, Italian Villa and The Iron Horse (2016). You can find them on my Flickr, Instagram or their respective EB topics. The top level has five more mini-modulars of mine: Sweets & Co, A Summer in Tuscany (2017); Klee Corner, Disco 2000 Vinyl Store (2018) and Baseplate Alley (2019). Blue Building: Rug Store For the blue building, I needed a shop that housed items on its walls as it barely has any floor space. A rug store is ideal. The ground level houses the staircase to the middle floor and a bunch of boxes and items that are little Easter Eggs to official modular. Both the middle and top floors and full of rugs! My personal favourite is the black and white one on the middle floor. Video of the modules flying around and showcase of the interiors: ============ Like I did with my previous model, you can have a look at the 3D model to explore all the little nooks and crannies: Exterior Interiors ============ Thanks for reading through and hope you enjoy this model!
-
It's been four years since the last classic European car graced the CREATOR range, and I said then I'd be delighted to see more of them. Since then we've seen the handsome Mustang and the sleek Aston Martin DB5 - technically a European classic car but I haven't counted that one! The range's latest offering, the Fiat Nuova 500 ('Cinquecento'), fits neatly into the category of small cute classics previously epitomised by 2014's 10242 Mini Cooper and 2016's 10252 VW Beetle. I was delighted to see the widespread use of a rarer colour (dark azure) in the Beetle; now Bright Light Yellow takes centre stage for the Italian classic. The Fiat 'Nuova' 500 was launched in 1957 as a successor to the 500 Topolino and was designed as an inexpensive, practical city car with a rear-mounted engine following the style of the successful Beetle. Its 479 cc engine boasted a stunning 13 horsepower (my lawnmower is 430 cc). Just short of 4 million were produced until the model was succeeded by the Fiat 126 in 1975. Earlier models featured rear-hinged 'suicide' doors; these were replaced with conventional front-hinged doors with the release of the 500F in 1965. Review: 10271 CREATOR Fiat Nuova 500 Parts: 960 Price: £74.99 | $89.99 | €79,99 | AU$139.99 Like the Beetle and Mini, the LEGO Fiat no steering, but aims at a realistic body for display with authentic features. Coming in at the same price as the VW Beetle (in the UK; the latter is pricier in most regions), the Fiat consists of over 200 fewer parts. Let's see if that price hike is worth it. Box I confess that at first glance at the box i thought this set was ordinary LEGO yellow, and it was only in looking at the little painting on the box that I noticed the paler tones of Bright Light Yellow - it's particularly noticeable when you compare to the yellow round tile on the artist's palette. The box art mimics approximately the scene of the painting, with the car posed attractively in front of Rome's iconic Flavian Amphitheatre, or Colosseum. I was disappointed not to see a tiny easel in the painting. Some lens flare adds sparkle. Cobbled streets abound. The box rear shows off the car's attractive rump, along with the set's other features which exceed the bounds of their respective insets. The car stands out beautifully in the otherwise nondescript and unidentified back street; a pronounced sepia filter provides a warm which contrasts but complements the dark blue of the CREATOR Expert range box trim. Sadly, thumb tabs are the designated means of opening - disappointing for an adult-oriented set such as this. I am pleased to see some schematics along with real set reference images on the box top: This saves me the job of sourcing my own reference images! They've even produced a LEGO schematic. The box contains some nine polybags - three modules with three bags each, the instructions, and a separately-packaged fabric part, which you can see here. Instructions The manual comes in a separate polybag which also contains the sticker sheet. There's no cardboard backing but the wrapping has in my case done a good job of preserving the booklet. I love this! The square manual evokes an old Polaroid photograph, and if that weren't obvious enough there's a rotated panel within the picture like a photo within a photo. The faded colours and dress provide the perfect 60s vibe and (even though I'm not that old) have me pining for family holidays long-since passed. Interestingly the car featured in the picture is an older model with rear-hinged doors. I think this is the first time I've encountered a LEGO instruction manual that doesn't feature the set on the cover. A downside to the cute square booklet is that it doesn't stay open, and I wasn't about to go breaking the perfect-bound spine just for the sake of some photos. The instructions are clear against a duck-egg blue background, with suitable callouts, and extra guidance for the few tricky bits. Some four double-pages at the front provide some interesting history into the car and the FIAT company. I'm a big fan of these educational instructions - what a fabulous way to preserve our cultural heritage. Also in the instruction pack is one of the prettiest sticker sheets I've ever encountered. The decals for the car are reasonably easy to apply, though the smaller square ones all go onto curved parts. They are well colour-matched. The 5x5 square painting is gorgeous. As is customary, a variety of nationalities are featured in the car registrations. The Danish (DK) and German (PN) plates both feature the set number formatted to a realistic registration number (although in Denmark, 10.xxx numbers were for motorcycles I believe). PN is not an obscure region of Germany but instead refers to the set designer Pierre Normandin. The Italian plate is worthy of note. 'TO' is the area code for Turin (Torino; the 'T' in FIAT and the firm's city of origin); 'F01965' can only refer to the 500F model which was released in 1965 and was the first to feature front-hinged doors, as does the LEGO version. Parts The three modules' parts are shown in the thumbnails below: click the pictures to see larger versions. I didn't identify any new moulds in this collection, but the headline is the shear number of parts appearing for the first time in bright light yellow. This colour has been in the ascendency for a few years, featuring for example as panels and bricks in Friends sets, or as the secondary colour of the new livery of the CITY fire sets, but I have not previously encountered such a fine spread. This extends too to the SNOT parts; there are SNOT brackets and bricks of various conformations all in BLY - contrast the Beetle whose extensive SNOT pieces were for most part grey. Otherwise, the 10x4x1 windscreen and the 4x2 2/3x1 trans-clear curved bricks are found only in the Old Trafford set, and there are three (one spare) 1x1 round tiles with a lovely FIAT logo - see later. The four medium dark flesh arms-with-pins in the centre photo took me a while to identify; they are originally Nexo Knight parts found more recently as ice cream cone limbs. Build I won't go through this exhaustively; instead I'll just try to give you a feel for the build and highlight some interesting bits. We join here fairly early in module 1. Of some interest is the construction of the chassis: In the centre are dark grey 2x4 plates with pins on each side, usually used as wheel axles, here connecting to the technic beams on either side. The centre beams are connected to the outer beams and the black 2x2 plates with technic hole via 3L pins. The result is a strong floorpan only a brick high. The underside is reinforced; see here. The rear bumper and lights is attached via SNOT plates, and also unusually with the 2x3 clippy-tile. I remain uncertain of the purpose of the two blue stud-pins on either side of each end of the chassis; they serve no apparent purpose except possibly to help put the axles into the right holes. If that's the case, I can't help but feel a little patronised. Next we build up the rear, at the start of Module 2. You get to see how the wings are attached at a slant using hinge-plates in a technique that will be familiar to anyone who has ever built an X-wing. See here for a part-assembled view. Above these slanted sections, SNOT-attached curved plates help define the car's double-curvature. Note the small 2x2 with corner cutaway, which attaches solely to the single stud of the grey headlight brick you can see mounted on its side - it's next to the turquoise brick if not immediately obvious. I always like headlight bricks used this way. You can also see the gearstick and handbrake, along with the bars to which the chairs will be attached. Up till now the build has been enjoyable, without being especially challenging. It starts to go up a gear at this point. r The dashboard section is a SNOTty conundrum that requires a bit of mental gymnastics to keep oriented correctly. This is made harder by the fact that a sticker needs to applied to one of the inverted 2x2 curved plates, seen here at the base of the dashboard but will face to the rear of the car when mounted - and it will be all too easy to set it upside down. The black block seen here is the fuel tank, which will attach to the visible forward-facing yellow studs of the dashboard section therefore reverting to studs-up. Towards the front are two black 2L pin joiners, the purpose of which is a little mystifying at this point. I (wrongly, as it transpired) assumed they were to attach the headlights. Next come the doors. I've part-deconstructed one here to show how it's made. 1x2 SNOT brackets - regular and inverted - hold some 1x2 clicky-hinges; these attach to 2x1 clicky hinges to produce a half-stud offset to which the contoured door upper is attached, delightfully smooth with curved plates on inverted tiles. Note the 1x1 corner panel brick just in front of the door hinges, and the 1x4 brick-with-slot at the base of the door - these are significant as will be explained later. On the right is the rear window made out of a door panel. The result is slightly asymmetrical, but it's barely noticeable. Moving into Module 3, the front panel is attached to the the inner studs of the 1x2 SNOT bricks, and the two 1x1 grey inverted brackets. You might think this would be a little weak, but the headlights help to keep it attached. Here you can also see that the black pin-joiners have nothing to do with the headlights, which instead will attach to the forward-pointing bars of the black 1x1 round-plates-with-bars (these things) sandwiched between 1x2 round-end plates. Why the round-end plates? And, for that matter, the heel-print tiles? Answer: they allow the wings to attach at a slant. Regular plates or bricks would interfere with the square front ends of the wings. Here, also, the purpose of the black pin-joiner part is made clear: the wings are seven studs long, and the 1x2 curved-top bricks require a 1x2x(4/3) curved brick to fill the gap. This has a protruding plate, and the black cylinders accommodate and also support this. Note the as-yet-unattached wing at the bottom of the picture. The free end of the hinge will be mounted on the black and yellow studs just in from the door hinge, and this reveals the reason for the 1x1 corner panel: it accommodates the rounded pivot of the hinge plate. Kudos to the designer for the problem-solving skills on display here . Finally, the secret of the folding roof is revealed to be more of those mini-frying pan pieces, this time in BLY. They leave a small visible irregularity in the roof edge, but I'm glad they are at least colour-matched. It is then a little tricky to attach the windscreen and the luggage-compartment cover without breaking it, but when it's done, plus wheels and the set's extra bits, we have a finished car. Overall, the build is deceptive. Apart from a few tricky bits, it is smooth and easy to follow, but enjoyable; it is all too easy to miss some wonderful design touches that help recreate the car's curvy outline. I'd rate the difficulty as 'Expert' (harder than Average but not Master or Legendary ) The Complete Set First impression: yup, it's definitely a Fiat 500. I think the LEGO version has the iconic double-curved bodywork down pretty well. I was pleasantly surprised by the slanted front and rear wings, which help to recreate the ovoid shape of the Fiat, and weren't immediately apparent from the box art or my brief look at the promotional pictures before receiving the set. It looks great in Bright Light Yellow which I think was the perfect choice: whilst the car would look stunning in a bright mid-blue tone, or dark blue or green, these have been used recently for CREATOR cars; possibly the only other colour I could see making such an impact here is the very rare Medium Green. The head-on view isn't the car's most interesting angle. The windscreen is perhaps rather obviously too rectangular, a flaw of the medium of course. There should be a curve to the top edge, and the screen of course should bow slightly. The front is nicely contoured, and I like the use of the unicorn horns to mimic the flashing here. I'm not quite so keen on the headlights, which I think might have been better made with inverted domes. You can see I've put on the Italian plated for the Italian car. A three-stud-long tile is used (3x2 at the back) which works well. The curvy rear has I think turned out nicely, helped by the stickers which are a reasonable representation of the vents for the rear engine. I'm not so keen on the flare of the wheel arches form these angles, but they are less obvious from any other viewpoint. Ideally, the lip of the wheel arches should extend all the way round, but no such part exists. You might also notice that the construction differs front to rear: Inverted slopes are used at the rear, but I think the SNOT-mounted cheese wedges at the front give a smoother more circular outline. The contour of the roof toward the rear is a little fussy from the side, with an obvious step between the roof and rear window. I do like the double-curve of the sides, but this comes with slight problems: notice the half-stud gap behind the door handle, caused by the upper bulge being offset, but this improves the front edge of the door, where the cut corner almost perfectly matches the rake of the windscreen. Ideally the top line of the upper curve would be continuous with the curve of the front luggage compartment; it's close, but not quite matched, and interrupted by the windscreen. The tricky curves of the rear have provided a significant challenge, which the designer has worked hard to overcome. The result is mostly successful: The convex engine compartment cover works superbly, and the light clusters look great and are instantly recognisable. The transition from the rear curve to the side is a little awkward: above the light clusters, there are two 45-degree slopes topped by a 33 degree cheese wedge, then moving to the almost-vertical bottom end of the yellow curved brick: the 33 degree cheese looks a little incongruous and I wonder whether another 45 slope would work better. I like the way the 45 slope echoes that of the cut-corner curved slope on the side, but below this the curved end of the rear wing ends a little messily. I can't suggest how to improve this though, and I am being super-picky here: the overall result is lovely. The birds-eye view really emphasises the car's ovoid outline. From here almost everything is smooth, and I hope you agree that the slanted wings are a triumph. I also like the minifigure skates as door handles. Here's a real one, in a similar colour, for comparison: The LEGO version has managed to reproduce the double-curved body sides pretty well, with only the step at the sides of the windscreen interrupting the curves. Missing are the tiny wing indicator lights, which i believe were standard on the 500F (correct me if I'm wrong), and the door mirror, which does not appear to have been mandatory and may even be a later addition. The lack of door mirrors does make the LEGO car look a little odd, conditioned as I am to seeing them on all cars these days. Features The luggage compartment cover lifts to a maximum of about 45 degrees to reveal a poky space taken up almost entirely by the fuel tank and spare wheel. No room for picnic baskets in this car. On the plus side, the spare wheel is the same size as the other wheels, unlike the Beetle's. I've switched to the German plates for this section. The inset shows a close-up of the 1x1 round FIAT tile, which is pretty and much nicer than the VW equivalent. You might notice here a slight quirk of the construction: the front panel sits half a plate height proud of the main body; the 1x8 tile on the top therefore half a plate behind. The latter lines up perfectly with the compartment cover when closed. It's barely noticeable, and if anything helps to smooth the contours. I'm not so keen on the black bars to which the headlights are attached, and wish they'd used light bluish grey. The doors open wide - really wide. On the inner aspect of the door is some dark red to match the seats, a telephone handset for the inner door handle, and an antenna to mimic the window handle (not a winder: it rotates the quarterlight window). Recall that I mentioned the 1x4 brick with groove at the bottom of the door: here you can see the reason for its use: it allows the door to close around the protruding pivot of 2x2-2x2 hinge plate at the rear (second panel). Again, an ingenious solution. The front seats flip forward, as you can see, using the ice cream cone arm pieces. True to life, the dashboard is rather Spartan body-coloured painted metal, and the steering column features an indicator lever and a single speedometer. You may just be able to make out some cheese wedges under the steering column to represent pedals. Compared to the real thing, the LEGO version is reasonably accurate. There's even a white round-end plate behind the speedometer, which would a more impressive nod to accuracy were the steering wheel also white. The wheel should probably be larger, but having seen the problem of the oversized steering wheel in the Mini, I think too small is better than too big. I've taken the roof off to give a better view of the interior. The decal does a good job of imitating the real dashboard switches, though there should be one more and some indicator lights. Here too you can admire the handbrake and gearstick, the latter crudely but effectively realised from a flick-fire pin in a ball joint. There's a surprising amount of space for such a dinky car; you could even sit two adults in the back, provided they have short legs and don't mind getting intimate. I'm not sure how authentic the white tops of the seats are; I can't find a reference image to a car which has them, except for this model. The rear engine is also given a bit of detail. True to life the cover opens downwards; the cover is perhaps a little thicker than necessary, but the effect when closed is pleasing. Here the engine looks like a rather randomly thrown-together collection of parts, but when compared to the reference image below, you can see that the designer has gone to some effort to make it accurate: Bonus points for the gold flower piece to match the oil filler cap! Finally we should look at the accessories. There's a sturdy travel case, emblazoned with national stickers of Switzerland, Sweden, Italy, Denmark, Poland, France, Germany, and Somewhere; there's a tall easel on which can be mounted the really quite beautiful artwork on a 5x5 grey tile. The accompanying artist's palette sports four paint colours only one of which (red) features in the painting: the yellow is regular yellow. Only the palette and brush fit in the trunk, requiring the easel to be stowed in the passenger footwell and poking out of the roof. The automotive masterpiece, meanwhile, must be thrown unceremoniously onto the back seat like grocery shopping or children. The trunk mounts easily onto the rear luggage rack, where the combination of reddish brown and MDF colours complement nicely the light yellow of the car. Comparison So how do the European small cars compare? Bear in mind that while the Beetle and Fiat and built at approximately the same scale (the VW Beetle is a metre longer than the 500), the Mini should be the same size as the Fiat. I now notice that somebody, probably a small child, has tipped both the Fiat's seats forward. I'm really quite positive about the Fiat, but I can't help feeling that it looks a little bland compared to its older siblings. Perhaps it is because the front is relatively featureless. The (intentional and authentic) lack of door mirrors is particularly noticeable here. All three look amazing from the rear. The Mini again has an unfair size advantage, and I am perhaps not doing the Fiat justice by showing it straight on where its narrow profile makes it seem that much smaller. However you feel, I think you will agree that the three make a great collection. Conclusion I really like this car. The slanted wings and double-curved bodywork help to capture the essence of this automotive classic, working well despite the constraints of medium of LEGO. The bright light yellow livery helps emphasise the car's playful nature, whilst bringing yet another peripheral colour to the LEGO mainstream. Realistic features abound and add to the display potential, and it will sit happily on the shelf by itself or in the illustrious company of any of the CREATOR Expert cars, including the Mustang and Aston Martin. The selection of BLY pieces will delight any parts-collector or MOCer, especially given the array of SNOT pieces. The build process is satisfying, and in the latter stages both entertaining and somewhat challenging, with interesting techniques from which I've certainly learned a thing or two. And now I find I have a conundrum. I reviewed the Beetle in 2016 and was quite critical; it is for the most part a great set, and an interesting build. It is currently still available, and in the UK is the same price as the Fiat, despite some 200 more parts; it is perhaps more interesting to look at, and not just because it is physically larger. On paper, the Beetle is the better set of the two. However, there is something about it which didn't sit right with me, and still doesn't: mostly it is the steep rake of the windscreen which resembled more a 2CV than a Beetle, but also the chunkiness of the wheels and wheel arches always felt a bit off to me The Fiat doesn't really suffer any of these issues. Aside from a few minor cosmetic substitutions, I don't think I would change anything about the set as it is, with the currently available parts, and I don't have any major criticisms of this set. And yet, if you asked me which of the two you should spend your hard-earned £75 on, I would have to say ... the Beetle. If you can afford it, get both. The Fiat is a better rendition of the original car, and has a wonderful informative instruction manual usually the preserve of Ideas or Architecture sets. Design 9 There's very little I would have done differently. Build 8 A little mundane at the start, but gets interesting from Module 2 onwards, with some mind-screwing SNOT work and some fascinating solutions to tricky problems. Parts 8 Lots of useful SNOT parts, and a ton of parts that are new to Bright Light Yellow. If you need BLY, get this! Play/Display 8 The car's small size and narrow profile might make it look less imposing compared to the Mini and Beetle, but its colour and curviness do make it stand out. Value 7 Parts per pound, it is still great value, although perhaps not compared to the Beetle. Whether this difference is due to licensing (TLG has a long history of licensed VW products) or the extended manual, I don't know. If the latter, I will just quote myself: Overall 80% My score 9/10 I love this set. Fiat or Beetle? Follow your heart. Oh, and TLG? More classic cars please! Rufus's 10252 Beetle Review Fiat 500 on Wikipedia
-
Hello everyone, in the near future I would like to show you a little bit of my Lego City, which is still under construction. To begin with, here is a video about the beach area I made yesterday. What do you think? Beach Area - Bricksonville Edit: latest video added (17.07.)
-
https://ideas.lego.com/projects/2fc13079-3c2b-4037-b71e-66b0904e7ca2 I love the modular buildings of the Creator Expert Line, this project is inspired by model n 10228 Haunted House. My construction is perfectly adaptable to the other Modular Buildings. Normally Lego Modular are made up of 3 or more blocks with a top view. I prefer to open the construction halfway to the side because it allows for greater playability and a better view of the internal rooms. Obviously it's my personal opinion. I have used Lego Digital Designer for the project while for the rendering Studio. The building consists of 2384 bricks and is divided into 3 levels. Ground Floor: Living Room First Floor: Kitchen Second Floor: Bedroom and Bathroom Measures 15.4” (39cm) high, 9.4” (24cm) wide and 9” (25cm) deep. Recreate the charm of a Victorian-style home that you might discover in many European villages or cities. The 3-storey house has many fun and surprising details, including a beautiful garden with barbecue, an elegant living room, a functional kitchen, a relaxing bedroom and a refined bathroom. Includes 2 minifigures. Collectors will love to display this large set with pride alongside other modular buildings.
-

LEGO Creator 2019 - Rumors, Discussion, and Speculation
Digger of Bricks posted a topic in Special LEGO Themes
Discuss everything pertaining to sets released for the LEGO Creator theme in 2019 here, whether it be for the "Three-In-One" or Expert subthemes. If you wish though, discussion of the annual Expert subthemes for Modular Buildings, the Fairground sets, Landmark builds, Expert-scale cars, and the Winter Village line particularly can take place over at these respectively linked topics instead: Eurobricks - Modular Building Sets - Rumors and Discussion Eurobricks - Fairground Sets - Rumors and Discussion Eurobricks - Creator Expert Landmark Buildings - Rumours and Discussion Eurobricks - Creator Expert Cars - Rumors, Discussion, and Speculation Eurobricks - Winter Village Sets - Rumors and Discussion This post will be updated as further information arrives, including official set numbers, names, and images. Futuristic Flyer (31086) Dune Buggy (31087) Deep Sea Creatures (31088) Sunset Track Racer (31089) Underwater Robot (31090) Shuttle Transporter (31091) Helicopter Adventure (31092) Riverside Houseboat (31093) Race Plane (31094) -
Well, after a long period of not doing much besides the giant Eleitian Central Command model, I present to you my newest model, The Cliffside Villa! The idea came about last Sunday, I was procrastinating on doing stuff I was supposed to, as one does. I decided to expand on the bridge, which I had been building as a standalone concept but couldn't figure out what to do with. I was going to build a fairytale castle on the cliffs that I eventually made behind the bridge, but then it morphed into an entirely different building altogether! The porches, stained glass window, and other elements of the actual pavilion came about next, after I'd laid the groundwork (literally) in the form of the cliffs. I then decided to make it into a combination of my previous Temple of the Moon Maiden MOC and something more open to interpretation. So it could be used, (it sits on a baseplate totaling 32 x 48) as an addition to a modular city! Perhaps a large city park with a pavilion, or some form of garden! From my official description: It's a fine spring day at the Cliffside Villa! The Moon Priest contemplates the deep questions of life on the porch, while his daughter strolls the elegantly appointed walkways of the garden. Two guards stand sentry by the staircase, protecting the inhabitants of the Villa from harm. Explore all the secret nooks and crannies of this large set, from the bell tower to the fish pond to the stained glass window behind which the statue of the Moon Maiden is placed! Set features: - 2568 Pieces - 7 Minifigures: The Moon Priest, Moon Priest's Daughter, Statue of the Moon Maiden, (2) Garden Statues, (2) Guards - Villa features a large stained glass window, metallic Statue of the Moon Maiden on a raised pedestal, and two spacious porches. Upper story features a movable bell! - Elegant bridge crosses a large frog pond filled with lily pads and other aquatic plants. See if you can spot the frogs hiding down there! - Statuary adorns the garden, which is built onto the cliffs with beautiful brick-built birch and cherry trees in full bloom. - Relax on the small bench set below one of the statues! - Features multiple unique pieces, such as the Ornamental gold fish adorning the roof, the Moon Priest's staff, and much more! - Spacious basement level beneath the Villa is perfect for placing hidden treasure or whatever you need for added suspense! But don't just follow that one story for this model, use your imagination to make it your own! This model, on baseplates totaling 32 x 48, can be placed as a standalone model or a complementary model for your modular city! Use it as a pavilion, a city park, or a historical monument in your LEGO town. This MOC is now on LEGO Ideas! If you want to, please help support it, I'd love for it to be one of the lucky few that makes it! The Cliffside Villa: https://ideas.lego.com/projects/4bfda07a-beb1-440e-bcfe-d9742e9d3746 Feel free to leave any comments below, and keep on building, everyone! :)
-
It's been a while, sorry for that, but I can finally present you with the interview I had last year during the LEGO Fan Media Days 2017 with Micheal (Mike) Psiaki, LEGO Creator and Creator Expert Designer at TLG. (sorry for typo's and spelling mistakes, it's not 100% checked and verified) INTERVIEW You are Creator Expert designer. Are you involved in modular buildings? So far my involvement with modular buildings has been more like doing some of the small details and not the building itself but in the future you can probably expect to see some module built by me...we'll see *laughs* I'm asking because we do have a lot of questions about modular buildings, but we'll just ask and see if you can answer them. One of the questions is; how do you determine the next modular building? You'll probably have a long list of potential buildings. Normally when we're developing a new model we actually kind of go through a lot of different...uhh...not necessarily committees, but a lot of different people at LEGO are involved in choosing what the new product will be. We've been pretty fortunate with the modular buildings. They've been quite successful, so all those different...stakeholders we call them ...are quite trusting of us. And they pretty much let us do what we want. So normally when you're making a new model you're coming up with a lot of different proposals and showing ideas to a lot of different people and they're giving their input and then you're narrowing it down, but with modular buildings we can essentially choose what we want to do, just as a design team. And then you just do it. So for the last, for the last.... forever, Jamie (Jamie Berard, https://www.lego.com/en-us/themes/creatorexpert/explore/designer-bios/jamie) has essentially been in charge of that and he will just make the make model that he and maybe one or two other people agree on should be the next one. As to how that will go in the future...uhhh...I'm sure Jamie will still be involved. But yeah we do have a list of buildings that we have kind of made our dream list of...eventually we need these things. We'd like to do these things in City. But then also sometimes we just have a more generic idea, like, hey, let's do a restaurant. Uhmm...trying to think what the first modular building was, that I was involved with...was the Parisian Restaurant. In that one, the idea had just started out that it would be a restaurant and then it kind of took on a Parisian style throughout the development and ended up as it was. So it's usually a very loose idea like that, that the model with start with...like the brick bank was just a bank. That's the only idea and then however that evolves was like, adding things later on, like, let's have this laundromat on this side and all that stuff is just kind of what we just add in as we please. The building style you choose is obviously depending on the model you choose. But like you said you chose a restaurant and then it turned into a Parisian restaurant. How does a process like this go? This all comes down to like, traditionally it's just been Jamie working on these models and what we do a is we just kind of build all year long, we've just seen what new elements are coming in. We're just building kind of little funny things like...uhmm...on the Parisian restaurant, there's this detail with the feathers that go along the top. You know, I think Jamie had that sitting on his desk for like six years or something. One day he got some of those and made this thing into something that could be a funny detail in a building eventually. And then those are just kind of start getting pulled together and you start to see a style emerge. It's almost just letting it happen. So taking some choice details that we want to put in and the style kind of emerges from that and then other things will change to fit that style. So I don't know that we've ever really made a conscious decision of this. You know, when we start from the beginning that this building will be this style and we'll kind of work towards that style. It's more we're going to we're going to make something that we think is cool and nice. And when sthe style kind of come in, then we'll go back and kind of refine things to match the style, if we feel the need to do that. Some generic Questions about the Creator Expert series. When is a set considered expert in the Creator series? What are your goals? So Creator and Creator Expert are two totally separate product lines at this point. So it's not like we start with an idea and then we develop it and then we decide, is this Expert or is this regular Creator? So for Creator Expert we're already thinking; this is the portfolio that we want to make for the next year and in Expert we want to make models that are for higher age fans. Adults, older kids, we are calling everything 16 plus, I think for the most part. The Winter Village ones are a little more down in age, so we start with that idea that we're building a model for more hardcore LEGO fan. What is it we do then that will make it appealing to them? It's a lot about how the model is built. It's kind of different techniques we use, but it's also about what parts we use. So we want to use fun kind of new different building techniques or just really crazy things building techniques in really wild ways. We also want to use parts that are fun or that are either in new colors or new shapes or just not seen before. Like on this one (10257 Carousel) where we're using a dinosaur tail in a City wheel arch to make the shape. It's doing things like that, that really kind of is the DNA of what makes something Creator Expert. Is it Creator Expert because it's hard to build or the use of different parts? I think it's more that it's harder to build because it's Creator Expert. Because we know we're making an Expert model, we say, whatever we have to do to make this look cool, we'll do that. It doesn't necessarily have to be super complicated but we have a way that we want things to look and generally you have to build things in a complicated way in order to get these results. Like on this car, you know, in order to get the wheel arch so smooth you have to do a lot of weird things to get stuff in it. We never do things intentionally just to make it difficult, but we find ways to make the models as appealing as possible. What are the key components in choosing a Creator Expert set for next year? For example, which percentage is driven by data? So, previous sales or simply 'that would be good to do next'? Well that's a tough one to answer. I think we are taking a lot into account of the market research that we do. It's not so much based on previous sales, but it's also that we have a lot of check ins throughout the year with different leaders in LEGO and so they're the ones that are deciding ultimately what will sell or not. We can come with an idea like, all we know about this is that we think it's cool. And then it's up to them to determine, will this sell? Do we believe that we can sell enough of these? We ourselves, we don't have to do a ton of market research, but eventually that gets done by people to determine if the idea will be getting out. For us it's a lot of thinking about what we would like. Me, I love airplanes and I love helicopters, so I'm always trying to say, hey we've got to do this, we've got to do this *laughs* For example; let's say you know there was a carousel not too long ago and there will be a carousel now. Do you come up with the idea to build a new carousel? Because it hasn't been so long before the other one was released. So a carousel sells? Well, that's part of it. But also we knew that we wanted to make this a new fairground, or another ride for the fairground, so we had the mixer and we had the Ferris wheel and we knew we wanted to do another ride. And we actually built four different models, four different concepts. And there was one of them that needed more development (red. Roller Coaster). It was too early. We didn't have the parts we needed to make it into reality and some that were a little more obscure. The carousel was the one that was the most promising to do that year. But the other part of it was that the carousel before this we actually had some stability issues. So after 11 months we pulled it off of the market. So it was a very short run. And so we saw that it was a really sought after set. So because of that we thought, if it had had its run and been on the market for two or three years then that's fine, you know, let it go, give it some time before we do it again. But then it was only around for 11 months and it had stability issues, but we still saw people were asking about it so much that we thought OK why not make one that is stable, that is good and that we can relaunch. The stability issues they had something to do with the animals going up and down? No the issue was actually that the old carousel was built on a 48x48 base plate. so it was fine when it was sitting there. But then if you picked it up from the plate and tried to move it, it would actually break apart. That's the reason you don't use baseplate now?. On this one we didn't use a baseplate. On the original carousel everything except the baseplate essentially is moving. On this one we have a ground level. This level is also stable to create a nice solid base that you can then actually, you know, lift the model up from that base. You shouldn't have any issues. That was the idea. And what was the reason for omitting up and down movement because that was pretty cool. No this has that. Oh, I was misinformed. This one is not going up and down. The other four going up and down (points at the animals on the carousel). The reason that we thought, you usually see it on the carousel where one animal is stable. So maybe that's for the grandmother or child and the other thing is, that there's also a mechanical reason for that. I wanted to have the stairs here. To sort of balance out the load of the function. It made sense to have no load on the other side as well. And actually the frog is a funny one because the frog had only the leg hopping. Are there also test groups for expert adults? We do both, that is, we were testing with adults, but also with kids. Eventhough you know it is for adults, we still want the kids to be able to play with it and have fun with it. Because ultimately when you buy it on the box then it says 16 plus, but as soon as you take it home and you build it in your home and it's there sitting on the counter, it's a LEGO model and to kids a LEGO model is for them. Are certain Creator Expert sets more popular in certain countries? And do you take that into consideration? When we make products, our goal is that we can have appeal everywhere. I don't know the data on which ones perform best in which countries. I don't actually know any of that off the top of my head. How long does it take to bring and initial concept to store shelves? From the initial concept it's about a year and a half and about eight months of that time is spent actually from the initial concept until the time we say the model is finished. And then from there it's eight months for production to get everything ready and actually have the final product ready for the shelves. So it's not like we're just one person sitting working on this for eight months but it's that we start out when we have the idea of a fairground, and then it's, ok, let's build a bunch of different concepts. Select the one that's best and do some development on that. Is that in line with a City set, for example? Yes. Everything has essentially the same development time frame. But when we choose, for example, when you're doing this one, that you're not working on another product as well. But if you're working in City you may be doing three models at the same time. Is that the reason that there's only one Modular released every year? It's not so much about that we don't have the resources to do it. It's more that we just don't know that there's that much demand for modular buildings, that people need to be bind to more than one every year. And we see it as a collection thing, that people want to collect the whole series so that if you start to release multiples every year then that's starting to be a really big.... it's a lot then to buy the whole series. So we feel right now, and it could change in future, that one modular building per year that's a good amount to have a collectible series and to build up anticipation and that is something that people could feasibly collect. So as soon as you start to put out two hundred and sixty dollar models a year all of a sudden everyone just had to double their budget in order to collect the whole series. How many Creator Expert sets are being released per year? In 2016 we had the Brick Bank, we had the Beetle, Big Ben and the Holiday Train. So traditionally we do four models a year. You might see that change. You might see it go up or down. Let's see...laughs. I can't say any numbers for this year. There will be others this year. I won't say any more than that. Do you also interact with other themes, because we also went to the Friends theme. There's a roller coaster in Friends. Is something like that possible in the Creator Theme? We all were in one big building, all the designers. I like to wander around and see what other people are working on. I don't know how well this fits with the Friends roller coaster but it is a similar theme. That one was actually being developed almost a year before this (Carousel) so it's very much different wavelengths. Our team, the Creator Expert team, we actually sit right with the regular Creator theme in one team so we interact with them quite a bit. The Friends Theme has roller coaster now yeah it's been pretty cool for the Expert team. Maybe one day we could do something like that. The release of the Caterham set, does that influence a potential release over another car in Expert series? While we won't do a Caterham, I'll tell you that, it doesn't make any changes to our plans. What we're trying to work out that we don't do cars that are too similar, so we kind of try to work together with them (LEGO Ideas) to make sure that we're not overlapping too much on the cars that we do. But it is a bit of a delicate relationship between us and ideas, what products can we do and what products are getting suggested on their site. There's quite some overlap in potential sets? Yes. Actually, the Saturn 5 rocket I've been proposing that as a Lego set five years and no one is listening to me. And then when I saw it on on Ideas I was like oh please, let it go through. I was actually really frustrated when I saw it go through because I thought that means they've already chosen the designer and they've started development on it. So what I did, is we have a digital system where we have all our models. And so I thought, okay, well let's see if they did anything good and when I looked in there to see if I could find it and there was nothing. So I immediately called up the project and I said; who's doing that model? I want to be part of it. We don't have anyone yet. So that was really cool to get to be involved in it. What was your role in the development of the Saturn? Myself and Carl (Merriam) were the two designers working on that model together. We started with the fan design and then we just turning that into something of an official LEGO set. Actually the first thing that we did was we build it that size to show how look at how cool this is so big. We actually changed the diameter of the original submission. They started to base their model on a section that covers the lunar lander and the diameter of the rocket was actually way too big for that. So we actually scaled down the main diameter, but we also found a way to build it so it's really round. So we didn't stay very true to the original model, which we don't talk a lot about. Essentially we just said we're going to make the model we want and we'll do your idea of a one meter tall Saturn V. But still I think the lunar lander and the little details are quite similar. The way that I see LEGO Ideas is that it's it's just an idea, it's just to say, to me the idea is a 1 meter tall Saturn 5 rocket built of LEGO. The specific details of how they built the engine it's not important. We do that however we find it's best to do. That's my view of it. Some people see it differently. And what do you think the reason was for not listening to you when you proposed the Saturn V? I didn't have any data to back it up. So it's just my opinion of saying this thing is cool. So in that sense I actually really appreciate LEGO Ideas that someone could say, hey this is cool and a lot of other people agree with you. And do you think it would have made a difference if you would have built a sample rocket to show them, like here's what we can do. I don't think so. I wish you could come in and see our office it's just full of so many cool models. We can go there now *laughs* Another question which may be hard to answer but it's been asked like it's been a while since there's been a Creator Expert Train, not counting the Holiday Train. Can you shed a light? You won't say yes or no but I mean; people seem to like the Expert Trains. The problem we the trains is that people don't like them that much. When we make our product line for the year we can only do four, maybe sometimes five, products in that year and then we look at what are going to be the most popular things. That's what we want to do. And every time we've done a train we always hear that people are really excited. But then every train that we've made will never perform as well as the other models that we make. And so it seems like there are two explanations. Either trains aren't as popular as people say they are or we just haven't been able to figure out how to make the right train. I think that it's more the second one that we haven't figured it out. I think the challenge with trains is that they're very kind of regional. There's very few world famous trains. Whereas with cars, everyone knows the Volkswagen Beetle and probably everyone has even driven one. But when you talk about trains; if you're from France you want a TGV. If you're from Denmark you want the Danish train. If you're from the US you want probably the Santa Fe. It's hard to pick what is the one that will have that universal appeal. We can definitely make a train. We can make a train that will be popular in France. We can make a train that will be popular in the US. We struggled to find what is an icon of a train that has universal appeal. And surprisingly the Winter Village train, that one has been quite a hit. So I think we can learn from that to figure out how could we do a train in the future. Do you think it could be option 3 that people won't buy a train because they think; well I don't have a train set. I don't have the tracks, so it's useless to me? That could be an option yeah. Generally when someone's buying an Expert model they've already bought a lot of other LEGO. So if they're buying an Expert train they probably already have tracks from other City trains that they bought. But it's a fair comment to say. I mean to your point, our holiday train, it does include track. And I think from my personal opinion the Winter Holiday Train is something you will buy because you collect the Winter Village sets. We will buy it. Not because we like trains that much or we want the tracks. So the thing is figuring out how can you get people, other than train fans, to get excited about this and that's what works at the Winter Holiday Train. You get everyone that's into the Winter Holiday sets and into trains, so maybe some train people will buy it. And everyone that's buying the Winter Holiday sets they will also be interested in that. So maybe we need a Modular Building with a train. Train Station maybe? *laughs* Some questions about miscellaneous themes that aren't released anymore or aren't released at all. I'm referring to, for example, Classic Space or Western themes, castles stuff like that. There are loads of things that aren't in current themes which could be released in Creator Expert. Do you consider making a castle or some Classic Space set in Expert? We definitely considered it. And it's similar to trains. For example, the Modular Buildings are actually part of the idea that they appeal to castle fans even though it's not a castle. It's a great way to get a lot of the parts that you would need to build a castle. Maybe more so with the older ones than with the newer ones where it got a little bit more wild with the colors, but I definitely wouldn't rule out Classic LEGO Themes. One of the questions that we have though with those is like with Classic Space is, was it so popular because there was no Star Wars? I mean when that was released there was no LEGO Star Wars. So that was the best LEGO spaceship that you could have. But now you could have the UCS Snow Speeder. So then how can we sell a classic spaceship. Will it live on nostalgia alone?Actually we begun some research to try to figure out just how powerful LEGO nostalgia is. There's some hesitation to just put a lot of faith in that, but it's not out of the question. So basically the Star Wars theme is one of the reasons that we don't have another space theme? Probably, we don't know exactly. It's not it's not 100 percent the reason that we don't do it in Creator Expert. There's other reasons as well, but having Star Wars is a reason that we don't necessarily do a second full space line line like that. And again that may change. There haven't been much Western's themes...at all. We used to have some sets, but aren't Western themes popular? I don't know about any of the market research on Western themes uhmm we'll see, I don't know...laughs. I love the old western theme actually. You know the LEGO Ideas projects made by Marshall Banana? Yeah the LEGO Western modular. I was looking at that and thinking, yes please do that. Like with the Saturn V. Please do that. I think it's the difficulty with something like that, of course they're really amazing models and they would definitely be really cool. But how do those fit in when we have the regular Modular Building line. If we introduce something like that, are we taking people away from the regular Modular Buildings. We can't just assume that when we introduce a product then people don't replace something else you know like, okay, now there's a new space theme. Now I don't need Star Wars anymore, so now all of a sudden Star Wars is nonexistent because I want to buy this new space theme. It's about striking the right balance of, we can only produce so many LEGO sets. And people only have room in their houses for so much LEGO. So when we think about making stuff for the AFOLs then it's just as much about are we giving them the elements, the bricks, in order to do what they want to do, instead of just give you exactly every model what you want just because we can only produce so many models. But we can we can make a dinosaur tale in blue. And I don't know what people are going to do with that but that's easy. You know we could make a whole car out of the weird Azure Blue color and then people can take that and they can build something really amazing with it. So for me I'm much more interested in trying to get fun and exciting elements into people's hands than just to make every single cool idea because there's an infinite number of cool ideas. you can see that on LEGO Ideas. there are so many cool projects but we will never be able to make all of them. Makes sense. Good explanation and I think you maybe right that classic feeling or that nostalgia is more of a feeling. Do you have any idea, like Bennys spaceship, did it sell well? Well I don't know the sales performance of this set. I'm really excited about the Saturn V combined with Benny's spaceship we're starting to see some real nostalgia for kind of this thing. I guess it's like the space race of the 1960s kind of nostalgia for that first journey into space. And I think that could mean a lot for LEGO in terms of what we make for products. Nowadays you hear more and more news about going to Mars in 10 or 20 years or so. Is that something that LEGO is looking into as well? Like maybe we can do Mars exploration? I shouldn't say anything about that. We're paying attention to a lot of things. How long have you been working for LEGO? In August I have been here for five years and I started on the Creator line in 2009. For the 2015 year I made the Ferrari F40 for Creator Expert and so from then until now I've been kind working half time on each and now I'm a full time only working on Creator Expert. Of course I did the Saturn V for Ideas and stuff like that. Interesting you bring up the Ferrari F40. One thing I noticed was it has different type of instruction booklet, outlining the parts you need to put on the model. I haven't seen that in the UCS Snow Speeder. Is that something that will be standard in newer instructions? I may be wrong on this but I believe we've implemented that for all Creator Expert products. Maybe not the Winter Village sets but I think all the others we now do, we outline the bricks in the right colors and that was an idea that the building construction team had when we were doing the Ferrari, because there was so much of the same color, they wanted to think of a way to highlight the parts. So did it work? Yeah because as you start building and then you don't notice it. And after a couple of pages you think; something's different. I didn't know what, so I was looking and thinking, they are outlining the parts! It's great! So I think you should do that for other sets as well. Some personal questions. How many sets have you designed? Somewhere around 20. What's your favorite? I'm really proud of the Saturn V rocket. But there's also a jet that I made for Creator. I think that's still my favorite because I love airplanes so much. Ok, thanks for your time.
-
It's 1964. Vietnam is starting. Martin Luther King receives the Nobel Peace Prize the year Nelson Mandela is jailed. Sony introduces the Video Cassette Recorder, and the computer mouse is invented. Richard Burton and Elizabeth Taylor marry for the first time. The Beatles are riding high in international charts, but I want you to put I Get Around by the Beach Boys on your internal gramophone, grab your shorts and the keys to your Bug, and head on over to Californ-eye-ay coz' we are going surfin'! Apparently. The VW Beetle, or Volkswagen Type I, was already over 25 years old in 1964. It was conceived in Germany in 1938, but let's gloss over that part of its history; production didn't pick up until 1945. Over the car's 65 year production span, an astonishing 21 million were built; it is unsurprising therefore that the Beetle was named in 1999's Car of the Century competition as the fourth most influential car of the 20th century (after the Citroen DS? Really?) and that may explain its inclusion as the logical LEGO follow-up to 2014's 10242 Mini Cooper, which came second in that competition. Review: 10252 Volkswagen Beetle This is not The LEGO Co.'s first VW Beetle set. Believe it or not, it's not even the second - many of you will remember the largely studded 10187 from 2008. To find the first, we have to go all the way back to the first year of LEGO mass-produced toys - 1958 - when an ambiguously numbered die-cast metal 260 VW Beetle was available; several iterations of the Beetle featured in the early days of LEGO metal cars, including one from 1964, but I believe 10187 was the first to be built in LEGO bricks. This latest offering joins the Mini in the recently introduced LEGO Creator Expert range. It's a very different bucket of worms to the last Beetle, making use of curves and angles rather than its predecessor's studs-up sculpture, and ascends to the mainstream another peripheral colour: Dark Azure. Set Information Name: Volkswagen Beetle Number: 10252 Theme: CREATOR Expert Release: 2016 Parts: 1167 Figures: N/A Price: EUR €89.99 - 104.99 | GB £69.99 | US $99.99 | AU $149.99 | CA $129.99 | DKK 799.00 Links ... LEGO Shop ... Brickset ... Bricklink The Box Click for a larger full-frontal image The minimalist Creator Expert packaging shares more in common with the Exclusives sets than the main CREATOR range, but it's smart and allows the set picture to dominate. Here a surf-equipped Beetle drives itself (hilarity ensues) down a sandy track. The set manages to stand out even against the similarly-coloured sea; the choice of surf theme for the set really dictates the box art. I wonder whether the set's colour scheme was decided by the reference image, or whether the artist hunted around for a suitable image. If the latter, they found one, and it's displayed on the right hand side: Click for a larger image Judging by the roof rack, I think the set designer must have used this image for inspiration. It also affects the set's historical accuracy: the real-life Beetle here is a pre-1965 model, given the smaller window apertures. On the back of the box, the sentient car parks itself among the dunes, and leans its surfboard against a conveniently-placed inset of the set features: Click for a larger image I love that. The board even casts a shadow on the inset! The insets show off the set's salient features well, though the main image is rather similar to the box front and I would have shown the car's rear off here. The box measures H 279 x W 478 x D 72 mm (11" x 19" x 3" approx) and weighs 1352 g (3 lb). It is tape-sealed . On the underside is the Volkswagen licensing information, interestingly in the official VW typeface. As is customary for CREATOR sets, the set inventory is displayed on the box top. The Instructions Now, I was under the impression that The LEGO Company had listened to the whinges of its die-hard fan-base, and endeavoured to wrap the instructions and sticker sheets of the more expensive sets to prevent bad things happening. Not so here. My instructions were loose and crumpled in the box. I hope that is just because I have an early promotional copy of the set, and that this doesn't represent a policy change. The single, perfect-bound volume has a cover similar to the box front. There are no technical or historical tidbits, unlike the LEGO Ideas or Architecture sets; I'd like to have seen a bit of information about the Beetle, but not if it would inflate the price of the set. The instruction steps are clear, with part call-outs, and a handy yellow line to show you where new bits are added. This doesn't help when you miss an entire step, as I did! The only other problem I encountered was trying to identify the colour of a 1x1 round stud which looked either white or grey (but probably meant to be flat silver). Sticker Sheet Mercifully, my sticker sheet was only crumpled but not damaged by its journey loose in the box. There stickers are handily numbered, though not unfortunately in the order you apply them. There's a lot of redundancy here, so you can get away with applying as few as 12 of the 24 decals: stickers 13 - 16 are duplicated, and the instructions suggest only applying one of each. You can choose which country's registration to use, though I was delighted to find that there are tiles enough to allow you apply all of them, and change the registration plate to enable a James Bond escape or something. The countries represented are USA, Australia (I think, assuming 'QLD' is Queensland), the UK, and (West) Germany. The Parts The parts are divided into three modules, of 3, 2, and 3 polybags each, as shown here, and the tyres were loose in the box. My first task was to confirm the colour - having not read the official LEGO blurb, I did what I always do when confronted with an unfamiliar colour, which is compare it to a part in a known set. Most of our LEGO is packed away, but fortunately the kids came to the rescue. So Duplo confirms this blue is Dark Azure. The three modules' parts are laid out below. Click each frame for a close-up It's great to see such a large choice of parts in a relatively rare colour, previously found mostly on minifigs and Duplo, or, more recently, in Basic Bricks sets. Prior to this Beetle there were no plates available in Dark Azure. Whether this means there'll be an abundance of regular sets in this colour remains to be seen; I had high hopes for Bright Green after the CITY recycling sets a few years ago but nothing came of that. Unlike, say, Dark Green or Dark Red, I can't see that there'll be much demand for Dark Azure amongst MOCers, though it might make a nice base colour for a re-imagined Classic Space. Otherwise, there are a load of handy SNOT bricks and plates of various kinds, and a few parts of interest: The dark azure corner brick is a new part, ID 24599, and I think would be described as Brick, Round Corner 5x5. Its curvature matches that of the Brick, Modified 1 x 2 x 1 1/3 but it is only three plates high. The 24246 heel-print tile is new this year in a few Mixels sets, and only in white; 23443 bar holder with handle is new, and listed on Bricklink but not yet appearing in any sets. New to me are the 1 x 1 x 3 brick, though it's been around since 2014 and quite common, the Technic axle 3 yellow, and the Ring pull tile, which I can see being very useful. The Round 1x1 tile with gauge featured of course in the Mini and several other sets. The clippy plate is shown only because of the mold difference: both types occur in this set (or my copy, at least) - they are I believe Bricklink types b and d. Then of course there's the new VW print tile. The tile is light bluish grey with a slightly reflective 'negative' print; I would rather have seen a shiny VW 'positive' print on a darker tile, buy hey. There are two spares in this set and I can see these being useful for CITY cars. Finally, there's the vaunted 'updated windshield design': I didn't even notice this until I read the blurb when writing the review: hence the stickers are already on! The mold is a stud less deep, but still quite sturdy; this design would have been quite handy for the Mini whose older design windscreen is also shown here. The Build The build starts with the chassis and is largely pedestrian until towards the end of module one, where SNOT begins to be applied in more detail and things quite suddenly get exciting. In the interest of brevity, I will not describe the build process in detail here, but it is shown in detail on my flickr; I will instead show a few interesting techniques. This is the back end of the car, late in module 1: A large chunk of tan and bley plates and bricks has been inserted, studs facing to the rear, with male and female clips pointing upwards. It's not until module 3 that you find out what the clips are for - they attach the rear window and engine cover. Behind that, a light bley 2x2 SNOT plate tessellates perfectly with a dark bley 1x1 SNOT brick with two 1x1 bley plates: these hold the tail lights; this technique is used in a few places in the set. Interesting SNOT abounds (*thinks of children* ). Here the rear (centre) and front (right) seat uprights are made; the rear one makes use of a stack of headlight bricks alternating studs right/studs up to make a stud reverser that is exactly 3 plates wide; when combined with the left and right halves, this makes 20 plate-heights or exactly 8 brick widths - so the seat rear fits neatly in the gap. I'll remember that technique! The front seats use 1x1 bricks with studs on two sides; these seats are slightly wider than 4 bricks each as they don't need to fit into a confined space - see here (you can also see where I missed a step - the bley plates either side of the rear seat should be a brick higher ). The entire front end of the car is initially attached only via the front axle, and at a half-stud offset: This is then corrected with the judicious application of jumper plates. You'll be able to see more when we look at the underside later. More delightful SNOT-work builds the front wings, including a repeat of the tessellation I pointed out earlier: The small construction I have removed here contains a SNOT plate that is used to correct the sideways-facing studs shown in the picture. I love that sort of thing! You can also see how the headlights are attached, with a technique similar to the Mini's. You'll be able to see more when we come to the features, or check my flickr. The Finished Car I've chosen the German plates for my car, partly because it's a German car, and partly because I put the British number plate stickers on badly. Plus I built it left-hand drive before thinking about it (you can very easily convert it). It does also mean that I can point out The Significance Of The WOB. The bonnet boot luggage compartment cover (from now on, it's 'luggage cover' and 'engine cover', mkay?) has popped open in the above picture, which happens all too easily. Here it is from the reverse angle with the cover closed: The designer has gone to extraordinary lengths to recreate the challenging curves of this iconic vehicle. Look at the nearside headlight: below it is a SNOT-mounted 1x2 cheese wedge; above it a regularly-placed 1x1 cheese next to a 1x3 bow; the contour these form almost perfectly matches the curve of the new 5x5 cover piece forming the wing. The entire wing then marries reasonably neatly to the luggage cover, itself a two-part design attempting to recreate the curves of the real thing. Conscious as I am that the stuff on the roof distracts from the car itself, I removed it: You can see a bit more clearly how the wing curves of the 5x5 corner bricks matches the 1x1 modified bricks at medial ends of both front and rear wings. Strangely, without the roof stuff, the wheels and wings themselves start to look a little too chunky to my eye, but we'll do a formal comparison shortly. Note the use of the new bar with handle parts to mount the door mirrors. From this view, the problem with the car's windscreen is becoming increasingly apparent. There's something I just don't like about it, but it's hard to put my finger on what. Here's a comparison shot of a '64 Beetle: Image from photogallery.classiccars.com It's not a perfect comparator. The wings are indeed a little too chunky on the LEGO version, but that's not the problem with the screen; '64 Beetles had flat screens with an arch shape, which the dark bley tile above the screen fails to recreate convincingly. Let's look at it in more detail from the side: Image from lehnan.hol.es The rake of the windscreen is too steep. It's a small difference, and it ought to be subtle, but combined with the relative loss of curvature of the front end of the roof, it has a dramatic effect making the windscreen look more like a Citroen 2CV than a Beetle. However, aside from the chunky wings and steep windscreen, the overall shape is otherwise remarkably good. Let's move rearward, where things start to get better again. The wonderful curves continue towards the engine compartment: You can see how the tapered door pillar gives gradient to the side of the car, and the 4x4 corner slope helps to smooth the lines from the wider sides to the narrower rear. This part sits, incidentally, on one of these, which defines the slope of the rear window. The engine cover uses a SNOTty construction to achieve a half-plate step, giving the (faint) illusion of a lateral curve. The curves of the rear wings are a little fussier than the front ones, but they still create nice effect even if they are not quite as flared as the real thing: Image from foundonthestreet.net The LEGO version uses grille tiles to depict the iconic air-cooled engine intakes; the effect is not entirely successful, and I wonder if they might have been better off using these (or even these, if they were still available). I do like the rear lights; I'm tempted to replace the deeper of the two bley 1x1 plates under the amber light with a body-coloured one (there are spares in the set!). Front-on, the gap between the luggage cover and bodywork starts to show, but this is the only angle from which it's noticeable. The windscreen, again, looks odd, but the wing curves look great. The tyres are possibly a little too wide. This view isn't quite so forgiving of the rear, which looks better from oblique angles, but I still think the rear is the car's best side. Note the bumpers, made with modern curved pieces, with a hinge to help at the rear; they are nice (but they're crying out for some chrome). I'm conscious at this point that I'm being quite critical. Take a look at this shot from above: Look at the apex of the luggage cover at the front, and follow the ovoid line of the bodywork backwards, round to the side, and in again at the rear, and then back again; then look again at the curves of the wings, especially at the front; then compare to the schematic: It is a remarkable feat to get anything near to the shape of this delightfully contoured car in LEGO. And back down to earth, quite literally: The underside is remarkable for one point, which I alluded to earlier: the axles are not threaded through the chassis as you might expect, but attached almost independently until the structure is built around it. You can also see how the front end of the chassis sits at a half-stud offset, I think in order to accommodate the spare wheel. Features Now let's have a look in a bit more detail. We saw this earlier, but here's another look at the elaborate work going in to get the wings looking as smooth as possible. It's not the most elegant solution, perhaps, and not perfect, but reasonable. Behind the wheel you can see some studs facing outwards - these are from two inverted brackets that form the walls of the luggage compartment; the studs don't connect to anything. Talking of which ... ... here it is, and looking roomier than in real life. The black bit with the VW badge is the fuel tank. The spare wheel just sits there; it rattles around a bit. Being the same size as the Mini spare wheel, it's also too small when compared to the main tyres! Some fiddly jumper plates go to make the door attachment, but the result is smooth and surprisingly sturdy, if a little unsightly. The seat construction is gorgeous, and I like the telephone door handles. The gauge behind the steering wheel is the sole instrument on the dashboard. No radio? I've removed part of the roof to give a better view of the interior. Again, the seat construction is highly effective; it's not obvious here but they are mounted on jumpers to give a brick-wide gap between in which sits the handbrake. Towards the front is a gearstick, made simply from a classic space aerial, but which sits on a semicircular curved brick representing the transmission tunnel ... ... and which continues to the rear: Both front and rear seats flip forward; behind the rear seat is a luggage shelf - true to life - in which the Picnic Rug is stowed. Note further clever SNOT supporting the door pillars. I alluded to this earlier, but here is how the rear window and engine cover are fixed: The upward-pointing male clips hold the window; the two flat silver (these are the ones that caused me trouble in the build) 1x1 studs prevent the window collapsing in. It looks fiddly, but it comes together easily and is remarkably durable. And here's what's in the rear: This is a simple but reasonable facsimile of the VW aircooled engine of the original Beetle. It looks like it might be a rotary engine but it's actually a flat 4; the larger wheel looks like it might be the fan, but it's actually the fan pulley - the fan being in the round black thing behind. In case you wanted to know! I think the LEGO version works really well. Finally, there's the window-dressing: A cool-box containing two green bottles and a green can with a ring-pull top, nicely made with simple but clever SNOT, and a surfboard that looks a little thrown together - I think it would be possible to make it without the white protrusions at the tip and the tail, but it's a minor thing. You might also just be able to make out the lip of a white 1x1 tile in the exact centre of the board - why they didn't use a plate here, I don't know. It all fits snugly on the roof rack, the box via one stud, the board by being wedged between the edges and those black rubber cheating-pieces: Comparison to 10242 Mini Cooper I don't have the 2008 Beetle, and anyway this set's immediate ancestor (and main competitor) is 2014's Mini Cooper. How do they compare? Next to the clean Mini, the Beetle's lines do look a little fussy. The Mini also highlights another minor complaint about the Beetle - the lack of chrome (or metallic silver, at least); though I understand that the Beetle would require a lot of silver parts or it would appear mismatched. The front end of the Mini is so good that meaningful comparison is lost; the Beetle is, after all, a much more difficult shape to render in LEGO. This really isn't a fair comparison! Everything about that Mini is spot on - probably the only thing about it I would change is the tinted windows. So how do they sit together on the shelf? Pretty well, actually, though the scale is off, and the Mini is noticeably larger than it ought it be compared to the Beetle (I estimate it would need to be 3 studs narrower to be at the correct scale). But who cares about that when they look so good! If you had to choose, which would you buy? The Mini, despite slightly fewer pieces, is more expensive, though only just - this may be a licensing issue. The Beetle is a more interesting build, even if the end result isn't quite so good. Here is how I would sum up this comparison: people might say of the Beetle, 'Wow, that blue LEGO car looks like a Beetle!' But they would say of the Mini, 'you know, that Mini model is actually made of LEGO!' But is that a good thing? Maybe it's all down to the Battle of the Picnics: Conclusion This has been a really difficult set to review. Inspired in no small way by the joy that is the Mini, I was eagerly anticipating this set, and really wanted to love it. I like it, but do I love it? I'm not so sure. The parts selection is interesting and useful, and largely in an unusual colour. The build is fun and instructive. The way those curves are achieved is delightful ... but it's just not quite accurate enough. I've been spoiled by the Mini's near-perfection, and this is a much more difficult and less forgiving original, so it's understandable - but disappointing all the same. Design 7 It's just not quite a Beetle, though it's close. Parts 8 A useful selection and unusual colour. More chrome or silver would be welcome. And what's with the crumpled instructions, TLG? Build 9 Fun, engaging, and instructive. Features 7 Opening compartments, doors, folding seats, picnic stuff, but this is a display set, really, and the cool box and surfboard are actually a bit of a distraction. Give me chrome instead! Value 9 At under £70 this is really good value - in the UK, at least. Overall 80% My Score 7/10 Do I like it? Yes. Do I love it? No. Would I buy it (if I didn't already have it)? Oh yes. Do I want to see more classic vehicles? Absolutely. I just wish they'd tilted that windscreen ... Thanks for reading! I hope you enjoyed the review. Comments welcome. Rufus Resources 1. VW Beetle on Wikipedia 2. VW air-cooled engine My flickr album
-
This was one of my first large-scale MOCs, that came before the Orient Express Thriller or Winterfield Academy were even conceived! (back in 2014) I had watched the miniseries for "The Shining", and I've always been enamored with National Park lodges. So, the product was The Glacier Falls Lodge, the official lodge for Brickler Mountain National Park! A perfect getaway destination/luxury hotel catering to any minifig's vacation needs! This MOC went through at least six different iterations, before finally being pared down to a (very) downsized version fit for LEGO Ideas. At its prime, though, the Lodge contained an enormous lobby, full dining room and kitchen, and several guest rooms upstairs, with two bathrooms per floor (kind of in the style of Chico Hot Springs in Montana). The first iteration was built in 2014, during that summer we had a major fire that caused us to evacuate. This hotel was thrown in a box and taken with us in a car at night fleeing to Seattle. Later, when the fire season was over and we returned, the hotel sat on the desk for several months without being worked on. The Second Iteration had a change to the tower, it was more octagonal and separated from the roof. And I used the Town Hall Skylights for the Lobby. The Third Iteration sadly has no pictures, as my computer had crashed and we lost them. But it was pretty ugly. I had the idea to try and make octagonal towers on either side of the main doors, with the idea not turning out very well. That iteration was fragile, and fell apart easily. The Fourth Iteration was a HUGE model, with an upgraded, fancier porch and a sign out front! This was also when I made it into more of a Victorian style hotel, with a large wrap around porch, and the two towers on either side. These were half-octagonal towers, which made it a lot easier to stay together. (I had actually figured out how to build them, and gotten the pieces for it). The roof was a major challenge, but we made it work! This iteration also had an enormous, well thought out and beautifully built dining room, as well as a large kitchen with three to four walk in freezers! The Fifth Iteration was downsized in terms of length to make it fit through the door, lol! The basic hotel structure remained the same, however, with the exception of a large rearranging of the rooms inside. This was the first project that I submitted to LEGO Ideas, before having to downsize it again for it to be accepted. This was by far the best iteration of the six, and the only one we have interior pictures of. 5th Iteration furniture and Grand Fireplace 5th Iteration First Floor Porch Detail Lobby Facing the Dining Room Lobby picture 2 Piano Music Room Lobby Picture 3 The cool part was that the interior walls of the 5th Iteration were removable! 1st/2nd floors This was also the first iteration to have major interior decorating and fancy chandeliers! The 6th and Final Iteration of this MOC kept most of the basic structure, subtracting much of the width, in order to make the 3000 piece LEGO Ideas limit. This unfortunately was at the cost of sacrificing the entirety of the interior minus several pieces of furniture. This iteration currently, sadly does not exist anymore. It was torn down and the pieces used for Winterfield Academy (pictured below) However the 6th Iteration is still up on LEGO Ideas right now, and currently has 2036 Supporters! If you would like to give your support as well, I'll include the link here. We would really appreciate any support given! :) https://ideas.lego.com/projects/66655f37-9622-4836-a2cb-797e916f4e2b Anyways, that's the whole story on the MOC! This was by far (not counting my disastrous attempt at a county courthouse when I was 15) my first successful MOC that I thought looked relatively decent! Please tell me what you think, anything you like about it, etc., in your replies! I'll finish with a couple shots from last December and our promotional Winter Photoshoot! :) Thanks for reading! :)
-
It seems that Creator is stepping their game a lot, not only Expert range but "normal" range seems to be every year better and better(Hello year 2017, I look at you ) .When city fails and their only budget is police, fire department or research teams, creator is going to save the day for minifigs(And buyers). What I like to see is police cruiser in 8-10 stud wide range and also in 1:16 scale or bigger to chase down these great creator cars!Also I like to see sedan, combi, muscle type of vehicle in normal creator range. Thanks for read
-
Discover a place where music is on the menu! Drop in at the LEGO® Creator Expert 10260 Downtown Diner, where you’ll discover a healthy portion of fun and surprises. This impressive model features removable building sections for easy access to the detailed interior, which comprises a ground-level 1950s-style diner with a large curved front window, red bar stools, jukebox, counter and an open-plan kitchen. The mid level has a gym with boxing ring, punching bag and weight training room, while on the upper-level you’ll find a recording studio, complete with vocal booth, mixing desk and a refreshments cabinet. The facade of the building features pink-and-teal Streamline Moderne styling with a large ‘DINER’ sign. Other external features include arched windows, balconies and a staircase, plus a pink convertible car and a detailed sidewalk, complete with mailbox, parking meter, flowerpots and a streetlamp. This incredible collectible toy has been designed to provide a challenging and rewarding building experience with a touch of nostalgia and charm. Includes 6 minifigures. • Includes 6 minifigures: a chef, waitress, boxer, rock star, manager and a bodybuilder. • The 3-level Downtown Diner comes with an array of brick-built details, including a detailed facade with pink-and-teal Streamline Moderne styling and a large ‘DINER’ sign, external staircase, arched windows, drainpipe, balconies, decorative roofline, opening skylight and a rooftop terrace, plus a detailed sidewalk with a mailbox, parking meter, flowerpots and an ornate streetlamp. This set also includes a pink 1950s-style convertible. • Ground level features 1950s downtown American diner styling with a large curved front window, red barstools, benches, jukebox, candy machine, counter, 2 soda dispensers, and a kitchen with a coffee machine, stove and a cooker hood. • Mid-level features a gym with a boxing ring, punching bag, weight training room, water dispenser and a wall clock. • Upper level features a recording studio complete with vocal booth, soundproofed walls, mixing desk and a refreshments cabinet. • Take a ride in the stylish convertible and head for a diner where fast food and music are on the menu. • Help the chef prepare the fastest food in town while the roller-skating waitress lines up the orders. • Drop in at the gym for a couple of rounds in the boxing ring or a good workout on the punching bag. • Open the skylight and eavesdrop on the making of a hit album. • Accessory elements include roller skates, guitar, golden record award and a buildable barbell. • Remove the building sections to access the detailed interior. • New decorated elements include a decorated door, album cover, lots of teal-colored and pink-colored elements, and a dual-face minifigure with singing and smiling expressions. • Special elements include new flower stalks and flower heads, plus 1x3 ‘jumper’ plates, 2x2 plate with 2 studs and a minifigure torso with boxing gloves. • Collect and build an entire town with the LEGO® Creator Expert Modular Building series 10243 Parisian Restaurant, 10246 Detective’s Office, 10251 Brick Bank and 10255 Assembly Square. • Measures over 13” (34cm) high, 9” (25cm) wide and 9” (25cm) deep. 10260 Downtown Diner Ages 16+. 2,480 pieces. US $169.99 - CA $219.99 - DE 149.99€ - UK £129.99 - DK 1399.00 DKK *Euro pricing varies by country. Please visit shop.LEGO.com for regional pricing. Available for sale directly through LEGO® beginning January 1, 2018 via shop.LEGO.com, LEGO® Stores or via phone: US Contact Center: 1-800-453-4652 CA (English) Contact Center 1-800-453-4652 CA (French) Contact Center: 1-877-518-5346 European Contact Center: 00-800-5346-1111 LEGO, the LEGO logo and the Minifigure are trademarks of the LEGO Group. ©2018 The LEGO Group. All rights reserved.
-
Well, here it is! My first train MOC that I've ever made, the Orient Express! Including a large Pacific class style locomotive similar to the Emerald Night, a tender, and a passenger car, I cobbled this together from several Bricklink orders and the LEGO Constitution Train Chase. ( I was very sad to take it apart, but it was for the greater good!) The passenger coach features opening doors, and I was able to put two lights into the roof, so it can light up at night! Here's the official story on this MOC: -Oh no! There's a Mummy on the Orient Express! Join dashing, adventurous Arthur Rutledge as he travels across Europe with several priceless artifacts to be delivered to the Louvre Museum in Paris. But be careful, his evil nemesis Cad Goldwater is also aboard, and will stop at nothing to acquire the relics. Will Rutledge be successful, or will the Orient Express be stopped by the nefarious plans of Cad? It's up to you! You can also see more photos of this MOC on the Orient Express Thriller page on Flickr: https://www.flickr.com/photos/150692089@N03/albums/72157676895085431/with/31865151642/ This project is also on LEGO Ideas to support! https://ideas.lego.com/projects/162979 We would really appreciate the support! Thank you. :) A couple extra pictures!
-
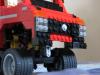
Selling brand new, MASSIVE Technic, Creator, Star Wars, etc. sets
sama posted a topic in Buy, Sell, Trade and Finds
Hi everyone! I have been a Lego enthusiast for years, but since I started school, I never had the time and money to focus on the hobby anymore. However now that I have the time, I do not have the space and need to build my bank. I am mainly Technic flagship and Ultimate Collectors oriented, and I prefer the newer sets as well. I have started a Bricklink store to sell some items I own that are either taking up too much space or I have no interest in it. These items are all new and sealed, and they include: -Lego Technic 42056 Porsche 911 GT3 RS (I do not like supercars generally, despite being Technic) -$349.99 CAD -Lego Technic 8480 Space Shuttle -$800 CAD -Lego Technic 8860 Car Chassis -$850 CAD -Lego Star Wars 7965 Millennium Falcon -$260 CAD -and Lego Creator 10226 SOPWITH CAMEL (will be added to the store soon ~CAD$185) Prices are a bit lower than its competition, only because I do not aim for high profits and just want the buyer to make the most out of it...and free up space in my home :) All are brand new except model 8860, box is open, and the black beams sit freely in the box (do not remember if they came in a bag or not), but all the bags and books are factory sealed and new, never opened or built. Many of the sets are old and vintage, and I will add more as I determine if I want to keep the set or not that I find. Also, I live in Canada so shipping will be determined on the weight/size of the Lego set and distance. I can do local pickups if you live around Toronto, ON. -My business email is: 1awansua@gmail.com -My bricklink store it: https://store.bricklink.com/legomaster1686&utm_content=globalnav#/shop?o={"showHomeItems":1} -My eBay only has model 8480 Space Ship added to it at the moment, but I will add the rest to it soon if you prefer buying off eBay: http://www.ebay.ca/usr/usamawa0?_trksid=p2047675.l2559 -
For the Celebricktion event in Atlanta earlier in October, I decided to build a new Modular for our LUG train layout. So, I built a little fast food joint. Here's the entrance: And right above it, a spacious loft apartment perfect for inner city living: Step inside the restaurant for a bite to eat: Then relax on a fall afternoon on your rooftop garden patio: Inside, the restaurant takes up most of the ground floor: Place your order at the counter: Then sit down to enjoy your meal: The upstairs resident keeps his apartment neat: He can always cook in his modern kitchen if he's not craving burgers from downstairs: After a hard day's work, it's always fun to relax with games and movies: On the top floor, you find the bedroom and bath: Where finally, he gets a good night's sleep in his cozy bed: Thanks for looking! Other photos and larger versions of these can be found in my Flickr album!
-
Hi! I'm a new train LEGO fan, my new passion started last spring... But I think that a LEGO tram is missing, so I created in LEGO the tram of my little city. This is my MOC: Tram of Opicina #DSC_1058 by Prison Brick, on Flickr Tram of Opicina #IMG_2473 by Prison Brick, on Flickr Tram of Opicina #IMG_2496 by Prison Brick, on Flickr Tram of Opicina #DSC_1061 by Prison Brick, on Flickr Now I submit it on LEGO Ideas: https://ideas.lego.com/projects/158520 Please, support & share if you like it! Thanks! Every comment helps me to improve!
-
Here's one of my smaller MOCs, the Half Modular Jewelry Store! I originally made this as a glass shop, but then I realized that not many people would recognize a glass shop and so I converted the downstairs area into a pretty jewelry store. This building has an elevator on the side and is compatible with all the regular Modular buildings. The upstairs is an apartment with a large kitchen and chandelier, and the roof features a garden! Here is the Flickr page for this MOC: https://www.flickr.com/photos/150692089@N03/albums/72157676732056872 Please tell me what you think!
-
-
Hi everybody, I'm thinking in purchase the 10214 Tower Bridge and turn it into a modular building MOC. It would be my first attempt to build my own MOC. I'm not interested on the set itself, but I feel that has a lot of possibilities to switch it into a nice building. My question are: has anybody attempted this? Any examples? Do you think it's a good choice to start with? Thanks in advance!
-
Hi all Just got into the whole modular building idea after purchasing a couple of the predesigned models, Cinema, and Detectives office. I've had a bash a MOCing using the very limited parts I have to join them. I was just wondering if there has been much interest in creating B models and instructions, from the parts in the modular sets, which retain the modular rules?
-
I own the pet shop and the fire brigade, my sister owns the green grocer, the grand emporium, the palace cinema and the town hall, she isn't into LEGO anymore, but she keeps them as ornaments.