Search the Community
Showing results for tags '8868'.
Found 6 results
-
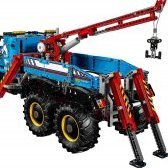
[TC25] Air Tech Claw Rig 8868
lcvisser posted a topic in LEGO Technic, Mindstorms, Model Team and Scale Modeling
This was my all time favourite set as a kid (still is, maybe), so when TC25 was announced, I was determined to shrink this set. I was worried that someone else would choose this famous set as well, but when I started last night to plan the build, I was convinced there was no other build yet. I overlooked @howitzer's topic. I'm looking forward to see their build and see how our builds compare. Mine is sized about 56% of the original Progress so far: -

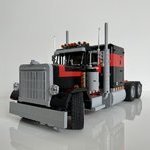
8868 Air Claw Redux Now With Free Instructions
Cardboy posted a topic in LEGO Technic, Mindstorms, Model Team and Scale Modeling
Finlay finished the instructions you can now download them for free here Air-Claw With a new Pneumatic truck possibly on the horizon, I decided to give the Redux treatment to one of my favourite models.This is due to its complexity and that it was the first large model that i bought for myself that was not a Christmas or Birthday present. And judging from a recent post on the forums a lot of you like it as well. I have still to model the tubing from my IRL model but I may have to switch to LDCad as stud.io is still not the best at this. As with most of the models of the old studded times, to convert to studless you have to switch the width from even to odd so the truck is now one stud wider. I have tried to keep as many details from the original and made changes where the new beams demand it or where newer parts allow a better build. With the redux models I make I always try to use the most current parts available so people who don't have the original have a chance to build it as well. Please let me know what you think especially the front of the truck as I have employed a few odd techniques to keep it looking like the original. Plans will follow eventually when i get the tubing done. -
Wind shield in Lego 8868
Yevhen posted a topic in LEGO Technic, Mindstorms, Model Team and Scale Modeling
After looking at screenshots I was surprised how easily a Lego designer set a wind shield in 8868 truck! But when I was trying to replicate the wind shield, I found that the 7 studs beams (or 8 studs bricks) don't fit the distance between the hood and roof! There is 0.1mm backlash! Also I have tried different schemes with use of combinations of bricks and plates to create a triangle with 7 studs hypotenuse, but no one of them works well. To make the long story short, I think the Lego designer used a cheap trick to build the cabin! Correct me, if I'm wrong. P.S.Looks like 8872 and 8280 have the same problem. -

Airtech claw rig. Couple of changes
Grosse Kind posted a topic in LEGO Technic, Mindstorms, Model Team and Scale Modeling
Evening kiddies. Got bored a little while back and chucked a few more alterations on 8868. Couple of pics and two short videos should be self explanatory of the bulk of it. First off, a question. I've tried to measure it and i'm getting a ratio for the half width bush groove vs the 6 hole pulley of 3 1/2 to one, and for the large two holed older steering wheel pulley of 5 1/4 to one. Any one got any definitive figures on these perhaps? Thanks in advance. I have added a simple 2 ratio set of gears at the front with a 12/20 or 16/16 combo which when used with the two variable pulley setups i put in place of 1:1 and it seems 3.5:1 make ratios of crankshaft to rear wheel of 3.33:1, 2:1, and an overdrive of 0.95 or 0.57:1 available. No need for any gearbox of course but thought why not. Theres a triangle liftarm as a floating brace to help stop gearshaft spread as i have no three full hole half width liftarm to go there. The 12/20 is reversed from my last build of the set as now instead of my wanting a less loaded drivetrain vs the original, the other pulley setups meant i could magnify the gearing this time round and it handles it fine. Popping the belt over from the big-small combo to the all small with two idler setup and back is a little fiddly with everything in situ but i've done it a few times. 2.77 and 1.67:1 are possible according to a rendering i did in LDD with a 20 driving a 24 tooth gear pair in place of the belt but the twenty in practice skims against the axle beneath it that drives the pinion on the steering rack. I may pare down the cross on one of my damaged axles to give clearance one of these days but for now i'm comfy with the belt. The six hole belt wheel fouls said axle more thoroughly so the highly underdriven crank ratios of the original aren't possible without further alterations that i don't deem acceptable: technic sets i try to only utilise or add to the original frame which rules out external dimension, wheelbase, height, and length changes. Suspension height/travel ,and wheel track i'm content to screw with but i like what once was, to stay looking like once was. I've obviated the belt drive to the compressor taking the drive ratio of 5.25:1 down to a faster 5:1 and triple the stroke on the compressor is via an 8 tooth onto a 40 using a 36 tooth as the other side flywheel which as luck would have it clears the passenger seat. It's handling it fine and the new pivot was well within range of the extension of the standard length clear pressure tube. Pump seems a tad more efficient now and even with half flat batteries isn't unduly loading up/stalling the electrics and i'm not gonna bugger around tracking down airtanks, they seem superfluous. As the steering gears moved back to accomodate the motor now taking drive from behind, the two sixteens didn't fit above the axle that keeps the tube manifolding that runs to the switches out of harms way. A half bush is now on the back end of said axle and the full bush at the front is shifted back a stud but could be eliminated entirely. I'm just lazy, and it's there if i want to return it to standard. The room its moving leaves gives space for a 12/20 combo that overdrives the hand of god a little but the 14 tooth bevels are handling it with no stress and its still playable. Theres all the driveshaft and diff bracing still in place from last time i delved it so no real need to re-show that i figure. Not totally happy with the fan now sitting external which may see me just leave it off but dealing with guilt fine for now. Grey grille/radiator shouldn't have an engine driven fan feeding through it and not finalized on the shape of grille still but it got a few of the bits i needed to move to alter the front engine mounting retained on the model so i can, once again, find them if i want to build it back to stock. Yes i've made an ugly duckling out of a beautiful swan but let me know what you think. Certainly happier that the pneumatics work better and the somewhat "komische vögel" use of a V6 in an application that should generally be inline or a bent eight is dealt with. (First two thumbnails are links to the videos) -

[MOD] 8868 Airtech Claw Rig
NevynPA posted a topic in LEGO Technic, Mindstorms, Model Team and Scale Modeling
So I did this forever ago, but I haven't been around much for months now, and I finally both remembered and decided to take pics and post this. Ever since I got 8868 at the ripe old age of SEVEN (23 years ago!) I've felt that the air pump in it is noisy, weak, and slow. Also, it never really had the capacity to keep up if you wanted to try and run more than one cylinder at a time. Well, I finally splurged back in 2014 and bought some parts to help bring it up to snuff. I took the "fuel tanks" off of each side of the truck, and replaced them with white pneumatic air tanks I ordered from LEGO Education. A couple extra tees and hoses, a few axles for mounting, and BOOM! Air storage to spare, and you can barely tell it's been changed! Two tanks is a LOT of air storage - and when pumped up to full capacity, it actually can whip the cab slew around fast enough to shake the whole truck! It's a simple mod, and I didn't pretty up how the manual pump is attached, but I'm pretty proud of how imperceptible the change in tanks is - I think these actually look better than the built ones. Driver Side: Passenger Side: View from underneath, looking towards the back of the truck. You can see the gray hose going between the rear ports on each tank to connect them together: View with one tank partially removed. The stud holes on the bottom of the tank are formed to grip an axle. View of the manual pump: -

Modifield 8868 truck with MOC trailer
J.Hakala posted a topic in LEGO Technic, Mindstorms, Model Team and Scale Modeling
Now i done trailer truck of two set 8868 and one 8880 lego models. Already build 8868 model i take of crane part with pneumatic,then real build begin. I add truck example V8 engine,double rearwheels,sleeping space,steering wheel connect chain to front wheels to turn and other litle thing. Now trailer... Trailer i do roughly in my own head. Only drivingbridges i copy from 8872 model. Drivingbridges and stay still foot work on pneumatic,when hoses is connect pump system in truck. I bought this 8851 digger on net. I only add it red seat. I thing it look awsome in this trailer! Last is extra picture with some big on trailer