Search the Community
Showing results for tags '42037'.
Found 12 results
-

[MOD] 42037 Ultimate *Now with Instructions!*
Leonardo da Bricki posted a topic in LEGO Technic, Mindstorms, Model Team and Scale Modeling
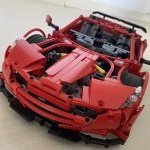
This was just a quick weekend project. I am fond of the 42037 set, as it was one the sets that got me interested in Technic. So, I decided to try to do it some justice, and I motorized it, first with an L-motor, which wasn't great, then with an XL-motor, which was about the same, then with 2 L-motors, which was the best. Then, I got a buggy motor. And since I had just taken apart a failed battlebot, and the buggy motor was lying there, begging to be used, I decided to use it. I rebuilt my 42037 Formula Off-Roader, with a few changes, which are as follows: 1. Changed the colors from light bley/med blue/lime/black to black/white/lime. 2. Removed the inline-4 fake engine. 3. Added full motorization, buggy motor for drive, servo for steering, AA battery box with a V2 receiver. 4. Bodywork changed a bit to fit the new colors and cover the gap left from removing the fake engine. And a light bar was added, because I didn't like the round spotlights. 5. Very minor, but I changed the rear shocks attachment point on the rear suspension arms, they were moved out one more stud than shown in the instructions, in order to have better travel and not be under compression, which was an issue in the original model. If anyone is interested, here is the LDD file instructions! Anyway, I know you're all tired of my rambling, so, with out further ado, I present to you the 42037 Ultimate Racing Buggy! 42037 F 42037 FQR It has easy access to the battery box, both to replace it and to turn it on and off. 42037 FQL The suspension is great, one of the best parts of the original set, which I kept and slightly improved. 42037 Mod 42037 FQR-s The source of power and speed! The almighty BUGGY MOTOR! 42037 Rear The required photo of the underside. The wheelbase and chassis are the same dimensions as the original set, though the buggy motor hangs out the back by a couple studs. 42037 Chassis I hope to make a video soon, but it started raining after I took photos, so maybe in a few days. But finals are coming up, so it may take some time. I will also add some cutaway photos soon, for anyone who wants to replicate my mod. Or, use the LDD file instructions. Thanks for looking at this, please give C&C, ask questions. More on my Flickr. - Leonardo da Bricki -
[MOD] Formula Off-Roader 42037 RC with SBrick
RabbiT_CZ posted a topic in LEGO Technic, Mindstorms, Model Team and Scale Modeling
Hi all, Recently I wanted to try to modify the 42037 Formula Off-Roader with the SBrick remote control and Power Functions. It is done with two L-motors for rear-wheel drive and the servo for steering. It is little bit larger modification but the shape is still close to original. Only the back of the buggy is bigger to accommodate the large battery box. It is capable of riding in a short grass and even climbing to a moderate hill. The final gear ratio is 1:2.334 but can be easily changed for higher speed on a smooth surface. If you are interested, here is the LDraw file: 42037_-_formula_off_roader_sbrick.mpd (original by Philo). PS: On the photo are different front springs as the front is very light and I wanted softer suspension. -
Winter-Ready Porsche 911 GT3 RS
StudRobotics posted a topic in LEGO Technic, Mindstorms, Model Team and Scale Modeling
This is Lego's 42056 Porsche 911 GT3 RS set with some unique rallycross-inspired features I added making it the perfect sports car to drive in the snow. Features Suspension system raised to make the car about two studs higher Wheels and tires from the 42037 Formula Off-Roader Mudflaps LED light bar Front off-road lights Rear bash bars Optional snowplow that attaches to the front The lights are fake and don't turn on, and all of the other lime-colored pieces are from the 42037 set as well. I had a lot of fun making this. I just had to switch of the area of the springs to change the height for the rear without any pieces needed, but for the front, I had to remove the entire Porsche's body to make the lift there using a variety of pieces. Overall, I'm proud that a got the result I wanted, which was making the Porsche 911 GT3 RS higher (so it wouldn't bottom out) and equipping it with off-road features so I could have fun with this set in the winter. It does need to drive in snow only about an inch high so I could move it without getting stuck (and so the plow can move the snow too). I recommend to anyone who has the Porsche set to try these mods out for themselves this winter! Here's some more pictures of the car and a desktop wallpaper that I created wishing everyone at EuroBricks Happy Holidays! -
[C-MODEL] 42037 - Off-road Formula
Tomik posted a topic in LEGO Technic, Mindstorms, Model Team and Scale Modeling
Main model from LEGO Technic set 42037 - Formula Off-Roader doesn't resemble formula at all so I tried to build something closer to formula out of its parts. Since it has huge wheels I call my alternative model "Off-road Formula". It features steering, independent suspension and V4 engine. I began building it more than one year ago and got stuck with front axle. It was the most difficult part of whole model because I had very limited sort of parts - this set lacks connectors, blue 3L pins (it contains just 9 of them) and there are no 5L liftarms in it. Even designers from LEGO decided to build front axle of official B model without suspension... -

42037 - Motorized
przemekm posted a topic in LEGO Technic, Mindstorms, Model Team and Scale Modeling
Hello, I would like to motorized my set - Lego Technic 42037 vers. B PF RC or A. Which parts I need and/or which briks I need to motorized my set? Is there any video to show (step by step) how to do it? Thanks for any help -

[MOD] 42037 ultimate
agrof posted a topic in LEGO Technic, Mindstorms, Model Team and Scale Modeling
Hi All, I ran into a sale (50% off), and couldn't resist to buy a copy of 42037. It was actually much more fun to build than I thought, pretty sturdy construction. Still, L4 engine? I had to change some bits of it... enjoy! https://rebrickable.com/mocs/agrof/42037-ultimate-mod -
[MOD] Formula Off-Roader 42037 fully RC
Tomik posted a topic in LEGO Technic, Mindstorms, Model Team and Scale Modeling
I've bought PF servo motor about one year ago and I haven't got chance to test it. Then this ugly buggy 42037 appeared and I realized it's good volunteer for testing it. My goal was to make it fully remote controlled with adding just PF parts and keeping original look as much as possible. So after two days I've got this result. It's powered by one M-motor, steered by servo motor and even uglier than before. It rides well on smooth and solid surfaces but it's pretty slow on carpet. Main issue was to find room for battery box. Front of buggy is almost unchanged and rear is rebuilt much. It can still open cab and fake engine works. It lost just seat and lights. If anyone is interested I'll share its LDD file. -
[REVIEW] - 42037 Formula off-roader
roppie11 posted a topic in LEGO Technic, Mindstorms, Model Team and Scale Modeling
The set 1.Introduction Hello, welcome to the review of 42037 by roppie11! I don’t buy much sets, so I miss a lot of parts. I wanted the 42000 hubs and some more useful suspension parts were very welcome. So I searched on Bricklink and the best option to get all the parts was buying 42037. I was lucky because some LEGO sets were on sale at wehkamp.nl. Of course I bought it immediately. I looked for reviews but there was no 42037-review on EB so I decided to do it myself. Enjoy and let me know what you think! Note: Go to my Flickr page for higher resolution pictures. 2.Set Information Let’s start with the set’s information. Set-number: 42037 Set-name: Formula Off-Roader Parts: 494 Price: €54,99 is advised by TLG, I paid €40,49 and it is €39,99 at Bricklink. Building time: + 1h Price per Part: 5499/494 = 11,13ct per part Power-functions: No, not upgradable either Box-weight: 152g Box-dimensions: LxBxH=36x26x7 A-Model-weight: 513g A-Model-Dimensions:LxBxH = 36x26x21 B-model-weight: 502g B-model-Dimension: LxBxH = 36x26x16 Link: bricklink 3.The box The box is a pretty standard one. In the left-corner is a logo and beneath that is some information. This set is dedicated to kids from 9-16 years. The front shows the main model with (right-corner) its functions. These are steering, moving pistons and an opening safety-cage. It also tells that there is a B-model which brings us to the other side. On the other side, we find the b-model. It is also some sort of race car. You also see a shipping sticker. The box came loose like this, without another box or something else around it. It is luckily not damaged. On the side, you will find a 1:1 picture of the lime rim to give you an imagination how big (or small) it is. 4. Content of the box The box is pretty full. About ¾. It contains the following: 5 unnumbered bags with pieces. 2 instruction booklets, one for the A-model and one for the B-model. A sticker sheet. 4 loose tires. (Not on picture.) a. The bags There are 5 bags, they are unnumbered. Not surprising for a medium set. The biggest bag, contains beams, some panels and other big parts. It also contains 2 small bags with pins etc. Another pretty big bag, contains the lime parts, the shock absorbers and some more stuff. There are three more bags, containing the other parts. b. The instruction booklets The sets contains 2 booklets. They were loose in the box but they didn’t got damaged. I like it that the b-model is included as well. I’m therefore going to review that as well. The front shows the model itself that will be build. The back on no.1 shows some more 2015h1 models and the bag on no.2 asks for feedback. If you do so, you make chance to win ‘a cool LEGO prize’. c. The sticker sheet The sticker sheet is really cool. It has a metallic layer and it’s shiny like a mirror. (Can you see me with the camera ;) ? The quality is as usual very high. I recently washed my LEGO bricks in hot water in a tub, and none of the stickers got loose. TLG knows how to make stickers. The stickers itself on the panels don’t have much metallic on them. I suspect that stickers are made from a shiny sheet and not that a metallic layer is added later. Because the underside of the sticker is also shiny and it’s shiny all around the stickers. The stickers are numbered so you can’t go wrong when applying the stickers. d. The tires The tires are 81,8x36R balloon tires. It’s written on the tires itself. I forgot to lay them on the table when I took a picture of all the content so here is a picture with the rims fitted inside it. They are pretty big. They are bigger than the 42043 tires but these can get very flat whereas the 42043 tires are pretty sturdy. I like them because it are my first balloon tires. I don’t know if it are my rims or the tires, but they tend to slide of the rims when playing with it. I don’t have this problem with the wheels from 42008 and 42043. 5. Parts. Ahh, my favourite section: The parts. I bought this set specifically for the parts. This set does not contain many new parts, by which I mean, this set does contain just a few new parts, that weren’t already available at that time but it does have a lot of parts that are new to me. The new part is a pin with pinhole. You get only two, but it’s better than none. This set has also a lot of suspension parts. You can see them at the picture. 4x: 6x2 A-suspension arms 2x: Front and rear wheel hubs 4x: Inner part of a wheel hub 1x: Differential 2x: 6l links 2x: female CV-joint 4x: male CV-joint 2x: H beams 2x: 5x11 Frames 1x: 5x7 Frame 4x:Yellow, hard shock absorbers 10x: 2l pin+1l axle 2x: Pin+pinhole I forgot to put the last part on the picture, but it can be very useful. It looks like this: The part was new, when the set came out. If you want some suspension parts, this is probably a good set for you. I don’t have to tell you that a lot of those parts are specifically for suspension. It also has 2 H-beams and some frames. These are far from rare, but I find them very useful so I decided to include them as well. I didn’t put this part on the pictures as well , but this little guy is very useful. It contains 10 of these. It does not include its counterpart: . A-model 6. The build Let’s build it! I was curious how long it would take me to build this one, so I had a stopwatch running. I paused it when I took a picture, so the time should be fairly accurate. I took a picture every time I finished a stage/module and sometimes in between. I build pretty slowly and carefully and I don’t assemble big sets at this speed. It took me 5 quarters but if you build at a normal speed, you can easily finish it in 1 hour. If you’re interested, this was my working space: a. Front-suspension We begin with the front suspension. It’s just a pretty standard suspension but the first one for me. It’s unusual how you have to attach the 5x7-frame. You have to slide it one stud upwards, so that it is locked in place. That is a nice one! After a few steps you have to put in the gear-rack. I was genuinely amazed how solid and sturdy the build was. There is really no way out for the gear rack and the whole build is held together with axles and pins, all around. After that it is just a case of putting wishbones and wheel hubs to finish the front –axle. The wheel has a travel of 2 studs from the neutral position. So it has a total travel of 4 studs. you add the shock absorbers you find out that they are placed just right. It uses full travel of the wishbones but the spring is not compressed. (In contrast to the rear axles where this is the case.) I didn’t expect the wheelhubs to have so much backlash. It works fine anyways. Time: 12:47 b. The motor The motor is a pretty standard inline 4. It goes right before the front wheels and it really shows itself. A few weeks ago I read in a topic(42056-porsche topic) that the crankshaft configuration on LEGO motors is wrong. On LEGO motors, the configuration is: up-down-up-down. In reality the configuration is: down-up-up-down. So I changed the crankshaft a bit and now it’s more realistic. A few more parts are installed https://c5.staticflickr.com/8/7786/27104071652_204e2bed4b.jpg[/img] Time: 18:22 c. The body After that you are building the body. The driving- and steering-axle go all the way to the back of the car and they are ready for the front axle. Also the exhausts are added. The lowest point is at that the moment the suspension-arm. Its 2 studs lower than the body. Time: 26:10 d. The rear axle The rear axle is also very predictable. This is what I have in my head when I think about suspension. The build is really study. The black pin on the wishbone limits the down-movement to 1,5 stud. If I place it on 2 frames, I can exactly lay a thin part under it. The up-movement is also a bit limited by the lime L-beams. When the shock absorbers are attached, it doesn’t go further than horizontally. The suspension works great btw. The shock absorbers should have been attached somewhere else because they are constantly compressed. Time: 36:10 e. The rest of the body After that, some work needs to be done before you add it to the body. First the steering axle is build and firmly attached. Here you can see that the spring is compressed. The black pin is slided a bit upwards. On the 3rd picture you see a loose shock absorber, to see how it should be. The axle gets added to the body and some beams lock it in place. Now, only the cabin and the panels need to be done. Time: 48:05 f. The chair This one does not really deserve a chapter but I took a picture so I did it anyways. I like the chair. It is blue as usual. It is made out of 4 beams. It looks pretty well as a chair but I don’t like the gap in the middle. They should have made a beam in the middle as well, but that is luckily easy to modify. 51:08 g. The panels This set includes 10 panels. 2x panel #5 2x panel #6 2x panel #4 2x panel #3 1 mudguard right 1 mudguard left They all get a sticker. The panels are placed very well and give a nice shape to the body. The stickers should already be added, but I was curious how heavy the look relies on the stickers. So I added them after. Time: 58:40 h. The cage The last step is the cage. It consists of several connectors and axles and 2 lights are added. On the rear, 2 bent beams are added upside down. If the long end points downwards, the beams is just perfectly vertical/horizontal. I’m glad the designer didn’t do that because this looks way cooler. The last step is adding the wheels, and it is finished. img]https://c7.staticflickr.com/8/7223/27103932942_f343f58c92_n.jpg[/img] Time: 1:05:51 i. The stickers I added stickers later. It took me a good 7 minutes because I also had to remove the panels before I could apply the stickers. I like the model both, with and without it, but it looks cooler with. I think that the sticker sheet is made from a shiny material. The back of the sticker is so shiny as well, and the area around the stickers as well. The final time ended up being 1:12:05. j. The spare parts This set has a staggering 6 spare pieces. Nothing unusual, you can see them at the picture. 7. Functions This set is medium so it does not have a lot of functions. All functions are manual because this set does not contain Power-Functions. HoG Steering Driven inline-4 motor. Openable safety cage. 4 wheel independent suspension. 8. Impressions ‘Hmm, I recognize that.’ is someone probably thinking. That’s right Sariel. I took it straight from you because otherwise I didn’t know how to call this chapter. I look at things I noticed when building. This is comparable to the ‘impressions’ in Sariel’s reviews. a. Reality I was wondering whether the model was based on an existing car or not. So I googled for: ‘formula offroader’. The most matching car I could find was this one: This one does not have the springs on the front and I have not seen any who do have it. I think they couldn’t find a better place for it and I can’t either. b. Stickers Here is the stickerless version compared to the stickered version. I like them both but the stickers make it look cooler. The shiny part was a good idea but it is not very good visible. That could also have been gray. You’re left with an empty stickersheet. c. Dimensions And what about dimension. I built a box for it. I build it as wide as the widest point and as long as the most out sticking point and as high as the highest point. The highest point is the steering wheel. I’s a pity that it is a small knob. Big ones are more pleasant. It is not held in place by (a half) bush but it just sits on the axle. The front-wheels and the bent-beams on the back are furthest from each other apart. All in all the dimensions are: LxBxH = 36x26x21. d. Just something As you can see, the body leans a bit forward. This is because the front-axle is higher than the rear axle, if you look at the chassis. The rear axle is 2 studs lower. The front axle however, has more travel and when taking everything into account, the body is at the front 1,5 studs lower. I like it. It looks a bit more aggressive which is what you want for such an off-roader. e. The suspension It is very nice that this model is fully suspended, but how good does it work? My camera has a slow-motion modus, so I filmed it. Sariel did it also, but I wanted to do it by myself as well. I looked at the front suspension first. It turns out to work very well, but I have to say I threw it pretty hard. For the rear suspension I have 2 videos. On one of the video’s you see that a wheel is getting loose. I have that problem constantly. I am almost thinking about not throwing it anymore :p The suspension is quite good. I could have let it jump on a ramp, but if you want to see that, you should look at Sariel’s review. 9. Rating Ok, the final decisive rating is finally here. Right now I am typing for 2,5 hours already so I’m glad I can give my rating. I will look at the same things as Jim in his review, but only on things which are relevant. Design: 7/10 Not bad, the springs on the front are ugly, cabin is well shaped. I’s missing the details. Building experience: 9/10 My first full-suspended set. Everything is new to me so I like it more automatically. It is very well constructed and this build will not fall apart easily. No loose parts. Playability: 9/10 Suspension is great, functions work like they should so it is fun to play with it. Parts: 8/10 Many suspension parts, and interesting parts. Few gears. Value for money: 9/10 Many great parts, and big wheels. 11ct per piece is not bad. Total score: 7+9+9+8+9 = 42 à 42/5 = 8,4 à 8,4/10! B-model 10. The build I first had to disassemble the A-model. When doing that, I realised that I did not have to disassemble every piece. A part of the rear suspension is the same and lots of other things. After half an hour of disassembling, I ended up like this and was ready to build the model. I didn’t use a timer this time because some parts were already assembled, I didn’t have to put on stickers, and I was building a lot faster than with the A-model. It took me a good 30 minutes to complete it. a. The front axle The build starts with the front axle. It is pretty similar to the one of the A-model except that it is not suspended. It is still steered. The way it is build, isn’t much different either. On the picture you see how the wheel hubs are attached. In the holes go 3l axles with stop, just like the A-model. Here you see the finished front axle. The suspension arms are attached the same way as in the A-model and the model has therefore the same width. (picture didn’t want to work. It’s still on my laptop) b. The inline-4 motor After that, you have to build the motor. I kept it assembled so, that didn’t take a long time. It still has the crankshaft-mod. A few more parts are added the body in this stage, exactly the same as in the A-model. c.The rear axle On the first picture, you see the part that I led assembled. Until this step (actually a little further) the rear axle is identical to the A-model. The difference comes when the steering knob gets added. It is much lower than on the A-model. This part, you have to attach to the rest. d. The body When the rear axle is attached, the beams come in to make it one solid piece of LEGO. At the sides, you have to attach a bent beam. In the A-model the bent beam is used in the front axle and the straight beam here. Since there is no need to attach a SA, the beams changed places with each other. This is great in my eyes because the beams on the front were very ugly. In this stage the Shock absorbers are added. They do nothing because the front axle is not suspended. The SA’s give a cool look to the car. It is a good place to add though. At first I was disappointed that they don’t do anything, but it would have been worse if they placed it on the suspension arms to fake the suspension. To cover the front, a panel is added. The rest of the panels comes in later. e. The cabin Then the middle part is very empty, so a cabin gets built. I like the cabin less than the one on the A-model. It looks very unfinished and it does not have a chair. Take a look for example at the blue 3l pins sticking out. There is also no chair included because it does not fit. The scale however is not changed. I don’t blame them however, because the parts are pretty limited. I am sorry to only have one picture of this stage. f. The panels From the last picture to this one, only the panels are added. I forgot to take pictures of those but it should be quite easy to see the changes. I like how the panelling is done. The roof is curved and all stickers are upright. ‘Oh, wait…. They are actually upside down. I did something wrong I think. Hmm, let’s look at the building instructions. Ohh look! The stickers are upside down on the panels!!” That literally went through my head when I saw it. I think they wanted the metalized part on the front to represent the motor, but that had a price of stickers being upside down. It is a choice they made. Luckily, you can make the panels right if you want by changing their places. The most obvious sticker however (with 65) is not upside down. g. Finished And there is the finished product. I can’t make the comparison, with and without stickers because they are already applied. There are quite a lot of pieces left as you can see. 27 to be precise. 11.Functions The functions are less, than on the A-model. Driven inline-4 motor Suspended rear axle HoG steering 12.Impressions a. Reality What were they trying to recreate? Is the model based on something? I don’t know but it looks like a beast. b. Dimensions I used the same box to measure the dimensions, because it has the same width. I can change the length and for the height I just have to move the red 3l pins. It turns out, that it is exactly as long as the A-model. It is a tiny bit wider because the suspension arms are not diagonal anymore but I decided to leave it like this. I had to change the height. If you are going to count the studs, don’t mislead yourself, you should count the space under the ‘roof beams’ and between the side beams. I made that mistake myself so I thought, it might be not a bad idea to warn you. If I did everything right, the dimensions are: LxBxH = 36x26x16 c. Comparison to the A-model I don’t know if this is fair to do, because building a B-model is pretty limited for the designer. There are a few things I want to have said about it. First of all, this is very similar to the A-model. The front-suspension is a bit different because it is not suspended. The rear axle is to a certain point exactly the same, and the way the motor is attached as well. The cabin and the panels are different which gives it another look. I am disappointed that the front axle is not suspended, but I understand it. It would make the model even more similar to its brother, the A-model. I like how the SA’s are placed now. The cabin is uglier, but of course it is difficult to construct it. The most obvious thing is the pins sticking out, on the green beam. You can even see it on the box. (no I’m not gonna post another image here, scroll back, you retard The model is leaning a bit more forward and I like that. It is constantly saying: “c’mon lets fight, or race!!” The panelling is more creative and looks really good. I only have doubts about the stickers but that’s a choice TLG made. All in all, I like this less than the A-model, but you can’t expect too much from a B-model. d. Just something again It is leaning forward more than on the A-model and that is the only thing I like more about this one than on the other one. The front is about 3,5 studs lower. On the picture of the dimensions, it looks a bit too much but it really isn’t. it looks quite good. e. Suspension I tested the rear suspension of course. I was also wondering if the tires are a good suspension because they can be pretty easily deformed. When looking at the video, you can see that the back is bouncier than the front. The suspension clearly does its work. The bent beams are not a good idea. If the suspension goes to deep, it touches the ground and the beams get loose. That’s what you see here: 13.Rating I’m going to rate this, the same way as the A-model. Design: 7/10 Not bad, cabin is ugly, front looks great. I don’t like the upside-down stickers. The leaning forward is great. Building experience: 8/10 I learned not how to make suspended axles, but how to make solid unsuspended ones. That is also quite useful. I only am less exited because I build it for a second time. I consider giving it 9 stars. Playability: 7/10 Suspension on front axles gives a better playability. Parts: 8/10 Idem ditto to the A-model. No special/useful parts are unused. Many suspension parts, and interesting parts. Few gears. Value for money: 9/10 Many great parts, very much, and big wheels. Uses quite a lot of parts from the A-model. The review 14.The making of the review This is my first review. I first typed some text in word, then copy-paste to EB. In word you can already add hyperlinks(to bricklink etc.) and add pictures by putting a link between img tags. It looks like this: http://..[/img] at the end, I only had to make some corrections. The review without this chapter had 4057 at his final version on word. The pictures and slow-motion vids are all taken with the Panasonic DMC-tz20 which has a 24mm lens from Leica. It costs lots and lots of time to make a proper review. More time than I thought. Even a set this small takes a lot of time. I can only imagine how much time it costed jim to make the 42043 review. To give you an insight I made a list how long it took me to make this review: Preparing and research about review: 0,5h Unboxing, pictures: 0,5h Unboxing, Writing 1,5h A-model, building 1,25h A-model, pictures 0,75h A-model, writing 2,0h A-model, disassembling 0,5h B-model, building 0,5h B-model, pictures 0,5h B-model, writing 2,5h The slow-motion video 0,5h Pictures: computeràFlickràWord 1,5h Links to text (for parts etc.) 1,5h Writing this chapter 1,0h ------------------------------------------------------------------------------------------------------------------------- Total: 16,0 hours I didn’t follow the reviewers academy. To make a good review, I took the 42043 review from jim as an example. I don’t think I’m gonna do another review because I don’t buy so much sets. Let me know what you think about it. Have a nice day! -
 Hi all. I'm asking for some advices from experts. I am into lego technic "standard" constructions from a few years, now I want to enter in the world of modding and make some custom creations. I love electric models, speed and the "mechanical engineering" behind LTechnic. I also know the existence of SBrick and I love the idea and I want to support them. Then i think that a good start can be the motorization of an existing model, adapting it to power function, engine, steering and SBrick. I am thinking about buying the 42037 Off Roader or maybe the 42039 LeMans Race Car. I have an old (10-15 years old) offroader, I can disassemble it and get some parts from it, mabye. So I think I'm going to buy: - SBrick - XL Engine (I know it's a bit overpowered but I want to create a speedy car and reuse the engine for future creations) - Servomotor - Power Functions - 42037: Formula Off Roader OR 42039: 24 Hours Race Car Is it a good way to start? I need something else important?
 -

Mounting AAA battery box
Billant posted a topic in LEGO Technic, Mindstorms, Model Team and Scale Modeling
What's a good way of mounting a AAA battery box to a vehicle for example? I'm modifying a 42037 and this is my first ever attempt at an RC vehicle. -
Hello there! Recently, I got the 42037 set as a gift, so I thought I'd try to make a quick review for it! This review is simple, nothing as professional as something Sariel would make, but I just wanted to have a crack at it! Sorry if the music doesn't please you, it's hard to find good music for videos nowadays. Tell me if you liked it or not, I'll keep it in mind in case I ever make another review.
-

Your thoughts on 42037 to start MOC
lee82gx posted a topic in LEGO Technic, Mindstorms, Model Team and Scale Modeling
Hi, I'm debating whether or not to buy the 42037 as a base for small outdoor vehicular robots with Mindstorms EV3 controllers. I see this as a nice platform with independent suspension, steering and big wheels (BL prices for these things cost more than the set itself). My question is am I missing anything compared to 42029, etc etc? I already have 42009 as part donor and do not care about colour. Cost wise, I'm at my limit with 42037. 2H 2015 will not yield anything similar or cheaper, right?