Search the Community
Showing results for tags 'wip'.
Found 313 results
-
The LandShip (Off-Road Tracked vehicle) [MOC] [WIP]
TheNextLegoDesinger posted a topic in LEGO Technic, Mindstorms, Model Team and Scale Modeling
A great man once said “Learn from the mistakes of others. You can never live long enough to make them all yourself.” (G. Marx). When i saw a topic popping up of a tracked ripsaw, i was intrested. But when i saw the pictures, I was SOLD, i just loved the moc, it was so simple, yet it was so nice. i wanted something like that to. and so I ditched everything i had to do (studying) and i began. I started improving on the mistakes he made, and i made my chassis. added a subtractor put the motors in and started testing. for now i have only 1 XL but i'm gonna add another one when i freed that one from a moc (still have to make a topic about that one). this because it lack's a little bit of power (now 1:1 transmission, might change to 1.66:1 or 3:1) as suspention i wanted a soft but 'strong' suspension so i went with springs. i aslo wanted a lot of vertical clearance, so i used near vertical 'bogies'. For a feel of the size, tracks are 92cm long atm chassis is around 45 cm. PS: the side pannels are primarily for looks, secondarly for strength. PPS: the topic where i got the idea: Greetz TNLD -
I have been working on this since Rebels first came out, and I've seen a lot of really nice MOCs being built, mostly of the Phantom. But seeing so many talking about building a Ghost to match, I thought I'd show off what I have of mine so far. It is 134 studs long and 109 studs wide. The original intent was to have a full interior, I'm not 100% sure if that plan will make it through to the final design but we shall see. Currently the cockpit, main corridor, loading area, forward gun turret, Zeb&Ezra's room, Kanan's room and Sabine's room are fully fleshed out, I will probably do Hera's room since it was finally shown in season 2. I may upload those pictures in the future. But here is what I have for the exterior so far. I put in the official LEGO Ghost set for scale. Thoughts and opinions are welcome. I look forward to one day hopefully showing off the actualized model.
-
I've been quite busy with a project of mine...and she's coming along very nicely. I've named the locomotive Anton, and she's a 0-6-0 tender locomotive. She's the one between the Iron Workhorse and the Winter Holiday locomotive. I'm currently planning how to design the tender, as I want the power functions in the tender. the question is, what size tender should I attempt? Too long and it looks quite ridiculous to have a small locomotive with a large tender, and too short, and I won't be able to fit the train motor anywhere. Of course, Power functions are expensive, and that's why the tender is still in the planning stage. Apologies for the photo quality.
-

[WIP] Jaguar XJR19 Le Mans Prototype concept
Erik Leppen posted a topic in LEGO Technic, Mindstorms, Model Team and Scale Modeling
Ever since set 42039 hit the shelves, I feel attracted to building Le Mans prototype cars, due to their characteristic shape and almost futuristic looks. So I think you can imagine the delight I felt when during my random stroll on the interwebs a few months back, I stumbled upon the following concept car. Back then, I tried building a Lego version of it and got quite far. But due to lack of pieces I had to abandon early. I have since bricklinked a thing or two and want to redo the model from scratch. I think the actual car doesn't even exist in reality yet, and I think this is actually a rendered image. If I remember correctly, it is a concept that they want to try to build in reality in 2020. Personally I think it's the least car-like looking car there is (if you only count serious car models). If you forget the wheels and decals, it could be modern architecture as well. What's also cool is how the black wheel arches are actually almost shaped like Technic panels. I will be using the wheels of 8070, 42039 et al. These are slightly less than 9 studs in diameter, which justifies the following side view: The planned functions are: front steering rear drive, driving a fake engine suspension doors (powered by the damped springs also used in 8448) There's little space, so I don't count on having a gearbox. With a bit of luck, I can find room for a 2-speed, which at least gives the idea of a gearbox. But it probably won't be a proper "supercar" in the Lego sense of the word. We'll see, and I might need some help from you guys with this later on. OK, let's start. All I have so far is the two suspension modules. Here's the front suspension: First thing you might notice is, I'm using the long wishbone arms. Personally this is what makes the suspension much more interesting to myself, because it's more challenging to make it work and looks much more like F1-type suspension. Also you see I'm using only 1 small spring per wheel. The suspension travel is very little (about 1 stud) so I hope having 1 spring per axle is enough. It'll have to be though, because the mechanism isn't very strong, so a stronger spring will result in parts coming loose. The black axle on the left is the steering input, to that's where the rest of the car will come. Thanks to the pins with pin hole, the 5x7 frame is pretty rigidly attached to the whole thing. The chassis will be connected to that 5x7 frame. The rear suspension is unsteered, and therefore less spectacular. But it holds the differential: Those two modules is where I am right now. I do want to have said beforehand that I'm really not good at recreating existing car bodies, so it will be difficult and I will take some slack here and there. But how fortunate is it, that Lego has the perfect color for this car. Older Technic fans know these panels from the great Offroader 8466 and its smaller brother 8465. I'm actually not even a fan of the old panels, but this car is really the perfect opportunity to put them to use (and indeed, I bricklinked some, so I have a nice collection of them). Unfortunately though, these four pairs of panels are the only pieces in this color (except a very rare ribbed hose I don't have). So the body will necessarily be a bit crude. A body with modern pieces would probably be better, but I want to see how far I can come using these good old panels. When we get there, your feedback will be very welcome. The gaps will be filled up with black, I think. But a word of warning: I will probably add some details in a second color, simply because I find black a bit boring to work with. OK, that's it for the opening post. I hope you don't mind all the rambling I do between the pics. Next up will be a basic chassis connecting the two modules together at the right distance. -
Hey Guys, This is my first post on the site and I'm looking for some feedback on my work in progress Crait MOC. I started prototyping a few hours ago and started on the trench. I would appreciate any feedback. Thanks, Baylez, If you want higher resolution pictures head to my flickr @, https://www.flickr.com/gp/147808246@N03/R09PD6
-
Hi I'm new. I'm working on some recolor/modifications to the official A-Wing (75150) and the T70 X-Wing (75149) designs. I started off using Stud.io Beta to recolor the 75150 and 75149 that I found in the LDD gallery, and that quickly evolved into some subtle modifications. What you think? Are many people on here using Stud.io? I'm finding it much more intuitive and stable than LDD. -AZiltz T-72 X-wing rev2
-
-Comments are welcome - Scroll through the progress see the changes as she goes. How she currently sits: Now on to the build: I figured i would post a wip thread for my first MOC ship ... I built and tore apart quite a bit trying to get to where i am at this point. I don't really have a plan im going off of but more a general goal ... Im by no means a historian on ships but i know the general shape im looking for. There are very few ships that have rams so i wanted one on mine The helm is working via technic parts ... Wish i took pictures of that. But you crank the wheel and the rudder moves via chains. This took a bit of work but it was something i loved on my 90s era lego ships. The capitans quarters is quite large for such a small ship but I wanted something a pirate could live in ... All the movies show a large state room lol. The ship does have a hold that can be accessed through the gun deck ... Which will be open in the center. I intend to use a combination of built small guns on top of the ship and the standard lego cannons on the gun deck. Im still waiting on four more cannons (the dark pearl shooting) as the rest of my cannons are the old grey imperial non shooting. I loved a depiction i saw with a spiral staircase to access the bridge? So I borrowed a method i had seen before as I don't think the potter stairs look navel enough. The helm I intend to redo ... As i started the design not realizing the space and the whole build has revolved around the working helm I made it more structural because early in the process it was just sitting up top with nothing but a hull. Im redoing the tops of the gun deck so i can incorporate a gang way and forecastle deck (although only large enough for the mortars) speaking of im not sure I will be keeping them fully mobile as they are now ... May opt for a stationary setup that appears to be mobile. Your thoughts and suggestions are appreciated.
-
[WIP] Monster Van
offroadcreations posted a topic in LEGO Technic, Mindstorms, Model Team and Scale Modeling
Hey everyone. Sorry I haven't posted in a while, I made something big but it didn't turn out as the best I could do. I didn't want to release a MOC with half effort. Anyway, I started this Monster Truck Van a few weeks ago. I have the chassis basically done and the body is around 60%. It won't have too many functions (just drive and steering), but I want it to look cool and be detailed (roll cage, seats.) Here's what I have so far. NOTHING IS FINAL. The body will be black and will have red accents. I will put the Ferrari rim covers on all 4 wheels. Chassis: Tell me what you think! -
Hi, Long time reader, first time (proper) poster. I'm working on adding a post office into my modular street (I loath to call it a town, as it's not even close to some that I've seen on here!). I was originally building it up in LDD, but have since redesigned it using stud.io. It's a WIP at the minute, but I'm looking for a bit of feedback, as this is my first proper MOC. I'm planning on using 7731 in the driveway, and 60100 for the helipad that will be on the roof. Any constructive feedback would be great. https://flic.kr/s/aHskxeK1gH Link to Flickr album, as it won't let me upload images > 20kb!
-
Hello Everyone, I am in need of Help, I wanted to build A Brickwright Y-Wing so I got the planes and started Building it with limited parts and a need to reduce the weight of the engine nacelles of the y-wing. I will admit this did not start out as a True MOC and for a large part of the build it was a FrankenSet, I.E. Little of this Little of that, and as I built I used inspiration from Other builders like DarthPineapple and Dmaclego. As it Stands my Build only has the engine nacelles and forward cockpit as true or partial MOC's and I am working to create a main body like DarthPineapple's The problem is the main body is from Brickwright's MOC for now I have extended the the engine pylons and dropped the engines down creating a offset making the engines lower than intended so now the main body will sit like a hunchback when all the detail is done. I am not ok with this as I want the center aft of the main body to look like a real y-wing. Reference the pictures below for how far I have Gotten on this build. I am looking for a way to lower the main body detail to match the model as best I can and would like any help on a good way to say convert or make this setup work. You can see the frame I came up with to make the engines lighter and lower and still provide detail on the outside... I just need some advice on how to make the body match. Enjoy Edit 11/25/017 Crossed out Help Parts Removed [Help]from Title [/url]20171119_075335 by Ender Wiggin, on Flickr] [/url]20171119_075311 by Ender Wiggin, on Flickr] [/url]20171119_074954 by Ender Wiggin, on Flickr] [/url]20171119_074920 by Ender Wiggin, on Flickr] [/url]20171119_074902 by Ender Wiggin, on Flickr] [/url]20171119_074827 by Ender Wiggin, on Flickr] [/url]20171119_074736 by Ender Wiggin, on Flickr] [/url]20171119_153714 by Ender Wiggin, on Flickr] [/url]2017-11-23_08-34-30 by Ender Wiggin, on Flickr]
-

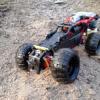
[WIP] 4x4 Crawler (More or less done!)
BrickbyBrickTechnic posted a topic in LEGO Technic, Mindstorms, Model Team and Scale Modeling
Hey everyone, This MOC is being built for 2 reasons: 1, to celebrate 3 milestones- Canada's 150th anniversary, Technic's 40th anniversary, and me hitting 1000 subscribers on Youtube. In fact, a comment suggested I do this. The second reason is to cure the errors that my 2 previous crawlers had: -weak axles (very weak in fact) -low climbing power -messy building -inefficient steering (used an M motor) -no additional RC functions So here's where I'm at right now: Above is the motor housing. I'm going with 2 L motors for the drive because they have good speed at a sufficient torque. That is the gear housing. Frames are abundant. Now the whole front axle. You can see that it is compact and yet very, very durable. The rear axle. And the two together. This crawler is being built for max performance but awesome looks. So I want to (but may not) do a Tacoma body: Update tomorrow, thanks for reading! BrickbyBrickTechnic -
[WIP] CLAAS Xerion 4000 Saddletrac (FINISHED! Slurry construction soon)
BrickbyBrickTechnic posted a topic in LEGO Technic, Mindstorms, Model Team and Scale Modeling
There is already a beautiful saddletrac MOC which was built by @efferman but I wanted to build a saddletrac using only pieces from the 42054 set. Here are the function: -3 steering modes -2 PTOs (1 top, 1 back & front) -attachments, currently undecided Here's what I've got so far: I did the front first specifically so I could ration DBG pieces. If you have any attachment ideas or constructive criticism, please leave a comment. Thanks! BrickbyBrickTechnic -
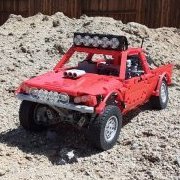
[WIP] Yet Another Baja / Trophy Truck
miguev posted a topic in LEGO Technic, Mindstorms, Model Team and Scale Modeling
Hello! I’m not particularly proud of this Technic horror I’ve created, but I’d like to share it with you rather than keep it to myself, possibly forever. Shortly after I learned about (and supported) SBrick and MiniZip in KickStarter, I started dreaming of building powerful, compact MOCs using a new combo: PP3 NiMh battery + MiniZip + SBrick + 5292 RC Buggy Motor. This is my first attempt at it, now that Android SBrick app (1.3+) is finally usable Functions Drive: 2x 5292 RC Buggy Motor, each connected to a separate SBrick, each powered by a separate PP3 NiMh 250 mAh battery using MiniZip. Steering: PF Servo. Front suspension: independent, soft, long travel, with “fake” positive caster Rear suspension: solid axle, dragged (didn’t figure out how to do four-link) 4x Lego LED Still haven’t applied myself to learning proper bodywork, so designing my own was out of the question. I went for an easy, fairly plain one. No openable doors, bonnet or anything. I worked with these two photos and scaled for 62.4mm tires. Full size (> 1024px): 1, 2. Photos were made really quick, during a baby siesta (indoor) and in short incursions (outdoors) no more than 20 meters from home. For now, I can only dream of having more time and freedom for this :D v0.99 without stickers: v1.0 with stickers based on video: Old school navigator refused to deal with GPS and computers, wanted just a compass (70001pb02) and a map with an X that marks the spot. Smart dude, run off with the loot. Very short of creativity and sleep, the only alternative I could think of to get rid of the demonic Monster logo and brand was a rather lame one: Music Energy. Example diff: I asked friends to vote in G+ and 3 out of 4 prefer Music, but the one who prefers Monster is my the only one into LEGO. I’m divided, will probably print them and try them on, but still not sure which ones to use for filming. I started with 1 battery, 1 SBrick, 2 motors. It seemed to run well. Adding an extra battery and Sbrick seems to make it run even stronger / faster, although SBrick developer Zsolt Majoros said it shouldn’t matter. The real reason I added the extra SBrick is that “2 ports 1 function” only works in Android app when those 2 ports are on separate SBricks. You may ask why use PP3 batteries instead of the acclaimed LiPo batteries… mainly because they are expensive, and a bit of a lottery with their thermal protection. MiniZip + PP3 NiMh 250 mAh wasn’t a whole lot cheaper, but the combo is certainly more compact, half the weight and doesn’t have any thermal protection. SBricks can draw as much current as the motors want, with just a small risk of overheating and possibly catching on fire… ah well, what could possibly go wrong? I haven’t actually managed to make the batteries warm up, they get warmer when charging. One likely reason for not achieving hotness is short life, according to this battery life calculator, they’d last 3.5 minutes at 3 A, 10 minutes at 1 A, 20 minutes at 500 mA. Can someone make a better-informed / estimation of a more realistic battery life? But there are more and worse problems, for which I sure can do with your advice! Caster angle is fake, isn’t? I mean, I just shifted the upper A arms a half stud backwards, but both A arms still move vertically. I think this is why big bumps will throw the truck’s front up rather than only the front wheel/s going up. When hitting a big bump with a front wheel, the wheel will thrust up and with it the whole car will roll to the opposite side. This results in a raised rear wheel taking all torque to just spin in the air, so the car stops until the raised wheel hits the ground again. Shifting the upper A arms a half stud backwards messed with the steering geometry, so now there’s a not-so-slight bump steering. I think this, combined with the twisting effect on the solid axle, is what’s causing the truck to steer to the left when accelerating. Too bad. Motors are hard coupled on their fast output and then geared down 20:12 twice, not including the 20-tooth to differential connection. Maybe I could / should gear down 20:12 only once, haven’t had a chance to try yet. I suppose integrating the motors in the rear axle and connecting wheels directly to them would help with the last couple of problems, but couldn’t figure out how to fit that in this body just yet. I’m also concerned that if one battery drains faster, the motor (no longer) powered by it will get damaged. With each rear wheel directly on one motor, that would result in the truck going in circles, but motors wouldn’t get damaged. How bad is this? Steering with SBrick (v1.3) as a significant latency, in the time it takes from the moment I slide my finger to a side (much or little) to the moment when the PF Servo starts moving, the truck is already going the wrong way. It’s really hard to drive straight. rm8, what’s your experience regarding this latency with your Double Trouble? If anyone has not seen rm8’s Double Trouble, I’ll put it as “my dream, properly done” Thank you for reading. If you were looking for a video... EDIT(25.05.2015): slightly better pics. EDIT(26.09.2015): I’m now a little more proud of my creation, at least the suspension seems right to me: it’s long travel and soft enough to reacts promptly to bumps, but the car doesn’t sink too much on it. I dare say it works better than most others, probably because it’s much harder to this the a bigger scale most others have been working with. The car is still not really fast, so I didn’t bother measuring its speed. I did try putting less reduction in the drivetrain, but that only resulted in lower speed due to lower torque, so I reverted back to my original setup. It’s still fast enough to be impossible to drive well, specially with the terrible latency in the SBrick. Latency is not a problem with the port tester, so it doesn’t look like a hardware limitation. Anyway, it’s fast enough to be fun. Thanks to Sir Wolf’s help and support, we finally have a somewhat decent video. Enjoy! :) And we learned many things the hard way: by failing. Fake caster angle is not good, you need real caster for off-road racing. I took the idea from someone’s supercar project here (sorry, couldn’t find it again) to displace the upper suspension arm by ½ stud backwards from the lower arm (see belly shot above). That gives you quite a bit of caster angle on the wheel (or snowmobile skies) but it does not help reacting promptly to the most serious bumps. It also screws the geometry in that the gear rack should ideally be ¼ stud backwards, but it’s either 0, ½ or 1. This results in notorious bump steering: front wheels are toes out when suspension is fully extended, and toes in when fully compressed. When this adds to the torsion exerted by the powerful motors on the live axle (see in the video how left front wheel jumps up when car starts). All in all: bad Idea. Portal hubs from 8070 are not good for off-road racing, I should have used the ones from the snowmobile 42021 (2015). They are also too expensive to go on dirt with them, so I didn’t. Differential slows down or even stops the car when one rear wheel take off. I knew this was a problem with crawlers, but never imagined how bad it’d be on a trophy truck. Damn it, I’ll never do this again. Just use one motor per wheel, and accept that if one motor runs out of battery or losses signal, you might take a sharp turn or find yourself driving in circles for a little, depending how the front wheels cope with the imbalance. MiniZip are great to get “buggy-motor-grade” power in a smaller size than LiPo batteries. PPA 9V batteries can fit a width of 3 studs, so a 5x11 panel makes for a perfect home. However, MiniZip’s lack of power switch in makes it a complete hassle to replace batteries. Should keep them very easily accessible. -
[WIP] Supercar chassis with 3 steering modes (Optimized, abandoned)
BrickbyBrickTechnic posted a topic in LEGO Technic, Mindstorms, Model Team and Scale Modeling
@Jim's stellar review of the 42056 gave me this idea. The chassis itself is mostly done, but I wanted to create this topic to get some tips because I am no supercar expert. Here is the chassis: It has independent suspension, RWD, 4speed gearbox, and 3 steering modes: front, 4 wheels, crab steering. Shifting is the interesting part: -if gear 1 or 2 is selected, 4 wheels steering is selected. -if gear 3 or 4 is selected, crab steering is selected. -if no gear is selected, front wheel steering is selected. This is (at least somewhat) realistic because: (From Jim's review) The gearbox: So that's what it is. I will post 1 more update before putting this to rest while I wait for parts to arrive. So leave a comment! BrickbyBrickTechnic -
[TC12][WIP] Formula 2.0 (Dropped out)
BrickbyBrickTechnic posted a topic in LEGO Technic, Mindstorms, Model Team and Scale Modeling
Yes, I am late. But all the ideas for this project are made, I just have to combine them. I'm gonna leave you with a list of functions excluding the wacky one. I'll leave you guys to guess it, it's really obvious. -HoG Steering -Adjustable ground clearance (offroad/street mode) -v8 engine -wacky function Here are the pictures: Leave a comment! PS This isn't done yet. -
This is a custom office building I built last month. Its not quite finished but its getting close. Will post pics and a finishing video once it is complete inside and out.
-
So I thought I might try something a bit different - rather than posting a finished MOC and receiving comments on the finished product, I thought I might try a WIP/build log and hopefully get some advice from you guys along the way. Also I thought some people may find a build log interesting? Anyway, I was supposed to whip up a quick build of my sig-fig, Colonel Dirk Allcock leaving Myzectlan. It was supposed to be a quick build for story advancement purposes. I had the idea of him speaking to the leader of the Myzec, High Priestess Zia in a sort of throne room. While looking for some inspiration on the internet, I found this image which almost perfectly depicts what I'd like to build: Problem is I'm not sure I can do it justice and need some help! And here is my starting point: The area is a 20x40 base. The green section at the end will have some background vegetation and I plan on taking the shot front on, no angle. And some progress: On reflection I am not sure about the dark tan additions to the flooring, I am however very happy with the SNOT splinter pattern. I am thinking that I will probably replace the dark tan with a mixture of dark green and olive green to match the columns. Thoughts? Circles are hard! Also the throne - I've experimented with various ways of trying to portray the circle part without any satisfying results, does anyone have any suggestions? The columns will likely extend the same height as the are now up with a flat roof on top in light bley with dark/olive green highlights and maybe some vegetation. The idea is the Myzec like their buildings to 'become one' with the life giving jungle. Any advice/comments/criticism most welcome! EDIT: LINKS TO UPDATES Update One
-
Hello, me and Legomonorailfan are writing a story for classic space! It is still in the making. C&C is always welcome!welcome! more updates to come!
-
[MOC] Telehandler (WIP)- finalizing
Aventador2004 posted a topic in LEGO Technic, Mindstorms, Model Team and Scale Modeling
The telehandler, what a funny machine. They are commonly used to lift containers, dirt, hay, and other things a excavator cannot reach. This is the kind of telehandler I was trying to make, a cat tl642c. I did not own more than 7 yellow parts, so that goes out the window. I kind of used it for inspiration, and made a few changes. Overview : The telehandler steering uses 2 gear racks, and a set a gears to reach the cabin, they must be aligned, like 42009, but they have only minor backlash. The outriggers lock in place using friction pins*, and stay locked, holding the vehicle in the air. The boom uses a linear actuator to lift, and a worm gear to tilt. The extention is 18 studs thanks to a special system, it uses a (+00) with a 3l axle through it, so only extending, there is no need to lift the piece. If I can find all my head racks, it will change to a gear rack setup. The model: the bevel steers, and the spur gear raises boom. Outriggers: front and rear: front outriggers fit outside boom. Boom: lift, extend. LA lift (1.667:1) 12 stud extension. the white piece allows it to stay extended. goes into middle hole. Fork: tilt. some pics would not post, coming soon. can i please get some comments, my last few mocs have gotten about 3 replies, so c&c please. -
[WIP] Peterbilt 579 (PLEASE HELP)
BrickbyBrickTechnic posted a topic in LEGO Technic, Mindstorms, Model Team and Scale Modeling
Hello everyone, I'm presenting you the startout of my latest MOC: the Peterbilt 579. Here are the functions it will have: -Drive(2 L motors) -Steering(with servo) -Working steering wheel(servo) -Gearbox shifting(M motor) -suspension(Independent on front, springless dual axle on rear) -suspended cab -opening doors and hood(discreet mechanism) Here's what I have: You can see the drivetrain is basically complete, and the springless dual axle (don't worry, it's not the 42070 setup ;)) There will be double wheels on the rear. Diagram of the suspension. And that's all I have for now. I have also started think about the grille and bodywork. Bodywork wizards, please leave a suggestion as to how I can make those because I'm drawing blanks Thanks for reading, updates soon! BrickbyBrickTechnnic -
[WIP] DjI Mavic Pro (Technic)
BrickbyBrickTechnic posted a topic in LEGO Technic, Mindstorms, Model Team and Scale Modeling
So drones are something new to the technic MOC line (I guess). This drone, the DJI Mavic pro, is the third drone I'm building. The other two are a generic drone and the GoPro Karma. Here's a picture of the Mavic. I'm doing it in white as oppose to DBG due to the general lack of panels in DBG. It will have 2 functions: -Rotating propellers -Control over the camera Here are my progress pictures. C&C is wanted as I'm not sure if I've gotten the lines right. The gray thing are too big. I'll fix that. So That'sit. Any help you can give on capturing the lines of this beautiful drone will be more than helpful. Thanks! BrickbyBrickTechnic -

[WIP] Fastest Lego Technic Motorless Car
Bostons Brick Closet posted a topic in LEGO Technic, Mindstorms, Model Team and Scale Modeling
The rules I am outlining for myself for this different no electric motors, no batteries, 100% Lego, and No Pneumatics. I am doing this because of the cheap price of Pull-Back Motors on BL, so I thought It would be worth a try! My first idea was basically to use a singe pull back and go motor and the large motorcycle wheels. It would look something like this: But It was not fast enough ( : So I have the Idea to actually add more Pull-Back motors. Using 4 of the newest ones I am hoping to get an increased speed using this method I have 3 more of these motors on order and am eagerly awaiting their arrival. I want to see if anyone else on this forum might have another idea I am willing to hear their ideas. -

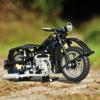
WIP MOC John Deere R4038
1gor posted a topic in LEGO Technic, Mindstorms, Model Team and Scale Modeling
Hi fellow Eurobrickers, when we wait for 42069, 42068 and 42053 sets review, I use opportunity to present one of my WIP projects that I'm currently working on for about half a year. It is a 1:17.5 model of John Deere R 4038 Self propelled sprayer, but equipped with flotation tires, so I can enjoy mocing with Xerion tires. At the moment I'm not sure if there will be fake sprayer or spreader, will see what future brings. Major difference from original is the drive which I can make only full mechanical. You all know that hydrostatic drive can not be made with LEGO parts. This is the first MOC where I do not have to worry that it will be to wide, since real ones are up to 4,4 meters wide which is 31 stud... This MOC will feature - fake 6 cylinder engine - all wheel drive - all wheel steering - all wheel independent suspension - front and rear pto (since I can not simulate hydraulic valves) - bonnet opening... will see what is possible. So far I've managed to make right and left wheel hubs, which you can see in following images. (sorry for bad image quality, I'll make better images when front axle will be finished, which I plan this week). On the right side of every image you can see something like building steps (not real instructions, but kind of help if someone wants to build it). Any kind of comment, critics is wellcome. Thank you -
[WIP] Crop Sprayer, 42054 c model [FINISHED, video soon]
BrickbyBrickTechnic posted a topic in LEGO Technic, Mindstorms, Model Team and Scale Modeling
So you're probably wondering what an Amazone Pantera 4502-H is. It's farm equipment, the 4502-H is a crop sprayer. I get that @eric trax is the farming equipment guy around here, but I couldn't not build this. Here's what the real life vehicle looks like: The wheels aren't a perfect match, but if I build this right and get good suggestions from you guys amybe that will be the only inaccuracy :) Here's what I got so far: It's just the base for the 3 steering modes, which this thing has. In the end, it will have some more manual functions and 2 power functions. Thanks for reading! Suggestion are wanted to make this MOC the best it can be. BrickbyBrickTechnic -
With the recent release of The Force Awakens, the seventh installment to the Star Wars Franchise (If you haven't heard of TFA, I wouldn't be surprised, almost no advertising and no merchandise was made for the movie), fans have been in love with the newest droid, BB-8. The new look to the droid caused many Lego builders to desire their own, and HenrikLego did just that. Totaling at nearly 11K pieces, Henrik built an enormous droid for a local theater of his, and even included the local community of AFOLs with an LDD file for it. His original topic for this MOC is here: http://www.eurobricks.com/forum/index.php?showtopic=116949&st=0 After seeing it, I immediately wanted one of my own. After an incredibly long and difficult debate with my wallet, I decided to pursue my own BB-8. Using the LDD File, I generated a parts list for bricklink totaling 10,909 pieces. I looked over the parts needed for this and took note of some of the nuisances. White Brick 2 x 4 (1184 needed) - The part itself is not all that rare, but getting it in new condition (Getting White Bricks in used condition is a nightmare) in that quantity was a challenge. It ultimately ended up costing me 25 cents per brick. White Plate 1 x 2 (1385 needed) - Also very difficult to get in large quantities, but I managed to find it for about 10 cents per piece. White Plate 1 x 3 (527 needed) - It always seems like 1 x 3 plates are a pain to obtain, this was the case here. About 15 cents per piece. Orange Plate 1 x 8 (25 needed) - I did not imagine this piece being very rare, but I ended up placing about 5 orders for it, despite it being cheap. About 10 cents per piece. White Plate 4 x 10 (24 needed) - The large quantity drove the price way up. 48 cents per piece. White Plate 2 x 2 Corner (374 needed) - Once again a hard to find piece that I never would picture as rare. About 12.5 cents per piece. That rounds out the worst bricks and pieces for me, the rest are not very difficult to find, but prepare yourself for about 11 cents per piece, I optimized smaller amount of orders over saving a few cents per piece because shipping charges really drive up the final price. To date I am glad to say that I have ordered all 10,909 pieces, just waiting for them to arrive. However, I have not started designing a desert base for BB-8, I need to work on this ASAP. Once the pieces come in, I of course will have to count them (I am not looking forward to this at all, but more and more it seems that bricklink sellers don't have the ability to count) and check off that everything is in my possession, including parts for a base. I hope to keep you guys updated as much as possible throughout this process, but for now I need to explain to my wallet why an enormous chunk was taken out of it.


.thumb.JPG.3c74c0d405dc1afb04b2fa216ebc79e6.JPG)