Search the Community
Showing results for tags 'wip'.
Found 313 results
-
[WIP] Small 4x4 Vehicle
JJ2 posted a topic in LEGO Technic, Mindstorms, Model Team and Scale Modeling
Hello all: For this project I want make a car-truck that has good off road capability but is at a very small scale. Enough "talking" here are the pictures. I have the basic chassis done as of yet, and I plan to use a L-Motor for drive, a M-motor for steering, and a old 9v BB for power. Yes I know that PF parts dont work with 9v parts but I plan to use this method where you bridge the two metal parts with tiny pieces of aluminum foil. I am not happy with the front suspension because I needed to use some gears to center the drive chain The suspension is going to be live axle and probably only have one spring each. I do not know what bodywork I am going to put on it but ALL suggestions are appreciated. Expect more updates soon! -

[WIP] Offroad SUV
Block_Smarts Lego Technic posted a topic in LEGO Technic, Mindstorms, Model Team and Scale Modeling
Hello EuroBrickers! I am working on a Offroad Suv (NEEDS NAME!) Here are some WIP Pictures, sorry for the flash, it was at night! Here is a better picture, TMNT Cup for scale Still needs batterybox and a better roof. AND A NAME! I will accept name suggestions! More updates soon! -
Good afternoon everybody! Ah, Slizers. One of Bionicle's two predecessors from the late 90s. A gaggle of diminutive, poseable robots who could throw disks and combine with each-other, on a world separated into 8 elementally themed factions. Certainly an interesting line, but sadly very short lived - two waves of toys, and it was gone. One other sad fact is that not much is known of the Slizers story. Many older fans have theorised as to the true story, and I'm sure countless kids have figured out their own stories for their Throwbots to engage in... But otherwise, the presence of story material for Slizers is indubitably scant. Now, I'm a quite the fan of the Slizers in regards to their design and concept, and have always wondered what a fully fledged Slizers story could look like. I always liked the idea that the Slizers were planted on the planet in an act of experimental panspermia, and the asteroid that came later on was simply a freak of nature that corrupted said scientific endeavour. So, I wanted to tell that story, but from a 1st person perspective. And this is where Tremor comes in. This humble little 'bot was to be the main focus of an adventure on the world of Slizeron, meeting 'bots both familiar and fresh, trying to discover his identity and place on this new, mysterious world, after crash-landing in a most unfortunate manner. I began writing Tremor's story a couple of years ago on my phone, only to leave it abandoned for quite some time. Eventually, I transferred it to my computer, and it now sits in my Google Drive. Since then, I have added two short chapters, and I intend to in future add more. To start your adventure with Tremor, click here. I've set it up so that, if you have a Google account, you can leave comments on the document itself. If I make further updates to the story (which I intend to), I shall notify you all in this thread. Thank you for your interest. Enjoy!
-
[WIP] 42043 - 8258 hybrid
Cumulonimbus posted a topic in LEGO Technic, Mindstorms, Model Team and Scale Modeling
I am working on some MODs for my 42043, so I build a copy of the front and rear axle of the Arocs and made a new chassis around them. In order to get a feeling for the correct proportions, I placed the 8258 cabine, front outrigger module and crane on this chassis and this is the result: Note that this is a mock-up, so none of the functions are connected to anything at the moment. What do you think, is this something worth pursuing? Should I focus on modding my 42043 or continue with this 8258 derivative? If so, what should its cargo be? -
[WIP] Mitsubishi Eclipse (1999)
Block_Smarts Lego Technic posted a topic in LEGO Technic, Mindstorms, Model Team and Scale Modeling
Hi everyone! Its that time again! MOC time! This isn't the chick car Eclipse, the older one is manly! It will hopefully have -FWD -Suspension -Opening doors -Opening Doors and trunk -Lights -Engine -RC Gearbox (Piterx, I need your help ) Updates coming soon! Feedback, help, and critics appreciated ! -
So, some of you may know that I have a Lego Pirate web-comic, and a point is coming up where I will need a port, and since the old port has long been demolished, I am starting a, rather large, project. After a week, this is what I have so far: Hurricane Bay 001 by Elephant-Knight, on Flickr The whole thing. Hurricane Bay 004 by Elephant-Knight, on Flickr The six sections that will make up the wharf. Hurricane Bay 005 by Elephant-Knight, on Flickr Yellow Frog Tavern. Hurricane Bay 007 by Elephant-Knight, on Flickr I really don't like this little fort. Will definitely need to redo it. Hurricane Bay 006 by Elephant-Knight, on Flickr Just half of MMV expanded. Hurricane Bay 008 by Elephant-Knight, on Flickr Currently working on the Magistrate's office In case you didn't notice, the whole thing is modular, for a variety of reasons. First, easier to store and even build. Second, if I need to access a certain building for inside photos, I can simply remove the desired section, instead of trying to work around buildings. Thirdly, it is much easier to add or destroy a building. Need a buidling which I don't have? Build one? Need parts from this one? So long, sucker! And Fourthly, maybe I could make it a stander (Like Moonbase, but for pirates!) and use it at a con. Well, thanks for looking! EKnight
-
Hi all! I present my work in progress spaceship for the SHIPtember challenge on Flickr. (More info: https://www.flickr.c...57654284609753/) Everything on the frame by Péter Ittzés, on Flickr The new panels mounted by Péter Ittzés, on Flickr Engine pod greebles by Péter Ittzés, on Flickr Keep an eye out for updates! P.S. If you like big spaceships, you should definitely give this contest a try. EDIT: UPDATE on the bottom of the page
-

(WIP) Ferrari 250 GTO
Ttimman posted a topic in LEGO Technic, Mindstorms, Model Team and Scale Modeling
I have decided to make a Ferrari 250 GTO and decided to bring it here for constructive criticism and the likes, so here it is. The first picture I took of it. Ferrari 250 GTO Wip by T.timman, on Flickr Left side view with my sig-fig on top. Ferrari 250 GTO Wip by T.timman, on Flickr Rudimentary rear axle for test purposes. Ferrari 250 GTO Wip by T.timman, on Flickr The bottom Ferrari 250 GTO Wip by T.timman, on Flickr The front, showing the front suspension (which at the time is the only suspension it has) Ferrari 250 GTO Wip by T.timman, on Flickr It currently is in a "see if it works" stage, I will be adjusting the rear to live axle soon. I look forward to sharing more of this with all of you when it starts take shape. -

[WIP] Supra Yacht - NXT boat
syclone posted a topic in LEGO Technic, Mindstorms, Model Team and Scale Modeling
Good day everybody and let's continue with the boat mania!!! Today I would like to post my experimental NXT project- The Supra Yacht. It uses two Nxt motors for propulsion , but I disn't tested the propulsion system yet. It is built on top of two 1l plastic water bottles , and all electronics are on top.Because every NXT component is on the rear of the boat I built a long mast on the front for maintain the balance. The mast is connected to one Nxt motor. Here's the video: -
Apologies for crap photos. Based on what you can see, give any critiques. Thaaaaanks.
-
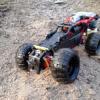
[WIP] Baja Truck
TheNextLegoDesinger posted a topic in LEGO Technic, Mindstorms, Model Team and Scale Modeling
hy i just started with a new moc, and it will be a baja truck. ( : another one? Me: Yes, i'm sorry) This will be my guideline but i think i'll get a different body work don't know yet. https://41.media.tumblr.com/0bcb8b46ab9d817442e1165be4ea83d5/tumblr_mw31eiXRQl1t0matto1_500.jpg It will feature: - RC steering (servo) - RC drive (2 L-motors) - suspention: - Front: duble whisbone - Rear: live axle I already made my rear axle DSC_0007 by thenextlegodesinger, on Flickr DSC_0008 by thenextlegodesinger, on Flickr DSC_0009 by thenextlegodesinger, on Flickr now i have to figure the front axle out. any help would be nice also is it really necessary or better to have a positive caster angle? thanks and i'll keep you updated To Jim: can i if i want still enter the contest with this moc or can't i? -
So I set out to make a smaller warship, similar in shape and size to the merchant ship that came with the Imperial Trading Post. The bow pieces in LDD are larger than the ones from the ship, though, so I wound up with a creation larger than anticipated. It doesn't quite seem right, though, and I'm curious as to whether anybody could help me figure out what's wrong?
-
My oldest son has really gotten into legos like I did as a kid, and we have pulled out all of my old legos from the 80s and 90s which includes a few ships like the 6271 Imperial Flagship, Renegade Runner, and Imperial Trading post. He got into the Pirates of the Caribbean so we have the Black Pearl and Queen Anne's Revenge too. My son told me that he has lots of Pirates, but not enough imperial/British ships to make it a fair fight! We have recently built quite a few custom kits from http://www.brickmania.com/, so I thought there might be custom ship builders out there or at least instructions to buy. I thought that something like this http://www.ebay.com/...=item2eda5a3ad8 might be a good solution, but it turned out to be way too big and fragile to be playable, and I wasn't happy with the lack of the tumblehome technique that I saw while browsing these forums. 20150703_111506 by adam_beck_bell, on Flickr I found Sebeus's masterpieces to be absolutely perfect and his HMS Marianne has become my goal. http://www.eurobrick...showtopic=71195 So I've taken apart the monstrosity I had built, and I'm trying to figure out how to replicate some of these amazing techniques from Sebeus and others. Being completely new to doing this without full instructions, it is a steep learning curve. Sebeus suggested that I make my own thread to get some pointers from the community so I can reach this goal of a playable and sleek Pirate killer. Here are a few pics and some comments on what I'm struggling with. Please feel free to offer critiques of my building work and posting. I am trying to build each section independently and then attach it to the hull. I've had to go back and completely break down sections and build it in place to get things to line up. I'm not entirely settled on what approach will work best for me here. 20150703_210350 by adam_beck_bell, on Flickr Tying together these gaps in the structure are really stumping me at the moment. There is a little gap between the sides of the ship and the interior deck and a big section i need to figure out between the very front which ended up at a higher elevation than the rest of the deck. 20150712_191039 by adam_beck_bell, on Flickr Overall, I'm liking the shape of the tumblehome but I'm a little worried about there being too much of a gap. 20150712_191030 by adam_beck_bell, on Flickr Once again, please help push me in the right direction... I'm a big boy and can handle it, I just want to learn. Thanks, Adam EDIT: Here is the (initial) completed ship! 20150816_163144 by adam_beck_bell, on Flickr
-
[Wip/Help] DuneBuggy Chassis
Block_Smarts Lego Technic posted a topic in LEGO Technic, Mindstorms, Model Team and Scale Modeling
I finished the chassis of my Moc. The thing is, I just don't know what kind of body I should put on it, any ideas? Here a pictures. -
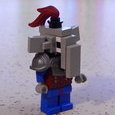
[TC7][WIP] The Boom-Dozer
veryrusty posted a topic in LEGO Technic, Mindstorms, Model Team and Scale Modeling
So it took me a little time to figure out what I would do for TC7. I'm still not sure, but at least I have a concept. Presenting the Boom-dozer My tc7 work in progress by Russell Murphy, on Flickr The basic concept is that the base stays the same, and the top transforms in some way to become a tank. Maybe the bulldozer arms could become some sort of armor. Who knows. Hopefully I'll figure it out. I've used the subtractor from Sariel's excellent unofficial lego technic builder guide (http://sariel.pl/201...-available-now/) as a base. My 42048 bulldozer and crawler have provided donor parts. Not sure which functions will be automated, except for propulsion. I think at this stage I'll be an enforcer, but depends on how far my white parts extend. I'll update as I get further. -
Hey everybody this is my first time posting so please tell me if I did something wrong or you need more clarification on something. This is the V19-83 Starship. It's something I am working on for a comic I am creating. The basic story of this is that it is a prototype that was left unfinished and found by my protagonist. I wanted something that in essence would be bare-bones but unique. I would like for this ship to change and grow as the story continues which is personally one of my favorite aspects in storytelling. I've always loved when the characters get a new base or upgraded gadgets. I wrote descriptions on every photo I took in my main album so I'm linking a couple of my favorite pictures here and if you would like to see more and read about my thoughts then feel free to visit the entire album. https://www.flickr.com/gp/133010472@N06/9VC3N3
-

The Marvelous Spider-Man: Mysterious Origins Brickfilm Teaser
LegoPercyJ posted a topic in Brick Flicks & Comics
In a few days, I can make a 2-minute Brickfilm. In 10 weeks of summer, however... The Marvelous Spider-Man: Mysterious Origins Fall 2015 (Yes, I will make this) Can you figure out what 6.13.1964 means? -
Working on a new Brickfilm...
-
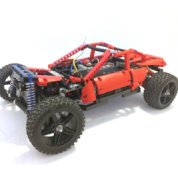
[WIP] Yet Another Baja / Trophy Truck
miguev posted a topic in LEGO Technic, Mindstorms, Model Team and Scale Modeling
Hello! I’m not particularly proud of this Technic horror I’ve created, but I’d like to share it with you rather than keep it to myself, possibly forever. Shortly after I learned about (and supported) SBrick and MiniZip in KickStarter, I started dreaming of building powerful, compact MOCs using a new combo: PP3 NiMh battery + MiniZip + SBrick + 5292 RC Buggy Motor. This is my first attempt at it, now that Android SBrick app (1.3+) is finally usable Functions Drive: 2x 5292 RC Buggy Motor, each connected to a separate SBrick, each powered by a separate PP3 NiMh 250 mAh battery using MiniZip. Steering: PF Servo. Front suspension: independent, soft, long travel, with “fake” positive caster Rear suspension: solid axle, dragged (didn’t figure out how to do four-link) 4x Lego LED Still haven’t applied myself to learning proper bodywork, so designing my own was out of the question. I went for an easy, fairly plain one. No openable doors, bonnet or anything. I worked with these two photos and scaled for 62.4mm tires. Full size (> 1024px): 1, 2. Photos were made really quick, during a baby siesta (indoor) and in short incursions (outdoors) no more than 20 meters from home. For now, I can only dream of having more time and freedom for this :D v0.99 without stickers: v1.0 with stickers based on video: Old school navigator refused to deal with GPS and computers, wanted just a compass (70001pb02) and a map with an X that marks the spot. Smart dude, run off with the loot. Very short of creativity and sleep, the only alternative I could think of to get rid of the demonic Monster logo and brand was a rather lame one: Music Energy. Example diff: I asked friends to vote in G+ and 3 out of 4 prefer Music, but the one who prefers Monster is my the only one into LEGO. I’m divided, will probably print them and try them on, but still not sure which ones to use for filming. I started with 1 battery, 1 SBrick, 2 motors. It seemed to run well. Adding an extra battery and Sbrick seems to make it run even stronger / faster, although SBrick developer Zsolt Majoros said it shouldn’t matter. The real reason I added the extra SBrick is that “2 ports 1 function” only works in Android app when those 2 ports are on separate SBricks. You may ask why use PP3 batteries instead of the acclaimed LiPo batteries… mainly because they are expensive, and a bit of a lottery with their thermal protection. MiniZip + PP3 NiMh 250 mAh wasn’t a whole lot cheaper, but the combo is certainly more compact, half the weight and doesn’t have any thermal protection. SBricks can draw as much current as the motors want, with just a small risk of overheating and possibly catching on fire… ah well, what could possibly go wrong? I haven’t actually managed to make the batteries warm up, they get warmer when charging. One likely reason for not achieving hotness is short life, according to this battery life calculator, they’d last 3.5 minutes at 3 A, 10 minutes at 1 A, 20 minutes at 500 mA. Can someone make a better-informed / estimation of a more realistic battery life? But there are more and worse problems, for which I sure can do with your advice! Caster angle is fake, isn’t? I mean, I just shifted the upper A arms a half stud backwards, but both A arms still move vertically. I think this is why big bumps will throw the truck’s front up rather than only the front wheel/s going up. When hitting a big bump with a front wheel, the wheel will thrust up and with it the whole car will roll to the opposite side. This results in a raised rear wheel taking all torque to just spin in the air, so the car stops until the raised wheel hits the ground again. Shifting the upper A arms a half stud backwards messed with the steering geometry, so now there’s a not-so-slight bump steering. I think this, combined with the twisting effect on the solid axle, is what’s causing the truck to steer to the left when accelerating. Too bad. Motors are hard coupled on their fast output and then geared down 20:12 twice, not including the 20-tooth to differential connection. Maybe I could / should gear down 20:12 only once, haven’t had a chance to try yet. I suppose integrating the motors in the rear axle and connecting wheels directly to them would help with the last couple of problems, but couldn’t figure out how to fit that in this body just yet. I’m also concerned that if one battery drains faster, the motor (no longer) powered by it will get damaged. With each rear wheel directly on one motor, that would result in the truck going in circles, but motors wouldn’t get damaged. How bad is this? Steering with SBrick (v1.3) as a significant latency, in the time it takes from the moment I slide my finger to a side (much or little) to the moment when the PF Servo starts moving, the truck is already going the wrong way. It’s really hard to drive straight. rm8, what’s your experience regarding this latency with your Double Trouble? If anyone has not seen rm8’s Double Trouble, I’ll put it as “my dream, properly done” Thank you for reading. If you were looking for a video... EDIT(25.05.2015): slightly better pics. EDIT(26.09.2015): I’m now a little more proud of my creation, at least the suspension seems right to me: it’s long travel and soft enough to reacts promptly to bumps, but the car doesn’t sink too much on it. I dare say it works better than most others, probably because it’s much harder to this the a bigger scale most others have been working with. The car is still not really fast, so I didn’t bother measuring its speed. I did try putting less reduction in the drivetrain, but that only resulted in lower speed due to lower torque, so I reverted back to my original setup. It’s still fast enough to be impossible to drive well, specially with the terrible latency in the SBrick. Latency is not a problem with the port tester, so it doesn’t look like a hardware limitation. Anyway, it’s fast enough to be fun. Thanks to Sir Wolf’s help and support, we finally have a somewhat decent video. Enjoy! :) And we learned many things the hard way: by failing. Fake caster angle is not good, you need real caster for off-road racing. I took the idea from someone’s supercar project here (sorry, couldn’t find it again) to displace the upper suspension arm by ½ stud backwards from the lower arm (see belly shot above). That gives you quite a bit of caster angle on the wheel (or snowmobile skies) but it does not help reacting promptly to the most serious bumps. It also screws the geometry in that the gear rack should ideally be ¼ stud backwards, but it’s either 0, ½ or 1. This results in notorious bump steering: front wheels are toes out when suspension is fully extended, and toes in when fully compressed. When this adds to the torsion exerted by the powerful motors on the live axle (see in the video how left front wheel jumps up when car starts). All in all: bad Idea. Portal hubs from 8070 are not good for off-road racing, I should have used the ones from the snowmobile 42021 (2015). They are also too expensive to go on dirt with them, so I didn’t. Differential slows down or even stops the car when one rear wheel take off. I knew this was a problem with crawlers, but never imagined how bad it’d be on a trophy truck. Damn it, I’ll never do this again. Just use one motor per wheel, and accept that if one motor runs out of battery or losses signal, you might take a sharp turn or find yourself driving in circles for a little, depending how the front wheels cope with the imbalance. MiniZip are great to get “buggy-motor-grade” power in a smaller size than LiPo batteries. PPA 9V batteries can fit a width of 3 studs, so a 5x11 panel makes for a perfect home. However, MiniZip’s lack of power switch in makes it a complete hassle to replace batteries. Should keep them very easily accessible. -
First attempt at a Town MOC; a well known convenience store. Because minifigures, like us, may very well crave for a hot dog and a beer at midnight. I don't have too many bricks so this was done the best way I could. Home-made stickers are a bit cheap but in the end they look not too bad to my eyes. I haven't finished the top as I still don't know if i try to make it modular or if i just let it on its own and give it a roof. It's open I started building more detailed air conditioners, but they looked less good to me than these good old fashioned printed bricks! The whole inside is pretty naive. I put many windows because i wanted to be able to see what's going on inside even when it will have a roof This gentleman looks spoilt for choice
-
It has been a while… Some of you know me from my previous layout. This layout has been taken apart and the new version is now under construction. I made my plans for this new layout early March. Planning by UrbanErwin(EPJL), on Flickr A big thank you to scruffulous for the BlueBrick files he sent me once. I had a small list of things I really wanted to have in my layout: - long or large curves as described by Railbricks and Cale Leiphart. - a turntable, better looking and functioning than my previous design - it has to be modular for easy transport - it has to connect properly to the other layout builders at LowLUG. I first laid the basplate and added track to see if my idea actually fitted, it did! Next where some tiles to mark the edge of the areas which should be tiled to support the track: Then the fun really began, building actual modules: Layout V5.0 work in progress 8-4-15 by UrbanErwin(EPJL), on Flickr Layout V5.0 work in progress 9-4-15 by UrbanErwin(EPJL), on Flickr Work in Progress update 13-04-2015 by UrbanErwin(EPJL), on Flickr After a couple of days building I made a start with the turntable: Some more foundations and landscaping Update 20-04-2015 by UrbanErwin(EPJL), on Flickr And this is the current state of progress: Work in Progress update 21-04-2015 by UrbanErwin(EPJL), on Flickr Work in Progress update 21-04-2015 by UrbanErwin(EPJL), on Flickr I will try to add updates every time I added something.
-

[LDD Idea] Spinning Gyroscope
sheo posted a topic in LEGO Technic, Mindstorms, Model Team and Scale Modeling
This contraption imitates a spinning gyroscope-like structure. The left axle is driven and the right axle is attached to the frame. When the left axle rotates the outer ring, the right axle transfers rotation in opposite direction through the series of gears to the middle ring. The same principle is used to transfer rotation to the inner ring. What do you think about this idea? Will it work? Unfortunately I don't have so many connectors #3 right now, so I can't reproduce it in reality. However, I tested this idea with only one ring, and it worked. The idea described above resulted in a project of a large Technic spaceship which is currently in a WIP state. Updates: -
Hi all, Long time lurker, first time posting. I came out of the dark ages (15yrs +) last year, saw all the amazing trains I'd missed (damn Maersk and EN) and decided to try my hand at a MOC - The new(?) pieces on offer these days are amazing! The following is all made up btw, it's loosely based on real engines and a bit of the LEGO Lone range train thrown in "The Persian Blue Express is one of the fastest in it's class, with almost unmatched speed for it's pulling power. Shown here is the model T version, which was used to carry the King and Queen through the Great Western plains. Following it's retirement in 1910, it has since made a comeback in 2015 with passengers from the city wanting to experience the regalia and nostalgia of the past." - Longer story is also WIP WIP, CC welcome please. I have a black clips and gold clips version. I'm learning towards the gold, although I haven't got any of those in my collection, but may well be brick-linked tonight! I've managed to build one side in bricks, have ordered all the blue bits I'm missing. I've also order enough parts to make an Emerald night carriage, so I'll hock that up when the parts arrive, before designing my own. Black Clips: Gold Version: Front: Cab: LDraw version, sometimes easier to see: And finally in real life! I built it in brick first, and then went to LDD, where I made some changes along the way..... I like the LDD file better than the brick built version now! The PF are in the tender, and it works well going round the track. (not with those Blue pegs though, annoying friction) - The T.C.R.R is from the Lone Ranger, I've yet to print my own stickers! Can anyone tell me how long the Engine of the EN is please? Mine is exactly two straight pieces long. Thanks Dylan
-
I have been wanting to build this locomotive for almost 8 years. It is a Reading T-1 Northern 4-8-4. It ran excursions for the Chessie System in 1977 and 1978. I first started designing it in MLCAD in late 2007. Since then I have redesigned it several times and even started building it in brick in 2011. However, I got stuck, became discouraged and didn't get too far. I have never built a large steam engine before so the thought of it was quite overwhelming because I knew it wouldn't be easy. On top of that, because all of the other great LEGO steam locomotives out there, I set my expectations very high for what I wanted it to look like. I am still far from being done after about two months work, but I am far enough along that I am finally ready to share. I have started working on the tender also, but it is a very rough draft right now. I don't claim very many techniques used as my own. I took inspiration from many other MOC's. Mostly Tony Sava for his #4449 Northern. A lot of the pilot truck and cylinder construction is based on his model. After serveral failed attempts trying to figure it out on my own, it was time for help. Here is picture of the real thing For fun I started a blog where I am going to document my LEGO builds. Right now there is a little history of the first 8 years I spent on this engine: John's Blog Thanks, John
-
Hi all, I just wanted to start this topic to let everyone know about a project that has been on my mind for quite a while now and is slowly starting to come to fruition. While I love the Fire Brigade and it has served me well since I first bought it, it does suffer from a lack of space for modern fire engines. I bit the bullet ages ago and bought a second Fire Brigade to add another garage and for an assortment of spare parts but now I've outgrown the two garages. Since I'm moving house I figured it'd be a good time to start from scratch so I've chosen the City of Sydney Fire Station as my reference building and here's my progress. While there's still a lot of work to go, I have a solid plan for what the ground floor layout of the building will be, and will try and get the facade as close to the real building as possible, although I have left out a large section of the original building to try and save a bit of space. The masonry side will be access to the upper floors, a room for the firesuits, the mandatory fire pole, as well as two bays for fire engines. The newer section on the right will house three fire engines side by side as well as some smaller support and logistics vehicles behind. My fire engines have been getting updates for the new facilities as well, with a permanent fleet of two pumpers, one rescue pumper, one heavy rescue, one aerial and one small vehicle planned to take residence in the station. The Scania chassis will make up the brunt of the stations responses, with two vehicles as pumpers and one as a rescue pumper. The basic truck features seating for four firefighters, with three of them being able to wear breathing apparatus in the cab on the way to calls. These three trucks will be almost identical on the outside but will have different loads in in the back to suit their allocation. The Isuzu is fitted out with pneumatic tools for responding to structural or vehicle accidents where a minifig may need to be cut out. Since this is a rescue unit, the two firefighters don't have a need for breathing apparatus or full firesuits so the cab is a little bit less crowded than the other trucks. The Duty Commanders vehicle is for providing quick responses to calls for the supervisor and is built on my standard SUV base. It has room for one minifig driver with a full breathing apparatus set and a small assortment of tools in the boot. A new aerial apparatus is still on the drawing boards, which will be more accurate compared to the previous incarnations. The biggest hassle is trying to get a functional and realistic boom and outrigger system into a City scaled vehicle. Comments, criticism and questions are welcome, and keep an eye out for updates.