Search the Community
Showing results for tags 'wheel loader'.
Found 23 results
-

[MOC]Manual single arm wheel loader
jorgeopesi posted a topic in LEGO Technic, Mindstorms, Model Team and Scale Modeling
This is a manual wheel loader that has the following features: Gearbox with lever inside the cabin to change between arm or bucket movement. Rear axle suspension. 2 differentials. Folding ladder. Working and removable V12 fake engine. Openable cabin doors and bonnet. Hand of god steering. Short video here Video I hope you like, the instructions are available here Instructions The build MOC process is here WIP Thank you for watching it. -
[WIP] Some kind of single arm wheel loader
jorgeopesi posted a topic in LEGO Technic, Mindstorms, Model Team and Scale Modeling
First of all I started this MOC just due the audi 42160 wheels. I bought mine one week ago so I do not have them yet... that is why I am using the zetros wheels. They are a little bit wider so I think the new ones will fit perfectly if I do not have any surprises with the measures... For now we have a manual MOC with pendular suspension, two diffs, gearbox to alternate between the two functions of the arm and a simple steering mechanism. I am being faster that I use to be because I started it last thursday so I am quite happy with the result until now. My next goals are choose the reference machine that could be a caterpillar 992 or 988 and based on that do it the corresponding engine a v12 or V8, I also think to do another little gearbox if I have enough room to operate the machine more faster without load but I hope not to have room enough . Problems right now are that the machine has more travel that the real one in comparison... but it is a small problem because I usually see just the opposite problem and that is a serious problem for me at least... -

[MOC] 42148 Wheel loader
ilyabuilder724 posted a topic in LEGO Technic, Mindstorms, Model Team and Scale Modeling
My 2nd aternative build for the 42148 set. A simple Wheel loader. I hope you're gonna enjoy the build! Feel free to share your pictures of assembled model! FEATURES Steering Working arm Additional palette to carry -

Three Wheeled Loader Idea
weavil posted a topic in LEGO Technic, Mindstorms, Model Team and Scale Modeling
I present to you the "3" wheeled loader. The back wheels act as one, It was an idea spawned from a mix of the Bell 3 wheeled sugarcane loader and BM-VOLVO LM loader, so a three wheeled loader. Took me a little longer to build then I care to admit, because of the lift arms and the not having the hoses kink or bind. It's nothing special as far as build goes. It might look better if I had a little smaller bucket. The truck used for the demonstration is a slightly modified version of grego18's on Rebrickable. More pictures HERE. -

Bobcat S130
Brick_Builder19 posted a topic in LEGO Technic, Mindstorms, Model Team and Scale Modeling
This is a realistic version of the Bobcat S130. This LEGO TECHNIC model built for 1:14 in scale. Functions: moving piston working lift arm tipping bucket Dimensions: long: 230mm wide: 115mm high: 150mm (with bucket lowered) Bricks of the set: about 670 piece Look at the other pictures and If you like this model please support on the LEGO IDEAS side. Link: LEGO IDEAS/Bobcat S130 Thank you for watching and any support! -

Wheel Loader 1:17 scale inspred by volvo
functionalTechnic posted a topic in LEGO Technic, Mindstorms, Model Team and Scale Modeling
Hi everyone After one year I finished another MOC. Here I present my wheel loader inspired by Volvo wheel loader L120H with technic chassis and creator style body. The model is controlled by two Sbricks an powered by one small PF battery boy. The boom and the bucket are controlled with pneuamtic cylinders coupled to a geared servo motor with the newest pneumatic valves. Like this it is possible to control "heavy" loads precisely. Furthermore, the model has an auto compressor which is controlled via the BrickController2 app, where it is possible to add one port of the Sbrick (here the compressor) to two independent other functions (here the two servo motors with the valves). Like this the pump always switches on as soon as one of the pneumatic function is selected. But check the functionality in the following video: Instruction is available on rebrickable: https://rebrickable.com/mocs/MOC-64106/FT-creations/wheel-loader-inspired-by-volvo/#details -

[MOC] Liebherr L506 compact
Jack06 posted a topic in LEGO Technic, Mindstorms, Model Team and Scale Modeling
[MOC] Liebherr L506 compact wheel loader Hello everybody, after a while I'm happy to present my latest MOC to you. It's a replica of the Liebherr L506 compact wheel loader, and it's controlled via a Vengit SBrick, as always. Some Infos about the model: 999 parts Width: 17,5 cm Height: 18,7 cm Length: 38,4 cm 4 functions Instruction is available on Rebrickable since today: https://rebrickable.com/mocs/MOC-59847/JB Lego Creations/liebherr-l506-compact-wheel-loader/#details Some pictures/Render, hope you like it: The video: Best regards and merry Christmas Jakob -

[MOC] Volvo L 350H wheel loader
mpj posted a topic in LEGO Technic, Mindstorms, Model Team and Scale Modeling
Hello! In march I completed my latest Moc, and today I took some photos. It's a wheel loader Volvo L 350H in 1.22 scale. It is an updated version of L 350G by Lego, which I used as parts pack. The bucket is in 1.22 scale, so I decided to build in this scale. I used XL motor for driving, and M motor for steering, by 2 mini LAs. Arm and bucket are controlled by L and M motors, and they have quite good movement range. Battery box and receivers are inside the bonnet. The tyres are third party, 96mm diameter. Sticker are home made! I hope you like it! -

Volvo L120H scale 1:17
Kio Liex posted a topic in LEGO Technic, Mindstorms, Model Team and Scale Modeling
I am finally done with my first real MOC that I am happy with and proud to show to all of you LEGO fans out there. This is my version of the Volvo L120H wheel loader. It is build in scale 1:17. I have used a M-motor for the sterring and bucket tipping, a L-motor for the bucket-arm lifting and a XL-motor for the drive. All of them are geared down to ensure enough power (except the sterring). I am using two standard IR receivers and the small rechargeable battery pack. I have considered lights but I think the wires will look messy. I am considering building it in Stud.io to get a brick count and if I do that then instruction might be an option. I have made it from these specs (page 18): https://www.volvoce.com/-/media/volvoce/global/products/wheel-loaders/wheel-loaders/brochures/brochure_l110h_l120h_stagev_en_21_20057313_b.pdf?v=QA5EPw Worker on Studio gallery: https://www.bricklink.com/v3/studio/design.page?idModel=82000 Worker instructions: http://liex.dk/LEGO_MOCs/Worker_1-17/Worker - scale 1-17.pdf And now for the pictures, I hope you enjoy. -
[MOC] Volvo L 120 H wheel loader
mpj posted a topic in LEGO Technic, Mindstorms, Model Team and Scale Modeling
Hello! I finally completed my new Moc: a Volvo L120H wheel loader in 1:17,3 scale. I started this project about 1,5 years ago, then I had a pause during last spring/summer, and I restarted working on it on October 2017. It has 4 powered fuctions: - forward/backward (L motor) - steer (2 mini LAs powered by M motor) - rise/lower main arm (2 LAs powered by L motor) - bucket (1 mini LA powered by M motor) All the electric components are hidden inside the bonnet, except one M motor which is in the cab. The main goal was to obtain the correct movement of the arm and the bucket. I worked with the original drawings scaled to the model size. At the end, the linkage works quite well and the bucket stays parallel during the movement of the arm. The battery box is on the back and can be easily be easily removed to change the batteries. Stickers are home-made. I'd like to change the rims with the 6 pin holes rims, but at the moment I only have the 3 pin holes ones. FInally, a short video, but I'm going to make an outdoor video soon : Enjoy! -
Hi I would like to show you my Liebherr L586 wheel loader. The scale is about 1:42 or 1:43. So far I have used about 600 bricks. Maybe a few more will come later. I built the wheel loader in white because I liked this color scheme best. You can play with it, too. A minifigure fits in the cabin, you can steer and the shovel can be moved up and down and dump. I hope you like the L586. Looking forward to your comments. :) More pics here: https://www.flickr.com/photos/138111247@N07/with/39052677940 Regards, Chris
-
Caterpillar 990
jorgeopesi posted a topic in LEGO Technic, Mindstorms, Model Team and Scale Modeling
Like I said in this topic Z-bar linkage help, I am building another wheel loader. This time is the Caterpillar 990 which is the biggest one I can build because the bigger ones like the 992, 993 or 994 have two cylinders for the bucket and it would be impossible keep the width in scale. It uses the Class tyres and in the beginning it had to be manual but I have so many room that I am thinking on a complete pneumatic RC loader. I hope you like the WIP process every advice is wellcome. I am trying wheels, should I have to buy the yellow ones?. -
Z-bar linkage help
jorgeopesi posted a topic in LEGO Technic, Mindstorms, Model Team and Scale Modeling
I am working on another wheel loader and I have again the same problem, the Z-bar linkage. In my previous loaders I solved it with hours and hours of tests to achieve the perfect travel but this time I wanted your help because I have seen a lot of pics and brochures of machines but I don´t find what I am looking for, I want the mathematical formula or whatever to be able to make arms more quickly, what allows to know the measurements and position of the different pieces depending on the size of the cylinder, arm and anchors of the bucket, it is a difficult question because even Lego wheel loaders haven´t got realistic bucket movements. -
[TC10] Mini Underground Mining Loader
Tamas Juhasz posted a topic in LEGO Technic, Mindstorms, Model Team and Scale Modeling
UPDATE1: Final photos and video can be seen below, like: .... Hi! I decided to make something for TC10 competition. My plan is an underground mining loader, like the ones from CAT, etc. Functions: - pneumatic bucket tilting - pneumatic bucket raising/lowering - manual steering - 2 cylinder fake piston engine - 4x4 drivetrain The progress looks like this, will be finished until deadline IRL, I think: More progress and real life pictures coming soon. Comments, questions are appreciated, as always. -
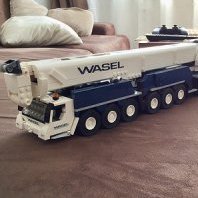
p&h [MOC] Fully RC P&H L1150 Wheel Loader
shineyu posted a topic in LEGO Technic, Mindstorms, Model Team and Scale Modeling
Hello Everyone, Let’s me introduce my new Crazy MOC; Fully RC P&H L1150 Wheels loader. Speed : 14cm/s weight : 4650g / 4.6KG lenghts :76cm width : 24.5cm height: 29.5cm I don’t know how to describe this monster? it using 132mm tires. please go to photos and video. Video: -
LeTourneau L-2350 wheel loader
Tamas Juhasz posted a topic in LEGO Technic, Mindstorms, Model Team and Scale Modeling
Until the Maz 535 is finished, I'll present some of my MOCs, which are a bit older, but weren't publicized yet. I start with the LeTourneau L-2350 wheel loader, the largest in the world. I made a scale model, with PF IR remote. All functions are motorized: - Drive - Steering - Bucket lifting - Bucket tilting Except drive, everything works via strings and reels. This way it could be built in this scale, there is really a limited space inside, autovalves or servo operated penumatic valves with compressor aren't possible. Weight: 1058 g Top speed: 0,6 km/h Parts count: 680 Video: Pictures: Gallery: With blueprints: Feel free to ask or comment. -
[TC10] Wheel Loader
jorgeopesi posted a topic in LEGO Technic, Mindstorms, Model Team and Scale Modeling
I have nothing physical but if I have the idea. I know it is no original but I like wheel loaders . I did my calculations and using new class wheels I can build a huge but simple wheel loader a komatsu wa1200, caterpillar 994 or a leturneau. They are gigants wheel loaders and the problem I had is that their wheels are so huge that in proportion the body it had to be so tight that I could´t put anything, with new wheels I think I can build a big and simple MOC with few parts, my goal is that it had a Lego set style. Here you can see these beautiful machines, they are perfects for me they have small cabins for a bad cabin builder . As you can see their wheels are even bigger than a new large pneumatic cylinder. -
[TC6] Komatsu WA 600-6
jorgeopesi posted a topic in LEGO Technic, Mindstorms, Model Team and Scale Modeling
Another wheel loader , a small beast, 2 motors on board and room enough... look out what narrower it is... -
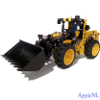
Little Pneumatic Wheel Loader
Appie posted a topic in LEGO Technic, Mindstorms, Model Team and Scale Modeling
Omg more wheel loaders?! Well, yes, it is the "Year of the Wheel Loader" after all This idea originally came about after my Mini Wheel Loader from the Mini Contest. I didn't want to leave the smaller scale of building things just yet (and still don't ). This model actually took some time to realize. Which was mostly due to a knee injury that made sitting at my desk and working on this model not as enjoyable. But since my knee has been getting better and I wanted to start working on my C-Model Contest entry, I wanted to finish this model. Building it was a joy, provided plenty of challenges for me to overcome. So here it is: Considering I went up in scale due to the size of the pumps I also wanted alot more functions than my previous MOC. It has the following functions: - 4WD (with diffs) - Pendular rear axle - Fake L3 engine - Articulated steering (and moving steering wheel) - Pneumatic bucket and I wanted the controls in the cabin (though in hindsight there would have been no other place to put them than in the cabin ) Some functions I wanted that I didn't manage: - Opening doors - Fully adjustable seat in height and forwards/backwards (had an idea with worm gears and whatnot). This function did make it into the model a little bit, the chair can move up or down manually Something I am still thinking about: - Ladders to reach the cabin. I want to built these out of "normal" Lego, but not sure how at the moment. I am open for suggestions Anyway about the model as it is now. Some more images: Lego's huge diffs taking centre stage in this bottom shot Not much I can do about that. I was determined to put diffs in the model and obviously I wanted to use real Lego parts and this is the best Lego gives me, so I worked with it. I kind of wish I could move the arm back one stud to be closer to the wheels, but they end up touching the wheels then. Since I never designed a wheel loader from scratch I spent quite some time figuring out the liftarm of the bucket to provide enough lift and tilt while still looking good when it actually has to scoop up dirt. Originally I had planned to use the big Pneumatic hand pump (I even have an image of this further in this post), but I needed more precise control of the pump that tilts the bucket. So I went with the 6L compressor pump instead. Now while this does provide the control I need for the bucket tilt it also means I have to turn the knob for the pump about 11 times to fully lift the arm, but I take comfort in the fact that a mini LA needs about 19 turns to fully erect Also in hindsight I don't think I would have been able to hide the handpump in the model, while the 6L sits nicely besides the driver's seat. While using 3 mini pneumatic cylinders was my original plan at one point I did try to put in a big cylinder for the arm lift, but I simply couldn't make this fit with the diff and the cylinder for the tilting. In the end I am glad it didn't fit because I really like how the cylinders and their hoses came out in the end I love how this looks (I like seeing the guts of a machine), but I also find it a shame I couldn't cover it up a little, the diff and the hoses prevent me from using that space. Figuring out how to route the hoses so they wouldn't touch the wheels or the diff was quite fun by the way, but they sit there perfectly in between The cabin houses the 2 switches, 6L compressor pump and steering mechanism. It was fun to built assymetrical, since the pump is on the left of the vehicle I only had room on the right to make a steering mechanism. It turned out to become a simple but effective liftarm steering mechanism on top of the pneumatic switch but below the seat, linked to the steering wheel in the cabin. The turning radius isn't really awesome, but it will do in my opinion. It is slightly less than the turning angle of the 8459. Earlier in the built I was afraid the engine would be too long and that I might have to use only 2 cylinders. They might look a little too big obviously for the model's size (much like the diffs), but I like how it turned out. Maybe I make it green when my second copy of the Volvo Loader comes. I think this is also the first time I actually used the big holes on the bent lift arms The rear diff and the fake L3 engine was fun to combine too, especially with the pendular axle. As you can see the pendular axle has (almost) half a stud of movement. At first I thought it didn't look as much, but looking at my Volvo Loader, it has half a stud of movement, so I guess it is ok. I had to use Technic half pins in the 5x7 frame, because if I didn't the differential could touch the crankshaft of the fake L3 engine if the pendular axle was at an angle. I also have some in progress pictures of this built (originally I wanted to make a WIP topic ) This was basically day 1 of the concept, with the big handpump, which I had planned to run from the bottom of the chassis to the top of the rear part of the cabin. Here you can also see I originally had 1 stud less for the cabin part of the model. I added another stud to better fit the scale and the fact I had a whole other stud of extra space didn't hurt either These 2 pictures are a little dark sorry: Here's "the heart" of the loader, its pneumatic guts. While the hoses are brand new (from a 42008) I decided to use the old school pneumatic colour scheme And here's an image of the loader without its "heart". Kept plenty of space so the hoses don't touch the drive shaft and have room to let the air flow freely without being obstructed. Hope you all enjoy this post and to finish up, here's a picture of my Wheel Loader "family" (seems I missed some corners in cleaning up the background of my photos ) -
[MINI] Wheel Loader
jorgeopesi posted a topic in LEGO Technic, Mindstorms, Model Team and Scale Modeling
My mini is finished, it is a wheel loader and it has 199 parts. It has functional arm, bucket, wheel steering, hand of god steering, pendural rear axle, cabin door and hood. I tried to build it as real as technic posible. Video And more pics You can see the evolution of the MOC, more videos and instructions in the old topic, thank you. http://www.eurobrick...showtopic=96518 -
[MINI] Truck with Trailer and Wheel Loader
Appie posted a topic in LEGO Technic, Mindstorms, Model Team and Scale Modeling
I like to present my Mini for the contest, it is a truck with trailer and a wheel loader: After finishing my little dump truck last week I came up with this idea instead of trying to cut down the parts of the little dump truck from 350 or so to 200. And to be honest I am glad I went with this idea. Was alot of fun and it provided alot of challenges, but I got everything in the model that I wanted with exactly 200 parts. A total of 9 functions (10 if you count adjustable seats in the truck) I managed to put in this entry. One function actually shares his with another and came to be by chance actually. I didn't plan it, it just happened when I placed a part for which all I had to do was turn it around to make it even more functional, but more about that later. Allow me to go over each part seperately: 1. The truck with a total of 97 parts. Could be a considered a "Mini" on its own I suppose. It has the following functions: - HoG steering - Rear suspension - Fifth wheel lock 2LegoOrNot2Lego actually inspired me for the fifth wheel with the version he has on his awesome US Truck T1 MkII. I wanted that on my little truck, but I had to do it on a much smaller scale so I didn't fully look at how his worked, just knew it had rubber bands. My fifth wheel requires a little manual assistance to function (don't have to open them this far to get the trailer in there). Trailer uses a technic crankshaft to lock into the fifth wheel And this is how it looks attached. The suspension on this model is actually an improved version of the one I made for my little dump truck. Originally the truck for this had a 5 stud wide chassis like the little dump truck, but after making the wheel loader this 7 stud wide body looked too big in scale (and had a wooping 135 parts). So I made a 5 stud wide truck, which means I had to refine the suspension from the little dump truck from 5 studs to 3 studs. This was a challenge, but making the centre of the rear chassis from connectors instead of liftarms made my day. But Appie this truck is 6 studs wide? Yes, the 5 stud wide truck looked too slim so I tried a 6 stud wide body while keeping the chassis 3 studs wide for a better look (works better with the tires too in my opinion). 2. The wheel loader with a total of 57 parts It has the following functions: - Articulated steering through gear on top of the cabine - Bucket lift through control at the rear - Bucket tilt with hinge Added bonus for me personally is that it uses less parts than Lego's smallest technic loader, but this one can steer Can't wait to see how it looks besides the 42030 3. The trailer with 46 parts. This was a real challenge. Before even starting this I remade the truck like 3 times to get the parts down to what it is now. I took apart the wheel loader for the same reason, but 46 parts is what I had to work with and I managed to get the functions in that I wanted to. Though they are a little simple in execution (as in: very direct), but that also happens in "Mini" Lego sets, so I guess it fits It has the following functions - Ramp that can be lowered - Stand that can be lowered - And the double function: the stand also functions as a lock for keeping the wheel loader in place during transit. The ramp at the end provides this feature a little too of course, but the stand really locks it into place, it can't move at all. I call it "the hook" Let me explain the hook with some pictures. This is how the stand would be during transit. When the stand is deployed the wheel loader can move a little, but is quickly stopped by the ramp at the end, so no crazy stuff will happen when standing still The wheel loader has an open space behind its front axle, the 2x4 liftarm fits perfectly in this space. Here you can see how it looks on the model: Thank you for your time and I hope you all like it. Big thank you to Eurobricks for this fun contest. It's alot of pictures, hope you don't mind. I like showing stuff Photo of the parts will follow soon (will have to disassemble it first). -
[MINI] Mining Wheel Loader
jorgeopesi posted a topic in LEGO Technic, Mindstorms, Model Team and Scale Modeling
So far less than 120 bricks including pendular axle, steering and functional arm and bucket. My inspiration is a caterpillar 988. http://www.youtube.com/watch?v=1c-95KaV57U&feature=youtu.be Sound track my wife eating and my 2 months son sleeping. -
 It's that time again, I have finished (well, mostly) my latest Swingloader, which is a bit different from the last one Firstly, I have based this one off of a real life loader, namely the Mecalac AS210E, which is the biggest in Mecalac's line of swingloaders. This is what the real thing looks like: And this is my Technic version of the machine: Emphasis on "based on". as there are several differences, mostly due to limited parts availability.. As you can see, it's not articulated, like my Mk II model, but rather has four wheel steering. This apparently makes for a more stabile platform, and that holds true in the world of Lego as well One of the problems with the Mk II was balance when swinging a load to the side, whilst the steering was articulated (?). The vehicle has been finished for a long time, except for the loader assembly. I think I have completely rebuilt the entire thing three times, and tried different geometries a thousand times! Today I got it to work satisfactory, so now I can show you! Technical features: -Four wheel drive, with central differential (not so sure whether this was necessary), powered by one PF XL-motor -Four wheel steering with Ackerman geometry (One PF Servo motor) -Swinging loader (one PF M-motor) -Lifting arm (one PF L-motor) -Tipping bucket (one PF L-motor) Non-technical features: -Openable doors -Openable engine compartment -2 x PF Lights -Fake, driven V6 engine in the rear Making it not articulated made it possible to make it a little more compact, as I wasn't restrained to keeping all motors in the rear of the vehicle, and then routing four axles vertically in line across the articulation point. This is the arrangement of the various motors in the loader: The middle M-motor (the one sitting the right way) is supposed to be a Servo motor (what's taking so long?!), so the output there is actually just a pin hole. The actual output is the #2 orange connector just below it. Also, the worm gear for swinging mechanism is of the new type. I haven't made the digger in LDD yet, so it doesn't go further just yet Anyway, I suppose pictures are due: Good tilting kinematics Driver's cabin is a bit empty as of now... Engine compartment and batterybox Underbelly shot. The central differential is covered by panels Underbelly shot, showing the steering geometry. THe servo is geared 1:1 through three 16 tooth gears, so I had to use 8 tooth gears and studded bricks for the steering to work properly.. I know it doesn't look too good And a short video: So that's about it! Thoughts and critisism and praise is welcome I don't have the time to make a video today, but hope to get one up in the next couple of days! Ans sorry about the sub par photo quality