Search the Community
Showing results for tags 'vehicles'.
Found 69 results
-
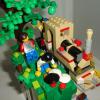
I am a Classic Town nostalgic and sometimes I miss the real 4 studs models :) In fact I think they are still useful for City dioramas. So I've built this tiny ambulance using the nowadays elements except the wheels and the back hinged door. LEGO ambulance 1 by Severus A, on Flickr LEGO ambulance 2 by Severus A, on Flickr LEGO ambulance 3 by Severus A, on Flickr LEGO ambulance 4 by Severus A, on Flickr LEGO ambulance 5 by Severus A, on Flickr
-
8-wide build, opening side-doors, two seats for minifigs. Can bother with opening trunk, though it'd make the model not perfectly strong and sturdy. Pics:
-
Hey there, I am from Croatia. I hope to meet some wonderful LEGO fans here and exchange ideas
-
Today I post my Space Probe "Explorer", the design is inspired by Space Probe "Voyager 2". I tried to recreat it with the best possible realism. A detail of the Space Probe: the planetary radio astronomy and plasma wave antenna and the RTG on the right. In the middle the "Platinum Record", a hydrazine thrusters and the bus housing electronics. On the left sensors antenna and the low-field magnetometer. At the top, the telocommunications parabola; at the bottom other hydrazine thrusters. Detail of the other side of the Space Probe: high-field magnetometer, a second hydrazine thrusters and the '90 Lego Space Program symbol in the middle. Seen from above
-
Hello! After a short absence, I return with a few space theme creations. The first I want to show is my Space Scooter. This creation is inspired by 2009 set 5969 "Squidman Escape" from the Space Police series. I made several changes, I added wings and changed colours scheme with pieces from Alpha Team set "Tundra Tracker".
-
Hi All, We recently picked up the LEGO City Fire Station 60004! It's pretty tall and full of fun with awesome play, my kid can attest to it. Was thinking this might be a good set for parts for a future MOD project. Though it would probably still need quite a bit of parts seeing that there are now walls. But hey that's fun on my part. Anyway its our first CITY building and it was a fun build, the multiple vehicles are a plus point. It doesn't have as many pieces and Minifigures as compared to the Police Station 60047 but it still comes with a good amount Firefigher Minifigures. (Different type of play I guess) Hope everyone enjoys my take on it, the full review and detailed pics here http://www.boxtoy.co...004-review.html Look forward to MOD-ing this set, if my kid agrees to it of course:)
-
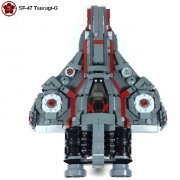
EDIT: Full Pics and Write-up now included. Most Kawashita fleets are furnished with a complement of Starjackers, a specialized light corvette that masquerades as a two-seat cargo barge and acts as a skirmisher unit in sustained engagements. In the ancient days of Earth's naval engagement, this type of ship was known as a Q-ship. The Starjacker's role, as its name may imply, is to use subterfuge to close in with enemy vessels, using the element of surprise to quickly overwhelm ship defenses and deploy small, heavily armed squads of marines for boarding actions. Though seeming like your average pair of rocket jockeys to any scans or ID requests, the Starjackers are actually piloted by veteran bomber aces, used to flying close to large enemy vessels with sophisticated point-defense systems. The second seat belongs to the gunner officer, whose job it is to oversee and deploy the weapons and specialized systems on the ship. The canopy is fighter-style, allowing the flight crew to quickly emerge from the ship if necessary: Here, on the portside of the Starjacker, the mock cargo pods, in this case rigged to resemble fuel canisters, are clearly visible: And here, starboard side, the smooth flank of the ship. Though visible to the eye as standard ant-meteorite armor for a ship this size, the starboard armor is reinforced beneath the visible layer: The visible armor is openly painted in Kawashita Group colors and, typical of our illustrious corporation, hides a handy secret: The "broadside" cannons allow the Starjacker to sidle up to enemy craft on the starboard side, rapidly deploying the cannons and opening fire to disable defenses and punch a hole in targeted ships for the second phase of the strike. Beneath the cannon mounts are layers of additional armor to protect the normally vulnerable section of the ship. The expected compartments of the starboard side will show up on holoscans, but aren't actually present in the ship. It's all armor with very limited additional space, even for a corvette. The rear of this Starjacker features a faux-refueler. The large and complex engine of the Starjacker includes articulated fins that allow rotational, omnidirectional thrust to provide the quick turning necessary for the ship to complete it's strike package without being caught in a slow turn. The engine's housing is also heavily armored, a feature that has been unconvincingly disguised as oversized heatsink coils: Here we see the mounts for the "fuel canisters", which are meant to be hot-swapped between runs just as expected. This feature is modular, allowing a Starjacker to be disguised as other types of corvette or light frigate as needed: In a galaxy far, far away, these canisters resemble escape pods. This is not too far from the mark, as the interior of the canisters are cramped, filled with limited air supplies, and probably incredibly uncomfortable. Kawashita marines don't complain, however. That sour look on Sgt. Galbraith is just his war face. The full complement of Starjacker marines is usually a fireteam of four. These units are specially trained to quickly breach and clear a ship's vulnerable decks. Their hardsuits are equipped with limited EVA capability, allowing them to fight in Zero G if their ship is able to disable artificial gravity in enemy craft: Additional detail shots of the Starjacker's underbelly with retracted landing gear and the sensor-package at the ship's front: Thanks for looking! C&C Welcome!
-
Title says it all, out of the vehicle sets LEGO gave us during G1's run which ones were the best? "Creature and rider" sets are included, as well as mechs, even if they may not be vehicles in the traditional sense. I apologize for the length of the list, vote on as many of them as you need to. Well, what are you waiting for? Vote! edit: the poll did not work, sorry. If an Admin could delete this thread, that would be good.
-
Hi, I have been looking at gameplay of the Lego Worlds game for PC on the web and wondered if it was possible to export vehicles/other models to lxf / lxfml files. I decided to try to build some models, starting with vehicles first, I have also noticed that some models are actually from official sets. So I opned those in LDD and checked the accuracy compared to in lego worlds, and it matched 100% Other (2 or 3) vehicles are partially based on existing sets I then decided it would be cool & useful to actually purchase Lego Worlds. The game is excellant however. you can only export basic bricks to a lxfml file currently (this is also the same story with imprting from LDD to the game). Assumably more brick support will be added in later versions of the game. Never the less, Here is the collection of models in the current progress http://bricksafe.com...ipe/lego-worlds Heres some examples of cood models: More to come shortly! Regards, Snipe
-
Location: G07 Tags: Science, Exploration, Vehicles Earlier, on H05. //"Log date 317, this is Dr. Danielle Long, Recording from the surface of Planet H05. My second day on this miserable planet has been much more eventful than the first. After receiving a transmission from one of our Engineers, Big Z, as the crew calls him, I was able to devise a method by which a prospector on this planet might reliably discover Awesomnium without the use of our advanced detector technology. The key to finding sub-surface deposits of Awesomnium is a very distinctive "bush." Found planet-wide, this bush only grows in Awesomnium rich soil. I've gathered several specimens for research aboard the O.C.S. Axle, and tested the surrounding soil with Sc119, or as the crew calls it: Hound. I'll be returning to Orbit shortly. Dr. Long signing off."// Conclusions Drawn --------------------------- Later, aboard the O.C.S. Axle. "Greetings, Comrade." "Greetings, Danielle. Have you gotten a chance to look over my Science Outpost request? I've detected very promising readings from a sector on the Northern Pole of H05." "I did review your work. Excellent adherence to protocol. We did send out a scouting mission lead by Horsleben, and work is underway for a permanent mining facility to be installed... however your request is being denied." "Wait... but why? I'm fully capable of working planet-side on this." "I know you are... but we're needed elsewhere. The Axle always follows the primary fleet... and the fleet is moving out." "You mean...?" "Yes. Domination has been achieved. H05 is ours. Now we begin firming our control over the nearby planets." "So... Where does this leave me?" "We will be needing a lab on G07 to test the water there for potability, in addition to performing routine environmental studies. This will be your new assignment. Go over the plans with Big Z. He's disembarking from the Axle shortly. I'm sure you'll have much to discuss." "So, Octan's reach is extending. Excellent." "You know what they say: Kawashita thinks red is the color of domination, and MANTIS thinks green is. They're both right!" --------------------------- Later still, on G07: //"Log date 322, this is Dr. Danielle Long. Preliminary reports from Hennigan II show bountiful water resources, but inedible biomass. This will have to be researched. Samples collected. Etc. I have my drones working on that now. There are more pressing matters, however. One of our explorers has reported an... "Unknown Artifact..." which is Octan code for a really interesting anomaly... Potentially produced by highly intelligent non-human lifeforms. That's why we send the explorers out first. They have a knack for picking up on interesting finds. Some say it's fate, or luck, but I don't believe in any of that. I will be inspecting this report, and employing the assistance of an explorer by the name of Jacques LaRose, one of my fellow executives. I've dispatched an Sc212 drone to locate him. Shouldn't be too hard. Dr. Long out."// Arial Observation and Personnel Location --------------------------- //"This is Dr. Danielle Long: Status update: In transit to location of G07 anomaly aboard one of our Scientific Personnel and Equipment Transporters. None of the hostile "butterfly"-like lifeforms have been observed, however I have noted several large arthropoidal creatures camouflaged in the grasses. They appear bovine and docile. We should be arriving at our destination soon."// Take Me to the River Take Me to the River Take Me to the River Out Standing in Her Field Sorry for the multiple Vigs. I got a bit carried away. Also sorry for the mediocre pictures of the centerpiece carrier craft. I didn't have much time, but I'll upload better ones later... probably too late for the judging, mais c'est la vie. Updated with some better pics. ~Dr. Long
-
Hi all, Here share my MOC, AEC STL London Routemaster start from 1930s, with minifigs scale. Routemaster and the Morden bus (coming soon)
-
-
Recently I picked up the Lego Creator Family House 31012, which has hitherto been neglected by the experienced reviewing eurobrickers. So you all will need to suffer through my first attempt at making one of the set reviews that make this site so remarkable. Name: Family House Theme: Creator Year: 2013 Pieces: 756 Price: $70 US, 60 Euros, 60 BP Brickset Link Bricklink link Note that this is this set released in 2013, and is not the first set to bear the title "Family House." A quick review of the Brickset archives reveals the following sets that bear the name, or essentially the same name: 31012: Family House, Creator in 2013 (this set) 8403: Family Home, City in 2010, which is reviewed at this link 6754: Family Home, Creator in 2009, which is reviewed at this link 5639: Family House, Duplo in 2009 2602: Family Home, Duplo in 1997 So let's get started. Here's the box and its contents. A whopping 9 bags, unnumbered. The top flap has an inventory of the yummy pieces that lie within. The box really isn't that interesting, and this post is already really picture heavy, so I don't plan to talk much more about it. When you do pick it up, the weight is substantial. I suppose it should be for a set with an MSRP of $70, but it's more than I'm used to. If you want to see more of the box without going to the store, leave a comment to that effect and I'll write something up. There are supposedly 756 pieces there. It's quite a heap of parts. There appeared to be parts from the first few pages of the build in multiple bags, so it seemed only appropriate to open them all at once. It's nice when you can open the bags sequentially with a build, but of course that would only work for 1 of the 3 builds, so I guess it's understandable. The primary color is white, which is a terrific color to build with. Unless of course you are Batman and only build with black, and sometime very very dark gray. What makes a set like this is really the parts. Oh so many nice parts! I've never gotten a very good sense of scale from seeing them heaped, so here they are in a 5 quart ice cream container. That looks to me like about 3 liters of Lego pieces. There's even a brick separator in there. Those things are great for protecting Lego pieces from damage. I have to teach my 5 year old son, his friends, and anyone else who plays with anything Lego in my home how to use the separator, or else they will resort to using their teeth to get plates apart! There are a LOT of windows and doors in this build. All the frames are the beige color called "brick yellow." The white ones are occasionally available on Pick a Brick walls, but the beige are not easy to come by in quantity. These are the parts that seduced me into buying 2 sets. The roof is made entirely of these 25 degree slopes. I like seeing them all the same angle, but would have preferred they all be the same color. They are dark red in 2 and 4 wide, and reddish brown 3 wide. As best I can tell, this is the first time the 3X3 25 degree slope has been offered in reddish brown. If you are after the dark red slopes for a project, you should also look at the 31025 Mountain Hut. It has several 1X3 red and dark red slopes that would compliment these from the Family House nicely. The frames for the doors and windows even match. There are several large plates, making for a pretty respectable amount of acreage. I'll take these full plate thickness bases over the thin base plates. Being thicker they don't flex when the model is lifted and they hold up much better. Let's go ahead and get the Minifgure discussion out of the way so we can get on to the reason you buy Creator houses, the structures. The figures are nice, even if they are made from common components. You get a man and a woman as the members of the family for your "Family House." While it's understood that not all families have children, it strikes me as odd for a set that has "Ages 8-12" written in some overstated type face on the front of the box to leave the target demographic out of the family. A child or 2 would seem to fit with the theme. Short legs were not enough to overcome their mature features, either. Here you can see them with the ancillary builds. We'll discuss the car a bit more when we get to the garage. The remote control car (or whatever it is) just looks out of place to me. I can understand including a car with a garage, a banana with a monkey, or a fire engine with a fire station, but what value does this silly little thing bring to house build? Odd as it sounds, this diminutive vehicle is featured on the box as the "actual size" piece, as if a 1X2X2/3 "motor" piece with cheese slope and 4 round tiles would give a consumer a proper sense of scale to the typical consumer. Okay, enough petty ranting, on to the build! The instructions come flat packed on a piece of cardboard in their own bag. This is a "3-in-1" set so they include instructions for using the same set of pieces to build the house 3 different ways. There are 2 books for the primary build and 1 book each for the other 2 builds. Here's an example page. The house and base are hinged, so the instructions show the build being performed with a small gap between the main plates. This splits the 2 halves visually, making it easier to distinguish where the pieces go. That was a nice touch, Lego. Here's the house part way through the main build, surrounded in-work pieces. Again, there are a lot of great pieces. Note that the set includes only 1 separator tool even though an extra one slipped in for the photo op. Here's the finished main build. Those front windows are a pretty impressive design. As mentioned earlier, the house hinges open. You can see the arched bedroom entry at the top of the stairs. The second stories on each half easily lift off. This makes for a nice level of playability. You probably want to see the sides. The chimney is nice. I'm at a loss as to what the blue plate is supposed to represent. A pond, maybe? A blue tarp covering the hole where a tree will be planted soon? Feel free to speculate,'cause there are plenty of reasonable answers. There is a catch-like part on the garage side the interlocks the living room side. This allows the model to be lifted without coming apart at the hinge. The same feature is found on the back of the house. You can unfold the house into a facade and these mating parts also keep it from twisting apart. Here are the sides of the house, hinged flat to be the front. Perhaps this would be nice if you are trying to line a street with houses, or if you wanted to increased playability while assembled. The big windows would then be on the side of the house, perhaps making it an ideal house for a street corner maybe? Here's the furniture. I really like the swivel chair, which fits the architectural style of the house very well. So, about the light brick. How does it light up the interior space? The light brick is turned on by pushing on the switch at the end of the brick. An amber LED lights up on the opposite end of the light brick. (Batteries included) The light brick is built into a small assembly that mounts in the living room ceiling such that the LED points down at the light fixture. Here is the light fixture prior to installation. It's a nice enough assembly by itself. Here it is lit up. The light brick is switched on by pressing down on the vent pipe protruding from the roof. It works really well. That's my 5 year old son's hand, so don't get thrown off by the scale. It fills the living room with a nice warm glow that really suits the house well. The balcony is nice. There is a grill, complete with turkey leg. This design holds the turkey leg captive. If playability is important to you, this balcony is about as nice as it gets. My favorite parts (aside from the big window) is probably the garage door. The effect that the 1X1 clear bricks make just works for me. It's simple, elegant, and brick built. The car that comes with the set of course fits in the garage. Let's compare to another smallish car, like this one from the City theme 60017 Flatbed Truck. This car is designed to ride on the back of a flatbed that is the standard City vehicle width. While the car from the Flatbed set goes in the garage okay, it's too long for the door to close. If you find the included vehicle not to your fancy you could certainly park a 4 wheeler in there. Here's a close up of the robin perched in the tree. It seems most of these sets have a brick-built bird. These are the pieces I would qualify as "left over." It's not uncommon to have a fastener or 3 left over when performing a large car repair, so not all of these pieces will necessarily be in your pile after you build it. The only other Creator series house I have to compare is 7346 Seaside House. Here it is for scale, although not with the primary build. The primary Seaside House build would bring them a little bit closer, but the Family House would still be much larger. The Family House would probably hold up to play a little bit better, and seems to be a better value than the Seaside house. You can detect that with just the heft of the box. I've not done the analysis, but it seems that the difference in weight is greater than the difference in price. So, after daddy assembled the primary build, what do you think the 5 year old wanted to play with? The grownup Minifgures? The boxy yellow car? The house? Nope. He spent a good long while playing with the tiny, non-functional remote control car! The one with wheels that don't actually spin. I guess that the Lego people know what they are doing after all. This set is a "3-in-1" so now we're going to discuss the other 2 builds. They are a lot smaller, so my son is did much of the assembly. It's right at his limit for skill and way too much for his patience to do in one sitting. Build 2 So here's the second build we did, surrounded by leftover parts. Sorry about the lighting; I was having trouble with my flashes. Hinged open you can see an odd looking interior feature. What this piece of furniture is supposed to be is anybody's guess. You can see most of the interior here lit up bu the light brick. Speaking of the light brick, you can see it from the outside here. The switch is not camouflaged in this model. Also not how small the balcony is. The stairway doesn't quite work accessing it, either. This is the side with a garage door. The inside of the house is either house or garage, not both. I kind of imagine it being a bachelor pad of some kind, since very few women I know would share their living space with a car. A "family house" this model is not. If you do want to live in your house without sleeping in your car, you can park it on those grey tracks. I guess this vehicle is some kind of truck or SUV with a side-opening back gate? Whatever it is supposed to be, the vehicle in this second build just doesn't do it for me. The side with the hinges, and not much else. It does show the security camera. This is the other side. The wall has a window A/C unit with controls that your neighbors can change? The tracks on this side of the house are too short for the vehicle in this build. This second build doesn't fit the Minifigure scale in most respects. If you assume all the small windows are a second story above a large garage, maybe it could work if you completely ignore the awkward interior. Maybe. A business owner with a flat above the shop perhaps? This model did not stay together long and I was happy to be taking it apart. Update: as you will see i the comments below, this build was apparently supposed to be a factory. Thank you Moderator Rick. Build 3 Here is the 3rd build, surrounded by the leftover pieces, and the leftovers in a large PaB cup. Closeups of the side. That outdoor fireplace lights up with the light brick. You have to open the model to activate the light brick, which in not camouflaged. View of the other side and back. This model doesn't have the latch on the back, but at least there are some windows. That odd bley brick holds up the stairs. Note also how some of the top row of bricks stick out past the wall and terminate with cheese slopes. I'm not sure why the designers would do that. The model hinges open, and the roof comes off. There is a catch mechanism to hold it together as a closed unit, just not a a facade. The interior elements consist of this bed and light fixture that look a lot like those from the primary build. Installed. The light brick is tied up in the outdoor fireplace, and does not light up the interior this time. There are no cars, but instead you build a lawn mower. The handle is terribly awkward for a minifgure to hold, but it's a reasonable use of parts for a set a like this. And the lawn chair with brick-built tree. This model works. The scale is a bit on the small side, but it works. I guess this is supposed to be a Mediterranean Villa. Perhaps someone more familiar with architecture of that part of the world would want to weigh in, please do. My son wants to leave this one together for a while. Super Subjective Summary: Playability: 9/10. This is wonderful doll house to help play with your dolls Minifigures. If the Minifigures were better suited for age range and theme, I might have given it a 10. If you have a bucket of others to use, you won't do much better for playing in the Lego system. Unless of course you're into spaceships. Design: 10/10. This is the most believable Lego house I've seen that wasn't a Modular. It's lovely. Build: 5/10. I didn't discuss it much because it's pretty straight forward stuff. The box says it's for ages 8-12. If you are a multiple of 12 years of age (like I am), there isn't a lot to get excited about. Price: 9/10. There are a lot of nice pieces, but it's also a lot of money. Overall: 9/10. If you dig houses, you gotta get this one.
-
Hi all, I would just like to start this thread to see what the general feeling is with regards to LED lighting in city/town vehicles and streets. Basically what would like to see in a city rescue vehicle? Would you like flashing lights on the top of the police/fire/ambulance/rescue vehicle and headlight/tail lights that stay on and would you want the LEDs to be controlled from a remote or just switched on/off on the vehicle? Likewise with street lighting. What would you want from LED lamp posts? I'm opening this discussion after seeing this video and wondering how popular this would be and if it was commercially available would you buy it? Many thanks Happy Building Neil
-

What should my next RC venture be?
z3_2drive posted a topic in LEGO Technic, Mindstorms, Model Team and Scale Modeling
Now that I perfected My latest chassis, I want a new challenge. I know my limits of weight/strength/power now and I want to build something different. Also I am going to make another Bricklink order with some random parts I currently lack, so I want to make a list of things I may need. Here's what I am thinking of at the moment: Drift car-either AWD or RWD using fast output of buggy motors. As for wheels: A car similar to Chassis V1 for outrageous top speed-suspension would be the main issue. A remake of a crawler using either XL motors or NXT motors with Doc_Brown's Reaper axles. Any other ideas would be appreciated. I would hope to build it before the end of this year, as I then plan to build a small, possibly non-pf vehicle using the new snowmobile suspension pieces. -
Time has now come for me to put some vehicles in what is threatening to become a full layout After milling around these forums for a while and gathering inspiration, I have ventured to start my own projects. Some of you (forgive me, I am horrible with names....) have been upgrading classic Lego vehicles, and I couldn't help but to want to try it myself. Specifically the tv-van, one of my all-time favourite sets, caught my attention, so that is where I started. TV-van Here is my take on a 6 wide version. I struggled a bit with fitting two minifig's next to eachother and fitting in seats, but I think I managed allright. It's gotten a bit boxy, and seems quite short, but I find that I quite like that. From the front right: Rear left: Obviously the antenna folds out. And the van easily holds a camera and film rolls. Containercarrier: (Or whatever it is called... ) Luckily, my brother visited me and got the same idea, only with a different set. (I am working on bringing him out of his dark ages, and I am starting to succeed ) Here is what he came up with. It wasn't easy to make the loader work with a longer container, but he managed very well, I must say. We both agree that it is a bit too red in red, but for a first build in a long time, I think he did very well! Semi: And here the third and last one. A semi to pull the trailers of Lego Town. Again, it seats two minifigs, and I find it turned out quite well. And I found a place to use my chrome parts! It's always a bit of a struggle for me to fit the wheels in without the arches I see many use. (And have very few of...) But for a semi, this solution works fine for me. And lastly a picture of them all together! Hope you like it! Comments and suggestions are welcome Bregir out
-
Hello, honourable Eurobrickers! Warning: Picture-heavy topic... It's been a while since I've posted any new content on the forum. It's not like I haven't been building at all since August, but I've been to a few events, for the first time in my life, and I was lucky enough to be invited to contribute to Megan Rothrock's LEGO Adventure Book. It's all really been an adventure over the past six months or so. Anyway - I haven't been able to photograph my latest MOCs and get them online until now. They've been uploaded to my Flickr in the last week, so some of you may have seen them there. But here they are all together in a single topic :) After having built four, eight, five, eight, fifteen, and sixteen cars earlier (yes, I still have them all, and let me tell you, 56 cars take up a lot of room), I have more or less found the niche that I'm comfortable building in, for now anyway. My builds now are primarily concentrated in two different 'themes': The hot rods/vintage cars and the modern interpretations of classic City sets. I try to incorporate a rear licence plate in all my builds. It's not always possible, but if I can find a way to cram it in there, I will. I also generally try to give the cars rear-view mirrors and indicator lamps. And all the stickers are official LEGO - some of them may be cut, but they're all from original sets. Before I start, here's my new setup for photographing MOCs. I've been planning to get a proper lightbox for a while, and this is how it all currently looks when operational: Very happy with the results I've got so far, and they will get even better when I start experimenting with longer exposures, now that I've got a remote for my camera. Oh well. Here we go! 1) Cowgirl Cruiser. I'll start with a modernised version of the classic set #6627. This is part of my pet project, Updating the Classics. The original set is one of my favourites among the oldest sets I've got, and I knew I needed to use that new cowgirl hat/hairpiece for the modern interpretation. Two different generations meet! 2) Speedy Seven. A small British sports car that ended up reminding me a bit of the Lotus Seven. So I gave it a colour scheme that seemed to fit with that idea. I don't know what all those monkeys are doing there, but they may have been attracted by the sweater. Although Seven-esque, the car is beefier and bigger when compared to the minifig. The front end is held together by using some 1x1 plates with light clip - it's a remarkably sturdy solution: 3) Super Square. This next one is a result of wanting to try my hand at building a sand blue car - and then I needed to make do without doors or panel elements. So I ended up with an open-sided solution that I admit is a bit unusual. Naturally, the owner has a sand blue shirt to match. The front end would probably be very unpopular among modern car legislators, with the pedestrian impact rules we have today - but from my point of view, the only thing that mattered was that it looked aggressive. And it does. The roof comes off, so it can be used as a convertible... ...but the design can hardly be described as 'handsome' in any case, and to remove the roof doesn't do it any favours. 4) The State Limo. Morty, leader of the Norwegian LUG Brikkelauget, asked me if I would do him a favour and build a limousine to go with his fantastic minifig-scale version of the Norwegian Royal Palace in Oslo. This was the first version I put together in MLCad. We then decided that it was a bit too narrow to fit with the massive palace. I still ilked the design, and it's pretty much exactly what I think a L@go limousine should look like, so I built it anyway. Here's a little story to go with it: The movie star and her boyfriend, chased by the paparazzi. Nothing new there. 5) Royal Ride. So this is what I ended up with instead of the previous one. It's a much more modern type of car, and something I'd never tried my hand at before. I went for a sort of edgy Cadillac style mixed with a Rolls Royce-style grille, and I'm reasonably happy with how it ended up. I was afraid it would end up not being sturdy enough, but it's actually rock solid. Yes, I have cut the bottom tap off the plume to make it fit into the jumper plate. That's not the only parts butchering I've done this time, I'll get back to that. I painted the plume with a silver marker, but the rest of the chromed parts are from Chrome Block City (recommended). I actually built two of these, because we invited the Norwegian Crown Prince and Princess to the event (50 years of LEGO Norway), and intended to give one away if they showed up, but they couldn't make it. So I've kept them both. They'll be in Copenhagen for LEGO World, on display along with Morty's palace, and by then they'll be equipped with proper Norwegian royal licence plates - 'A-1' and 'A-2' - instead of the dollar bills they have now. Here they are, HRH Crown Prince Haakon of Norway and his wife, HRH Crown Princess Mette-Marit, waving to a group of affectionate Norwegians. And at least one foreigner. 6) The Vintage Truck. Also built on request - birgburg wanted a car that she could use in her fabulous Klosshavn diorama at the Oslo event. I came up with this: I'm quite happy with the colour design on this. The truck is also asymmetrical; it's got an exhaust pipe on the right-hand side and a step for easier access to the driver's seat on the left-hand side. And about those strange doors: They're a result of my mad Photoshop skillz :) - they were meant to be 1x3x2 doors, but the BrickLink seller I ordered them from sent me the wrong parts, and I had to use two 1x3x1 doors for the photosession. They have since then been replaced. The owner is probably involved in some sort of activity that we weren't supposed to know about... 7) Cobalt Speedster. (Accidentally mis-named "Cobalt Cruiser" when I started this topic.) A low-slung roadster built mainly to find out just how long the front of the car would actually get if I used those long slopes. The answer is: Very long. I know there would have to be a twelve-cylinder engine underneath such a long bonnet, so I added some chrome bits and twelve minifig hands to mimic small exhaust pipes. The owner has an affection for navy-style clothing... and, whaddyaknow, he plays tennis. 8) Six'n'Twelve. Another monster roadster with twelve cylinders - but with a definite twist to it. I've always had a thing for six-wheeled cars - the Panther Six, the Covini CW6, the old Tyrrell P34 F1 car, Captain Nemo's car from The League of Extraordinary Gentlemen... and they all have four wheels up front. So, I thought, why not build one? I've realised it will probably look prettier without the front pair, with a long overhang, but the six wheels make it different. And I was told that it would go well along with Jon Hall's sky-fi planes, which is probably true, it's got a bit of the same design going on. The owner relaxes with a cup of something while caressing her beloved roadster. And before you ask me about that mudguard: Yes, I did. And that's about it! "Hey, wait a minute!" I can hear you scream. "That's just eight. He promised us fourteen! Can't he count? Where are the other six?" The parts are trickling in as we speak, and I'll be updating this post when they're ready. That's another very varied batch: - The Whizz Midget, a little speedster - The Sensor GTR, a six-wide supercar - The Étoile d'Élégance, a neo-classic bling luxury coupé - The Wolverine SS, a vintage sports car ...and two more modern interpretations of classic sets - which I think you will like. I do, a lot :) Also, there's another, bigger project in the pipeline. But that's a secret for now... Comments and criticism is, as always, welcome, and there are more pictures in my Cars and Trucks and vans photosets on Flickr. Thanks for looking! To be continued...
-
Hi everyone! As a result of the rebuild of my emergency vehicles I also finished a little emergency station. This areal has got a large dual garage for two ambulances and another one for the emergency car driven by the doctor. The structure has some room for the personnel. You can find a small kitchen, a computer workstation, a rest room and of course a toilet. So the doctor and his paramedics can do some acitivities beside all the actions. A little kitten from a neighbor comes around from time to time... The Farnheim Fire Department had formed a new rescue concept for the 21st century back in 1998. It implied to build three different Emergency Stations strategically sited throughout the municipal area. The goal was and now is to reduce the way to the scene significantly - and save lives. This station was built in 2005 and can be found in northern area of the city. So, that's all with that little (fictional) history of that building. Hope you like it. Here are the pictures... Thanks for watching. C&C welcome as always... Best regards, Farnheim
-
This is based on the classic yellow school bus. I built this awhile ago but never took any pictures of it. I have modified it a few times since I originally built it.