Search the Community
Showing results for tags 'vehicle'.
Found 434 results
-
-kpia.thumb.png.a265cddff9575859eea3a4d2aad663c2.png)
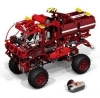
MOC RC Hägglunds BV 206 ATV
Technic BOOM posted a topic in LEGO Technic, Mindstorms, Model Team and Scale Modeling
Please suport my project on Lego Ideas. https://ideas.lego.com/projects/bc17ae38-b3e7-4cb2-b804-401e0bcc7aef Power functions: 3x L-motor 1x IR Receiver 1x IR Remote Control 1x AAA Battery Box 1x Control Switch 1x Extension Wire Description All openable doors. Model have fake motor V6. Color: Black and Yellow Number of Pieces: 800-100 Thank you very much for your support! Military version: Hägglunds BV 206s -
Hello Magnum, Ferrari and Speed Champions fans, this targa topped 1984 Ferrari 308GTSi Quattrovalvole (pictures 1 and 6) was made famous by the television series Magnum, p.i. in which the series' lead, Thomas Magnum (Tom Selleck) drove the car around Oahu for eight seasons while on his investigations, from 1980 to 1988. Several 308 GTS cars were used, a new one for each season, most being auctioned off after filming and all with the license plate ROBIN 1. The berlinetta version of this model is called Ferrari 308GTB Quattrovalvole (pictures 2-5 and 7-8). The design inspiration of this model came from a Ferrari 308 Matchbox which I received as a child. Building instructions are available on the following links: https://rebrickable.com/mocs/MOC-64110/_TLG_/magnum-pi-ferrari-308-gts-gtb-quattrovalvole/#details or https://www.mocsmarket.com/lego-mocs/instructions-moc-magnum-p-i-ferrari-308-gts-gtb-quattrovalvole/ They are a studless builds in the new, 8 studs wide Speed Champions style. I wanted to create a sleek models which are as accurate as possible in this small scale. Only two stickers are used per model: the rectangular Ferrari logo, and the vehicle registration plate, to keep the flexibility of the used parts in further builds. My intent was to keep the width-length-height ratio of the real car and this size makes it possible. The models contain lots of details: for example the emblematic air vents on the hood (black on GTS and red on GTB), the front bumper with the turn signal lights, the tilted front grill, the rear three quarter window with black cover, the turn signal lights on the front side, the black stripe on the sides, the side-view mirrors, the tiltable seats etc.. Maybe the most challenging one was the iconic rear side with the vehicle registration plate, here there is a half stud offset. I tried to fill every unecessary gaps and therefore some tricky build techniques are used. The model has space for two minifigures. I suggest to use small hairs. Without the seats and the two interior tan tiles minifigures with bigger hairs can be used too if they are leaned back. Thanks for visiting, _TLG_ Magnum's car 01 - INSTRUCTIONS by László Torma, on Flickr Ferrari 308 GTB Q. 02 - INSTRUCTIONS by László Torma, on Flickr Ferrari 308 GTB Q. 03 - INSTRUCTIONS by László Torma, on Flickr Ferrari 308 GTB Q. 04 - INSTRUCTIONS by László Torma, on Flickr Ferrari 308 GTB Q. 05 - INSTRUCTIONS by László Torma, on Flickr Magnum's car 06 - INSTRUCTIONS by László Torma, on Flickr Ferrari 308 GTB Q. 07 - INSTRUCTIONS by László Torma, on Flickr Ferrari 308 GTB Q. 08 - INSTRUCTIONS by László Torma, on Flickr
-
I was wondering what vehicle width you guys prefere when building, but most importantly why? I mainly build just 4 studs wide, sometimes 6 if I want of more retro kinda look cause of the fenders. But right now I can't decide between 6 wide or 8 wide; 6 because I'm used to it and feels right. 8 because it looks right, but don't feel right. So I added a multipable choice poll to this thread, to shed some light on this topic. But even so, do eleborate your choice.
-
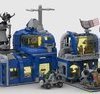
LEGO IDEAS Classic Space PERMANENT PLANETARY STATION
Operacion Saturno posted a topic in LEGO Sci-Fi
https://ideas.lego.com/projects/43814e85-ead4-46d0-886c-b024d6156756 2800 piece Space Base The base is composed of four modules: Vehicle Hangar, Habitation quarters, Command center, Lab module. Click the link for more images. I tried to upload an image, but won't let me. -
Racing Speedboat microscale vignette.The "sea" part is made in a way that the hull of the speedboat seems submerged as in reality.It contains 235 pieces and throws a lot of water...I also made an alternative front end in parts designer that can be made if you chop the ball of a 4131 party hat and glue it to the cone and one with a 24482 spear that you can easily make if you dont like the front part to be only the 2x2x2 cone.Enjoy and comment if you like it. https://www.bricklink.com/v3/studio/design.page?idModel=245825
-
FUTURON - POLARIS EXPRESS Polaris Express par Horlack , sur Flickr Polaris Express par Horlack , sur Flickr Polaris Express par Horlack , sur Flickr Polaris Express par Horlack , sur Flickr Polaris Express par Horlack , sur Flickr Polaris Express par Horlack , sur Flickr Polaris Express par Horlack , sur Flickr Polaris Express de Horlack , sur Flickr Polaris Express by Horlack, on Flickr "Polaris", in reference to the mythical Set 6972 Polaris-I Space Lab, and "Express", in reference to the Trans-Siberian Orient-Express, in relation to a tracked vehicle of the tundra The inspiration comes mainly from the Russian tracked vehicle Vityaz DT-30, and its little brother the Vityaz DT-10PM, particularly adapted to the tundra and the cold. Multifunction vehicle. It can be converted to Cargo, Passenger, Small Vehicles, Oxygen, etc. There are 6 modular blocks of 5x7 studs, which can be unclipped, can be put in the hold, and can be put in the order you want. Include a mixture. The roof can be unclipped. The 2 types of Vityaz DT have many military or civilian variants. Surely one of the most varied vehicles in the world, however crazy it is. Excavator version, passenger / troop transport version, ballistic missile version, freight transport version, radar station version in arctic base, amphibious version, crossing bridge version, forest transport version, tank version (yes yes, with 2 turrets!), Version snowplow, mobile laboratory version, gas / mining version (currently used by Gazprom), etc. We are on a monster which is not far from being 3 to 4 large cars wide depending on the version. I wanted to stay a little in this “multifunction” spirit for the MOC. Custom radar, with lots of sensors. Cockpit, with an articulated twin-arm / view of the seat. Lights on the roof to illuminate everywhere = in the tundra, at night, in the cold, in the blizzard, in a lunar environment, etc ... Also, I focused on the armored aspect, trying to homogenize the 2x2 tile base on the hull. (or close). I made a maximum of modularity, I could not decide on one type or another of vehicle. So I made it simple and complicated at the same time: all types at the same time, lol! It's better :) I could also have made a command vehicle, with lots of consoles and control panels. It is quite possible, thanks to the available space. There is no limit to the imagination when it comes to converting the vehicle. Make a presentable base. Shall we say, a 1st for me. Especially the effect of the caterpillars in the sand, and the Lettering (which I'm not used to). The roof can be unclipped. All with a playable and accessible aspect. (I remain in the mentality / the spirit that a Lego must be playable, solid, playful, modular)
-
Hello Ferrari and Speed Champions fans, Ferrari Testarossa is a legendary supercar of 1980s. It is a two-door coupé from 1986 and it is the red version of the car from the TV series Miami Vice as the used Lego windscreen is not available with white decoration. Almost 10,000 Testarossas, 512 TRs, and F512 Ms were produced, making it one of the most-produced Ferrari models, despite its high price and exotic design. Building instructions are available on the following links: https://rebrickable.com/mocs/MOC-57875/_TLG_/ferrari-testarossa/ https://www.mocsmarket.com/lego-mocs/lego-instructions-ferrari-testarossa/ UPDATE: Oct, 2021 - This MOC is available as kit too :) : https://mocsmaker.com/product/custom-building-kit-tr-84/ It is a studless build in the new, 8 studs wide Speed Champions style. I wanted to create a sleek model which is as accurate as possible in this small scale. I minimized the use of stickers to keep the flexibility of the used parts in further builds. (Third picture shows the model without any stickers.) My intent was to keep the width-length-height ratio of the real car and this size makes it possible. The model contains lots of details: for example the emblematic side intakes with the bottom black stripe, the turn signal lights on the sides, the side-view mirrors, the front grill with the head lights, the iconic rear side with the vehicle registration plate. Maybe the most challenging one was the interior where the seat assemblies hold side panels too. I tried to fill every unecessary gaps and therefore some tricky build techniques are used. The model has space for two minifigures. I suggest to use small hairs. Without the seats minifigures with bigger hairs can be used too if they are leaned back. Thanks for visiting, _TLG_ FerrariTestarossa_byTLG_01 by László Torma, on Flickr FerrariTestarossa_byTLG_02 by László Torma, on Flickr FerrariTestarossa_byTLG_03 by László Torma, on Flickr FerrariTestarossa_byTLG_04 by László Torma, on Flickr FerrariTestarossa_byTLG_05 by László Torma, on Flickr FerrariTestarossa_byTLG_06 by László Torma, on Flickr FerrariTestarossa_byTLG_07 by László Torma, on Flickr FerrariTestarossa_byTLG_08 by László Torma, on Flickr
-

[GBW] - Service truck - Erotema - Indoor mobility test / Light Exploration Vehicle
sigpro posted a topic in The Great Brick War
The Erotema Research and Development institute, now called Erotema Research and Development Institutoff, has designed a light exploration vehicle, in Russian (machine translation), Легкая разведывательная машина, Legkaya razvedyvatel'naya mashina . This vehicle allows 4 troops inside and is fitted with a roof mounted machine gun (the Erotema weapons depots are still full of Western-style gear) and can carry 2 grenade launchers, 4 grenades or other stuff in its structure, being a very versatile vehicle. 20210326_195847 by green helmet spanish AFOL, en Flickr 20210326_195657 by green helmet spanish AFOL, en Flickr 20210326_195708 by green helmet spanish AFOL, en Flickr 20210326_200621 by green helmet spanish AFOL, en Flickr 20210326_200557 by green helmet spanish AFOL, en Flickr Interesting features: the seats allow a fully equipped minifig (with vest and weapons belt) to seat comfortably (in a Soviet-like vehicle this would mean the designer should be sent to a labour camp...). 20210326_200639 by green helmet spanish AFOL, en Flickr 20210326_200805 by green helmet spanish AFOL, en Flickr The mobility is significant, and the vehicle is able to overcome obstacles fully loaded. 20210326_200716 by green helmet spanish AFOL, en Flickr 20210326_200732 by green helmet spanish AFOL, en Flickr And even a dog can be comfortably placed in the rear! 20210326_200657 by green helmet spanish AFOL, en Flickr Enjoy! -
Back in 2015, Ive started to build the Core Mining Unit. That's a mining unit which will be used by the Xerion Mining Corporation. The Xerion Mining Corporation is a group of miners and researchers who discover new planets to search and mine ores. I've finished this MOC in 2018. The Core Mining Unit is a modular mining vehicle, which can be used in various mining and exploration missions. The vehicle have several modules: Drill, magnet crane, transport module for a small spaceship, sattelite launch module, laser cutter, tool module. The cabin contains a small speeder. Core Mining Unit modules: Several configurations: More pictures: More pictures at Flickr: https://www.flickr.com/photos/mathijslegofan/albums/72157718769903438 I hope you like it
-

Ambulance Ver.1 - An American version in technic.
weavil posted a topic in LEGO Technic, Mindstorms, Model Team and Scale Modeling
So I looked for ambulance and found nearly all results showed normal City theme builds. Only one or two Technic theme builds. So I made the plunge, found some drawings, and got to work. The first attempt was a fail as the scale was a little to big, cause I ran out of parts. So I found a different set of drawing and found Sariel's unit converter app. This allowed me to plan and make to scale and smaller, only to find out near the end that I still didn't have enough red. (Or money at the time to get more, but have also moved on). So I will call this somewhat viable MOC- Ambulance V.1 I have plans to build digital and make a version 2 in the future, but I got another set of MOC's on the table at the moment. -

Bobcat S130
Brick_Builder19 posted a topic in LEGO Technic, Mindstorms, Model Team and Scale Modeling
This is a realistic version of the Bobcat S130. This LEGO TECHNIC model built for 1:14 in scale. Functions: moving piston working lift arm tipping bucket Dimensions: long: 230mm wide: 115mm high: 150mm (with bucket lowered) Bricks of the set: about 670 piece Look at the other pictures and If you like this model please support on the LEGO IDEAS side. Link: LEGO IDEAS/Bobcat S130 Thank you for watching and any support! -
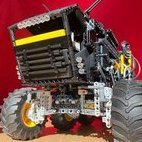
[MOC] All-Terrain Winter Expedition Vehicle
teetertater posted a topic in LEGO Technic, Mindstorms, Model Team and Scale Modeling
Hello EB! I'd like to humbly show this remote control (PF) winter expedition vehicle (MOC). Featuring 4 independently driven tracks with a unique steering system. More explanation below and in my YouTube video. It has many issues that I'm not willing to spend more time to fix, but I've learned a lot from the process, which will help improve my future MOCs. If I was to start from scratch here's what I would change: Put motors closer to driven axles Split drivelines into either front/back or single motor per tread less complicated steering system Use a different type of suspension instead of pendular raise the height of the driven sprocket instead of extending driveline with gears reduce weight with panels vs lifttarms (I didn't have any at the time of building) Never use an Adder again, or if I really have to then use the old-style 24t differentials Work more on the cabin/exterior design A sizeable portion of the issues stemmed from the weight, which is something I didn't expect! I ordered some parts to allow me to finish the frame, and added design elements in the meantime. The design elements were pretty much the difference between being-able-to-carry-its-own-weight and not. The MOC is already disassembled, but I'll be happy to hear feedback and suggestions! -
Hi everyone, This is my latest creation: Futuron Dropship. I wanted to build a dropship and was inspired by several Star Wars cruisers. This dropship can transport an exploration car and droids. The front can be opened and two people are positioned behind the controls. At the back is a ramp, that can be openend (like a plane). The roof can be removed to see the interior. See more pictures in my Flickr album. A few months ago, I've build some speeders for Futuron. One other picture is in the same album I mentioned earlier. Sander
-
[Updated] This bus was not selected to be final 15, but I submitted it to Lego Ideas. Please support it if you like it: https://ideas.lego.com/projects/e9b3598f-db12-4b90-aca9-206872843695 This moc is for LEGO Ideas contest "BUILD A VINTAGE CAR TO CRUISE THE STREETS OF LEGO® MODULAR BUILDINGS!" . I will design several more for this contest :D https://ideas.lego.com/projects/e9b3598f-db12-4b90-aca9-206872843695 In the old days, not many people owned a car. Bus was important transportation for people. So a vintage bus should be included in every Lego city. The vintage bus I designed has many playable features. The engine hood, passenger, driver, and back door can be opened. I also added a luggage rack on the top of the bus. Some passengers' accessories were placed on the rack, including two cute pigs. The vintage bus dimension is 6x18x8 bricks. I hope you will like my bus :D My other MOC models: [MOC] Vintage Stylish Convertible [MOC] Vintage Bus [MOC] Halloween Pumpkin Horse Carriage [MOC] ISUZU NPR Light Duty Truck [MOC] Karsan Jest Mini-Bus [MOC] Ford F150 XLT [MOC] London Double Decker Bus Dennis Enviro 400 [MOC] Lada VAZ-2105 [MOC] Subaru WRX [MOC] Classic Cadillac Convertible [MOC] Toyota 6th Gen. HiAce Van [MOC] James Bond Aston Martin DB5 [MOC] Toytoa HiAce van [MOC] Toyota GT86 [MOC] Office Desk [MOC] Ferrari F355 [MOC] Toyota AE86 Coupe (2018 version) in Initial D Animation [MOC] Police Motorcycle #2 [MOC] Sport Bike Stop Motion Speed Build [MOC] New York City Police (NYPD) Car [MOC] Lego Mini Cooper [MOC] Japan Tokyo Taxi vol.1 東京無線タクシー [MOC] Ice Cream Truck [MOC] LEGO California Highway Patrol [MOC] LEGO Police Car [MOC] Police Motorcycle [MOC] New York City Taxi / Cab [MOC] LEGO NYC News Stand [MOC] New York City Transit Bus [MOC] Newspaper Rack [MOC] Coke/Beverage Cooler Initial D AE86 Racer AC Transit Bus AC Transit Bus Short Version Ice Cream Van
-

[MOC] Cars to scale minifigures (or nearly to scale)
dimka_ya posted a topic in LEGO Technic, Mindstorms, Model Team and Scale Modeling
Hello. When building models from Lego systems for a child tires of, switching to technic. I'll start with the last built model - a small minivan for minifigures. It was not possible to completely get rid of unnecessary colors - there are not enought details, or in others models. The car has a steering control output in the windshield, opening doors and trunk lid, a interrior from the system :) -
Hey all, I just wanted to share a new Lego creation that I just finished up, after a year of working on it. It's based on the Borderlands video game series and I'm hoping long term fans will enjoy it! Anyone wanting to see more, including 360 video and free instructions can check out my website or instagram profile. Thanks! www.HansenBricks.com https://www.instagram.com/hansen_bricks/
-
[NCS] Heavy Mobile Rocket Launcher Do with LDD and Stud.io It's a mix that brings together the sets : - 462 Mobile Rocket Launcher - 483 Alpha-1 Rocket Base - 6881 Lunar Rocket Launcher - 6950 Mobile Rocket Transport at the same time, and bigger ! All these sets look more or less alike, or are just different variations depending on the version. Hence the idea of bringing them all together, in a 4 in 1, mastodon version. I used the 90 ° snot technique with the control consoles in the wall, in order to be able to accommodate as many control panels as possible and gain 2 additional horizontal studs. This allows me to put 4 crew members, their seats and a small passageway (narrowly) for them to move between the seats. The roof with the 2 radars unclips and the front canopy swivels, allowing accessibility. My only regret: not being able to put the 2 sides in blue (the back of the 2 console panels), because part N°11203 (flat Tile, Modified 2 x 2 Inverted) does not exist in this color. I had to settle for gray. I was amazed, myself, to have built it in just 3 days! Upon reflection, I think I understood why I did it in such a short time. I put this down to several things: -1/ I already had the basis of my NCS - City Mars Exploration - Heavy Mobile Lab, which had taken me a good 10 days. In addition to the experience of construction / internal arrangement of the vehicle. -2/ I already had the radar and the rocket, of my [NCS] 462-897- Mobile Rocket Launcher, Remastered, which took me 3-4 days. -3/ I already had the seats of my NCS - Heavy Transport -4/ I already had the wall consoles, from my NCS - Heavy Transport. (at least, retained my reverse construction technique) which had taken a hell of a lot of time, because I had to put a maximum of computer consoles in a minimalist space, and above all, at 90 ° and inverted in relation to the wall! (so damn technical difficulty in tearing your hair). Just for that, I had to spend several days there. -5/ My past experiences, which are almost a hallmark of me: the exterior ofmy ships and vehicles (NCS - Heavy Transporter, NCS - City Mars Exploration - Martian Colonization Base, Intergalactic Girl, NCS LL-6929 Starfleet Voyager, Space Heavy Rover, Lunar Space Pod , NCS - City Mars Exploration - Heavy Mobile Lab, etc) are generally stripped down, but on the other hand, the interior is generally quite shielded in every way. Putting a lot of greeblings, in a confined and minimalist space, it almost became my "hobby". So normally, given the size of the mastodon's vehicle, it should have taken me at least 7-14 days well packed. But since I do all my constructions " in modular ", I can easily transplant parts (or modules) to put them in other constructions. In addition to past construction experiences. This is why I only took 2-3 days and saved a lot of time. The images are in HD + (> 4096 pixels) on my flickr to zoom in on them. [NCS] Heavy Mobile Rocket Launcher. by Horlack, sur Flickr [NCS] Heavy Mobile Rocket Launcher. by Horlack, sur Flickr [NCS] Heavy Mobile Rocket Launcher. by Horlack, sur Flickr [NCS] Heavy Mobile Rocket Launcher. by Horlack, sur Flickr
-
Merry Christmas to all of you in this weird year, i hope all of you stay health and safety! Well, i hope you enjoy this cars....or at least you get some smiles.... As usual questions, and criticims are wellcome.Like past year im make some cars for some minifigs. This one is a litle "bizarre", but no one saids that greek goddes can,t be badass :P I like this minifig, like her "ugly" face, so i made this, it´s old schooll, and was nice go back to basics... This rally car is inspired by the iconic Renault 5 copa turbo, so i make it 5/4/6 wider to try to chatch the spirit.... This is the last car i made this year ( 2 days ago......yeah im very lazy.....) im looking at my minifigs collections, see this cowboy girl and boom.....big jeep/bronco 4x4 off road car...horns (i wish i have bigger horns) and patriot pattern tiles... Once again Merry xmass, and happy (couldn´t be worst.....) new year.
-
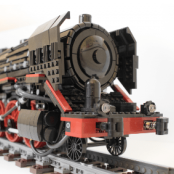
[MOC] Lego Pneumatic Steam Locomotive
alfredboyer posted a topic in LEGO Technic, Mindstorms, Model Team and Scale Modeling
Hello everybody, I am glad to introduce you my last big project : a pneumatic steam locomotive ! I think it's one of the firsts pneumatic locomotives, using only Lego parts. First of all, the YouTube video and some photos: The idea with this model is to replace the steam of a real Locomotive by compressed air, and this for as much functions as possible. Here are the main functions : Movement of the train : Using 4 pistons, 2 on the sides, and 2 inside, the train can move forward. It works like a classic LPE, with 2 pistons shifted 90° from the others. 4 pistons consume a lot of air, but they guarantee enough power to move the whole train. To make the rotation smooth, a free wheel is hidden inside the boiler part of the locomotive. Its rotation is 25 times faster than the wheels of the train (40t/8t x2). The train isn't moving very fast because the pneumatic elements aren't modified. However, it's fast enough to make it interesting to look at the connecting rods and wheels moving. The breaks : On a real locomotive, compressed air is produced by a compressor (powered by steam) and is used to press some brake shoes against the wheels. Here, the same technique is used : a small piston is filled with compressed air, and thanks to some rods, brakes shoes are pressed against the wheels. It's cool but...it's not enough. Plastic against plastic isn't very efficient to stop the train's movement. Therefore, another rod is connected to the brake system and press another brake shoe against the free wheel. Because its rotation is faster (and therefore, with a low torque), it's is way easier to stop it. The Whistle : A system that I love in this locomotive is the whistle. Currently there isn't any whistle produced by Lego that could be used in the locomotive, so I had to think a little for finding something working. This whistle is activated by a switch in the cabin. The Cabin : Nothing much to say except that in contains 3 switches for the 3 main functions (whistle, wheel movement and brakes). There is also a pressure gauge showing the pressure coming from pumps. The train moves with a minimum of 1 bar. A 2-2.5 bars, the movement is faster. The air supply : There are several possibilities for the train : we can directly pump with Lego pumps, or store the air into 6 to 8 airtanks or produce the air with Lego motors and small pumps. For instance I use 4 pumps side by side, linked to some air tanks, but I don't what the final model should work. Maybe some motors and pumps could be cool ? The design : The hard part was to make the boiler of the locomotive. It's a little hard to make cylinders with Lego technic parts but, with flex axles passing through Technic beams, I managed to make something satisfying. Some details are visible on the locomotive, I tried to make it look a little crowded like a real locomotive with fake air/sand tanks, fake compressors and mechanical elements. It's probably possible to make it look better, but for instance I am happy with it. The rails are "homemade" with Lego bricks. The locomotive is too big of course to work on Lego railtracks. The wheels aren't perfectly flat so the train is "blocked" in position inside the rails. Therefore, the train can move foward cur cannot go out of the railtracks (which is great for a train). Finally, as a bonus functions, there are some bumpers at the front and back of the locomotive to imitate the real bumpers used to absorb small chocs on a Locomotive. That's it for now, I hope the model is interesting to you and if that's the case, don't hesitate to support it on Lego Ideas ! Click Here to support :) If you have any question or comment, please reply to the post, I'll be glad to discuss with you ! -
Hello Knight Rider and Speed Champions fans, KITT (Knight Industries Two Thousand) from the original TV series Knight Rider is one of the most famous fictional cars. It is a modified 1982 Pontiac Trans Am which is an artificially intelligent electronic computer module in the body of a highly advanced, very mobile, robotic automobile. It is a studless build in the original, 6 studs wide Speed Champions style and fits perfectly to the new City style cars too. Building instructions are available here: https://rebrickable.com/mocs/MOC-52083/_TLG_/kitt-knight-rider/ More details: I wanted to create a sleek model which is as accurate as possible in this small scale. I minimized the use of stickers to keep the flexibility of the used parts in further builds, and the last picture shows the car without any stickers. The model has space for one minifigure. The Michael Knight figure on the main picture is from the set 71286. One of the most challenging details was the front with the iconic red scanner bar and the rectangular white headlights. I made lots of versions and I think the actual one with some tricky build techniques is the best one. Simple black stickers were added to the side of the clear transparent elements on the sides to make visible the headlights only on the front side. The model contains lots of details: the circular fuel cap on the left side, the orange one and the red one turn signal lights on the sides, the side-view mirrors, the convertible roof, the small rear wing and the blue vehicle registration plate on the rear to which a custom sticker had been added. The steering wheel is modeled too, and three stickers are added to the dashboard to recreate some of its iconic elements. The wheels are built too and on my physical model the white circles between the wheel covers and the tires are made of a Lego rubber belt. Thanks for visiting, _TLG_ KITT - Knight Rider - INSTRUCTIONS by László Torma, on Flickr KITT - Knight Rider - INSTRUCTIONS by László Torma, on Flickr KITT - Knight Rider - INSTRUCTIONS by László Torma, on Flickr KITT - Knight Rider - INSTRUCTIONS by László Torma, on Flickr KITT - Knight Rider - INSTRUCTIONS by László Torma, on Flickr KITT - Knight Rider - INSTRUCTIONS by László Torma, on Flickr KITT - Knight Rider - INSTRUCTIONS by László Torma, on Flickr
-
[NCS] 886 - Space Buggy, Remastered It is my chassis from [NCS] 6802 - Space Probe by changing the rear of the vehicle. Rear with articulated arm, 2 fire extinguishers, ore box, articulated arm control panel, 1 spaceman's hand tools, one antenna, 1 airtank. Front of the buggy with camera, sensors, binoculars, 2 walkie-talkies, a mini-satellite-antenna and control panel. [NCS] 886 - Space Buggy, Remastered by Horlack, sur Flickr [NCS] 6928 - Uranium Search Vehicle, Remastered [NCS] 6928 - Uranium Search Vehicle, Remastered by Horlack, sur Flickr [NCS] 6928 - Uranium Search Vehiclen, Remastered by Horlack, sur Flickr [NCS] 6842 - Shuttle Craft, Remastered A small remastered 6842-Shuttle Craft. Walkie-talkie, camera/weapon (depending on). On the Shuttle : reactors, engines, jet turbine, cannons, 4 front sensors, radiators, small antenna, 2 horizontal ailerons, 2 vertical ailerons, lifters, steering nozzle, rear computer control panel. Basically, I took a bit of inspiration from the Speeders of the Meta-Universe from Starwars. search keywords for all see : "type = speeders" https://www.starwars-universe.com/encyclopedie/vaisseaux_vehicules.php [NCS] 6842 - Shuttle Craft, Remastered by Horlack, sur Flickr [NCS] 462-897- Mobile Rocket Launcher, Remastered The Mythic 462-897 Mobile Rocket Launcher set was too small, so ... I remastered it in 2020 version. I had some difficulty with the Rocket, because I didn't want to use round bricks. I wanted something more elegant with cool building techniques. So I remade the rocket entirely in brickbuild. Ditto for the radar. In short, a little technical originality. I didn't want to be conventional. I used the elements of my old constructions to keep it homogeneous. The radar cockpit rotates 360°, and the radar itself also rotates, 360°. The radar cockpit is quite worked with control screens everywhere, as well as small joysticks. A walkie-talkie, a hammer and an adjustable wrench hang on it. I retake : - The chassis of my [NCS] 6802-Space Probe Remastered - The radar of my [NCS] 452-894-Mobile Tracking Station, Remastered [NCS] 462-897- Mobile Rocket Launcher, Remastered by Horlack, sur Flickr [NCS] 462-897- Mobile Rocket Launcher, Remastered by Horlack, sur Flickr The goal is to remain homogeneous in the architecture. Which is sometimes not an easy task. All the blocks are interchangeable, between all my creations. It's Modular, on a vehicle scale. Details of the rocket. Use of modified brick, by turning them 45 ° in the central body of the rocket, in order to build it "in hexagon" [NCS] 6901 - Mobile Lab, Remastered Always in the spirit of keeping modules of old constructions to reuse them. Just to swap modules, to make another MOC. Maximum standardization. The forward cockpit contains 2 repair utensils. It opens through doors on the side or through the central canopy. It is a resumption of the cockpit of the "1580 Lunar Scout, Remastered", by adding 2 ladders, and by rotating the roof sensors 180 °. The aft cockpit opens by rotating the canopy, or through the roof by eclipsing the radar. It contains 2 levers and 3 control panels which are in height. The chassis is also a recovery. An excavator entirely made in brickbuild. I did not find any existing parts, adapted to the scale of the vehicle, so a brickbuild is needed :) [NCS] 6901 - Mobile Lab, Remastered by Horlack, sur Flickr [NCS] 6901 - Mobile Lab, Remastered by Horlack, sur Flickr Well, I'm pretty happy with the look. I was worried that with my history of taking modules from other builds, it would result in a lousy mobile lab. Overall, "no". I had to be inventive on the rear 4x6 module block part. Once the seat and the astronaut were installed, I found myself stuck putting screens on him! And worse, not being able to get it out of the cockpit, lol Yeah, that's bad! Even blowing up the radar which is made up of 2 modular blocks, there was really little room. in fact, I had it kinda on my own, absolutely wanting a seat, which made it worse in a minimalist space. My neurons have overheated! Hence the idea of putting a canopy at an angle, from the top, to gain length space to take out the spaceman, but also to put control panels on the ceiling. And in fact, without wanting to, I took again in a different form, the horizontal rear opening of the 2 doors of the original 6901, but in a single vertical one at the rear. [MOC] [NCS] 6802 Space Probe, Remastered Bigger on a Buggy chassis with double probes. The robot deserved a 2020 update. :) - Head 3626bpb0034 : Minifigure, Head Alien with Copper Skin and Silver Eyepiece Pattern - torso 973pb1061 : Torso Robot with Silver Rivets - Arm 62691 : Arm Mechanical [NCS] 6802 - Space Probe Remastered by Horlack, sur Flickr [NCS] 6802 - Space Probe Remastered by Horlack, sur Flickr [NCS] 1580 Lunar Scout Remastered I kept the structures of my old creations, to remain homogeneous, and above all to make it "modular". The goal is to make all of my vehicles modular, and interchange the components between vehicles, to rebuild them as they see fit. Structure of the articulated Mini-arm found in, my [NCS] 6841 - Heavy Mineral Detector, Remastered Structure of the bumpers, which can be found [NCS] 452-894 - Mobile Tracking Station, Remastered I put a mini articulated arm at the back, in addition to the 2 mineral containers. The canopy is not green, because I will take over the cockpit structure for another construction. I couldn't put the chassis as low as the original, but overall I stayed in the "spirit" of the little scout utility vehicle. [NCS] 1580 Lunar Scout Remastered by Horlack, sur Flickr [NCS] 1580 Lunar Scout Remastered by Horlack, sur Flickr [NCS] 6841 - Heavy Mineral Detector Remastered I continue my series. I feel hot and boiling there! ☢️ A little Classic-space 6841 Mineral Detector Remastered, only bigger. I have tried to stay true to the functionality and structure of the original. Then added in all directions: Mini-articulated arm at the back, box to store minerals, box to crush minerals and analyze them, communication antenna, walkie-talkies, various small radars / cameras / front detectors at the front of the vehicle, small rock hammer, hand detector (which can be hung on the mini articulated arm) and various control panels. [NCS] 6841 - Heavy Mineral Detector Remastered by Horlack, sur Flickr [NCS] 6841 - Heavy Mineral Detector Remasterised by Horlack, sur Flickr [NCS] 452-894 - Mobile Tracking Station, Remastered Functional quality, of course :). Radar in tow that turns in all directions. The 2 small folding jacks when the trailer is unhooked. (A radar not horizontal, when the trailer tilts, it works much less well!) Radar on the roof of the vehicle which rotates 360 °. I really thoroughly styled this 2nd radar with sensors everywhere and tried to keep "the best spirit" with the 2 round transparent things. [NCS] 452-894 - Mobile Tracking Station by Horlack, sur Flickr [NCS] 452-894 - Mobile Tracking Station by Horlack, sur Flickr
-
Hi everybody, I always wanted to make Madoca1977’s Baja Trophy Truck or something similar…. Well here’s my result. Now here you can see it in action…. I wanted to use buggy motors to drive the Baja buggy. (Unfortunately I only have 1 Lego Buggy motor, but for this model I bought 2 buggy motors from CADA). The front of the Baja Trophy Truck's chassis is the same as Madoca. The rear wheel drive is my own design. This also applies to the seats and cabin. The cabin is not as strong as Madoca's and also lacks the roll cage. I wanted to see if this model has a bit of speed and agility. As it turns out, I can barely drive the model because it is so fast. It drives on all kinds of terrain. The buggy drives fine with the normal 1.2 volt rechargeable batteries. But driving through the grass is a bit difficult. I once read a topic on this forum about lifepo4 batteries and thought let's give it a try. And to my surprise, it really drives everywhere like crazy. Topic "do-you-use-12v-or-15v-batteries" The buggy has : 1 Servo motor for steering 2 Buggy motors for driving (1 on each rear wheel) SBrick for control Battery box with 3x LiFePo4 and 3x dummy batteries (Work also fine with normal (reachable) batteries but has not much speed when driving through grass or very rough terrain) Building Instructions Nowadays I want to be able to rebuild my own models when I break them down, so I make a digital copy of the model. I always did this in LDD but since it is no longer updated I switched to Stud.io. It took some searching but now I am able to build the models and making the instructions is also easy. Here are some examples Since Madoca has provided his Baja Trophy Truck with free instructions, I want to share my Baja Buggy's instructions with everyone for free. Here you can find the Building Instructions and Studio file I'm not good at designing beautiful bodywork, but building this Baja Buggy has given me hours of building fun. Making the instruction toke me a lot of evening hours, but I like the result. Sorry for the experienced builders, the instructions are step by step as Lego does nowadays, this means that there are a total of 663 steps (about 500 pages). It is certainly not a professional design, there are some steps in the Studio file that do not fit completely, but it fits perfectly when building. Some work in progress Compare Here are some pictures showing the model compared to the famous 8466 4x4 Off-Roader and the 42110: Land Rover Defender. And a few renders of the Baja Buggy More pictures can be found here.
-

Lego CLASH set 001- blast-cab vs ultracycle
mrfang2 posted a topic in LEGO Action and Adventure Themes
I’m not sure the rules about linking worldbuilder projects here but I’ll just say this is connected to mine, under the name “lego clash!” On there, and if you check that out there will be a lot more context to what this is. the blast cab, main vehicle of the villain “wrecker”, is a classic tow truck converted into a mobile weapons platform. With an armored front to ram opponents, rebar blasters on the sides of the cabin, and a dock at the back to equip wreckers newest giant weaponry packs, the blast cab is a powerful weapon in the hands of its creator. to combat him, the hero “lightfoot” creates a motorcycle that can interface with his power, turning into a bolt of energy to avoid attacks and using its own weapon to plant trackers and mini-bombs on the larger truck. so far I’ve only got a prototype done for the blast cab itself, but that should be refined within a few days and the ultracycle should be done shortly after as that one isn’t going to be a large build. Posting the wip here to give myself a bit of pressure to actually finish it. Some sketching while I designed this version of the truck. A sketch of a previous design can be seen on the worldbuilder page but isn’t included here since it has little resemblance to the model now. -
Hi all, since my police force has substantial numbers now, it's about time to focus on the other emergency services for a while. First cab off the rank is a Mercedes-Benz Sprinter based ambulance. I think the 4431 set was based on a Sprinter as well, but given that it's the size of a truck, it doesn't really fit in with anything else. The MOC ended up being 5 wide and 16 long to give it the correct looking proportions. This still allows for a driver up front, a passenger or another paramedic sitting in the back and a patient on the stretcher. The exterior of the MOC won't be changing as this is about as close as I can get it, but under the bonnet there's a bit of space left free for clips and odd connections that LDD just wouldn't allow. Trying to attach the windscreen was giving me issues as well so when I get to building I'll attach that with some clips. There's a breakdown of the sliding door on my flickr stream, but since the MOC's only 5 wide, it can only work on one side. Naturally, I opted for the safe side (kerb side). The large double doors on the back allow for a small stretcher to slide in and the fender piece holds it in place. The middle section of the roof is also easily removed for a bit off added access. As always, let me know what you think, and keep an eye out for updates.
-
Miss Octan is aiming to break the Lego water speed record!!!! She contains 806 parts!!! She features 8 massive flame spitting jet engines and a huge spoiler!!!! The concept of this build is a powerboat loosely based on any record smashing boats and Ekranoplans but rather with an approach to be pleasing to the eye (I'm a mechanical engineer but no engineering accuracy is present here,sorry:P).The front and the bottom pieces are a Lego airplane tail!!!The design was straightforward and joyful and stability was a fundamental factor of the building process. I want your opinions in the comments!!!! https://www.bricklink.com/v3/studio/design.page?idModel=172979