Search the Community
Showing results for tags 'upgrade'.
Found 11 results
-

[MOC] [WIP] 42122 Technic Jeep Rubicon Remake/Upgrade
Fluwoeb posted a topic in LEGO Technic, Mindstorms, Model Team and Scale Modeling
Hello everyone, This is Evan here with my first Eurobricks topic! I decided as soon as I obtained the 42122 Technic Jeep Rubicon set to massively upgrade it (similar to what y'all did here, here, and here). The only difference is that I am starting from scratch and rebuilding the whole vehicle based on the original set to not only be more functionally proficient (which is the focus of this venture), but also to look a little bit more aesthetically appealing;) As per my preference, I will start with the functionality. Since everyone else put the differentials in the axles, I decided at first to take a different route and take them out of the axles and instead put them in the cabin. See the following pictures of the front axle: Maybe this idea will work for you in a different project, but I quickly found out that it would not work for my MOC after making a few test chassis assemblies. By displacing the differentials from the axles to the center of the vehicle greatly increases the area that the drivetrain takes up in the cabin of the Jeep, so I decided to go with the differentials in the axles. As you can already see, I went with the CV joints for the steering drive connections just like Zerobricks did. However, I decided to go with the mustang wheels to center the steering pivot more. Also, I added Ackerman geometry to the steering system out of necessity. See the following pictures: I used this piece to connect the steering gear to the axle frame with the gear that drives the differential. It works quite well. Also, the steering rack is held in place by the actual "U" technic frame. Please let me know what you think of it so far, I will continue to update it until I finish it! -
This MOD upgrades your 75331 Razor Crest as below: - add a toilet next to the sleeping room - removable front landing gear - retractable rear landing gears (they're strong as the original) - add a display stand (229 parts) - tidy up the front panel - add more details to the laser cannons - entirely flip the boarding ramps - enlarge the rear entrance so that blurrg can walk through it - fill gaps and holes around the body and engines 419 extra parts are needed. Instruction is available at https://rebrickable.com/mocs/MOC-131686/ Enjoy and have fun!
-
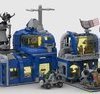
The Robot Command Center is a controversial Classic Space set and in some senses was a pioneer set. It was the first classic Space set which wasn´t neither a Vehicle, nor a Spaceship and even a proper Base. The design pushed the limits of 1984 Lego pieces and yet the structure was solid. Making aside the fact this set had many cool features, as many 80s space sets, it had some problems. The awkward "feet", the too low grabbing arms, the unreachable boxes, but many CS fans consider its worst flaw the two large canopies on each side of the robot. I´ve seen for years several updated versions of this set as Neo Classic Mocs and either remove the "beaks" or leave them as a mere adorn. In either case the problem wasn’t confronted. Following this logic, the solution would be leaving the canopies, but making them useful. Give them a purpose, to make them more than just a decorative feature. Some examples would be making them tool boxes, containers for equipment like jetpacks or drones, covers for hi tech sensors, an extra pair of arms inside the covers or defensive mechanisms. I focused on the last option and designed modern weapons which fit inside the canopies and leaving intact the rest of the original design as much as possible. Giving the RCC a worthy upgrade for this retro set. Link https://www.facebook.com/astronautagris/posts/508673584111677
-

[MOD] Lego 21321 ISS - Upgrade with new modules - "Nauka" & "Prichal"
cyberdyne systems posted a topic in Special LEGO Themes
Real life ISS is constantly growing with new modules attached. So set #21321 has become outdated. In this video I will show how to add missing modules "Nauka" and "Prichal" to the Station and how to upgrade russian segment for better resemblance. Everything is made from extra parts from this set (and parts from one of Soyuz spacecrafts from this set) or from enough easy-to-find parts. Except for solar panels, which I used from Shuttle Discovery 10231 (But you may use the ones from newer and cheapier sets like 60227). Thanks for watching! Keep your stations safe! -
LEGO did a great job in re-releasing R2-D2 as 75308, but there are still some parts not the same as the real one. So I've made the followings: - changed the outlook of the leg's fuel cells - flushed the third leg outlet panels (front and rear) by 1 plate - completed third leg outlet panels by adding the left and right sides - switched the position of the buttons and pillars of the legs (same as the 2012 version) - changed the outlook of the middle exhaust vents - moved the tools compartments further outward and made it taller - filled the gap between the head and the body - more SNOT outlook - push-to-open the lightsaber cover 195 extra pieces are required. Spare parts are also needed, about 80 original pieces will be left. Instruction available at https://rebrickable.com/mocs/MOC-85457 Happy building. Have fun and enjoy!
-
hey, been a while since i've built anything major, but i've finally figured out what i'm going to do for my next moc series. i'd like to build upgraded, full-scale versions of the crazy vehicles from the ninjago movie, as the released sets each seem to be roughly half the size of the movie versions. unfortunately i'm running into an issue in finding reference images of them. the concept art book has some good stuff in it, but stuff like cole's mech in the book isn't the final one (it has a brick built wheel) and the garma-mecha-man isn't represented in its brick form like, at all. any google searching i have done has nearly entirely lead me to pictures of the toy versions, not the movie versions. i'm looking for any screenshots, current mocs or in progress shots, or production shots that are available for these, or any tips you guys could give me on doing them. i'm starting off with the ice tank, so shots of that are the most helpful for now
-
Dear Lego Fans, While at work, my colleges and I were talking about how awesome it would be to connect our work desks with a cargo train to haul post-it notes, candy and office utilities around our office. I offered to bring my old Lego train set and we set it up during our lunch break. It has really relighted my love for Lego trains! I got my first Lego set around 1999/2000 with the blue and white Lego Railway Express (Set 4561). Being a kid at that time, I could not afford much Lego. I got a few track-packs and switches and intersections. I also bought a Santa Fe engine and one of the cars with it. I've stopped playing with lego all together roundabout 2006/2007 when the first RC train sets were released and 9V systems were retired. It's been 10 years since I last got my train set out and now being an adult with money on my hands, I really feel like getting back into the Lego trains that I so dearly loved as a child. I'm now faced with a few problems since the 9V system is no longer available. For one I know very little to nothing about the new train sets. I'm wondering wether it's worth buying a new train set or not, which train set to get, or just lurk around eBay to see if someone might want to sell their old 9V system. I'm thinking of building a new, larger layout in my basement once I bring home my train set from the office. As far as I know, all the rolling stock will work fine on the new rails and the new trains run fine on the 9V track. so to conclude, here's a list of questions I have: - Are there any train sets out right now that I should get? - Are there any train sets coming out in the near future that are worth waiting for? - Should I not care about the new train systems at all and check eBay frequently for old 9V sets? If anyone is interested, I will post some pictures of our little office-cargo-train thank you in advance!
-
And... done. Finally finished the hospital and that is all I will upgrade for now, next step is the interiors and modding the green grocer to be playable from the back... which I will leave myself some time for. So for those that came late here is a link to the police station: http://www.eurobricks.com/forum/index.php?showtopic=122523 And fire station http://www.eurobricks.com/forum/index.php?showtopic=122627 So one more time... here was the problem: Which is the odd one out? :) So here was the plan: And here the results another: And one more: And now from the back... here I have to say I did nothing with the interior yet, almost totally out of usable bricks at this stage... something for my next project... also you will note I stuffed up my colour order of the floor tiles... such is life, something for next time. So now that I am done, what do they all look like together? And another: And one from a lower perspective: And there you go... that will be it for a while as I do some other things but it was a lot of fun and I think the results are respectable. Got to love lego. Biz
-
Hello All, And here is the second upgrade to my town set, the fire station. Police station can be found here: http://www.eurobricks.com/forum/index.php?showtopic=122523 So, once again the problem: (town sets don't really match the look of the new modular buildings) The plan! And the results: again from front From the back (this one I spent a bit more time on the interior as the fire station is the favorite of my son. And finally a zoom in on the living quarters: So there you go, one more left. Anyone else undertaking similar upgrades to their town sets?
-
Hello all! Here are a few pictures of my upgrade to The DeLorean Time Machine set. If you have an upgrade to share, put a picture below so we can all see it!
-
Remember a while back, be it on deviantArt(can I say that site name?) or here, that I posed up a picture of a black, muscled HF-build torso, and promised a figure would be completed around it? The muscled black HF torso, that looked similar to this? Well wait no more, it's finally here! The one, the only... Dark Matter!? That's right. Evidently he has returned, Upgraded to a new body(and in a sense, a new mind), and ready to lead his forces against the Factory once more. By the way, his upgrade has increased his height exponentially. He now stands at about 2 standard-size Heroes tall. 'Shine' and my panda-like Hero demonstrate here. He's got quite an arsenal, with his shoulder-mounted plasma-bolt cannon, the thrusters in his boots, and his bloodied-up broadsword(not shown), along with his loyal army of Villains. Among these villains is the Red Fist, who you will be seeing more of.. shortly. Comments and criticism are greatly welcomed. More to come soon! -Cirkit