Search the Community
Showing results for tags 'ucs'.
Found 180 results
-
From the designer of fantastic UCS-scaled MOCs comes a Hammerhead Corvette. The MOC contains 3,606 pieces in total, and measures 35 inches long, 13 inches wide, and 14 inches tall. Take down Imperial Star Destroyers with a UCS-scaled Hammerhead Corvette from Rogue One: A Star Wars Story. Despite the fact that the scale of this model is unknown, the model itself does not disappoint in terms of both accuracy and detail. There is an instructions bundle available for this MOC which includes a 480 page pdf instruction manual, a parts list, and LDD files. All we ask is an exchange of 35 U.S Dollars ($35) for the entire bundle. For more details about purchasing the bundle, please either PM me or contact me at chrdvorak@hotmail.com via email. As for sticker, The manual includes a plate to where the sticker will go, but until more information is learned about the Hammerhead, a sticker will not officially be released. Here are some images from the manual that show the design and completed model: https://flic.kr/s/aHskUfjEMD Parts list: http://rebrickable.com/mocs/MOC-7593/cjd_223/dmarkngs-hammerhead-corvette/ Please use this topic to discuss anything about the MOC including the building process, questions, part substitutions, etc.
-
I've been away for a little while (again), but I've been busily working on some designs for my UCS TIE project. First up is a model I had been avoiding for a long while, the iconic standard TIE Fighter. Overall I really like this design, but the cockpit ball could use some work. It's decidedly more curved than any other TIE I've done, but is a bit too cylindrical, as opposed to spherical like it should be. I really don't like the sloped method used by TLG in the official TIE Interceptor and TIE Advanced, and this curved method allows for a SNOTed pylon, which I really like a lot. Once the venerable TIE Fighter was done, it opened up a lot of variations on the theme. Like the TIE Experimental M1. And the TIE Experimental M2. And once I had started doing TIE Experimentals, I just had to do all of them. TIE Experimental M3 TIE Experimental M4 TIE Experimental M5 And then I realized that the M3 was the perfect starting point for the Emporer's Royal Guard Interceptor Next came one of my favorite TIE variants, the Lancet Aerial Bombardment. Needing a break from the starfighters, I next moved on to the TIE AP-1, also known as the TIE Mauler. And that led into the Century Tank, or TIE Crawler. I did a few of the odd-ball shaped TIEs next, the TIE Lambda and the TIE Raptor. At this point I returned to the standard TIE variants, starting with the TIE Fire Control. Followed by the TIE Reconnaissance, and the TIE Ground Targeting. Next up is one of the more unique shaped TIEs, the TIE Scout. Then for something completely different, the TIE Neutralizer. It was finally time to tackle the Bomber variants, starting with the TIE Electronic Warfare. Then came the TIE Heavy Bomber the TIE Interdictor the TIE Hammer and finally the TIE Lander The Lander needed two renders, just to shhow off the landing skids I had designed. The TIE Shadow Squadron was next on my radar. After that came the TIE Sentinel Then I finished up the Standard TIE variants with the TIE Vanguard and 'completed' the TIE project with the Nsiss Chiss-Class Clawcraft. I say 'completed' because, even though I've created a model for every variant I intend to, there is always room to improve them. So I looked at the older models I had made, and realized that they didn't age well next to the new methods I was using now. So I set about re-designing them. First was the TIE Bomber the TIE Boarding Craft and the TIE Shuttle. The TIE Predator got a cockpit update, but I couldn't find a combination of slopes that I liked for the wings, so the old design has to do. The trio of the TIE Clutch TIE Phantom and TIE Shadow received updates, though the main hulls remained from the old versions. The last five all received complete make-overs, starting with the TIE Hunter. Unfortunately, I couldn't find a mechanism to make the wings open and close. Then came the TIE Avenger TIE Aggressor TIE Oppressor and last but not least, the TIE Torpedo Bomber The only two original models that have not gotten a facelift are the Scimitar Bomber and the TIE Droid The Droid's wing angle makes it very difficult to brick-build the wings while keeping the pylons from looking like crap warmed over. The Scimitar's complex wing design doesn't lend itself readily to a brick-built design, and the hull I am extremely happy with. None of these new designs have been built yet. I believe I have ordered all of the parts for my interpretation of the TIE Defender. Stay tuned, as soon as the parts arrive I will begin construction. If you have questions or comments, or want different views from some of the models, feel free to ask.
-
From the designer of the most famous AT-AT MOC comes a UCS Tie Defender. The MOC contains 1,676 pieces in total. Despite being a relatively simple design consisting of a base with 3 identical wings, the model itself does not disappoint in terms of both accuracy and detail. There is an instructions bundle available for this MOC which includes a 162 page pdf instruction manual, a parts list, and LDD files. All we ask is an exchange of 20 U.S Dollars ($20) for the entire bundle. For more details about purchasing the bundle, please either PM me or contact me at chrdvorak@hotmail.com via email. For the sticker, I recommend printing it at 122mm width by 61mm height after downloading the original file in the bundle. Here are some images from the manual that show the design and completed model: The Rebrickable listing will be approved soon for an easy to access parts list. Please use this topic to discuss anything about the MOC including the building process, questions, part substitutions, etc.
-

[MOD] UCS Millennium Falcon engine vents rotate align without increase height
Nachapon Lego posted a topic in Community
My small tricks: Lego UCS Millennium Falcon engine vents rotate align modify without increase height (clone band). Blue plane: Oxford band brick, Korean air home made stickers + engine support MOD. Hope you like it -
did everyone see this? From Lego ideas. Vote for Nebulon, Bomber or Gunship. I voted Nebulon https://ideas.lego.com/activities/ab2e9684-6b82-4133-9066-d574fb23d375/response/837d9a41-0a9b-47c9-8152-e2b443fb195a/page/27d472af-f9c2-48a0-8413-981c94a03c7f/edit
-
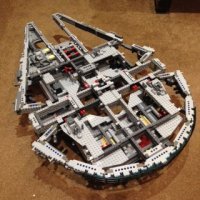
75192 Millennium Falcon™ Ages 16+. 7,541 pieces. US $799.99 - CA $899.99 - DE 799.99€ - UK £649.99 - DK 6999.00 DKK *Euro pricing varies by country. Please visit shop.LEGO.com for regional pricing. Travel the LEGO® galaxy in the ultimate Millennium Falcon! Welcome to the largest, most detailed LEGO® Star Wars Millennium Falcon model we’ve ever created—in fact, with over 7,500 pieces it is the biggest LEGO model ever sold! This amazing LEGO interpretation of Han Solo’s unforgettable Corellian freighter has all the details that Star Wars fans of any age could wish for, including intricate exterior detailing, upper and lower quad laser cannons, landing legs, lowering boarding ramp and a 4-minifigure cockpit with detachable canopy. Remove individual hull plates to reveal the highly detailed main hold, rear compartment and gunnery station. This amazing model also features interchangeable sensor dishes and crew, so you decide whether to play out classic LEGO Star Wars adventures with Han, Leia, Chewbacca and C-3PO, or enter the world of Episode VII and VIII with older Han, Rey, Finn and BB-8! • Includes 4 classic crew minifigures: Han Solo, Chewbacca, Princess Leia and C-3PO. • Also includes 3 Episode VII/VIII crew minifigures: Older Han Solo, Rey and Finn. • Figures include a BB-8 droid, 2 buildable Porgs and a buildable Mynock. • Exterior features include intricately detailed and removable hull panels, a lowering boarding ramp, concealed blaster cannon, 4-minifigure cockpit with detachable canopy, interchangeable round/rectangular sensor dishes, upper and lower quad laser cannons, and 7 landing legs. • Main hold features a seating area, Dejarik holographic game, combat remote training helmet, engineering station with turning minifigure seat and a doorway build with passageway decoration. • Rear compartment features the engine room with hyperdrive and console, 2 doorways, hidden floor compartment, 2 escape pod hatches, engineering console and an access ladder to the gunnery station. • Gunnery station features a minifigure gunner’s seat and detachable hull panel with fully rotating quad laser cannon. An additional quad laser cannon is also mounted on the underside. • Also includes an informational fact plaque. • Features a new cockpit canopy element. • Classic crew weapons include Han’s blaster pistol and Chewbacca’s stud-firing bowcaster. • Episode VII/VIII crew weapons include Han’s blaster, Rey’s small silver blaster and Finn’s medium blaster rifle. • Change out the features and crew characters to switch between classic and Episode VII/VIII versions of the Millennium Falcon! • Open individual hull panels to access the detailed interior while retaining the overall exterior appearance. • Slide the panel to reveal the concealed blaster cannon. • Turn classic Leia’s and Han’s head to reveal their breathing mask decoration. • Makes the perfect intergalactic toy or flagship display model. • Measures over 8” (21cm) high, 33” (84cm) long and 22” (56cm) wide. Available for sale directly through LEGO® beginning October 1, 2017 via shop.LEGO.com, LEGO® Stores or via phone: US Contact Center 1-800-453-4652 CA (English) Contact Center 1-800-453-4652 CA (French) Contact Center 1-877-518-5346 European Contact Center 00-800-5346-1111 The set will be on display (not for sale) in LEGO Brand Retail Stores beginning on September 1st as part of the Star Wars Force Friday II promotion. Launch date for the UCS Millennium Falcon is October 1 with VIP Early Access starting on September 14. Extremely hi-res pictures can be found in this Flickr album. Disclaimer: this topic has been created before publication, hence the early date.
-
After some tweaks and revisions to the model, Cavegod's First Order Special Forces Tie Fighter is ready to be released to the public! The MOC itself contains 1,691 parts, and its manual is 91 pages long. The MOC is built to match the scale of the UCS Tie Fighter released by The Lego Group in 2015. One of the big changes is that the wing color has been switched from white to Light Bluish Gray to better represent the true color of the wings. In some of the photos attached to this post you will see white wings, those photos are from the original model. It should be noted that this MOC can easily be converted into a standard First Order Tie Fighter by switching the red pieces to black. Lots of interest has been generated for this MOC, and Cavegod and I are really glad to make its release to the community! If you would like to build this MOC, we are happy to share it with you in exchange for $20. Included is the pdf instruction manual, an xml part list, LDD files, and any help you need throughout the process of making the MOC. For more information please PM me or contact me at chrdvorak@hotmail.com A rebrickable page with a parts list will be live soon, and will be posted here: {filler} Here are some pictures of the MOC and of the pdf manual:
-
Hi forum, I'm a UCS collector. I collect to build and display, not to have MISB sets. Therefore I need tips to keep my collection nice and tidy. Do you have your sets with or without stickers? I'm concidering peeling of all stickers that I've applied, especially the older used sets I've bought, since they simply look worse and worse every year. How do clean off dust? I bring them outside every once in a while to blow the dust of with compressed air. Problem is that some of the dust does not come off. All tips are welcome.
-
Finally! I am done! Or am I? ... Luke is sitting in the rather uncomfortable steel chair of the Redemption’s medical bay. His new mechanical hand feels cold where it is attached to the bone. Stupid Vader… His glance wanders up towards the large viewport. He squints as the light of the hundreds of billions of stars in the galaxy greets him. But the glow of the stars is just a faint glimmer compared to the magnificence of the kickass Rebel Fleet just outside! My latest creation is the Rebel Fleet as seen in the last scene of the Empire Strikes Back: Fear the Might of the Rebel Fleet! UPDATE: Many more fighters: Overview The fleet is made up of the following ships (Updated): - 15 T65A X-Wings - 16 BLT Y-Wings - 6 A/SF B-Wing Heavy Assault Starfighters - 5 RZ-1 A-Wings - 2 TIE/LN Starfighters - 1 Lambda-class T-4a Shuttle (Tyderium) - 1 heavily modified YT-1300 Light Freighter (The Millennium Falcon) aka. a piece of junk. - 3 GR-75 Medium Transports - 1 CR-90 Corellian Corvette (the Tantive IV) aka. A Blockade Runner - 1 EF76 Nebulon-B Escort Frigate with medical retrofit (The Redemption) And… - 1 heavily modified Firespray-31-class Patrol and Attack Craft (Slave 1) As you can see a few guests have snuck in – not all of them are especially welcome. There are a number of unidentified ships in the fleet scene, but rather than speculate on the exact scale and shape of these ships, I have focused on creating “Guests to Scale”. The Fleet Or “Home, sweet home”, as it is known to many rebels. The Fleet. Straight Perspective. This angle gives an overlook of the fleet and a sense of how the different ships relates to one another. Flying away. I was a bit challenged capturing the entire fleet from this angle – a few ships are missing in this shot, but a wall was in the way. The Flagship Leading the fleet is the flagship, the Medical Frigate – Redemption. The Flagship. The Medical Frigate is currently the flagship of this ragged fleet. The eagle eyed amongst you may be able to spot that I once again have made a number of modifications and added detail. Hint: The changes can be found from front to back on the ship :) Charting the Course. The flagship leads the way. Mmm look at those engines… The Falcon The most famous (and infamous) ship in the Rebel Fleet. This old YT-1300 freighter has seen more action in its lifetime than half the Imperial Fleet. Falcon and Transport. This picture is interesting because it shows the Falcon’s size in relation to a number of ships (the fighters closest to the camera not included). The Falcon is naturally dwarfed by the Transport, but it is also worth noticing how little space there must be on the bridge of the Transport. Two pilots would be hard pressed to fit in there. Closer. Here the docking ring and cockpit are in focus, but we also get a sense of scale in relation to the characters in the viewport of the medical bay. Falcon Front View. Several types of smaller crafts and fighters can dock and resupply with the frigate. The Rebel Fighters Escorting the fleet is a range of different, specialized fighters, from A-wings to Y-wings. Fighters. Five types of fighters can be seen this picture. A-wings. Beginning alphabetically, we have two A-wings zipping by the Deflector Control tower of the frigate. A-wings are among the fastest fighters in the Rebel Fleet, giving even a TIE Interceptor a run for its money. B-wing. Two B-wings are in the Rebel Fleet, they are not on direct escort duty, but more than capable of disabling even larger Imperial ships with their formidable array of deadly weapons. The B-wing was developed by none other than Admiral Ackbar and is the most heavily armed fighter in the Rebel Fleet. The fighter is mainly used in hit and run missions against Imperial targets. X-wing. The X-wing is the most common fighter in the Rebel Fleet. Today it is on escort duty, but this all-round fighter is capable of so much more; for example transporting force-adept farmboys around the galaxy and blowing up multi-trillion-credit Imperial installations. Y-wing. Six trusty old Y-wings serve as escorts in the Rebel Fleet. The attack fighter mainly serves on bombing runs but can also be used for escort detail. The fighter is one of the oldest active fighter designs in the rebel fleet and has gone through a number of modernizations. Most Y-wings have their engines’ hull plating stripped to make the heavy fighter lighter. The Corvette If you freeze frame the last scene of the Empire Strikes Back, you can just make out the silhouette of a Blockade Runner flying in the background. The model for this ship is most like the Tantive IV, which is the one I used for reference when building my CR-90 Corellian Corvette. Corvette Front View. The Corvette trails the Medical Frigate in the fleet. It is the second largest ship in the convoy and sports formidable anti-fighter capabilities. As such the Corvette could easily fly without fighter escorts, but a prudent fleet admiral has assigned four Y-wings to escort the ship – this may prove to be a very wise decision. Corvette Side View. As Slave 1 zooms past the Corvette the main canons try to train on the target, however the target is much too fast. Front/Side. The Corvette is followed by two more Transports. Corvette Engines. So many glorious engines. Unwelcome Guests Building at this scale it became very hard not to build other crafts, which may not be a part of the Rebel Fleet. I am a sucker for scale models and seeing ships in relation to each other, plus it gives the entire scene a sense of action. This is not just a Rebel Fleet meandering the outskirts of the galaxy; stuff is about to go down :) Slave 1. Boba Fett jumps in from hyperspace, almost colliding with the Rebels. Can the Imperial agent sabotage and disable the frigate before he has to flee? Even the powerful Slave 1 is no match for a Rebel Fleet this size, so he has to be quick. Slave 1 Up Close. The little Slave 1 moc features as much de detail as possible: a fully rendered back side with engines, poseable wings, canons and a translucent cockpit. The wedge slope is from the 6964 mini Slave 1 set. Imperial Shuttle and TIE Fighters. Have the Rebels already captured and secured Tyderium? And two TIEs? Did Boba Fett track the Rebel thieves and follow them to the fleet? Why don’t we see these TIEs in Return of the Jedi? So many questions! The Rebel Transports Rebel Transports are the backbone of the fleet. They carry supplies and mobile bases the ragtag group of freedom fighters can put up anywhere in the galaxy. Close Quarters. A 90 meter long transport flying side by side with the flagship and being utterly dwarfed. Enjoying the View. The Transport captain is probably thinking the Princess is waving at him from the viewport of the Frigate. Side by Side. The Rebel transports have very limited armaments, thus each transport is escorted by two X-wings, piloted by the elite Rouge Squadron. Containers. Each transport features dozens of containers. I have made sure that each transport features a specific container configuration – they can’t all transport the same stuff :) Details. Besides the container configuration, each transport features unique detailing. Having three carbon copies of the same ship is boring and by adding different detailing to the ships, each craft gets its own storied life. To sum up Building this fleet has been a challenging experience. It has been frustrating at times, but also very rewarding. Thanks to all the comments and feedback from all of you who commented on the various ships, and thanks to the EB staff for the shoutouts! I leave you with one last shot: Rebels in Space! As always, please let the comments fly!
-
has anybody attempted to make the new ucs star destroyer (75252)? im stuck with lining up the sides. is there anyone that can help me?
-
[MOC] UCS CR-90 Corellian Corvette – Blockade Runner (Tantive IV)
mortesv posted a topic in LEGO Star Wars
The work building a Rebel Fleet continues! The latest addition the Rebel Fleet is the CR-90 Corellian Corvette, better know as a Blockade Runner. The CR-90 was built by the Corellian Engineering Corporation for the Empire, but many of them were stolen by the Rebels. Over time they became a mainstay in the Rebel fleets. This specific rendition is of course Leia’s counselor ship: the Tantive IV. The model is built using the same 2-meter/stud scale as the rest of my Rebel ships and fighters. Thus the 150-meter ship becomes a 75-stud model. My goal was, as always, to capture every little detail of the studio model. However, this time there was also the challenge to improve the two official renditions of the ship. Comparing the TLG versions with the studio model, it became clear that getting the proportions right seems to be difficult - since both version are pretty far off. As always the design process began in LDD but ended in bricks – some things are simply more easily designed in real life :) When I was done the model consisted of just over 2800 bricks distributed across 250 brick types. The Tantive IV. Chased Through Space. This angle shows off the command section - which was one of the last parts I built. I knew all the proportions of the section; it was just a question of how I could represent them best while retaining crucial detail. It was tempting just to use large cone bricks. But I did not want to compromise any detail. I ended up using a lot of different slope -and wedge bricks and plates, combined with hinges and tiles. Dark red round 4 x 4 plates in combination with 3 x 3 discs was the solution for the red markings on the sides of the command structure. However, this also meant I had to make room for technic axles inside the cockpit – alongside hinges, the spine of the ship, and other stuff. Suffice to say, it is a very cramped bridge :) Model Side View. As mentioned above, getting the proportions to fit with the studio model was a priority when designing the ship. Using pictures and diagrams of the studio model, I have gotten with within a pretty tiny margin. Model Top View. Another challenge was to replicate the smooth transition from the body to the engines section. To achieve that I used corner slopes. Comparison pictures of the studio model can be found here: http://www.modelermagic.com/?p=57848 The Main Dish. The mold for the main dish is the same as the one used on the two TLG versions of the ship. The way it is mounted is inspired by the movie version - using droid arms to get the proper detail. Just below the dish, the studio model has two angled door-like vents on either side of the base. I have recreated this detail using hinges and grilles. On the same base, facing the engines, are also four small, horizontal cylinders – these are visible in the picture below. The area around the antenna sports an almost fin-like structure. The purpose of this structure is to stabilize the otherwise very slender body of the ship – considering the combined torque provided by the 11 Girodyne Ter58 Ion Turbine Engines. I tried to convey this thin structure in a multitude of ways. The cleanest solution I found was using flags. Flags are quite thin and can be placed at the desired angle with no fuss. Using several flags in a row I could slightly adjust the angle from flag to flag to approximate the desired lines. Docking Rings. Beneath the antenna we have the symmetrical docking area. Here we find the docking rings where the CR-90 can dock with other ships. An interesting side note: since the early concepts and prototype models of the Blockade Runner was referred to as the “smugglers ship” aka the Millennium Falcon, the round housings around the docking rings were originally supposed to represent a one floor walkway. The equivalent on the final Falcon is the side docking rings – in the Smuggler Ship’s original form these we 1:1 with the ones on the Falcon. In the final version of the Blockade Runner, the docking tubes are representing several floors of walkways. In this picture it is also apparent that the ship if made up of a number of slightly different sized cylinders. To get these shapes I once again turned to the curved slopes I used in the GR-75. It turned that I could render most of the core body of the ship using these bricks – all I had to do was to create a long square 4x4 center with studs on all sides running through the entire body :) The Main Turrets. As with the docking rings the main turrets were originally equivalent of the turrets seen on the Falcon. Since the ship changed purpose and scale substantially during production of “The Star Wars”, the turrets grew from anti-fighter duty, to heavy turrets effective against large ships – although still immensely underpowered against the shielding of an Imperial Star Destroyer :) Main Hull. The main hull of the ship houses the living quarters. We also find a number of smaller anti-fighter turrets. Oddly these turrets are only found on the dorsal part of the ship, rendering it vulnerable to fighter attacks from the ventral angle. This part also sport a bit of discrete piping. On the spine of the main hull is more detailing and I have displaced some of the slopes one plate to give the side of the spine some texture. Escape pods. But who cares about fighter attacks or encroaching Star Destroyers, when you can jettison yourself to the desolate safety of Tatooine’s sand dunes? As you can see, several of the escape pods have already taken off – perhaps one of them were carrying a couple of oddball droids? The escape pods are made up of a 2x2 cone brick with a 1x1 round tile on top. Jettisoned escape pods are represented by a 2x2 round dbg tile with a hole in the middle, to convey the scorching from the explosion that shot the unlocked escape pod into space. Side Detail. On the sides of the main hull there is a narrow band of greebling on the studio model. The band wraps around the entire section and, like with the section itself, I used hinge bricks to capture the different angles. Main Turrets Bottom View. In this close-up we see more of the detailing of the main turrets. This area also hides the ship’s front landing legs – where the transparent stand is. However the ship is in flight right now so the legs have been retracted :) Engines! Now to the best part of any ship :) The official UCS version (10019) of the Tantive IV was one of my favorite ships for a long time. But when seeing the movies, it is clear that the Lego version has some issues regarding proportions. It is very bulky and square looking and does not properly convey the slender nature of the ship. This is especially true for the engine section, which is a large square block with oversized engines placed directly next to each other. In this regard the later 10198 is much more accurate. I my version the engines have the correct diameter and length in relation to the ship’s overall proportions. The horizontal spacing between the engines are ½ engine diameter. The vertical spacing between the three rows of engines are around half a stud. Each engine sports brick built panel with detailing – no stickers :). I used a bracket brick to have the panel run down the sides of the cylinder. Engines Top View. The 11 Girodyne Ter58 Ion Turbine Engines in all their glory! Here you can see all the details and cables on the engines. I considered using rigid cables, but I had to heat them up to get the proper shape. The cables were also too thick. However, I found that by placing a 1x2 bracket in the side panels I could place levers on top of them. The levers convey thin cables running from the sides of the engine to its core. Engines Close-up. The engine housings were also detailed looking at the studio model and as you can see not two engines are the same. It is worth noticing the angles of the engine housings. I have tried to get as close to the studio model as possible, while also taking into account that the side-most engines have a steeper angle. The middle (seen from the side) engine housings also have their own specific angle. These features were completely ignored on the official TLG models and contributed to the 10019’s blocky appearance. Engines Bottom Rear View. As mentioned above, each engine is different. This is not only in terms of detailing, but also how they are attached to the ship. Top, middle and bottom engines are attached differently. Top engines are placed on the top of a plate, middle ones at the end of technic bricks, and bottom ones are attached to the bottom of plates. Since the engines are mirrored left/right not two engines are the exact same. The detailing of the nozzle of the engines is made using a sailing ship rudder and a lot of 1x1plates with side clips and 1x1 tiles. And yes, the exhaust should have been yellow, but there are no trans-yellow 3x3 dishes :) Scale Comparison. As always, I have a scale model with my MOCs. This time the model is my 7½-week-old son. He is a huge Lego Star Wars fan :) The Tantive IV Flying Away. Enjoy, and please comment! -
Greetings everyone! After a couple of months work I am proud to present my minifigure scale Zeta-class cargo shuttle. “Manufactured by Telgorn Corporation with Sienar Fleet Systems, the Zeta-class shuttle carries a modular ‘interstellar orange’ cargo pod for versatility mounted on a 35.5m length frame.” Ever since Rogue One introduced the design, the industrial mining tug aesthetic appealed to me. It has the kit-bashed sensibility that I love in Star Wars, so I set about a UCS sized build. The lower cargo deck has space for troops and features a communications patch bay. I’m still working on finishing touches to the upper deck, but it houses the two seat command console and aft tech station. The gearing mechanism from 10212 locks the wings upright. By simply lifting the top deck away I can adjust the angle if required. The wingspan measures 1.15m, so I have yet to find space to photograph the wings in flight mode! During construction I used LDD for rapid prototyping. I still need to update the final build into the program, but the current ballpark is 4000 pieces. The Rogue One ultimate visual guide and Battlefront Scarif DLC were invaluable for determining the proportions. My personal technique for ‘minifigure scale’ is to calculate in-universe size against stud length. Small craft like speeders and skimmers skew towards 4.0s/m, starfighters 3.5s/m and large craft (e.g. UCS Slave 1 and Lambda shuttle) at 2.7s/m. Therefore I aimed for 92s long and 75s high. The final model measures 88s (l) 70s (h) 48s (w) / 70cm (l) 56cm (h) 38cm (w). Finally I threw together a Scarif landing pad for a diorama. Hope you all like it! (Link to the flickr album is here.)
-
This topic is made for everybody who wants to modify their UCS Hulkbuster Ultron Edition (setnumber 76105). I will update the OP when new mods are posted in the topic. There are a few points people would like to see modded, which are (credit to @Scarilian): Here are a few mods I've spotted recently: MOD by NYESSbOss on Reddit MOD by CX52J on Reddit Potential moving leg solution MOD by @Leewan MOD by Chezzymann on Reddit Mod by @Warbinator Mod by @chubbybots2 If you have a modification you want to share, post it here so everyone can enjoy it.
-
Has anyone done a parts list comparison between the old and new UCS Millenium Falcon? I've previously Bricklinked a 10179 and wonder if I can use it as a basis for 75192. The cockpit, gun turret glass and 'chess' table have all appeared on Bricklink. As have the grey mast riggings at an affordable cost. Though I think I'd go with Scottish Dave's engine mod. No need to buy a radar dish because I'll do the square TFA version. Currently got a DBG one. I'd appreciate your thoughts.
-
Hello! Several months ago we were able to get to know the new First Order machine "Gorilla Walker". When I saw the version released by Lego 75189, at first I thought it was necessary to build it in version "plussize" :) The design requires a lot of parts so I do it in LDD, after designing, I will order the appropriate parts. Current work lasts about 1.5 months, maybe I'll finish it by the end of the year :) How do you like it? All suggestions and comments are welcome :) More photos on flickr https://flic.kr/s/aHsm97P5CD
-

[Instruction] UCS First Order Resurgent-class Star Destroyer
Kommander posted a topic in LEGO Star Wars
UPDATE: Instruction avaiable - at BrickVault UCS First Order Resurgent-class Star Destroyer by Kommander, auf Flickr Size: 109cm x 52cm x 25cm Parts: 7855 LEGO STAR WARS UCS FO Resurgent-class Star Destroyer Render by Kommander, auf Flickr UCS First Order Resurgent-class Star Destroyer by Kommander, auf Flickr UCS First Order Resurgent-class Star Destroyer by Kommander, auf Flickr And some instruction pages. Instruction by Kommander, auf Flickr You can find more pictures HERE Original post: Hey Eurobricks I wanna share with you my new project - a First Order Resurgent-class Star Destroyer in UCS-scale. To avoid another long time MOC in WIP Nirvana I started this time with little help from LDD. Dimensions, main frame, angles... took me about a year to set these parts. Because of the LDD file I generated instructions and and part lists for me. On the picture you can see an early version of the ship and one of the latest with much more details. For the moment only one digital render of the ship. There will be some adjustments/tweaks in the "real" version but most of it works fine for me. I already finished the main frame with the instructions... and its good! More pictures will be on flickr Greetings Kommander -
While I'm not sure how much this will help people right now. I am working on building 75192 in LDD. I am separating the build into "bags" like the set. When I finish this, I will try to put it all together without LDD crashing, but, with the number of pieces and number of angles, I don't know how that will work. I have read some people saying they don't have $800 to shell out for 75192 and they were thinking about bricklinking it. If so, this may be the way you want to do it. If it doesn't help anyone now, it will when this set is discounted. I will update and edit this as I finish "bags". I am on 8 now. I am still working on it. Also, keep in mind, some pieces are not available in LDD. I will update as I come across them. LDD files are in my Brickshelf gallery when modded. Bag 1, The Frame: 705 pieces. Bag 2, Landing Gear: 388 pieces. The 6 landing gear are identical to build. Bag 3, Forward Rooms, Gunner Seat, Greebling and Front Landing Gear: 545 pieces. Forward landing gear is the same as Bag 2. Missing stickers. Bag 4, Rear Rooms: 457 pieces, missing are 4 Light Bluish Gray, 27263, Modified 2 x 2 Corner with Cut Corner - Facet, I used 14719 on the model. Missing stickers. Bag 5, Rear Engines: I couldn't get the boat rigging pieces on there, they won't flex. Also missing are 6 Trans Light Blue, Hose, Ribbed mm D. 26L. Not available in LDD. 458 pieces, 464 when you add the missing pieces/ hoses. Bag 6 , Forward Mandibles: 530 pieces. Bag 7, Underside of Mandibles: 295 pieces. Which is odd, I figured this would be an even number since the builds are identical. I may have screwed up here, just noticed it when posting. Bag 8, various bits of the underside. 356 pieces. Bag 9, Tops of the mandibles. 426 pieces. Nothing missing, but, the 2, 2 x 4 curved slope pieces are printed. Bag 10, Final parts of the underside, including bottom Quad Laser. 454 Pieces, but, 2 pieces are not available in LDD. 2 light Bluish Gray, 26599, Plate, Modified 2 x 4 with Pin Holes used on the boarding ramp. Bag 11, Starting the top of the ship now. 361 pieces. Missing 8 White 30166, Minifig, Shield Rectangular with 4 Studs. If you are going to Bricklink this set, you can sub 30166pb01, same part, same color, just with a window print on it from 75166: First Order Transport Speeder Battle Pack. You get one in the Battle Pack. So Bricklink maybe with best option!! Also, after posting this, I realized i missed 2 pieces on the right section. So, the total for this "bag" is 369. The file on Brickshelf is correct. Bag 12, Top, back of the ship, Exhaust vents. 472 Pieces, but, there are 16 missing pieces, 27507, Tile, Round Corner 4 x 4 Macaroni Wide. Bag 13, last 2 parts of the top exhaust vents. 357 Pieces. I think from here on out all the bags/ sections should be 100%. Bag 14, front, top of the saucer section. 298 pieces. Bag 15 more of the top, front of the saucer section, base for the radar dish and escape hatches on the sides. 371 pieces. Bag 16, Cockpit and hallways to it. 483 pieces, I know I said everything should 100% since the update, but,the 2 sections of the cockpit are not included in this file. So, this bag has a grand total of 485. Bag 17, last 2 sections of the saucer section, 2 radar dishes, Mynock, plaque, top gunner seat, and front thingies! 443 pieces. Jamie
-
Latest up in the fourteen-year cycle of remakes of the original Star Wars Ultimate Collector Series is the BTL A4 Y-Wing Starfighter. I reviewed the 2004 original back in 2010; it suffered for being over-long but scored praise for the use of gruelling on the ship's exposed innards. We’ll see here if the new offering has addressed the issues of the earlier version and how it compares to the movie original. Review: 75181 UCS Y-Wing Starfighter Name: Y-Wing Starfighter Number: 75181 Pieces: 1967 Figures: 2 Year: 2018 Price: GBP £169.99 | USD $199.99 | EUR 199.99 | DKK 1799.99 The Box A dramatic view of the Y-Wing in the obligatory Death Star Trench setting makes for a bold and attractive front. The box has the same frontal dimensions as that of the set’s predecessor 10134 - shown behind - but somewhat surprisingly it is deeper that the earlier version. The ‘ULTIMATE COLLECTOR SERIES’ designation has returned to prominence; it disappeared from the boxes quite early in the series’s run, around 2002 if I remember. Normally Star Wars sets share a box logo with all contemporary merchandise, LEGO or otherwise; this set’s logo is currently shared only by the new UCS Millennium Falcon, possibly indicating that it is expected to have a longer run than the regular sets. We shall see if this trend continues, and if subsequent UCS sets use the same livery. For a square-on frontal image click here. The ship is shown from a similar angle on the back, though the angle is reversed: There is less drama here. The ship sits on its stand in what appears to be a hanger, though the ground looks suspiciously like floorboards; I’m surprised that more wasn’t made of the Y-Wing’s return to prominence in Rogue One. A few features are demonstrated in insets. It’s a smart-looking box, and understated, with minimal clutter; on the top is a line-drawing of the ship with dimensions and a photograph of the figures, but there’s little on the sides worthy of comment. Contents I was surprised to find a smaller box inside the outer carton, and very pleased to find this delightful line-drawing of the set gracing the front and extending to the bottom and sides. There is a further outline sketch on the bottom, this time showcasing the ship's underside: Whilst it is not unheard-of for larger sets to contain inner boxes, I've never seen one with decoration before - a nice touch, though I suspect fans would rather pay a little less for a plain box, or at least one that doesn't require destruction with thumb-tabs. Accompanying the inner box inside the outer are eight polybags - numbered 2 to 6, 8, 12 and 13; insider the inner are a further seven (1, 7, 9, 9, 10, 10, 11 - 9 and 10 are duplicated) and the large black tile for the stand. There doesn't seem to be much logic to the packaging, and you need to open the inner box to start building. Instructions Also in the outer box can be found the single instruction manual wrapped in plastic with the sticker sheet: The front view is a cut-down version of the box front, though they have managed to avoid cutting off parts of the ship. There's no cardboard backing, which seems no longer to be a thing, but the Perfect-bound manual has remained reassuringly crumple-free without it. Inside are some four double-pages of information not unlike the manual that comes with Architecture or Ideas sets. It opens with a foreword from the head of the Star Wars design team, Jens Kronvold Frederiksen, who I believe designed the earlier 2004 version. There follows a double-page spread of trivia about the Y-Wing itself: I'm not sure of the value of list of fictional statistics, but the schematics and cutaways, and Ralph McQuarrie concept art on the facing page are nice. The model shown bottom left in the picture shares several features with this LEGO version and I'm sure was used as a reference. Next follows an interview with set designer Jordan David Scott in which he is asked the question, 'How accurate is the LEGO Y-wing, compared to the real in-universe vehicle?' I will not spoil his answer, but will attempt to answer it myself during the review. There is also an interview with graphic designer Madison O'Neill, part of which is reprinted below: Mostly I showed this page for the further reference models; I will make reference to the top right picture later. The studio models (bottom right) appear to be in the process of being painted; they are largely coated in (presumably) a primer which looks to be a lovely sand blue colour: sand blue features quite prominently in this and the current System versions. The set construction is modular with two or three polybags per module, counting the engines separately, and a single bag for the stand; there are two pages demonstrating the modules so you can plan your build accordingly. The instructions are clear with call-outs and sub-builds (example), and I encountered no colour-differentiation issues. I felt it important to show that real starfighters wear pink, or at least contain pink as filler. I like the plain grey background, with white for the module header, blue for part call-outs and tan for sub-builds: smart and clear. The obligatory decal sheet isn't too terrifying this time, and unlike 10134 there isn't a large and fiddly cockpit canopy sticker - the sand-blue decals go on the cockpit sides, but the top and front are printed. The console is unfortunately stickered too (12 and 13). The information sticker contains similar information to 10134's, though rearranged somewhat, and it's a little less fussy. Parts The spread of parts is shown below in thumbnail form; you can click each for a close-up. They are divided according to module, which corresponds to polybags 1, 2, and 3; 4, 5, and 6; 7 and 8 respectively: I haven't found any parts which look new or especially rare; there are however a larger number of sand blue plates in 1x3 and 1x4 which I am pleased to see. There is a useful quantity of jumper plates, and some 80 1x1 round plates in flat silver, along with 22 grille tiles in the same colour. I like flat silver - it is an inexpensive way to make something look metallic when bluish grey won't cut it. There are also 26 light bley ingots, used to good effect here and useful for paving. Disappointingly, there are fewer pieces of flex-tubing than I would like (or expected, after the multitude of copper and long dark bley tubes of 10134); here there are only 6 in reddish brown, and most of the pipe-work is achieved with 3, 4, or 6L bars. Bags 9 and 10 are duplicated; one of each is shown here, along with bag 12: bag 11 is the same as 12 minus the figures. I wonder why they did that. The 6x6 round brick is new in light bluish grey and sand blue; it is previously available only in 2015's 60080 Spaceport. The corresponding 6x6 round plate is common but this is its first appearance in yellow. The large Viking Wagon Wheel is new in light bluish grey. The right-hand picture features bag 13 which builds the stand; of note here is only the four black 1x2 - 1x2 SNOT brackets; only two are necessary so you can easily pilfer two if you need to. Figs Two unique figures are included: a flat silver and dark bluish grey Astromech droid, and Gold Leader. The droid is unnamed in the manual, but the box top reveals him to be R2-BHD ('Tooby'), and who featured in and was created for Rogue One: A Star Wars Story. His body is, I believe, the same as that of the droid R3-S1 who features in the latest System 75172 Y-Wing Starfighter, but the head is unique. Gold Leader, aka Dutch Vander, has a beautifully detailed torso with leg printing to match - vastly superior to the previous generic Rebel pilot torso, and the helmet is a thing of beauty with olive green printing on the top, crest, and even sides. No wonder he's grinning! He also has a scared face on the rear; his head also sports a detailed visor and microphone. The torso rear-printing is also an improvement over the older design, with a more detailed tabard and a buckle. He comes with a small blaster, not shown here. Here is Dutch (centre) next to his earlier incarnation from 9495 (left) and Jek Porkins from 9493 X-Wing fighter: I'm sure you will agree the new design is much more detailed and a great improvement over the older torso; whether it will remain unique and exclusive to this set remains to be seen. I'm still unsure whether I like minifigures in UCS sets, but they make nice extra collectors items, and in the case of this set you can actually seat the figure in the cockpit. Whether you should remains unanswered. Build Rather than an exhasutive trawl through the build process, I have selected a few pictures to demonstrate important features of the construction or interesting techniques; for a more complete set of pictures, see my flickr album. Like her older sister 10134, we start by building the main body of the ship. Here, midway through module 1, the large Technic block is lined with cross-axle bricks (green), and flanked with further Technic bricks; this will form the main receptacle for the wing pylons: Some greebling and an axle connector is left dangling at the front. Already some detail is added to the underside; the square hole will of course receive the stand, and some flat silver Technic connectors at the rear look like they should have some function, but they don't. Maybe they are bomb doors (it's a bomber, after all). See their construction here. It is not until module 2 that we start to add the serious greebling to the top of the body. The reddish-brown whip piece will fold forward and clip into two of the grey clippy tiles to make an interesting feature. Note the Ingots of Bley which are used instead of 1x2 tiles to add texture, and to good effect. Also note the 4x2 bley SNOT area at the side towards the front ... ... this is built on sideways to add bulk, with some nice usage of various SNOT parts: It is nothing ground-breaking, but adds interest to the build, and reflects the build-process in general which is never dull. You can also see here where the whip got clipped. Next we see how the wing pylons are attached: slotting into the Technic bricks on long axles and secured with pins: To see inside the pylon, click here. Much like 10134, the pylons are a sandwich of bricks inside plates, but the attachment with Technic axles is much more secure in this version. They are stop-end axles, so they will stay in position if you want to dismantle the set. Removing the pylons from the body will however not be easy, because the join gets built on. Under the dark tan jumper plates and dark red grille tiles at the rear are several long 1-wide plates placed over the join: The jumper plates are used to good effect to add features to the top. The 1x3 double-inverted slope in the inset will be attached upside down into the centre jumper plate, using a 1x2 round tile with bar and pin holder as a stud reverser. Just in front of the centre jumper plate is a shield under an inverted 2x2 round tile with hole, attached via a clip in a technique similar to the headlights of the CREATOR Mini and VW Beetle. Every so often you have to flip the body to add details to the underside, and this is done gradually so that you're building on a flat, stable surface ... ... at least until you add the two 1x4 arches via SNOT bricks to make yet another interesting feature. This is not done until the end of module 2 - and it's a good thing, as this little add-on is somewhat fragile. Module 3 builds the cockpit section. The angled sides of the head are attached via hinge-plates at the rear, and skeleton arms at the front, to make a reasonably secure connection. The sudden appearance of some minor Technic here surprised me; the axle at the rear will insert into the dangling connector we met at the beginning. Note the brown and yellow double-headlight brick constructions, which produce some downwards-facing studs ... ... allowing the whole underside to attach, studs-down. This leaves only a few available connections on the top surface; the 2x3 white slope attached to only one stud on its base, but it will be secured with a tile on top. The engines are formed from a central stack of SNOT bricks and green cross-axle bricks, to which will be attached some side panels; note the use of headlight bricks to reinforce the connection on the sides with the green bricks. The clever part is that the engine needs to be rotated through forty-five degrees relative to the pylon attachment for the long axles to sit correctly, and this is achieved using a large 4x4 turntable at each end - a wonderfully simple solution; see here for more detail. At the end of the long engines, the Viking Wagon Wheels are attached using pneumatic T-pieces pushed into the little holes in the front, and marrying up to Technic crankshaft parts which allows a half-stud offset. The remaining point of the T-piece is used to attach a curved slope to neaten the join, though it remains rather flimsy. Note the flag pieces, which form the 'thrust vectrals': the instructions are very specific about placing the pole half-way into the upper clip (inset) - the free end of the pole needs to be long enough to insert into the centre holes of the wagon wheel. The construction of these thirst victuals seems rather inelegant, but we'll see how well it works later. Finally, some panels will add detail and texture to the sides of the engines. Panels 2 and 4 in the picture below sit higher on four 1x8 plates; these connect to the headlight bricks on the green cross-axle brick faces of the engine centre: the sides that will connect to the wing pylons. Panel 4 has a hole ready for the attachment; panel 3 has the landing gear. There now just remains the stand, and we're done. I thoroughly enjoyed this build; little details and surprises abound, and keep it interesting at every stage. Even the repetition of the engines isn't particularly tedious. On a personal note, I found the construction of the side panels of the engines and the SNOT underside of the cockpit reminded me greatly of building the Bullfrog all those years ago. The Complete Set First impressions: the set looks smart, which is no mean feat for a ship with all her innards on display. The colour scheme works well; the flashes of white, yellow and sand blue stand out against the grey, with pipework nicely picked out in brown. The shape is good, and looks about right, but we'll compare in more detail later. Incidentally, the stand can be attached in-line (as here) or transversely, and has two positions: upright - as here, although it doesn't lock in this position - and tilted to about 20 degrees. From the front, and slightly above - the ship almost disappears when viewed directly from the front - we can admire the shapely head, although I am not sure the shape is quite right, and should perhaps be two studs wider - compare to the reference picture I pointed out in the manual earlier. I'm also conscious that the wing pylons are a little fatter than they ought to be, though that may have been a compromise necessary for strength; I do like the use of 1x4 groove bricks to make a stripe at the front of the pylons. Perhaps my favourite angle is what I might call 'Darth Vader's view': Like the 2012 X-Wing, the ship's exhaust is (correctly) pinky-red. Here we get our first look at the thirsk victories on the rear of the engines, which seem to have come out quite well, but we'll look more closely later. I was looking forward to see if this set had addressed perhaps the biggest issue of her predecessor: the length of the engines. I am pleased to find that it has: they look about the right length. The smartness of the colour scheme again stands out in this view; note the sand blue stripe along the side of the cockpit. From the top, the relative proportions of body, pylons, and engine look pretty good: Compared to the schematics, the proportions seem about right, though the head still looks too small. The front of the engines should perhaps be more conical (I think they are parabolic in cross-section) rather than flattened hemispheres as the are here, but that's a minor point. I don't think I've ever seen so much detail on the underside of a set before: Hats off to the designer for going the extra mile here, and acknowledging that it's nice to have something that looks good even on the top shelf! You can also see that the landing gear sits unobtrusively when folded. Take a moment also to appreciate the smooth SNOT of the cockpit underside, seen more closely here. Here is the 'real thing' for comparison: Picture from starwars.wikia.com You can see here that the overall shape is good. The engines in LEGO's version should perhaps be a little fatter, but the length is about right; as you can see the wing pylons should be thinner and mounted towards the top of the engines rather than on their midline. Features Let's now take a closer look, starting with the head. No LEGO UCS ship would be complete without cockpit detail, though not much is possible at this scale; there are stickered panels, a seat back cleverly made from a flag piece, targeting computer, and I love the bucket handle control stick: And it will seat the figure! It shouldn't, of course; the scale is all wrong. The cockpit should also open sideways rather than backwards; no official LEGO Y-Wing has tried to correct this. There should ideally be more of a curve to the cockpit canopy, but this would be difficult to render with existing pieces. As it is, the cockpit comes out a little boxy - but the sand blue colour works well. There's a little surprise in the turret, which is otherwise similar to the System version. Remember the surprising Technic in the head section? It connects to the turret: Turning the turret moves the little 8-tooth gear in the neck; or, you can move the gear with your finger and the turret turns. It's not much, but I appreciate the little extra. The silver droid gets a little lost in amongst all the grey; and like all UCS ship droids he's still too small. However, let's not focus on him; as we move back, the greebling detail becomes quite impressive. The pipework steals the show here, but there are some small features at the side of the neck, and even the rear of the head section gets some greebling via a hinge brick sandwiched between two white flags. The flags don't quite line up with the slopes, but I can forgive this. Note the droid body forming some extra detail at the back of the neck. Now we come the really good bit. The use of various parts to form arcane equipment on the body of the ship is superb. I've taken guesses as to what it might do. Moving backwards from Tooby, there's a couple of bley ingots (battery?). Behind this, a couple of wheels on a Technic pin sit within some tan wall elements (starter motor), all a few layers deeper in the model. Behind this are two dark tan bucket handles sitting in corner wall elements, which look like switches or circuits and between them bley binoculars on a round tile with stud (distributor cap - you can see where I'm going with this). Over all of this runs the brown whip piece (HT cable); this passes rearward past a hinged grille tile (carburettor) and between an inverted ice skate (oil filler cap) and what looks like a cylinder head from a two-stroke engine to the shield-disc (air filter). I'll dispense with the lame analogy now. Moving ever-rearwards, you can admire the inverted double-slope, in front of a wheel hub and two binocular pieces sandwiched in. Either side of the flywheel are two mechanical claw parts best seen in the picture above, and another shield-disc behind. There is an incredible amount of detail covering every part of the body with barely a stud left exposed, and what is more, the height/depth of the features varies considerably: it is not simply a plate with lots of small parts stuck on. Round the back are two frames constructed from handlebars and fire hose nozzles, resembling rear-end bull bars; I hadn't noticed them on the real ship, but they are supposed to be there. Notice the vertical brown 4L pole on the right - there is space for one on the other side, but the instructions don't have you place one there. This is an opportunity to compare again to the 'real' ship, this time in the form of the Bandai 1/72 model: Looking towards the rear of this model, you can hopefully recognise several of the features I have pointed out on this LEGO version: the shield-disc, binoculars, flywheel, inverted double-slope, cylinder head, oil filler, carburettor etc. are all there in as much detail you could render in LEGO pieces. A splendid effort. I bet the Bandai model doesn't have landing gear. LEGO's does! It looks totally flimsy, but it is really quite sturdy, and does the job well. I don't recall any other UCS set having retractable landing gear; I'm sure I will be corrected if I'm wrong. The ski parts work well ... ... and the gear sits at a slant which looks better than the vertical stanchions you tend to see on System sets. As I have already shown, they fold quite neatly and are unobtrusive when folded; click here for a further picture. Now let's look again at the thrush vegetables, er, thrust vectrals: Despite the rather Heath Robinson construction, I think they work quite well. The curved slopes at the edge of the wheel are a little flimsy and easily knocked out of alignment, but the flag pieces are reasonably sturdy. I believe those parts are like rudders and should tilt around 'y' and 'z' axes rather than rotating around the long axis of the ship, but I can live with that - certainly a better solution than any other LEGO Y-Wing set. Comparison to 10134 I dug around in some boxes and rescued 10134 from retirement especially for this moment. The senior UCS Y-Wing was notable at the time for the extensive use of greebling, but when I reviewed her before I worried that the proportions were out. Principally, 10134's engines are far too long; 75181 gets it right here: I was surprised to the new set had used grey rather than white for the long engine struts, but I think this gives a smarter finish; they are attached more neatly to the nacelles too. The engine greebling on 75181 better resembles the original ... ... as does that of the body, and by a country mile: 10134's detailing is very much parts-stuck-on-a-plate, and there is minimal attention to accuracy; 75181 is the winner hands down ... ... as she is again on the underside: 75181's belly is remarkably detailed, almost pretty. Little effort was made on 10134 where plain plate undersides are all that is to be seen. Note also the colour schemes; again 75181's smart livery is a vast improvement over 10134's blocky, almost random colours. If there is one way in which 10134 edges it slightly over her younger sibling, it is the shape of the engine cones - closer to the real thing, though still not perfect. There isn't so much difference in the cockpit design, compared here without stickers. I prefer the tapered outline of the newer set, and the sand blue canopy, but if anything the scale is worse, going from a three stud to a two stud wide seat. Compare to this movie still (featured in the manual of the set): I think the System version is a better representative of the ship's size relative to a minifigure, and I would rather have had a wider cockpit on this UCS set and forego the figure altogether. Conclusion I confess I didn't have particularly high expectations for this set, mainly because the Y-Wing itself isn't the most interesting ship, but what 75181 lacks in functionality it certainly makes up in style and detail. The designer has gone to extraordinary lengths to recreate every mysterious lump or bump on the surface of the original in as much painstaking detail as possible with LEGO bricks, and for the most part has done a fantastic job. The colour scheme is smart, and attractive, and going by the various models around is close to the original; the scale of the LEGO version is much closer to the real ship than the older set, and it's a thousand times better overall. There remain some issues: some fixable, some less so; it may be difficult to render the thrust vectrals better, and the nacelle cones aren't perfect but probably optimal with the parts available; however, I would have traded in the new figure for a new side-opening cockpit mould, and I think the head shape could be better. Design & Accuracy 8 A great-looking set that is for the most part a faithful rendition of the original, with some wonderful detail. I remain uncomfortable with the scale, and I think the cockpit needs to be bigger; the shape of the entire head section isn't quite right. Build 9 An entertaining build process with minimal repetition and no frustration and several interesting techniques; it is well-structured allowing for you to pick up and leave off with ease. Parts & Figures 7 I don't think there are any new parts in this set, but there are older parts in new colours. The selection is all generically useful without being exciting. Some may be excited by the unique figures; they look great, but that's not why I buy UCS sets. Display & Function 8 The ship looks great on the shelf; it's one of those set that is a little tricky to tell from a distance that it is LEGO. There are a number of display options, with two stand orientations and two configurations; thanks to the landing gear, you can dispense with the stand altogether. The ship is well-balanced, sturdy, and reasonably swooshable; of course, there's also the turret function! Value 9 The older set 10134 cost £109 in 2004; that equates to about £165 now - for some 500 fewer pieces than 75181. £170 for 2000 pieces in a licensed set seems like good value; throw in a smart and informative manual and the price starts to look very good. Overall 41/50 (82%) This is an excellent rendition of the Y-Wing, good value, and a great addition to the collection. I wouldn't say it's a must-have, though sadly that's the problem with the Y-Wing herself - not perhaps the most sought-after of Star Wars ships. Thank you for reading, and I hope you enjoyed the review. Comments welcome! Rufus With thanks to the LEGO Group for the review set. My flickr
-
Hello, all! I am looking to sell my Venator MOC to be able to work on some more projects! The model is composed of 2849 pieces, is 80cm long, 41cm wide and 23cm tall. The model weighs approximately 4KG. With your purchase, I will include the instruction manual free of charge! All of the pieces are 100% Lego® and the majority of the pieces are new and in fantastic used condition, only used to build this model and sourced from Bricklink! There are a few part substitutions but these will be noted and most are on the interior! I am looking for somebody to buy, collection only in England. Please let me know if you or anybody else would be interested! Kind regards, Ellis.
-
For a few months I've been playing around with redesigning the 10215 UCS Obi-Wan Starfighter (Delta-7 Aethersprite) with a few objectives in mind: Change the colour scheme to match Anakin's Delta-7, as per the Clone Wars animated series... but only in bricks. Improve the canopy to rear cockpit lines so that the curve is smoother and continuous. Have landing gear that can carry the weight of the set Have the option of a droid socket in front of the cockpit. Ideally this would be sized to fit the 30611 R2-D2 polybag build. As is always the case with a Lego design/build, compromises are made between style, colours, parts availability/count, function, build stability, etc. I've redesigned pretty much every aspect of the original design, with only a few core elements left untouched. The wings, engine shrouds, central hull and cockpit have all been changed extensively. I've yet to build this in bricks, so I don't know if what I've chosen so far will work. I do know that some of the pieces I've selected aren't available in the colours I want. Here's a few test renders. I'd be interested to hear anyones thoughts and feedback on how to improve this.
-
Hi. I thought I would share my experince with the bricklinking and building of one of the most wonderful MOCs I have seen in my life: The 6100+ pieces UCS AT-AT designed by Cavegod. I have already bricklinked the UCS 10179 Millennium Falcon and had lots of fun doing it. Some threads already discuss in lenght the process of doing so. Since there seems to be no thread from other members discussing in details this adventure (please point me to one if it already exists), the following posts will describe, step by step, my own experience. Comments are gladly welcome! Here's a picture that shows in a great way the sheer size of that thing...(with Cavegod, its creator):
-
Hi everyone, I'm a big fan of the SW UCS theme, especially of the TIE Fighters. My first UCS set was the 2000 TIE Interceptor. I was very proud to have it. However, as I get the Vader's TIE and the new TIE Fighter, the TIE Interceptor didn't match to them at all with its blue and dark gray colours... I decided to replace all blue, dark and light gray parts to light and dark bluish gray. I haven't found a modification like this on this forum, so I'd like to share with you what I came up with. My purpose was to create a nice display modell, which fits to my taste and is faithful to the original set as well. On the other hand, I wanted to customize it to be more appropriate to the film version. I used the elements of the Vader's TIE to build the cockpit (octagonal pieces and the hatch). In addition, I carried out some minor changes on the wings as well (1x8 dark bluish gray plate on the sides, replacement of the hinge bricks to plates, light bluish gray "stripes" on the inner sides). The interior got also an unique colour. It can't be perfectly appropriate to the film version, mostly because of the the inadequate angles of the wings, but I'm satisfied with the final result. Hope, you like it. Thanks for stopped by!
-
Hi, I present you my new creation. Last weekend, I was looking on the internet for the "XL" size of the tri-fighter droid (the version of Lego is certainly good, but the scale is for minifig, and also too round, while the real is supposed to be more flattened ). So I decided to create mine. 20180908_131536 More picture on my album Flickr : My Flickr
-
Here is project I've been toying with since November - UCS X34 Landspeeder MOC. There has been a lack of land vehicles in the UCS line-up. I built with LDD initially and after six versions I ended my journey with this - although updates are already brewing. It measures 22.5 inches in length, 15.5 inches in width and 14.5 inches in height with the stand at 2798 pieces. Would love to hear any comments or critiquing on this. I am by no means an experienced MOC builder as this is only my second MOC - the first being a UCS Tie Fighter. I had the best time doing this and I'm looking forward to my next build. Let me know what you think...https://www.flickr.c...57649885427838/If you like this MOC, feel free to "Support" it:https://ideas.lego.c.../91535/comments Lego Star Wars UCS X34 Landspeeder by aaron.fiskum, on Flickr
-
I came out of my decades-long Dark Age in 2009 and missed out on all the big LEGO UCS TIE fighters. So, I am really looking forward to the new UCS TIE (75095) designed by Olav Krøigaard. I'm impressed by the size of it, the engineering and ingenuity it takes to build larger structures in LEGO, and it looks nice overall. It's got an accurate shape, proportions, and details that captures the classic TIE fighter design. I've been collecting, building, painting, destroying, and playing with TIE fighter toys and models since I was a kid back in the 70s, so to me, the TIE fighter looks a certain way - a combination of a round ball and straight edge angular pylons connected to big solar panels. I think Jerac nailed it in LEGO. Ever since I saw Jerac's TIE, I've wanted to build a LEGO TIE fighter like it, but just never got around to it. The new UCS TIE (75095) got me motivated to plan a build inspired by Jerac's and Olav's work. I wanted to replicate the differing shape of roundness versus angular edges on the TIE: WIP LEGO 75095 UCS TIE cockpit modification by SPARKART!, on Flickr. After a bit, I got bored with just a seat in the cockpit, so I put a minifig in. That didn't look quite right to me, so I made a brick-built pilot: WIP LEGO 75095 UCS TIE modification by SPARKART!, on Flickr. The brick-built pilot is "permanently" placed, not designed to be removed. I lined the inside with white LEGO to bounce around what little light can get into the cockpit. When I build this for real, I hope the pilot can be seen. WIP LEGO 75095 UCS TIE modification cutaway by SPARKART!, on Flickr . The pilot in the cockpit is about 1/20th to 1/24th scale, based on the assumption that the standard LEGO minifig is about 1/48th scale. WIP LEGO 75095 UCS TIE modifcation sizing by SPARKART!, on Flickr. What scale are LEGO minifig helmets? by SPARKART!, on Flickr.
.thumb.JPG.3c74c0d405dc1afb04b2fa216ebc79e6.JPG)


.thumb.jpg.25baa490c88582e649b56b854a721261.jpg)