Search the Community
Showing results for tags 'truck'.
Found 657 results
-
Hello fellow EB members. A small vignette showing a mid century streamline truck in an Octan livery. The driver stops for a well deserved break! You can view all my creations on my flickr account here if you so wish. Regards!
-
What started out as what to do with 2 chrome fuel tanks has morphed into a monster. Also wanted to design and build a cabover truck so this is what I ended up with. Already have 75% of cab and trailer parts at home. Will get the rest plus forklift parts from Bricklink. Forklift can slide fork hoist back and forward as per prototype. Turning the air cleaner also steers the back wheel.
-
I have just finished building my food truck empire. 8 USA based food trucks and 8 Italian based Piaggio Ape food/drink/toy selling trucks. Donut Food Truck: Piaggio Ape Wood Fired Pizza Truck: Has a LEGO light brick installed to simulate the pizza oven glow. Popcorn truck: The popcorn machine is from the polybag set so the corn can bounce by inserting finger thru rear door and tapping lever. Piaggio Ape Coffee Truck: Coffee machine this side. Coffee bean grinder and top opening milk fridge. With doors down.
-

[MOC] Volvo FH Aero 62 pusher Tractor
Sebeus I posted a topic in LEGO Technic, Mindstorms, Model Team and Scale Modeling
I had seen the Volvo FH Aero cab a couple of times before it was publicly presented but I hadn't decided to actually build a lego version of it until the weekend before the press release Last week my model premiered at the Volvo Trucks Factory in Ghent, where I work. I'm not so happy with how the upper front grille turned out, my previous model really was spot on, in fact I dare even say that that one is the best out there when it comes to that section. But! There is a good reason why this one's upper grille is rather mediocre, I managed to include a cool feature that would not have been possible on the previous model; Cab Tilt! I have more pictures in my Brickshelf gallery, for some reason I am no longer able to embed those in here. You can check these out once the gallery is public: Brickshelf. As you can see in the video, the model is motorized: A System PoweredUp hub sits under the cab, an L motor for drive and angular M motor for steering are fitted in the wheelbase area. The model features front and pusher axle steering. However due to the unbalanced weight distribution I have experienced a lot of issues with the driving stability. The weight on the front axle is massive, giving the rear driven axle a hard time to find some grip on the road. A reflection I had; I'm quite happy with the fifth wheel, it's the first one I ever made and I wanted it to actually look like a real fifth wheel. Strangely no one else seems to care much about a realistic looking fifth wheel. Don't forget to check out my Volvo FH Hooklift! -
Hello people! I want to start showing you some of my latest models, it's quite a lot of time I don't share them here. This is an Iveco T-Way, full RC with PU motors and hub, controlled via Brickcontroller2 and a Joypad. It is equipped with suspensions on all axles (pendular on the front axles and pendular in 2 directions on rear axles). The drive motor is directly connected to rear axles (it "moves" together with the third axle). Stickers are self made. This model is a mod of my original static model, in grey and black version, which features Hog steering, rear pendular suspensions, fake engine and tipping body. Instructions available here: https://rebrickable.com/mocs/MOC-121004/technicprojects/iveco-t-way/#details
-

[MOC] 42167 skip loader truck
TechnicMOCer posted a topic in LEGO Technic, Mindstorms, Model Team and Scale Modeling
My alternative model of 42167 Mack LR set - skip loader truck. It features HOG steering and detachable container which can be loaded/unloaded. -
I based this vintage dump truck MOC off the Moving Truck GWP (set 40536) from last year. I made the cab 6 wide and added a new back half. Two each of these brackets are missing from the LDD file: 36841 in black is needed for the front bumper 36840 in yellow is needed for the headlights The rear of the dump truck with the bed lowered. The MOC seats two figures, while the cab doors open and the bed raises to dump the load. Free LDD file available at Bricksafe. Thoughts?
-

[MOC] Ginaf HD 5395
jorgeopesi posted a topic in LEGO Technic, Mindstorms, Model Team and Scale Modeling
It is based on a Ginaf HD 5395 and I chose it due how rare ti is, it looks like it is between a mining and a normal tipper truck, icing on the cake was that fifth driven and steered axle, the challenge was inevitable . It has openable cabin doors and bonnet. Tiltable cabin that hide the 6 in line fake engine. 5 axles, 2 are steered, 2 are drive axles and the last one is a drive and steered axle. All the drive axles have its diff and are connected to the engine. The steering axles are controled by 2 HOG on both sides behind the cabin. The tiltable bed woks with a long linear actuator operated with a lever that has to be used between the first and second axles, they are a hole for it on both sides of the truck. The gate of the bed has two movable connectors to close it. It is a totally modular MOC so it can be easily improved. I hope you like it, I will post a video and I put a couple of pics more to see it better. Here with the 42112 to see better the real size. And now with my other 2023 MOC (if I do not promote myself... ). Ok, ok the last one... Thank you for comment. The WIP thread is here Ginaf HD 5395 Video here Ginaf HD 5395 Video -

[MOC] Lego Technic Military Truck (Building Instructions)
makushima posted a topic in LEGO Technic, Mindstorms, Model Team and Scale Modeling
MOC Lego Technic Military Truck Building Instructions: https://play.google.com/store/apps/details?id=max.technic.building.instructions Lego Technic MOC - Military Truck (Building Instructions) Lego Technic MOC - Military Truck (Building Instructions) -
[MOC] - Lego Technic Cartoon Truck (Building Instructions)
makushima posted a topic in LEGO Technic, Mindstorms, Model Team and Scale Modeling
Lego Technic Cartoon Truck (Building Instructions) Building Instructions: https://play.google.com/store/apps/details?id=max.technic.building.instructions Lego Technic Cartoon Truck - Color Version (Building Instructions) Lego Technic Cartoon Truck - Black and White Version (Building Instructions) -
Hello! I designed almost everything I wanted in a width of 5-6 stud. It's time to grow :) The new line of my models is approximately the same scale as the SpeedChampions series. I'll start with the Mack Defence. "offroad'' version 6x6 with short wheelbase civil version 8x6 with long wheelbase and photo nearby :) Thank you for watching! I will be glad to comments :)
-
 A motorized trophy truck model controlled by BuWizz. It is propelled by two RC buggy motors. Features drive, steering, full suspension, and working headlights. Functions/features: Drive Steering Full suspension Working headlights Instructions available on Rebrickable: https://rebrickable.com/mocs/MOC-156104/JLiu15/red-beryl-t/#details This is a MOC with an interesting backstory. I first decided to do my third MOC in the Red Beryl series (after my Red Beryl GT in 2018 and AWD supercar Red Beryl X in 2019) in late 2020 shortly after my first MOC featuring BuWizz and RC buggy motors - my Azure Racer XL. Unlike the finished model, my first attempt used CLAAS Xerion tires and had the RC buggy motors in the chassis instead of having the wheels directly attached to them. I don't recall exactly, but I even included a two-speed gearbox in the model thanks to the inclusion of a drivetrain and differential from the motors. The model turned out much larger than anticipated, meaning the bodywork would have to be very large as well. Given the model was already performing below my expectations, I decided to abandon the project...until two years later. I knew a good first step would be to use smaller wheels, and the spiky treaded tires from the 42124 and 42126 sets seemed to be a perfect fit for a trophy truck. The rear suspension is similar to that of my Azure Racer XL (it even retains the same basic geometry), although it is a solid axle this time instead of the left and right wheels being independently suspended. However, the suspended section is longer on this model, providing a softer suspension with more travel. I guess the shock absorber setup here is not the most realistic for a trophy truck (as most trophy trucks I've seen have their rear shocks more or less vertical), but the suspension setup nevertheless performed well. The front suspension is a typical double wishbone setup with the entire front axle tilted 10.8° for positive caster. Because the front and rear shock absorbers sit approximately half-compressed while the model is on the ground, it did impact the front ground clearance a little, although it was not really an issue when I tested it. The BuWizz unit is located directly in front of the rear axle and is placed low in the chassis to lower the center of gravity. The two RC buggy motors are each connected to its own BuWizz port (as recommended by BuWizz), with another port used for the PF Servo motor for steering. Because there is one port left on the BuWizz unit, I added two pairs of PF LEDs to the headlights. Thanks to the BuWizz speed settings they can shine brighter than when powered by a PF power source, although in my video I did not film it with the lights on as I did not want the BuWizz to cut power from the drive motors. Designing the bodywork was surprisingly challenging. I wanted to stick to pieces I already have as much as possible. The choice of wheel arches/fenders was easy - I used the black arches from the 42126 set paired with fenders from the 42125 set, adding some much-needed curvature to the model. The hood was also straightforward, as it is comprised entirely of 3x13 curved panels. Because the front axle sits at an angle for positive caster, I attached a front bar to it that allowed for an angle normally not achievable with angled connectors. I tried to avoid blue pins as much as possible, using red or gray pins in place of them. The doors were more challenging and it took me a few tries to get the desired result. I wanted to ensure the doors stand out from the rest of the model, but too much curvature looked weird. I went with a design where they slightly recess into the model. The section between the doors and rear fenders was perhaps the most difficult, as it needed to provide a transition from the relatively flat doors to the curved rear fenders. I went with all curved panels and liftarms for this area. I did have to order some new red pieces for the bodywork, namely the curved 1x2 and 3x2 panels at the top edge of the doors and the red 2x3 and 2x5 liftarms in the section between the doors and rear fenders, but the bodywork still mainly consisted of red pieces I already had. System pieces (tiles and curved slopes) are used to fill in the gaps in these areas. The roof was a simple build, although securing it was a bit challenging as it had a tendency to tilt forward. I had to experiment with the A-pillars a little bit but settled on a setup with 7L flex axles. The rear of the model is left rather unfinished to reduce weight, although that is pretty typical of real-life trophy trucks, and the single spare wheel in the back provides just enough weight for the front and rear axles to sit at similar heights when the model is on the ground. The model performed pretty well, and the two RC buggy motors gave it plenty of power. I had wanted to drive a fast off-road MOC at a skate park for years now, and this is my first MOC that I filmed at a skate park. It was fun seeing the model drive up and down the slopes, although it still lacked torque to completely drive over the smaller slopes. I had to be careful with letting the drive motors run at full power as in the Fast and Ludicrous speed settings (or even Normal sometimes) the BuWizz would cut power to the motors when overloaded. Accelerating from a stop on Ludicrous mode was pretty much off the table, although I was able to switch into Fast mode after accelerating on the Normal setting. Two RC buggy motors with their inner outputs geared 3:1 was good for fast driving and small obstacles, although more torque and traction are needed to overcome larger slopes/obstacles. Overall, I'm quite impressed with how this model turned out. Despite having more than twice as many pieces as my Azure Racer XL model, the performance did not suffer much and I had a lot of fun driving it around at the skate park. The suspension is also satisfying to watch, as the model can "float" over obstacles with both the front and rear shock absorbers approximately half-compressed when the model is on the ground. Compared to my first attempt at the model two years ago, it shows that the ideal approach to such fast RC buggy motor-powered models is not to build big, but just big enough to achieve optimal performance. Video: Photos:
 -
Just began another baja/ trophy-truck project, the other 2 (or 3) being ”canceled”. I managed to put 2x L motors and 1x servo motor, both Power Functions; it also has positive caster-angle, independent suspension in front and solid axle suspension on the rear, (at least) semi-detachable body and the headlights can be be lit (there are 4 pin-holes for installing lights). Heavily modified version of this
-

42156 Volvo: The Iron Knight - alternate build
Timorzelorzworz posted a topic in LEGO Technic, Mindstorms, Model Team and Scale Modeling
Hi Folks, let me allow to share a new creation. This replica of famous Volvo Iron Knight Race-Truck is completely built with parts only from set 42156 Peugeot 9x8 Hypercar as an alternate model (B-model). Only a copy of donor set 42156 is needed to build this iconic truck. You can buy the instructions for this model here if you're interested in building. Features & Functions openable doors on both sides HoG-steering with removable knob independent push rod suspension in front and back V6-engine with moving pistons connected to rear differential openable lid in back to see suspension working Volvo brand with no sticker detailed design and interior lights that are glowing in the dark modular building with splitted premium PDF-instructions measures 44cm x 20cm x 18cm Impressions Headlights Lights in front are made with fluorescent bars from donor set to represent instantly recognizable headlights. A Lego addicted heart beats higher for the first time when the iconic V-shaped lights are glowing in the dark. No custom sticker Thanks to the inventory I'm happy to share my first model with a completely brick built front to recognize Volvo's brand only with pieces from 42156 and without any need for custom sticker. Suspension The model uses a soft push rod suspension in front and back. Due the fact that this truck is two studs shorter in wide than its base model, the suspension design is not only a simple copy, but an own approach with a way different building instead. Through an openable lid in the back, the suspension can be watched working. Steering Driving and steering the truck works directly with a steering knob on top of the cabin. This steering knob is removable and can be easily pulled out for better displaying the model. Engine The real Iron Knight uses a straight 6 piston engine instead of V6. Due limited inventory and missing crankshaft parts, it was not possible to form a straight working engine out of V6. Some compromises are made here and as a result, this alternate model uses a working V6-engine with moving pistons. Instructions & building process Premium instructions for this model comes in two separate PDF-files with high quality images and building steps very close to the original Lego Technic ones to ensure a satisfying building experience. Building this Iron Knight alternate model starts with the 249 pages long main PDF to finish the rear end first with differential and suspension included. The second instruction file takes over to assemble the entire front section together with a suspension and steering system you never built before. After 132 pages the front section becomes married with the rear end. Frames and structural elements are added to make the model solid. The working V6-engine becomes attached and connected to the rear differential through drivetrain. More parts are added to form characteristic lines and shapes, getting closer to a real looking Volvo Iron Knight. Some parts of the cabin are attached and the drivers seat and doors take place at their final spot of the model. After 381 pages of joyful building in total, this Volvo Iron Knight alternate model is finished in all glory and ready to drive on your shelf or desk. Grab instructions here Crafted in Sweden. Rebricked with passion in germany. Have fun with this 42156 Volvo Iron Knight alternate build. Follow me on Instagram -

[TC25] 8479 Barcode Truck
Berthil posted a topic in LEGO Technic, Mindstorms, Model Team and Scale Modeling
40% shrinkage of the 8479 Barcode Truck. Obviously without the electronics and also without the Flex Cables. The idea is to 'program' the truck by road plates. The road plates will have Technic Gear Racks and the truck will have gears catching the gear racks when driving over them. The gears catching (rendered red in the image) will result in movement of the front arm and tipper as in the original model. It will also have HOG steering. I will try to stick to the original green but don't know yet if there will be enough Technic green parts for that. Obviously there is still a lot of work to do but already got the dimensions and steering that I'm happy with. -
Model of a Mack Granite truck equipped with a boom and flatbed. Features drive, steering, full suspension, motorized boom elevation, extension, and rotation, winch, and extending/lowering outriggers. Functions/features: Drive Steering Full suspension Boom elevation Boom extension Boom rotation Winch Outriggers Instructions available on Rebrickable: https://rebrickable.com/mocs/MOC-150955/JLiu15/mack-granite-boom-truck/#details After the 4-output distribution gearbox on my MCI D4500CT Commuter Coach model proved to be ineffective, I didn't want to simply abandon the gearbox design. I decided that I was going to tweak the gearbox a little to be used in a new MOC. I had wanted to use the same suspension setup for my MCI D4500CT model as a test bed for the suspension design, so I settled on incorporating the gearbox into a truck model. A boom truck like this is a MOC I had wanted to make for quite some time, as I see plenty of them in the US but not that many MOCs of them. Because the turntable for the boom is placed higher up, it leaves more room to route gears/axles from the gearbox to the 4 functions it controls. Because the gearbox sits in the heart of the chassis between the outriggers and rear axles, the chassis is built very densely. The gearbox makes use of two Control+ L motors: one for shifting and one for driving the output functions. The drive motor (a Control+ XL motor) sits directly behind the gearbox, and drive is transferred to the rear axles via an extendable CV joint. The drivetrain is geared down after the CV joint to reduce the amount of torque applied to it. Lastly, there is another Control+ L motor for steering which is built into the front axle. I designed the suspension (a simple live axle for all 3 axles) entirely in Stud.io before building it physically, so I had no idea how it would perform upon building it. However, the entire setup worked flawlessly, and there are no issues with drive transmission into the suspended rear axles. My initial plan for this MOC was to just build it as a generic US-style truck, but upon finishing the cab someone said it resembled a Mack Granite, so I modified the cab to actually make it based on the Mack Granite with the Mack Bulldog emblem from the 42078 Mack Anthem set in the front. A number of metallic silver elements are used in the front, although due to the relatively low number of pieces available in that color there is still plenty of gray in the front (such as the bumper). The Control+ hub is placed in the back of the cab and is removable for battery replacement by removing the roof, as the hub and roof are attached to each other. This means the sides of the cab must be sturdy to compensate for the relatively loosely attached roof, so the doors do not open on this model. I decided to build the cab in dark blue, a color I have not used much before, as I now have a sizeable collection of dark blue pieces from the 42083 and 42154 sets. I built the boom in yellow to contrast with the dark blue cab. The boom is built around 3x19 frames covered with tiles. Their abundance of pin holes makes them a good candidate for crane booms. It was difficult routing the two motorized functions through the turntable and into the boom, as two separate axle functions must pass through a small space. Because only two axle functions can be routed through a turntable, I had to make the winch manually operated with a ratchet mechanism. I was initially concerned about the weight of the boom, and while the boom does tend to lean forward during the elevation process, everything remains intact even at maximum elevation and extension and the range of the boom is quite impressive. There are no stoppers for the boom rotation, so the boom can theoretically rotate infinitely as there are no wires going through the turntable. The outriggers, however, were a weak point for the model as they are quite flimsy and are unable to lift the truck off the ground without substantial bending, so I limited the outriggers' legs extension to where they are able to make contact with the ground. Additionally, I should have geared down the mechanism substantially more, but a modification would require essentially rebuilding the chassis from scratch. As a result, I set the gearbox motor responsible for driving the gearbox functions slightly below maximum speed. I had wanted to be able to control the gearbox functions with a single touch (e.g. pressing one button shifts the gearbox then drives it in a given direction) but was not able to figure it out so I went with a much more straightforward (albeit more difficult to use) controller setup. A single slider is used to drive the gearbox functions, and three buttons are used to shift the gearbox (up 90 degrees, down 90 degrees, and return to one endpoint). I have to keep in mind the position of the gearbox while controlling the model, but the setup overall worked well. Overall, this was a MOC that had plenty of mechanical complexity, but certain functions could've been designed better. While all of the functions work as intended, the boom leans forward quite a bit when the boom elevates and the outriggers cannot lift the truck off the ground. The front axle could've also been reinforced better, as during the steering calibration process the steering pinion gear often skips a tooth. Despite the drawbacks of this MOC, it still largely met my expectations as the drivetrain and suspension worked flawlessly and the dark blue/yellow color scheme worked well. Video: Photos:
-

[MOC]◄URAL 4320 6x6►[2023]
Michael217 posted a topic in LEGO Technic, Mindstorms, Model Team and Scale Modeling
Welcome to my garage LEGO!!! Hello! My name is Michael. I'm a Builder from Russia, I love muscle cars! URAL 4320 6x6 The legendary Soviet truck, which has been produced since 1977 to the present! I started collecting in parallel with Dodge at the beginning of the year. Initially, I put ordinary hubs on it and drove around the house very well, but before photographing the finished model, I decided to test it on the street, as a result, it was very hard for the engine, (the old version is on the video) after which, over the past week, I went through the chassis, put the portal hubs, abandoned the fake engine and moved the buggy motor under hood (to make a direct gimbal on the gearbox). As a result, it became slower, but more passable! Description: -Drive Buggy motor -Steering Geek Servo -Managing RCbrick -Permanent ALL-wheel drive 6x6 -Bridges with planetary gearboxes -2x high-speed transmission (the lever is duplicated in the cabin) -The steering wheel turns with wheels -Doors, hood and tank open -Detailed interior and under-hood space -Weight: 2.6 kg Length: 68 cm. Instagram: https://www.instagram.com/lego_muscle_garage/ Join my group in VK: https://vk.com/legomusclegarage All photos on the link: https://bricksafe.com/pages/Michael217/ural-4320-6x6 All photos on the link: https://bricksafe.com/pages/Michael217/ural-4320-6x6 -

[MOC] Scania P-series Fuel Tanker
damjan97PL posted a topic in LEGO Technic, Mindstorms, Model Team and Scale Modeling
Hi Guys. Today I want to show you my latest creation, a Scania P-series with fuel tanker. -Lenght: 38,5cm -Height: 15,5cm -Width: 14cm Parts count: 1864 Functions: -Drive -Steered front axle -3rd axle with lift system -Openable cabin and door -Fake 6 cylinders engine A truck is propeled by L motor and front axle is steered by servo motor. 3rd axle lifting mechanism is propeled by M motor and operated by 1 small linear acctuator. Cabin can be tilted and it has a openable door. Under the cabin is a fake 6 cylinders inline engine. A battery box with IR receivers and M motor are under the fuel tanker. On the right side is a openable storage. I'm waiting for your opinion :) GALLERY INSTRUCTIONS -

[MOC] Off-road truck Gaz 66[instructions available]
keymaker posted a topic in LEGO Technic, Mindstorms, Model Team and Scale Modeling
Hi, I would like to present my newest creation – off-road truck Gaz 66. It is my interpretation of small, old and very popular truck, which has a lot of off-road capability. Someone can ask why next similar small scale off road truck? I would say I like this type of vehicles, the scale and challenges they bring. And with every build I try to test something new, which I wasn't try before. Here the main goal was to go below standard for those wheels width of the model - 15 studs and prepare narrower axles than standard - 11 studs ones. Which I did. Gaz 66 has 13 studs width body with 9 studs (from rim to rim) front axle - stereed and driven. Thanks to that size of the body is more proportional to used wheels. And you can also use tractor tires provided with cargo for even better effect (you can see such modification in real Gaz 66 on one of polish off-road YT channel - LINK). I also tried to add as many details related to real truck as possible, in this scale, I hope there are here some fan of original Gaz 66 and they will recognise some elements I added. Below you can find video and list of features and details. Enjoy. Instructions: LINK General details scale: 1:20 dimensions LxWxH: 30x10,5x12,5cm weight: 946g Features: RC front axle steering (C+ L motor) RC 4x4 drive (C+ L motor) RC winch with place to lock the hook (C+ L motor) 4-link live axle suspension for all 4 wheels three studs ground clearance (with "KrAZ" tires) openable doors and easy access to spare tire working V8 engine with fan located in cabin, plus grill via which working engine can be watched detailed two seats cabin powered by Buwizz 3.0 but also prepared to be powered by standard C+ Hub can operate with "KrAZ" tires included in cargo Photos: LINK My Gaz 66 is powered by Buwizz 3.0, but there is no problem to use standard C+ Lego battery box: Internals of the MOC, so drivetrain connected with V8 engine, steering and the winch: -

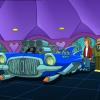
modular pizzeria restaurant and gangster hideout MOC - with pizza planet delivery truck
Murdoch17 posted a topic in LEGO Town
Here is the NYC-style modular building I designed for my dad's modular building collection, but I might end of building it myself if he doesn't want it. For the building I was partially inspired by half of set 76108, Sanctum Sanctorum Showdown. The delivery truck was heavily inspired by this build by @hachiroku of the classic Pixar vehicle Easter Egg. The pizza parlor is a front for a gang of nogoodniks who are led by the Brickster (who else?) from the LEGO Island theme. Chef Enzo (from the Hidden Side theme) runs the pizzeria as part of the front, although he secretly has been sending the police info on the Brickster's operations as undercover operative "Deep Dish". Pepper Roni (from the 2002 LEGO Island sets) is going to be the pizza delivery dude who eventually foils the Brickster's plot, as usual. The chimney on the rear of the building *looks* like it goes up in one piece, but it separates at the floors and actually isn't connected at all to the other levels. On the roof is a water tank, while on the ground floor is a window AC unit and back door. First floor: standard pizza restaurant fare, with menu piece on the wall, wood fired oven and cash register, plus four tables with at least two chairs each. The sign out front would have two pizza-box tiles for use as a "neon" sign. I also used a ramp to the front door because of ingredient deliveries and for wheelchair bound customers. Second floor gets a lot more... interesting, shall we say? Filing cabinets for records of "enterprises" of all kinds, a big ol' desk with a reclining chair and two smaller chairs for potential "clients". The gas heater / stove is for if the police raid the place... you get the idea on why! Third floor with the Brickster's home. A rabbit-eared television, a money-counting desk, bed, and safe for holding said dough are all up here. This model of the iconic Pixar Easter egg, better known as the Pizza Planet delivery truck. I changed around the rear camper section to be more stable, added a different 'rocket pod' to the roof, and placed printed placards on the side of the doors. Also, LEGO Island's famous delivery dude will be driving this vehicle when it's built in real life. Yep, you read that right: Pepper Roni has got his drivers license! The model seats one figure and the center section of the roof comes off to place a fig at the wheel. NOTES: I plan on building at least the truck with Pepper Roni. (Already found a bunch of parts for it from my collection) If the building gets built or not in real bricks remains to be seen. ...Thoughts? -
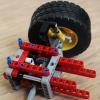
[MOC] Monster (but small) truck
Jurss posted a topic in LEGO Technic, Mindstorms, Model Team and Scale Modeling
Recently built 42005, so it inspired me to build some smaller monster truck. I don't want to call it smaller 42005, as then it should have been littlebit different. Here it is Fully compressed supension Somthing from build process Next to big brother -
[WIP] Ginaf HD5395 (Render added 29 12 2023)
jorgeopesi posted a topic in LEGO Technic, Mindstorms, Model Team and Scale Modeling
It is been a while without building, so good for me whatever it ends... It will be a 10x6 truck with 3 steered axles, the last one is the rare one, I do not know if it will be motorized or not, pneumatic or not, I do not know much so I just keep building. I discarted using bigger wheels because it would be too large but who knows... -
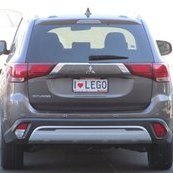
I recreated set 40586 (Moving Truck GWP) in blue, and changed the wheels, rear-view mirrors, front bumper, and a few other things. You may be asking why I chose blue for the truck. The answer is simple: I had two blue wheel arches lying around unused, and this neatly solves that! The rear of the truck. The roof comes off and the ramp slides out. Also in this picture you can see the cabin door opens. The roof of the cab section also comes off to seat a driver at the wheel. Thoughts?
-
Hello and welcome to the page! One of my favourite sets ever! It became a part of my collection in a veeery long and hard way several years ago. I was thinking to motorize it several times. Simply install several motors was easy deal, but I wanted a suspension also. This requires fully rebuild the chassis. So, initially I built a completely new scale RC chassis, then adapt it for 8285 outriggers, that adapt it for the 8285 crane then adapt it again for the 8285 cab. I tried to keep as much from original iconic 8285 as possible. None of the 8 PF motors is visible One BIG battery box + 2 sBricks OR two sbricks 2.0 can be used to manage al 8 channels. The only manual feature is a pneumatic polarity switcher, because it would be a 9th channel. Full suspension, rear based on 42043 Arocs set. Servo for steering 2 XL for drive M for outriggers L for pump M for winch L for crane raise L for boom extensionin Please enjoy! https://bricksafe.com/pages/Aleh/liebherr-lrb-355/rc-8285-rescue-tow-truck Truck now uses 6 soft shock abosorbers. To keep it higher it will be enough to replace first rear axle to yellow shock absorbers.
-
[WIP] Mack Granite Boom Truck
JLiu15 posted a topic in LEGO Technic, Mindstorms, Model Team and Scale Modeling
With the gearbox-controlled mechanisms on my MCI D4500CT model proving to be impractical, I did not want to just abandon the gearbox design. Because of this, I decided to incorporate it into a different vehicle. I decided that a boom truck like the following would be god for a four-output distribution gearbox: I have not seen many boom trucks in this style done in LEGO Technic. I've seen plenty of mobile cranes, knuckle boom cranes, etc, but I figured this would make for a unique build, especially as I see plenty of these here in the US. The turntable for the crane is also mounted higher up (at the same height as the roof of the cab), so that'll provide more space for mechanisms. As of right now, the chassis consists of essentially everything to the rear of the wheelchair ramp module on my MCI D4500CT model. A difference is that both rear axles are driven, as opposed to one driven axle and one tag axle. The gearbox outputs will control the outriggers, boom rotation, boom elevation, and either boom extension or winch. There can only be two functions routed through a turntable in order to allow for unlimited rotation, so one of the boom functions will have to be manual. Because the suspension design is identical to that of my MCI D4500CT model, this model will also serve as a test bed for the drivetrain and suspension on my MCI D4500CT model. If everything works well here, I can be pretty confident using this suspension design. Let me know if you have any suggestions for me! Photos: