Search the Community
Showing results for tags 'train motor'.
Found 4 results
-
On the basis of a post I ordered the parts from AliExpress to make a Powered Up Extension Cable. I would like some advice. The photo shows my best efforts. When I plug in the light sensor - it lights up ( but I did not test beyond this) The train motor does not run. Without a crimping tool and rather basic soldering iron I was able to make a cable. I have tried to test the voltage and all seems OK, but I must admit I don’t really know what values I should be getting. I would also seek some advice on how to test the voltage values of the pins. I’ve used computer ribbon cable, is this OK? The extension cable that I made is about 100cm, it this too long? The size of the male plug from AliExpress had to be trimmed and reduced in size to fit into the LEGO HUB. I’m absolutely stumped. Any advice would be gratefully received.
-
In his Lego Train Book, @HoMa mentions that tutorials are available to access the internals of 9V train motors (#5300, #10153). Where can I find such tutorials? The only thing I am interested in is how to open these motors without damaging them permanently.
-
So I ran into a problem I couldn't solve on my own but reduced the possible error to the PF train motor. I have three, differently colored, but in dimensions and structure identical Stadler FLIRT electric motor units built from LEGO bricks. All three of them are powered with SBrick, using three PF train motors under each train. Here they are: I noticed that the yellow-green one runs slower than the other two, the speed difference on the same level of SBrick slider is very noticable, and there is a speed level when the yellow stops, but the other two runs on multiple curves and points with no problems. For first I thought that it could be the failure of the oldest SBrick in my yellow train, but when I replaced it with a new one, nothing happened. I measured output voltage on the output reserved for train motors, but it was just fine, only 0,02V less than the actualy batteries had. Than I replaced train motors, all three to brand new ones and the train became even slower. Than I replaced all PF extension wires between battery box and train motors, still runs slower. I measured the weight of the train, but they are 3882 and 3814 grams, the difference is only 68 grams (the yellow-green is heavier)., this is no explanation for the speed difference. Than I put the new train motors under the red one and it became slow as well. It is also noticable that a train with new motors is harder to push by hand than the train with older ones. So, my question is, did TLC change something in the internal gearing and other properties of the LEGO train motor? Neither Bricklink, not Brickset knows about the difference (if there is any), and the PF train motors has no production year printed on them, just "(C) 2005 The LEGO Group" on the bottom and a four digit code at one end, like XX JX, where XX is a two digit number, J seems constant (I checked 10 train motors), and the X after "J" seems increasing with time (my oldest motors have J0, J1 or J2, while newer ones have J4, J5, J6 underneath). The XX digit seems totally random. So does anyone know about any change in the inside parts of the PF train motor and could you advise me a method to select the faster ones?
-
[MOC] RC Ripsaw aka "FastTrack"
JamesJT posted a topic in LEGO Technic, Mindstorms, Model Team and Scale Modeling
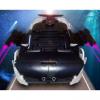
I have been experimenting with RC train motors to make something fast and fun (but not exactly cheap). It uses 4x RC train motor, a IR V2 and a LiPo.