Search the Community
Showing results for tags 'tank'.
Found 237 results
-
[MOC] T.13B3 Tank Destroyer
Tarix819 posted a topic in LEGO Technic, Mindstorms, Model Team and Scale Modeling
History Here is my latest model, which is of the T.13B3, a Tank Destroyer used by the Belgian Chasseurs Ardennais from 1936 to 1940. The T.13B3 was to be the third model of the Belgian T.13 series of Tank Destroyers, all based upon the British Vickers model 1931 Artillery Tractor, which were purchased by Belgium in 1934. The T.13B3 of 1936 attempted to improve upon the previous T.13B2 in many regards; the hull was greatly redesigned, with a raised rear idler fitted to improve stability. It recieved a new 360-degree rotating turret to house the 47mm Mle. 1931 Anti-Tank gun, as well an additional crew member to serve as the dedicated loader. These vehicles saw service in 1940 during the Battle for Belgium. The Model This was my first foreign vehicle I have built, but given its British origins it shared many components with some of my previous vehicles I have built before, namely the Vickers M1937 and M1936. The suspension and chassis design were all quite similar, but I still refined and improved it quite a lot - for example I have used the full motorcycle and tyres for the road wheels instead of just the motorcycle wheels. I had only three weeks to build this vehicle after preparing and scaling the design, so this similarity came in handy, and i'm thankful I never ran into any major problems when building it, as I have done on some earlier tanks, as I would not have been able to finish it in such a short amount of time otherwise. I am still finishing off the instructions which will go up on Rebrickable and Mocsmarket within a week with any luck. Features -1:8 scale -6.3kg in weight -Controlled by three SBricks. -Hull is powered by two AA Battery Boxes each containing three 3.7v Li-Ion 14500 batteries and three dummy batteries, giving a total output of 22.2v or 11.1v per track. -Turret is powered by one PF Li-Po 7.4v Battery Box. -Full RC driving - each track powered by two PF-XL motors. -Functional leaf-spring suspension (Horstmann). -Functional track tensioners. -Functional headlights. -360-degree rotating turret. -Elevating and depressing main gun. -Firing main gun with high power and recoil effect - the spent shell casings are ejected after each shot. -Four-shot magazine with short reload time. -High detail, including tools, exhaust, tow-hook and siren. Photos -
US troops, members of the Coalition Forces carrying out Operation Desert Storm, enter a vacant Kuwait City in February 1991. Coalition Forces Enter Kuwait City, 27 February 1991 by Nicholas Goodman, on Flickr Kuwait City by Nicholas Goodman, on Flickr CU_Kuwait by Nicholas Goodman, on Flickr
-
[MOC] Lego Technic RC A11 Matilda I Light Infantry Tank
Tarix819 posted a topic in LEGO Technic, Mindstorms, Model Team and Scale Modeling
Hi, I wanted to show my latest model, which is of the A11 Matilda I, a British Infantry Tank that was in production from 1937 until 1939. It saw brief service at the beginning of the Second World War with the British Expeditionary Force during the Battle for France in 1940, probably the most famous battle it participated in was the Battle of Arras, where it was found the Matilda I was almost inpenetrable to most German anti-tank guns, having 60mm of frontal armour protection. After the withdrawal of the British Army from Dunkirk, the Matilda I was seen as obsolete and withdrawn from service. Features: -1:8 Scale. -6.4kg Weight. -Powered by four PF-XL Motors for the tracks. -The Hull is powered by two SBricks and two battery boxes fitted with 14500 Li-Ion batteries, providing 22.2v of power for the hull. -There is an SBrick and 7.4v Li-Po battery box in the turret which powers only the Commander's Periscope. -Nine motors in total, 4x PF-XL, 5x PF-M. -The Engine is a Ford V8 Model 79, accurately represented in the hull. -Functioning headlights. -The turret can be traversed 360 degrees, and the main .303 Vickers Gun can be elevated and depressed. -The Commander's Periscope can be traversed 360 degrees, the Driver's Persicope can be rotated with limited traverse. -Functional track tensioners. -Functional and accurate leaf spring bogie (Horstmann) suspension. More images: -
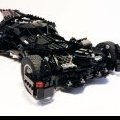
Today I'll show you my new Leopard 2A7V German Main Battle Tank, a completely rebuilt and renewed version of my old model, more detailed and realistic. This is the latest updated version of the Leopard 2 German MBT series. Leopard 2A7V: modernized version of Leopard 2A7 Main Battle Tanks (MBT), proposed to the Bundeswehr by Rheinmetal. The main armament of the Leopard 2A7V is L/55 120mm Rh 120 smoothbore gun, MG3A1 7.62x51mm caliber coaxial machine gun, 7.62mm MG3 machine gun mounted on loader hatch located on the left side of the roof turret. Eight 76mm smoke grenade discharger are mounted on each side of the turret. The hull has been modified to attach add-on armor elements. The standard armor can be fitted with additional modules to increase protection all-around the tank against anti-armor weapons. It's motorized with an MTU MB 873 Ka-501 liquid-cooled V12 twin-turbo diesel engine developing 1,479 hp. Includes a collective NRBC system, SOTAS-IP intercommunication system, PERI R17A3 commander’s panoramic sight with third-generation thermal-imaging system as well as UltraCaps in the turret and hull to optimize the onboard electrical system. This model also has a CROW System also equipped with ATGM missile launchers. Other images on my flickr!
-
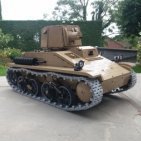
[MOC] Lego Technic RC Vickers M1937 Light Tank
Tarix819 posted a topic in LEGO Technic, Mindstorms, Model Team and Scale Modeling
Hello, Here is my latest model, which unfortunately I didn't manage to finish filming before the New Year: The model is of the Vickers M1937 Light Tank, a vehicle designed and produced by British arms manufacturer Vickers-Armstrongs in 1937. This was to be the fourth member of Vickers' line of commercial light tanks, coming after the successes which were the M1933, M1934 and M1936 (the latter which I have already built). The turret was to be enlarged, and a Vickers 40mm Anti-Tank gun fitted, providing the anti-armour firepower that the M1936 lacked. It had a crew of two men (Commander and Driver), and 9mm of armour protection. The vehicle only entered service for a short time in Latvia, before it was quickly outclassed by more modern designs. The only surviving vehicle remains at Kubinka Tank Museum in Russia. I decided to build this Tank because it shared most of the components with the Vickers M1936, and I didn't have much time over Christmas to build, so I thought this would be perfect. I intend to also make building instructions for it, although this takes time, I decided to get the video out and then finish the building instructions afterwards. Features: -1:8 Scale, the vehicle weighs 5.6kg. -High mobility - the vehicle is powered by four PF-XL motors for the tracks. -The hull is powered by two SBricks and two battery boxes fitted with 14500 Li-Ion Batteries - this is unchanged from my previous two models (Vickers M1936 and Vickers Mk. E (B)) and provides a total of 22.2v for the hull. -The turret is powered by one SBrick and one 7.4v Li-Po battery box. -There are nine motors in total; three for the turret and six for the hull. -The firing mechanism is powerful and features a recoil effect that functions even more smoothly than on my Vickers Mk. E (B) and A34 Comet. The spent shell casings are ejected into a collection tray inside the turret, and the magazine can hold up to four shots. This firing mechanism is a smaller, more reliable version of the one I fitted in the Vickers Mk. E (B). -The engine is a Meadows ESTE Six-Cylinder, which I have accurately represented in the hull from the few pictures of this particular engine online. -The headlights and rearlights are functional. -The turret can be traversed 360 degrees and the main gun elevated and depressed a few degrees each way. The turret bustle at the rear is slightly raised as it was in real life, so that it does not hit the driver's compartment at the front of the Tank. -Track tension can be adjusted using the track tensioners, which there is one for each track. This makes it easier to remove the tracks if need be. -The suspension is a type of Horstmann suspension, with there being four bogies each with two roadwheels, fitted with coil-spring shock absorbers. The shocks are the extra-hard type, to support the heavy weight of the vehicle, though I have replaced the yellow part with the equivalent black part of each shock absober for aesthetic purposes. -The two battery boxes can be removed through a hatch in the rear of the vehicle, and can be switched on/off through two hatches to the right of the turret. I didn't demonstrate this in the video, however I did demonstrate largely the same process in my Vickers M1936 video. -The vehicle also has other details, such as a fire extinguisher, exhaust, vision slits, vents and hatches. Pictures: -
[MOC] Lego Technic RC Vickers M1936 Light Tank
Tarix819 posted a topic in LEGO Technic, Mindstorms, Model Team and Scale Modeling
For photos, see the Imgur gallery: https://imgur.com/gallery/rBwm0Pi Hello, My newest Tank is a model of the British Vickers M1936, a member of a line commercial light Tanks developed by British arms manufacturer Vickers-Armstrongs from 1933-1938, designed for the export market. The Vickers M1936 was sold to the Netherlands, and as such earned its nickname 'Dutchman'. The vehicle also saw service as a training platform for the British Army during the Second World War. Building Instructions can be found on Rebrickable: https://rebrickable.com/mocs/MOC-51517/Tarix819/vickers-m1936-light-tank/#admin Now, usually, I include a firing mechanism in my Tanks, as I had done with my A34 Comet back in April and my Vickers Mk. E (B) in August, however this was the first vehicle I intended on designing building instructions for, so I wanted to keep it simple. Whilst the Tank was far easier to build than the Vickers Mk. E (B), the instructions were somewhat challenging to make on Studio 2.0. This one took less than a month to build, compared to the almost four months it took me to complete the Vickers Mk. E (B). This is probably due to the greater simplicity. Features: -Weight: 4.9kg -Scale: 1:8 -Pieces: 4855 -Suspension: Coil-spring bogies, or, the less specific name, Horstmann. The 9.5L soft shock-absorbers give the vehicle a sort of 'hop-along' impression when travelling at full speed, however they are almost at the limit of their strength. -Two AA battery boxes each with three 3.7v Li-Ions and three dummy batteries, giving an output of 11.1v per track, and ultimately making the vehicle incredibly fast. This is also because the drive wheels have 10-stud diameters. -Seven motors in total: Two PF XL for each track, and three PF M for turret traverse, gun elevation and the engine. -The engine is a realistic model of the Meadows ESTE 6-Cylinder engine used on the real Vickers M1936 and many of the interwar British Light Tanks. -The vehicle has functional Headlights and Rearlights. -The turret can traverse 360 degrees, although rather slowly, as it is a one-man crank-operated turret. -The main .303 Vickers Machine Gun can be elevated and depressed. -On each side of the Tank there are track tensioners for tensing each track. -Detailing; exhaust, fire extinguisher, periscopes, vision slits and covers, handles, doors, vents, etc. -
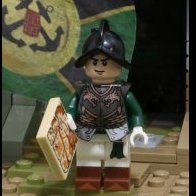
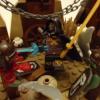
Been ages since I posted something here, but this one just had to be added. I never thought this day would come. I really thought 2020 would take this from me, but jokes on it! My last order got in on December 24th! So, let's get this one started! Back in 2013, I made this bad boy. It's the Dwarven "Fury" Siege Tank for my dwarf army. Well, I kept it for a long time. I always had plans to revisit this MOC because, well... it really sucks. I mean, it's open top, the mechanics are really bad, and overall never quite matched my ideal siege tank. So, I decided to go back to my initial inspiration: Grabbing this picture and a better idea of how to proceed, I darted off to Stud.io, and slaved away to bring you... The Dwarven "Fury" Siege Tank 2.0 Bigger, badder, and just overall more pleasing to me, I'm quite proud of this one. Compared to 1.0, this version features a much better system for fuel generation. It's easily accessible, and allows for additional tools to be stored. The only downside, as with all of the dwarven artillery, the tank has its inherent flaws. While refueling is easy, it also creates a HUGE weak spot to be exploited. Correct faction colors have also been added! The army of Faermoore is dark red and red, not blue and gold. Though the cannon is smaller, the overall turret is just a massive upgrade. I even added a spyglass and a cloth roll for a little bit of details. A hatch was also added for easy access. The front is no longer a terrible ram, but rather a sloped, spiked, front plate. The grills are windows, allowing the driver to see outside. As for the two red 1x3 plates, let's just say some decals are intended to go there. OH! And MOC'ing features have also been added! Steam can come from the steam tank and the cannon can actually be shown shooting. Additionally, trans-clear pieces can be added to show ammo flying across the field. So that's another bonus! Following my earlier system of 3-5-7 (three heavy, five medium, and seven light), three of these tanks were made to further the war effort. And that's all for now! Just happy to have crossed this off of my "To-Do" List for 2020. Hope you all enjoyed! As always, C&C is welcome and appreciated! - Nick
-

[MOC] Lego Technic Tank - Free Building Instructions
makushima posted a topic in LEGO Technic, Mindstorms, Model Team and Scale Modeling
Lego Technic Tank - Free Building Instructions Free Building Instructions: https://play.google.com/store/apps/details?id=max.moc.technic.instructions Lego Technic Tank - Free Building Instructions Lego Technic Tank - Free Building Instructions Lego Technic Tank - Free Building Instructions -

Help in improving tank suspension
general molotof posted a topic in LEGO Technic, Mindstorms, Model Team and Scale Modeling
Hi all, So recently I have been building a T-90A at 1:25 scale. I solved a lot of problems but i am stack with an under performing suspension system. The problem lies at the road wheels, the way they are attached to the suspension, and the traction between them and the tracks, not the mechanism itself (which is fairly responsive). Let me explain: (sorry for the picture quality, it won't let me upload better ones) There are two sets of 4185 wheels, attached to a 30374 light saber blade (which acts as the spinning axle). The light saber blade is itself attached to a 6632 1x3 thin lift arm, which is then attached to a 15462 5L axle with stop that acts as the pivoting axle of the suspension. The suspension is made of orthodontic rubber bands, but the smaller Lego rubber bands should work as well (i tried to explain the poor quality pictures as best as i can). The problem: The light saber blade creates a lot of friction with both the wheels and the axle socket of the liftarm, so when the tank moves, the wheels won't spin (which is a problem). I am asking here for help, does anyone more experienced than me has a better solution (note that the overall dimensions of the suspension, must not change in order to keep up with the scale). Thanks in advance! -

[MOC] M60A1 AVLB - Armored vehicle-launched bridge
MajklSpajkl posted a topic in The Military Section
Dear LEGO fans!I present to you my LEGO MOC, my all time favourite armored vehicle, the M60A1 AVLB - Armored vehicle-launched bridge. When I first saw this video of the real machine, I was mind-blown. Being a mostly Technic builder, I instantly wanted to try building it fully functional. There are some fantastic Technic models already out there. But most suffer from abstract looks of the bridge in particular, due to obvious weight problems. Well, unfortunately I learned about it the hard way, as the plate & tile clad bridge was just too heavy for the launcher to be able to lift it, even when the bridge was stripped of all the cladding. (Here is the link to some photos of my fallen Technic Mastodon, if someone is interested). To heal my wounds after Technic debacle, I decided to try it out in minifig scale, trying to make it as accurate as possible with at least manual functionality of the real machine. The result is in front of you. I must admit, I am very satisfied with the result, and this is why the model is still sitting on my shelf in my LEGO room for almost two years now (I usually disassemble all my creations very quickly). So after almost two years I finally managed to edit photos and also make instructions and a short video. So, about the actual MOC... I must admit that I was at first heavily inspired by this fantastic M60A1 Brickmania's Cody Osell. This video and a couple of their photos was the only brick built reference material, so the only similar thing might be the looks of the underside and it was helpful to determine the size of the tank and the bridge afterwards. According to dimensions of the real one I found on-line, it is built in approximately 1:33 scale and is a completely manual model, although the cores of both the tank and the scissor bridge are made of Technic bricks. It has some moderate play-ability, like independent torsion suspension of all road wheels, but it is more meant to be - and I absolutely love it that way - a display piece. Since I decided to go for more or less authentic looks and not so much for the actual functions, the bridge is actually heavier than the launcher, so I hope it is clear, that the tank cannot hold the bridge in raised position by itself. I used two pillars made of trans-clear panels below the hinges of the bridge to support it. The loose end of the bridge on the other hand is only supported with a string - "steel cord/cable" on the hinge. There is some photo editing done on the raised bridge photos to look like it is elevated solely by the tank. I hope you don't feel too fooled by that. I'm sure that those readers and fans, that know much more about the M60A1 AVLB, than I do, will find many details not accurate, but overall, I think that the main presence is there. Enough writing. I'll let the photos speak. The V12 engine is only indicated with visible 6 pistons, the other 6 (nonexistent in the model) are "deeper" under the hull :-) Here an example of IRL display, where translear pillar is visible to aid keeping in the position on those slippery tiles. Also, when bridge is carried on the tank, i used a special brick-built pedestal to aid the rather soft independent torsion suspension of all road wheels. It was my wish to see it on some diorama, alongside a ruined bridge or something... who knows, maybe someday... Some data of the model are in order as well I guess... The final part count came down to 2233 parts (1100 for the bridge 1133 for the tank) in 266 different lots + 2x 30 cm of non LEGO stiff and strong (non elastic) string + some short thin string to attach some of the clutter on the tank. Launcher dimensions (LxWxH): 20,5 (24,5) x 11,5 x 11 cm or 26 (31) x 14,5 x 14 studs with the launching arm put over the hull. Launcher weight: 546 grams Bridge dimensions (LxWxH): 57 x 14 x 3,6 cm or 71 x 17,5 x 4,5 studs when extended. Bridge weight: 738 grams. Here are some comparisons with the sketches I found on-line. As you can see on the second one, the height on the tank is close, but I wasn't able to keep the bridge thin enough to perfectly match the scale. I guess the road wheels could be a bit bigger too, but it is LEGO after all and with smaller scales compromises are inevitable. I also prepared a short video presentation with some nice animations from stud.io, although I admit photos do this model more justice: With this creation, I decided for the first time to seriously venture in creating a digital model, some renders and building instructions by using Stud.io designer. It took some time and ended up consisting of 420 pages and 627 steps in total. I didn't get into modelling of the strings with other CAD software (I found this is the only thing to improve in Stud.io at the moment), so I enhanced the instructions with some photo and text guides as well. This said - the string for "steel cable" for the hinge is the only non lego part of the build. The instructions can be found and purchased (yes trying to get on the money train , not that I'm too optimistic) here on rebrickable.com. Below I add a couple of renders used to "enrich" the building instructions and some pages of the actual instructions as well. Thank you for taking time to read this through and thank you in advance for your constructive criticism and support. I hope someone decides to build it as well. Best regards, Miha -
How to make a turret turn and elevate?
Geekman9097 posted a topic in LEGO Technic, Mindstorms, Model Team and Scale Modeling
AMX turret.lxf I've been working on a model of an AMX 13 105 light tank, and decided to take a break from the hull to work on the turret. The attached file is my LDD progress, because for some reason i prefer working digitally before I start putting stuff together. My first problem is that this turret works by elevating the entire gun carriage, including the autoloader box at the back. My second problem is that this is a small turret. 5x7, so I can't put a motor in there. To help with this, I have a gear in the center that pushes the entire carriage up and down against the side mounts. Now I need to figure out how to put the side mounts on a turntable, so that they can turn. My third problem is that mock mounted on a turn table, I can't find a way to turn the gear to move the turret. Any ideas? Blueprints I'm using: http://www.the-blueprints.com/blueprints-depot/tanks/tanks-a/amx-13-105mm-1.png, -

[GBW] - Supporting the war effort - Plantasea - The Tank
BoBKiD posted a topic in The Great Brick War
The Tank In an effort to modernize their army, the Plantasea forces develop a new enhanced armored command center vehicle... or at least they are trying to! [MOC] The Tank [GBW] by BoBKiD206, on Flickr [MOC] The Tank [GBW] by BoBKiD206, on Flickr [MOC] The Tank [GBW] by BoBKiD206, on Flickr Extra detail: The differential is a 100% working model. It only needs a power functions motor to make the tank run! [MOC] The Tank [GBW] by BoBKiD206, on Flickr -
And here comes the latest one: the TX-225 Katyoucha, directly derived from the Occupier tank. TX-225 Katyoucha by Veynom, on Flickr When the Empire asked for a combat vehicle with superior firepower to support first-line troops from behind, Rothana Heavy Engineering decided to modify its somewhat popular TX-225 Occupier by adding a rocket launcher pod on the rear platform. The idea was to boost its tank production and benefit from the existing investments made for the Occupier. The impressive rocket launcher is able to fire its 16 rockets under 14 seconds if necessary with a deadly precision thanks to its mounted sensors. Results were highly impressive and the Katyoucha was up to its promises, able to smash opponent's strongholds, positions, or even any facility with accurate effectiveness and a frightening noise crushing enemies' moral. Unfortunately, the Katyoucha suffered one deadly operational flow: reloading the rockets is slow process, mostly manual. Moreover, the TX-225 could only carry a few extra rockets under the platform and required an additional ammunition carrier to follow. In the end and give these operational limitations, the Empire selected the famous AT-AT and it sounded the end of the Katyoucha. This was a hard blow for Rothana Heavy Engineering. TX-225 Katyoucha by Veynom, on Flickr TX-225 Katyoucha by Veynom, on Flickr TX-225 Katyoucha by Veynom, on Flickr TX-225 Katyoucha by Veynom, on Flickr Compared to the original set, this model has been completely rebuilt from scratch. It is 2 studs longer and external similarities with the set are purposely made, in order to align the Katyoucha with Occupier tanks during upcoming Lego events. PS: as often with my models and their story, everything is completely fandom and not canon. Star Wars Legends brick-based by Veynom, if you wish. TX-225 Katyoucha by Veynom, on Flickr
-
Hello, Here is my latest model, which is of a Light Infantry Tank known as the Vickers Mk. E or Vickers 6-Ton, originally designed as a private project by the British arms manufacturer, Vickers-Armstrongs back in 1928. The design was rejected by the British Army, however was bought and built under licence in great quantities by the Soviet Union, Finland, Poland, China, Bolivia and others. The vehicle was used as the basis for the famous Soviet T-26 and Polish 7TP tanks. The model I have built is the production Type B version. Whereas the Vickers Mk. E (A) had twin turrets with machine guns mounted in each one, the Vickers Mk. E (B) had a single two-man turret with a 3-pounder (47mm) short gun and a coaxial .303 Vickers Gun. Images of the model can be found at my Imgur post: https://imgur.com/gallery/va9A4IT YouTube Video: Here is a list of features: -Scale: 1:8. -Weight: 6.8kg. -Motors: 9, four PF-XL for driving, two PF-M for the firing mechanism, one PF-M each for the engine, turret traverse and gun control. -The hull is powered by twin AA battery boxes each fitted with three 3.7v Li-Ion 14500 batteries and three dummy batteries, giving a total output of 22.2v for the hull, which is how such a heavy vehicle drives around without many issues. The turret is powered by a single 7.4v Li-Po. -Unlike my A34 Comet, which was driven only from the rear, the Vickers is driven from the front and rear, vastly improving mobility. On smooth ground it can neutral steer, on rough ground it can turn in a large radius. -There are two SBricks fitted in the hull, and one fitted in the turret. -Track tensioners are mounted on the side to increase or reduce track tension. This makes removing the tracks rather easy. -The removable engine deck allows access to the AA battery boxes and the straight-six Armstrong-Siddeley Puma engine, which looks and functions like the real one. -The turret can traverse 360 degrees without any snags. -Six different hatches can be opened on the turret for maintenance. -The gun can be elevated and depressed to a limited extent, the coaxial Vickers Gun follows suite. -The main gun can fire and is rather powerful (More than my A34 Comet). The projectiles fire through the actual barrel and look like real shells rather than just regular technic liftarms. -The firing mechanism automatically reloads each shot, the spent shell casing is ejected into a collecting tray at the rear of the turret for retrieval. -When firing, the gun recoils in a realistic manner. -The magazine can be removed for resupplying, and can hold up to four shots (four shells and four shell casings). -The suspension system is Leaf-Spring Bogies and is quite unique - I used lego 1x8 tiles to function exactly as leaf-springs do in real life and it works a treat. -The model features white headlights and red rearlights for a nice effect. -Other decorative features include a fire extinguisher, shovel, spare roadwheel, rearview mirror, exhaust pipe, radiator and vents. Building Experience: This model was quite challenging to build, with most of the initial problems caused by the suspension and the turret. Firstly, on the real Vickers, two bars run width-ways along the chassis to keep each bogie securely attached, however at this scale in Lego it is not possible due to the flexibility of Lego pieces. It took about thirty revisions of the suspension system to stop it from collapsing when driving at full-speed, and oddly enough the actual leaf-spring part was to begin with the most reliable part of each bogey. Thankfully, the final revision fixed this problem completely, though I now understand why the British army rejected such a design . . . The turret also gave me issues, mostly because of how small it is, with the firing mechanism barely being able to fit inside, with room to elevate, depress and recoil about two-studs' length. On top of this I needed room for the elevation/depression mechanism, the battery box, SBrick, motors and finally room to remove and insert the magazine. I fixed all of these problems to a certain degree, with the only issue being inserting and removing the magazine is a bit fiddly, however I am willing to accept this minor inconvenience for what is otherwise a very functional and decently reliable turret. Thanks for reading.
-
The Boston and Albany had two wheel-arrangements that were used in their Suburban tank locomotives the 2-6-6t: In 1906 the Boston & Albany received ten 2-6-6T locomotives built by Schenectady followed by eight more in 1907 designated Class L-1a and L-1b. The tank engines had 20x24 inch cylinders, 63-inch drivers, and operated off 185 lbs. of boiler pressure. During 1928-1931 Lima rebuilt the engines with superheaters, increased the cylinder bore to 23 inches, and the boiler pressure to 200 lbs. The rebuilding produced a substantially more powerful engine. The rebuilt locomotives became Class L-3 and L-3a and when 4-8-2's were delivered in 1940 as that class, they were reclassified D-2a and D-2b. After that, the B&A came out with a class of 4-6-6t locomotives: In need of specialized locomotives for its Boston commuter service, the Boston & Albany purchased five 4-6-6T locomotives from Alco in 1928. The locomotives were designed for rapid acceleration, adequate power for heavy trains of up to 20 cars and perhaps most uniquely – to be operated equally well in either forward or reverse. Not having to turn the locomotives at the end of the line saved space and cost and also a lot of time. The locomotives bore a strong resemblance to the New York Central's Hudson in the front, with a small attached "tender" behind the cab riding on a shared 6-wheel trailing truck. Coal and water capacity was adequate for the commuter runs. The D1-A class served the railroad and Boston's workers well for two decades before being replaced by diesels. Although these locomotives were unique to the B&A / NYC, there were similar designs used on other railroads with the same needs. My Model: I'm still waiting for side rods which I will 3d print at my library after COVID is over. The model took me 4ish months to build A lot of parts Many modified bricks Powered with an L-motor geared 1:1 Entered in the Brick Train Awards under the 'Teen' Catagory D1a 4-6-6t Brick Train Awards by Coal Fired Bricks, on Flickr D1a 4-6-6t Brick Train Awards by Coal Fired Bricks, on Flickr D1a 4-6-6t Brick Train Awards by Coal Fired Bricks, on Flickr D1a 4-6-6t Brick Train Awards by Coal Fired Bricks, on Flickr Comments, Questions, Praze, and all critical thinking are welcome. Bye Bye everybody, Cole (the name I own on my birth certificate)
-
Lego M1A2C (SEP V.3 and CROW on top) TUSK2 with APS (Active Protection System) TROPHY. The M1A2C Abrams TUSK2 is a modernized version of the M1A2 SEPV v2 main battle tank which benefits from a number of upgrades in the areas of survivability, maintainability, full efficiency and network capability. Features Ammunition DataLink (ADL), improved 120mm ammunition, Improved Forward-Looking Infrared (IFLIR) and the low-profile (LP) Common Remotely Operated Weapon System (CROWS), 120 mm smoothbore M256 cannon, asmoke screen can also be laid by an engine operated system, M829E4 (soon to be type-classified as the M829A4) fifth-generation kinetic-energy anti-tank (AT) round. Features also a depleted-uranium penetrator and anti-armor design advancements to defeat threat targets equipped with AERA (Advanced Explosive Reactive Armor), APS (Active Protection Systems) TROPHY, advanced multi-purpose (AMP) round, a new improved entire IED capability electronic warfare,IFLIR Improved Forward-Looking Infrared to identify a target. Also this model have interiors:
-

MOC T2-B tank (canon) updated with physical model
Mandalorianknight posted a topic in LEGO Star Wars
This MOC actually started as a conversation about legends sets in the "future star wars sets". @ARC2149Nova mentioned how he liked the T2-B tank, I looked it up, remembered it from an old mobile game, and decided to MOC it. It probably looks drastically different from what you Empire At War players remember it looking like, and that's because it's based on the canonized version from the "star wars commander" game. It also appeared in the comic "vader down" according to wookiepedia, though I don't have the comic myself and can't confirm this. It's meant to resemble an actual set, with play features and figures, and the design of the base of the turret suffers slightly to allow it to fit a figure. I really like the tank's design in-universe, and must have spent hours on an 8-stud wide version before starting over with a 10-stud wide version. The final specs are: 10 studs wide (not counting the side pods) and ~25 studs long. There are 470 pieces including the figures. There weren't any good images of the back on google for the canon version, so I made some detailing based on what I could see and a bit from the legends version. Front view shows one of the play features I mentioned, hidden spring-loaded shooters. Pushing down on the 1x2 dark red tiles towards the middle of the tank will cause them to fire. I enjoyed making the firing mechanism a lot, and I think the shooters are hidden enough that they're not obstructive to the set. Removing some parts gets you to the driver's seat. Despite the amount of parts removed, it's mostly one chunk that comes off easily enough. Finding a way to include a driver's seat was by far the biggest challenge of the set, and while this solution isn't perfect, it's not too detrimental to the build and even has some control panels down there. Any good set has figures, so I added two stormtroopers and two rebels. Overall, I'm pretty happy with how this turned out. Let me know any suggestions/criticism/comments you have! -
Just managed to complete both MOC. Quite statistic with the Wheel AFV. But the light tank looks kinda of .... funny ? https://www.flickr.com/photos/184704915@N04/shares/s0P6m5
-
This is my own creation of a micro-scale British Mark V Tank. You can download the instructions and view the parts list for this MOC in my Rebrickable post here: https://rebrickable.com/mocs/MOC-43037/BrickHugger171/british-mark-v-tank-micro-scale/?inventory=1#comments
-

Tracked machine-gun Tank
Laurent14790 posted a topic in LEGO Technic, Mindstorms, Model Team and Scale Modeling
After reading several topics on Eurobricks, today, for the first time, I present an MOC on the forum. Do not hesitate to notify me if I made mistakes in my presentation. This MOC is a kind of tracked machine-gun Tank. It is powered by 2 BuWizz (one in the body, the other in the turret). Motorization: one RC per track with each a gearbox with 2 speeds. The two gearboxes are synchronized and controlled by a motor L. Orientation of the turret by motor M. Lifting of the "gun" by motor L. The firing mechanism uses 2 XL motors. Some pictures : Overview : Char Jaune Lego 001 by Laurent Lesellier, sur Flickr Char Jaune Lego 002 by Laurent Lesellier, sur Flickr Char Jaune Lego 001 by Laurent Lesellier, sur Flickr Char Jaune Lego 003 by Laurent Lesellier, sur Flickr The body : Char Jaune Lego 005 by Laurent Lesellier, sur Flickr Char Jaune Lego 006 by Laurent Lesellier, sur Flickr On-board ammunitions (105 rounds) At around 6 shots per second, the magazine empties in 17 seconds! it's very fast ! Char Jaune Lego 004 by Laurent Lesellier, sur Flickr Photo of a charger, there are 15 in the magazine: Char Jaune Lego 008 by Laurent Lesellier, sur Flickr For the video, you can watch the video on my wife's Facebook account. If you like it, you can like, comment and share! This will give me a few points for the contest organized by BuWizz. The subject of the competition is how to play with Lego during the lockdown due to the coronavirus! I propose an idea with playmobil! Do you like it? Thanks for reading. Do not hesitate to comment. -
This is my MOC of the Separatist AAT from Star Wars: The Clone Wars. It features a moveable turret and seating for one battle droid.
-
[MOC] Lego Technic A34 Comet Cruiser Tank
Tarix819 posted a topic in LEGO Technic, Mindstorms, Model Team and Scale Modeling
If some of the images aren't showing up, here they are linked on Imgur: https://imgur.com/gallery/lLRkXIL Greetings all! Here is the post on my new Lego Technic model, which is of the British Second World War Cruiser Tank, A34 Comet: It entered production in late 1944 but didn't see proper service until early 1945. By Second World War standards it was an excellent vehicle, being fast, well armoured and equipped with a powerful QF 77mm HV gun capable of dealing with almost any enemy tank. It also saw action during the Korean War, however was shortly after superseded by the Centurion Main Battle Tank. The Korean war saw the introduction of the Comet Model B, with the large engine vents sticking out like a spoiler, as shown in the image below. My vehicle is of the Model A which was used during the Second World War, which is noticeably different as it lacks this 'spoiler'. Some information: Weight: 5.9kg (Making it possibly one of the heaviest Lego RC tanks on YouTube). Dimensions (mm): 290 width x 680 length (830 including the length of the main gun) x 300 height. Motors: Nine Power Functions Motors in total (2 XL, 2 L and 5 M) Driving is done by the two XL Motors alone. Fully functioning headlights and turret lamp. Traversing bow machine gun. 360-degree traversing turret. Elevating and depressing main gun. Shooting mechanism which fires projectiles through the barrel. Recoil mechanism for the main gun. Spent shell casing ejection system - dispenses through the floor at the rear of the turret for collection (Not enough room for a proper collecting tray). Powered by one PF 7.4v Li-Po Battery Pack in the turret, and one AAA Battery Box in the hull. The AAA Battery Box is equipped with three 3.7v 10440 Li-Ion Batteries and three AAA dummy batteries which when fully charged give the vehicle 11.1v of power, though they need to be recharged somewhat more often than a usual 6x 1.2/1.5v Battery Box would. This is how such a heavy vehicle can drive so quickly. Another benefit of this power set up is I could take the advantages of programming in the SBrick (Which is how the firing mechanism works), whilst achieving almost the same voltage as the BuWizz, without spending so much money. The firing mechanism is quite powerful, and the footage doesn't really do it justice (probably in part due to the quiet sound), though its power is somewhat reduced by the length of the barrel and the small space inside the turret, still it is a good deal more powerful than most Lego Tank firing mechanisms on YouTube. It alone is controlled by three M motors. Speaking of the firing mechanism, this is the sole reason the model is so big. My firing mechanism as you have read is very functional, however it is also quite large and I needed more space inside the turret for it, as well as the Li-Po, SBrick and Elevation/Depression mechanism, and on top of that, room for it to recoil. The Comet already has quite a large turret in comparison to its hull, if I decide to build tanks with smaller turrets, they would be to an even larger scale. The tank can only turn reliably on smooth surfaces due to its immense weight, however it is at least able to. Powered by two SBricks, one for the turret and one for the hull. A few last images: First photo of the in-development hull, I started work in early December 2019. Photo of the in-development turret, showing the mechanism and SBrick. Early photo of the turret married to the hull. Taken some time over Christmas. The placeholder three-cylinder tractor engine I had in the tank before I built one which looked more like the Rolls-Royce Meteor. I like my 'Expert Builder 1977-1980' style of Technic engines.The SBrick and Li-Po (Which was originally in the hull) can be clearly seen. Photo of myself next to the mid-development vehicle. The thing is huge and a pain to carry around. The vehicle at about 90% completion. The vehicle compared to the 8865 Test Car, showing the huge scale of the model. The almost completed vehicle compared to the size of a mug. Prior to some last suspension changes, though the front fenders have been improved. Thanks for reading. -
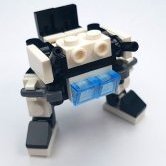
Tank Brothers - mini tank troop. It is made of 2 Short Range Tanks, 2 Long Range Tanks, 1 Spy Drone and 1 Commander Tank. These 6 tanks can combine into a big combat robot to defeat more powerful enemies.
-

Tank with horizontal volute spring suspension
Tomas TECHNIC posted a topic in LEGO Technic, Mindstorms, Model Team and Scale Modeling
Check this modern tank. It is not a model of some real tank but I think it don't looks bad. One of the most difficult challenges were to build the suspension strong enough and to make the turret with gun elevating system only three studs height. Propulsion: 2X PF XL motor, turret rotation: PF M motor, gun elevation: PF M motor -
It's been a while since I've built a tank model. This time I wanted it to look accurate and perform well. You'll be the judges of looks, but I dare to assume that ability to cross 22 cm wide trenches, climb 9 cm tall vertical obstacles and ascend a 31° slope counts as decent performance. Not to mention that the hull is built partially upside-down, and includes partial interior based on that of the original tank.