Search the Community
Showing results for tags 'tank engine'.
Found 22 results
-
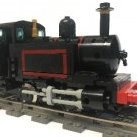
After some time in the making I can finally share a little something I’ve been working on. This right here is one of the engines built by the Société de Saint-Léonard, and employed by the SMMP (Sociedad Minera y Metalúrgica de Peñarroya) in the mining complex of Puertollano, Spain. It hauled coal and other goods between the different facilities until the mid-70s. By the time the mineshafts closed, they had no use for these engines and most of them were scrapped. Luckily a couple of them survived, one of them being this very same engine. Although officially named “Pozo Norte” after one of the main mineshafts in Puertollano, to this day everyone referres to her as “La Gorda” (The Fat One) no doubt in part because of her imposing girth. Nowadays you can find her sitting (in a rather disheveled state…) on a few meters of track in the gardens of the Mining Museum of the same town it used to work at. I’ve been to this museum many times, and seeing this locomotive was always the highlight of my visit. It was only a matter of time until I finally built it out of Lego. Building this engine was a refreshing change of pace from the high-speed modern trains I’m more used to. Trying to replicate as many shapes and details as possible was a fun challenge. Also, shoutout to @Redrado for suggesting the use of the 4625 hinge 1x4 tile to represent the riveting on the side of the water tanks, it looks great and the engine wouldn’t feel complete without it. The models for the wheels (ML), connecting rods and side rods are from Breckland Bricks. The model is designed to be motorized with a Powered Up L motor, the power is transmitted to the middle axel and through the connecting rods to the rest of the wheels. I’ve used this type of transmission before and I trust it will be strong and durable, however, I’m not so sure about the placement of the battery box, I’m concerned it’s hanging off too much and will cause balancing issues. Hopefully the weight at the front will shift the center of gravity forwards, but that’s something I won’t know for sure until I start messing with real bricks. Here’s a bonus picture of what these engines used to look like in their heyday.
-
MOC: Swedish Class S1 2-6-4T (with local train) in 1/32.5 scale – update: now with video
Sven J posted a topic in LEGO Train Tech
Dear trainheads, It’ s been a very long time since my last steam locomotive ... But now, after tinkering with the design for almost two years, I’m very proud to present my 1/32.5 (gauge 1) model of my all-time favourite engine, the utterly handsome Swedish Litt. (=Class) S1 2-6-4T. For those who are interested, a few words about these locomotives first: My model is held in exact 1/32.5 scale. It consists of approx. 2,400 parts and weighs around 1.4 kg. The locomotive is driven by two vertically-mounted PF-L motors, which are directly connected to the 2nd and 3. coupled axle; the 1st coupled axle is driven by the rods. A BuWizz 2.0 is used for power supply and remote control. Lighting equipment (directional headlights and cab light) is from Brickstuff, while the wheels were purchased from BBB as usual. The rods and valve gear parts are 3D printed elements of my own design. But let the pictures speak for themselves now: Two two-cylinder beauties “Made in Trollhättan” … The coal bunker is detachable and gives access to the electronics. With the coal bunker detached, we can get a glimpse inside the cab: The main frame is as realistic as possible, with all the prototypical cutouts. The leaf springs are connected by realistically pivoted compensating levers (a bit crazy, I know). The leading truck and the rear bogie are built using a combination of liftarms and studded parts. The bogie is laterally slidable and with off-centre pivot pin. This enables the model to negotiate LGB R3 curves (1,200 mm radius) despite having flanges on all wheels. Road numbers and builder’s plates are printed on self-adhesive gold foil: As an extra gimmick, the model has a synchronised sound generator from Mobatron in Switzerland. It works with a a tiny optical sensor and a reflector disc on the 1st coupled axle, which triggers 4 exhaust blasts per wheel revolution. See and hear in these function test videos: And here she is with the entire train: Scandinavian nights are long and dark, so there need to be decent lights on the train… The freight car and 2nd class coach are improved older models, while two slghtly different 3rd class coaches were built from scratch. As usual, I’ll make an on-track video of the whole train soon. High-resolution images and many pictures from the WiP phase can be found in my Flickr album. Thanks for stopping by! Kind regards, Sven EDIT: Video now online! -
Hello there! I'm The LEGO Railway Series! For those of you who don't know me from twitter, I model characters from The Railway Series (Thomas the Tank Engine) but I do so as realistically as possible using the actual basis for the characters. So I posted here on Eurobricks once before and just never kept up with the site or the thread. So I'm just gonna start over again! I'm gonna be using this thread as a central place to post all of my stuff to make things easier for myself. So what better model to get this started off with than Thomas! Everyone knows Thomas is an E2, so that's what I've built. He's got as many bells and whistles as I could cram onto the model. He's fully motorized using Power Functions (IR receiver and an M motor) and is powered by a 9v battery in the firebox area. (it needs a custom wire adaptor to transfer the power to the PF components) He also has an entire cab interior with controls and everything. Aside from the side rods which use modified liftarms to attach the flex tubing, the 9v battery adaptor wire, and some custom wheels (I plan on using Breckland Bricks wheels), the entire model is Legal and buildable. Unfortunately I've not been able to physically build this model yet, but I plan on it by before the year is up! Thomas by The Lego Railway Series, on Flickr Thomas_2 by The Lego Railway Series, on Flickr Thomas_3 by The Lego Railway Series, on Flickr Thomas_4 by The Lego Railway Series, on Flickr
-

LB&SCR E2 Class Tank Engine ("Railway Series" Thomas)
The Lego Railway Series posted a topic in LEGO Train Tech
I've been a long time lurker here and decided to finally bite the bullet and post. I don't know how tagging works or what the etiquette is for this site yet, so feel free to yell at me for that stuff it I miss something or whatever. Anyway I've been posting stuff on twitter and other places for a while now but I thought I would break the ice here finally. So here is my most recent build, its all digital for now until I have the funds to actually start building my models. But here is my Railway Series inspired Thomas the Tank Engine. 31.5 studs long buffer to buffer. he's a long boy, so the couplings swivel atm to make it around bends with rolling stock. currently I doubt they will work for pushing, but ill find a solution to that when I build the model physically. pulling should be fine. 15 stud wheelbase from the center of the wheels. (I know the middle isn't a blind in the images and that a physical build would require it) Fully motorized with a PF M motor and an IR receiver and powered by a normal 9v Battery with an adaptor wire. Full decorated cab interior. I've also done my best to make sure he's build out of parts that actually exist and actually physically buildable and legal. This model does have a single illegal technique, the hands holding the flex tube on the left side of the boiler. -
Hi everyone! Today I am sharing an updated version of an old MOC from 2013 ! It's based off an Engine from a long gone railway in my hometown, a GSR J26, or Irish Terrier as the type were nicknamed. It's a turn of the century tank engine, that operated on a branch line that wasn't connected to the rest in Ireland. I'm quite proud of how far its come from its first incarnation, which can be found here : Without further ado, here it is ! I got Big Ben Brick medium wheels as i found the official Lego large scale wheels looked great but made it monstrously large. Newer pieces of recent years made for nice rear windows, those 1 x 1 round tiles. And finally the engine from the front solo. Those smaller 5 link chain pieces are great! Thanks for looking ! Please let me know what you think!
-
This little British-style tank engine is built around an old 9v train motor. I've had this model up on Flickr for some time, but just got around to posting it here. It's unfortunate that the 9v motor doesn't accommodate moving rods, but I can always pretend the engine has its brakes constantly applied to control those troublesome trucks! Thanks for looking! Soli Deo Gloria
-
No. 111 is a small 0-4-0 saddle tank locomotive on display at the North Carolina Transportation Museum in Spencer, NC. It was built by Alco in the 1920s and ended up moving coal around power plants before it was retired. IMG_0226 by the chestertonian, on Flickr I recently downloaded Studio 2.0 and thought this engine would make for a good experiment as my first project in the new program. I really like how it allows you to use custom parts like BBB wheels and shows the prices for each part. This 8-wide model would cost a little over $100 to build - not counting the BBB drivers! I was also surprised to see that the built-in POV-Ray rendering options are much faster than the settings I have used before. The Studio file is available here. Thanks for looking! 0-4-0ST-1 by the chestertonian, on Flickr 0-4-0ST-2 by the chestertonian, on Flickr Soli Deo Gloria
-
This MOC Tank Engine is inspired by the german Knapsack but it is not a scale model…. It is my very first MOC steam Engine, and I focused on the estetics…. hence no motor nor advanced connecting rods with brake cylinders etc.... To accompany these tank Engines I present two concept motorized wagons, with PF and PuP respectively. Please let me know what you think.
-
MOC: Just a humble 0-8-0T... (Flensburger Kreisbahn No. 1 in 1:22.5 scale)
Sven J posted a topic in LEGO Train Tech
Dear train lovers, It's time for another locomotive MOC! As a tribute to my favourite holiday region (where in fact I am right now, writing this), I chose the Flensburger Kreisbahn's No. 1, a 0-8-0T narrow gauge locomotive, as a prototype. The Flensburger Kreisbahn ("Flensburg county railway") was a 1000 mm gauge railway in Germany's extreme North, with two lines (94 km in total) running through the hills of Anglia close to the Danish border. When the railway's older, saturated-steam locomotives became too weak to handle increased train loads, two new superheated-steam engines were ordered from AEG in Berlin - yes, there was a time when AEG, famous for its electrical devices, also built steam locomotives! Delivered in 1926, these 0-8-0T engines, numbered 1 and 2, were an immediate success. With approx. 300 hp and a permitted speed of 40 km/h, they were suited for both freight and heavy passenger trains and remained in service until the railway's closure in 1953. Sadly, both locomotives were scrapped. A substantial problem while designing the model was the almost complete lack of reliable sources. All technical information had to be derived from a short description, some b/w photos and a single small drawing in just one book (Schöning/Kupfer: Die Flensburger Kreisbahnen. Verlag Kenning, Nordhorn, 2004; the drawing is reproduced below with kind permission by Mr Kenning). Nevertheless, I'm confident that my model comes as close as possible to the real engines. The MOC consists of approx. 2,200 parts and weighs just under 1.5 kg. It is held in accurate 1:22.5 scale, therefore compatible with conventional garden railway equipment (45 mm G-scale track), and can be coupled to rolling stock fitted out with LGB link-and-pin couplers. My layout uses the LGB R3 radius (1195 mm), so the locomotive has to be able to negotiate these curves. However, as I wanted to avoid the use of blind drivers for aesthetical reasons, this required two little tricks: The last axle is slidable sideways by +/- 1/2 stud, and the second axle's wheels are slightly set inwards, resulting in an increased lateral track play. Although this arrangement causes some drag while negotiating curves, it nevertheless works. The locomotive is driven by two L-motors. A BuWizz functions as both a battery pack and remote control receiver. The lighting equipment was bought from Brickstuff, while the wheels are BBB XL drivers, as usual. Purists may kindly ignore the two following scenes... Of course, the engine crew was proud to pose for a souvenir photo. Even the local grocer came to have a look at the new locomotive. The engine frame: While my previous BDZ 606.76 had its focus on exploring the possible level of detailing for a LEGO model, this time the goal was to design a simple locomotive for uncomplicated operation. Above all, the new model had to overcome the 606.76's proneness to tipping over. Thus, the frame houses two weight bricks for improved traction and a lower centre of gravity (highlighted in blue): Some views of the brake rigging and the two large vacuum-brake cylinders: All drivetrain components, including the BuWizz, are tightly packed and positioned as low and as close to the engine's centre as possible, again with the aim of optimizing the COG: The power button and the charging socket are accessible by removing part of the boiler top: The cylinders, closed-type feedwater heater (system "Knorr"), and generator: The upper part of the cab. While looking quite simple, the task to model the roof's half-stud offset and the vent hole in the cab front almost drove me nuts... But I think I found a satisfying solution: Cab interior and lights: This time there was no space for magnetic switches to control the headlights; so the coal bunker contains two small separate battery packs (with built-in switches) for front and rear lights. The cab is illuminated, too, when any of the two circuits is turned on. Realistic Winterthur valve gear. The basic dimensions are the same as on my BDZ 606.76: Originally, I had used zephyr1934's rods and valve gear parts again. But then I found them to be looking too massive , considering the rather delicate rods of the prototype. Besides, during the first functional testing sessions of the near-completed model, the flex elements which I originally used for the side rods proved too large by just a fraction of a millimetre - the cable connectors collided with the rear mounting of the crosshead guide, something which could not be foreseen in LDD. So I knuckled down to get used to Tinkercad and designed my own rods, including thinner, slightly tapezoidal main rods as well (both subsequently made by Shapeways). And for the first time - SMOKE (using a Seuthe No. 99 smoke generator, powered by the BuWizz via a modified PF cable): I finished the model just in time before going on holiday, so I had no time to shoot a video on track. Of course, I'll do this when I'm back home again. In the meantime, your feedback, comments and criticism are most welcome! As usual, high-resolution images can be found in my Bricksafe folder. If someone should be interested in the LDD file, please contact me by PM. Thanks for stopping by! Best regards, Sven Edit: Now with on-track video - see here! -
MOC: 1:22.5 Bulgarian 2-10-2T narrow gauge steam engine (class 600.76)
Sven J posted a topic in LEGO Train Tech
Dear AFOL trainheads, After almost six months of designing work, another five months of construction, countless bursts of temper, and being relieved of a small fortune, I am very proud to present my latest locomotive MOC. This time, it’s a 2-10-2T narrow gauge (760 mm) steam locomotive, class 600.76, of the Bulgarian State Railways (Balgarski darzhavni zheleznitsi, BDŽ). Basically an enlarged version of the German DRG Baureihe 99.73, the first five locomotives of the class were built in 1940 by BMAG (formerly L. Schwartzkopff) in Berlin for hauling all kinds of trains on the mountainous Rhodope railway from Septemvri to Dobrinishte. Delivering about 850 hp, the engines were extraordinarily powerful by the time’s standards for single-frame narrow gauge locomotives. They were so successful that the BDŽ were keen to acquire more, but after the Bulgarian Tsardom had turned into a communist republic at the end of WW II, it became almost impossible to buy industrial goods from German manufacturers. Thus another 10 engines were delivered in 1949 by Fablok in Chrzanów, Poland. These Polish-built locomotives were technically identical to the original Schwartzkopff ones, but could easily be distinguished from the first series by the combined steam/sand dome casing and the odd-looking smoke deflectors, which seem quite ridiculous on an engine with a top speed of no more than 45 km/h! From 1966 on, after new diesel locomotives had arrived at Septemvri, all class 600.76 locomotives were relocated to Cherven Bryag in northern Bulgaria. Several have survived until today, albeit most of them in desperate condition. One engine – No. 609.76, however, is in operational state (now stationed in Septemvri again) and regularly used for excursion trains. My model portrays a locomotive from the second series as it ran in the late 1960s, some years after the whole class had been equipped with compressed-air brake and supplementary oil firing. As opposed to the drawing, it therefore has a shortened right side tank (to make room for the air compressor), air reservoirs below the rear tank and an extended coal/oil bunker. The model is in accurate 1:22.5 scale except for the track gauge, which according to G-scale standard is always 45 mm regardless of the prototype’s actual value (as mentioned before, class 600.76 has 760 mm, or 33.8 mm in 1:22.5). Therefore, it matches LGB garden railway track and rolling stock. Dimensions and height of the coupling bars are designed in a way that they work with LGB link-and-pin couplers. Three PF L-motors working on the central driving axle are responsible for propulsion, with the other drivers (BBB XL) being coupled by the side rods, just as in the real thing. One BuWizz brick allows to remote-control running direction as well as speed, and serves as a power supply for the lights (separately switchable front/rear headlights, combined cab & running gear lights). The LED equipment was purchased from Brickstuff; valve gear parts and main rods were supplied by zephyr1934. The running gear layout proved to be quite a challenge. The leading and trailing axle are of the Bissell type and can swing out by 9°. Of the driving axles, the second and third one are blind, while the fourth one is slidable laterally by +/- ½ stud. With this configuration, the engine is running stably on straight track, yet also able to negotiate LGB R3 curves and switches (1195 mm radius). The model consists of more than 3200 parts and weighs about 2.2 kg. Enough said – enjoy the pictures! Some views of the engine frame. For reasons of stability, I had to fill the prototypic cutouts with trans-clear plates and bricks. You can see the steam inlet pipes running to the cylinders on the outside, as well as the exhaust pipes inside the frame, leading steam to the exhaust nozzle in the smokebox. Underneath, the brake rigging is also reproduced: The leading/trailing trucks. The tongue connecting the truck to the main frame is free from load, which means that it could be kept prototypically thin; the engine weight is supported by the axle bearings via the 4x4 tile on top. Fully detailed cab interior, including a tiltable ”Marcotty“ type firebox door and functional folding seats: Complete smokebox interior as well. The exhaust nozzle, spark arrestor, smoke stack bottom, boiler tube openings and superheater tubes are visible: Plenty of water in the side tanks: Some boiler details, among others showing the generator hidden behind the smoke deflectors: The combined oil/coal bunker can be removed to give access to the power button and the charging socket: The three magnetic switches for the lights are hidden in the rear toolbox: Posing in front of a historic BDŽ crest: The cab lettering: The lights: Some matching, albeit non-purist decoration (1:24 GAZ M20 Pobeda by Yatming, 1:22 [sic!] VAZ/Lada 2106 by Avtoprom)… A short video, showing the valve gear in motion. Note that unlike many conventional model locomotives, the valve stem is really pushed back and forth. A video of the engine pulling an LGB G-scale train will follow as soon as possible. As always, you can download the lxf file here. Also, more and much larger pictures can be found in my Bricksafe folder. Finally, I’d like to say special thanks to Sergio Monai, who with his fruitful feedback and proposals kept me stimulated to achieve the best possible result! Comments are of course most appreciated – thanks for stopping by! Best regards, Sven Edit: New video here! -
MOC: 1:33 Hohenzollern 0-6-0T v2.0 - UPDATE with new features
Sven J posted a topic in LEGO Train Tech
EDIT: Model's latest revision HERE! Dear train community, a while ago, I presented my model of a small industrial shunting engine (for information about the prototype, and to compare the pictures below with version 1.0, please see here). However, although it proved to be a strong and reliable little locomotive, I was never entirely happy with it: The roof turned out to be very flimsy, and the battery box and IR receiver were completely blocking the view through the cab. So when BuWizz was announced, and I realized that its height would be considerably lower than that of 84599, and it would need no additional receiver, I thought I should give it a try and rebuild my MOC (even though this meant that I had to get a smartphone… ). The revised model has been completed for a couple of weeks now, but it wasn’t until last week that a BuWizz app version was released which allowed to control two output channels via one slider, so I couldn’t let the engine run until then… (By the way: One more thing that I would really wish for would be an option to „lock“ the slider in a given position, so that you don’t have to keep your finger on the phone all the time when the engine is running. Maybe someone from BuWizz will read this… ) Following alterations have been implemented: - BuWizz replacing the rechargeable battery box - boiler diameter increased by one plate for better scale accuracy and a brawnier appearance - slightly larger, smoother side tanks - revised colour scheme without black striping (thus adding to the stouter look) - additional small windows in the cab front - completely redesigned cab roof with more prototypical profile and no longer needing transparent plates to support the door openings - handrails below the buffer beams for the shunting men - strings as sand pipes - improved shape of the cylinders - smaller headlights - (at least rudimentary) cab interior thanks to the reduced height of BuWizz But unfortunately, still no opening doors – sorry, Sergio! (I promise my next model will have them. And it will be a BIG model. REALLY big!) With BuWizz set to „slow“ mode, gentle and precise shunting becomes possible; something one couldn’t even dream about while using Lego’s IR remote control system. As always, you will find larger versions of the images in my Bricksafe folder. Comments are of course most welcome. Thanks for stopping by! Best regards, Sven EDIT: Model's latest revision HERE! -
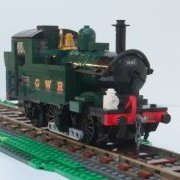
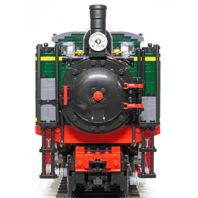
Hi guys. I'm quite new to Eurobricks and this is my first MOC. I'm from Britain so have done a quite recognisable Great Western Railway pannier tank. I've experimented with 2 liveries a British Rail black (post 1948) and GWR green (pre 1948) I have never used LDD that much so any hints are tips will be appreciated. Thanks
-
Greetings Train Tech, This MoC was actually built over a year ago! I originally designed and built it for use as a "demonstrator" model for a how-to post on Power Functions steam locomotives that I haven't gotten around to writing (although the precursor post is available). While we're waiting on that, I figured I might as well post this model. Prototype History British Railways built this class of 2-6-2 tank engines for a mixed traffic role. Apparently they were very similar to the LMS Ivatt Class 2 2-6-2T, from which they were derived. While none of the class survived into preservation, The Bluebell Railway is rebuilding one of the related 2-6-0 tender locomotives into an example of this class. Engineering Details Usually when I build a MoC, I start with the prototype in mind, then work towards the model. This model began with the desire to build "a small steam locomotive to demonstrate Power Functions", which then determined the choice of prototype. The Standard/Ivatt Class 2 has a number of helpful features in this regard: Small tank engine Large bunker could hide a Power Functions receiver Side tanks can cover up other Power Functions components And indeed, that's how the locomotive is laid out: Even so, the locomotive is quite cramped -- there wasn't enough room for an M-motor based transmission, so I went back to the trusty 9V gearmotor. The output shaft of the motor is very close to the driving axle: ... and it took me a couple tries before I found a good solution: The side tanks contain a channel that allows a cable to pass through, connecting the motor and receiver: The power button is on top of the smokebox and is only held in by gravity: Thank you for reading. Full Brickshelf gallery here.
-

[MOC] Canadian National X-10-a with Power Functions and 9v
Commander Wolf posted a topic in LEGO Train Tech
Well, it's been more than a year since I started work on my last locomotive MOC, the China Railways QJ. Having built most of the practical engines (not too big for R40 curves) that I was visually interested in, I had to wait a bit before my interest was piqued again on the locomotive front. My inspiration came from running the QJ at most BayLUG meetings for the past year and change. The QJ isn't necessarily unreliable or difficult to set up, but it's still not very convenient: the model isn't that easy to move around or manipulate due to the size, the tender, and the number of fragile bits. The lengthy drivetrain with its fair amount of friction and torque also prevents the engine from generating smooth low-end torque. Finally, BayLUG still runs 9v at most of our shows, and the QJ can't easily be converted to run on 9v. So this is really my second locomotive to be born of functional requirements (the first was my U30B): 1. It should be easy to transport [from here to there] and move around [a layout] 2. It should be designed with robustness as a key feature 3. It should be easily convertible between PF and 9v operation 3b. The PF components should be easily removable (also helps with charging) 3a. It should run smoothly when pushed [by a 9v power car] Requirements 1 and 3 really insist that this engine be a large tank engine: for 1 I don't need to deal with a tender when transporting or moving and for 3 it needs to be big enough to fit all of the PF stuff. It actually took me quite a bit of time to zero in on the X-10-a as large tank engines are apparently pretty rare in the US and North America: it seems that even most of our branch line and shunting steam engines were tendered. But eventually I found a drawing and the work began! What I learned from the QJ is that if the weight of the loco is properly distributed, one powered (and tyred) axle is good enough to generate usable torque. From this notion I designed the chassis to have exactly that one powered axle, which I could easily remove to remove tyres and gearing for 9v operation. For the same reason, the driven axle isn't cranked either; in the QJ I would have had to remove all of the cranks and all of the wheels to access the tyres or gears. The lack of cranks on the driven axle also lets me keep the chassis articulated, which should help minimize rolling resistance for 9v operation (say compared to a 6-coupled flange-blind-flange configuration for the drivers). The drive rods are made using the half-pin in rod-track technique, and there's a bit of a hack: the connecting rods have to go around a corner due to the articulation, so the travel is longer than the usual three studs, and the connecting rods are both loosely pinned down and made of flex. As far as I can tell this arrangement doesn't add significant friction, probably because the corner is very small. The engine is designed to be powered with two M-motors, but I'm using the E-motor right now for the novelty. Unfortunately it wasn't quite possible to get as much weight as I would have liked over the driven axle: the battery box must go behind the boiler due to its height, and that really limits weight distribution options. The loose 9v motor in the front is simulating the weight of a second M-motor, and it helps bring the net weight over the driven axle to maybe 60 percent? Here you can also see how all the bits come out of the engine: almost all of the top surfaces are detachable. Whether this is convenient enough to fulfill requirement 3 remains to be seen. Construction of the body is actually very similar to that of the QJ: structural integrity is mainly provided by studs-out beams and everything else is studs up. Stickers are created at 300DPI and printed on 3M 3200-L mailing label material. This is a small detail, but it is actually one of my favorite parts, inspired by and stolen from 60052: And finally a video showing the locomotive running. The first 70 seconds is PF running and the last 20 seconds is 9v running. For PF running I'm using the AAA battery box with AAA Eneloops and the aforementioned E-motor. The E-motor is actually pretty neat: it has a wider dynamic range than the other PF motors and it is quite quiet as well. Sadly it is a little bit underpowered as well; I'm geared down 3:5 and you can still see it struggle a little in the corners during the PF segment. The 9v segment is a bit hazy, but we ran out of sunlight because DST. The engine is actually smoother than I would have guessed in the unpowered configuration: you can see how it basically doesn't lose *any* speed in the turns, and the regulator is only turned up to notch 3. Alright, I think that's all the commentary I have on this. There is as usual a full gallery if it ever gets moderated. There's a bunch of build and reference pics there that I didn't show. EDIT: Instructions for this model are now for sale on Rebrickable: https://rebrickable.com/mocs/MOC-61355/NonsenseWars/148-canadian-national-x-10-a-powered-up -
Dear fellow AFOLs, it’s been quite a long time since my last MOC, but finally, I am proud to present another one. And I dare say that the waiting was quite worth it… But let’s take one thing at a time: I’ve always loved Swedish steam locomotives for their clean, elegant lines, their beautiful colour scheme and those massive snowploughs ; so when the Mallet project I announced a few months ago had failed, I thought it was time for an old Scandinavian lady in 1/33 scale – the TGOJ M3a No. 104. The prototype is a three-cylinder 0-8-2 tank engine (did I mention that I love tank engines, too?). Four of these locomotives were built between 1928 and 1930 by Nydqvist & Holm AB (NOHAB) in Trollhättan, Sweden, and delivered to Frövi-Ludvika railway, where they were classified as Litt. M3a, nos. 101–104. From 1931 on, the engines were operated by TGOJ (Trafikaktiebolaget Grängesberg–Oxelösunds Järnvägar). They were used primarily in freight service, e.g. for hauling ore trains to the harbours on the Baltic Sea. While engines 102–104 were scrapped in 1975, no. 101 is preserved at the railway museum in Grängesberg. The model consists of ca. 2100 parts and weighs about 1.4 kg. It features a working reproduction of the inner cylinder and a realistic frame with prototypic cutouts, inside-mounted equalizing beams, and brakes. The cab interior is as detailed as possible, given that the battery box is placed inside the cab. Two L-motors, controlled via one IR receiver (V2), are working directly on the fourth axle; the first to third axles are driven by the side rods. All the rods were made to measure by zephyr1934 (and I really want to thank him for this great job!), while the wheels are BBB XL and Medium ones. Enough said, here are the pictures: The frame during construction, showing the prototypical inclination (approx. 6,7°) of the middle cylinder, which allows the connecting rod to clear the first axle: Two more views of the frame. You can see the equalizing beam between the first and second axle as well as the one between the third and fourth: The motors are situated in the side tanks and in the lower half of the boiler: A longitudinal section (render). The red boat weight brick improves weight distribution: Some cab side detail. Note the small windshield glass between the windows: Self-made stickers: The rear windows are barred, to prevent them from being damaged while taking coal: The roof is detachable for easy access to the on/off switch and the charging socket. You can also see the rudimentary cab interior: Finally, here’s a video, showing the locomotive in action. Despite its long wheelbase, the model is able to negotiate LGB R3 curves and switches, as the trailing axle (Bissell type) swings out both radially and laterally (Note: The brakes between third and fourth axle are for display only. In operation, they have to be removed; otherwise, they rub against the fourth axle’s flange and make a terrible noise). As usual, you will find larger versions of the pictures in my Bricksafe folder. You can also download the LXF there. Thanks for your kind interest! Best wishes, Sven Edit: New videos here!
-
For a while, I've been interested in trying to squeeze PF into a small british style steam locomotive. I'd played around with several ideas in my head but couldn't for some time land on a design that looked good. Eventually, I found an image of an Andrew Barclay 0-4-0ST shunter that had slightly more squared-off tanks than the usual short saddle tank locos. I decided that was the route to go down and set about putting a plan together, and here is the result: There's not really very much to say about it. It's somewhat shorter in appearance than the prototype, party because that seems to have become my style, but practically because, on such a short wheelbase, there is a limit to the overhang you can have at the front and back for cornering purposes. I plan on refining it, of course, so any comments are more than welcome. EDIT: Short video of it working and a self-indulgent snap of my steam locos built so far: Power Functions Steam Shunter by Srbandrews, on Flickr
-
A fun little deviation from my usual steam locomotive MOCs. Thomas was my gateway drug into the world of steam railways. The design was actually a lot trickier to figure out than I anticipated, and I'm not 100% happy with how it turned out - but it'll do. I plan on incorporating this engine into my planned Lego railway layout too. Steam railways here in the UK often have "Thomas days" where one of their usual locos gets painted blue and fitted with a face, as an attraction for children. So this engine will represent that.
-
Yet another Lego 'Saddle Tank' locomotive of my own design, an 0-6-0 based on the locomotive 'Portbury' that still operates as a tourist attraction at Bristol harbour. I live in Bristol so, as a child, I had a number of rides on Portbury and it was probably an influence in my extensive love of steam railways. I've also updated the design for my GWR-style coal truck. It now has doors that can be lowered for disposal of its load! Sadly though, try as I might I couldn't get them exactly level with the rest of the truck's walls. But I'm happy enough with how it turned out.
-
After beginning my Lego train building career with a large engine, I had a real yearning to create a smaller engine. I originally had in mind to either build something LMS because I really like the dark red colour elements or another GWR loco (just because their the best). I hadn't until recently seen the GWR 5700 series in the maroon livery they wore after being bought by London Transport in the 50s. As soon as I saw them I thought it was pretty inevitable that I was going to try to make one from Lego sooner rather than later: I had a pop at building in 7 wide, which seems to be what everyone suggests for british loading gauges and it seems to have worked out ok, although the boiler plate is actually 6 wide plus door rails. You'll notice that the boiler is a little on the short and fat side; that's because I wanted to keep it as in-scale as possible with my King class. I'm quite happy with how the boiler looks anyway. This is where I'm at after two bricklink orders. I don't use LDD so I just try to work out in my head and on paper what I'm going to need and then see where that gets me. The parts that I know I need to change are: Make the dome in dark red (I couldn't get the parts I needed from either seller from my first orders) Improve the buffer bars and add some kind of coupling. Squeeze in a little more detail. If anyone has any specific suggestions for how it could be improved, I'd be more than happy to hear them. I would really like to add a London Transport decal to the side of the boiler. Does anyone know the best way to go about getting clear vinyl stickers printed? Thanks.
-
Hey folks! Well, some years ago I designed a model of an LMS (London Midland and Scottish Railway) Ivatt Class 2MT 2-6-2T engine designed in LDD. So one week ago I changed the livery to the one that was really used and reduced bricks (it just has about 580 for that detailed model). Furthermore I tried to incorporate Power Functions. There is enough room for them, the PF Small motor will definitely fit, but I'll try it with the PF Large motor first. Here is the design from LDD: Here is a pic where you see the PF components: I have built some of the model in real bricks, I just don't have all the parts yet( at least in the right color), though I nearly finished one side: The trailing wheels all clear nicely in curves. I also designed a model of the BR 9F 'Evening Star' which could be operated with Power Functions or 9v in the tender, maybe I will try my hands on that one sometime: I hope you enjoyed it, I will update the thread when it's more finished.
-
The very first Train MOC I did was a very small 0-4-0 Pannier Tank engine with Power Functions. It's ok, but fitting PF into it kinda threw the proportions off a bit, so I wanted to do a proper one which looked a bit more realistic in shape. So I set to work on one which was, and built it from the various different colour pieces I had, before placing an order for the parts in needed in specific colours. However, I couldn't decide on which colour scheme to have it in, whether to have the top half of it in Black or Dark Red. Eventually, I decided to do two of them, one in each colour. After placing nine Bricklink orders and an order with Big Ben Bricks in America for his Medium Driver wheels, I received all the orders this week, and built them both over the past couple of evenings. The Dark Red one has PF integrated into it, while the Black one can fit PF but doesn't yet have it, instead having brick-built 'placeholders' for the PF gubbins. I'm also waiting on a custom order from America for 13-long connecting rods, which should finish them off nicely. If anyone on here is in the UK, they will be on display (along with my other train MOCs) at the Bradford Brick Show on 8th/9th Feb, and at the Yorkshire Brick Show on 22nd/23rd Feb. So without further ado, to the pictures. Can you spot the differences?
-
I've spent the evening building a Pannier Tank Engine. it doesn't run, as I haven't put an IR receiver or battery box inside it yet (I'd have to take them out of my Constitution train), but there are 'dummy' ones in there which I built out of bricks so I had something to work around. It's sat on top of the PF train motor (I removed my Constitution tender from the motor temporarily) to see if it would sit on it well, which I think it does. In the second photo you can see how it's meant to sit on it, and how most of the body is basically built onto the (dummy) battery box. There should be enough space for all the wires... What do people think? Can you see any potential issues or problems? Looking at it now, I'll probably lower the roof by one plate, and I might replace the windows with something else. I'll probably do other stuff to it as well, but for an evening's work, I'm quite pleased.