Search the Community
Showing results for tags 'steam'.
Found 189 results
-
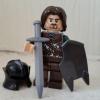
I have been wanting to build this locomotive for almost 8 years. It is a Reading T-1 Northern 4-8-4. It ran excursions for the Chessie System in 1977 and 1978. I first started designing it in MLCAD in late 2007. Since then I have redesigned it several times and even started building it in brick in 2011. However, I got stuck, became discouraged and didn't get too far. I have never built a large steam engine before so the thought of it was quite overwhelming because I knew it wouldn't be easy. On top of that, because all of the other great LEGO steam locomotives out there, I set my expectations very high for what I wanted it to look like. I am still far from being done after about two months work, but I am far enough along that I am finally ready to share. I have started working on the tender also, but it is a very rough draft right now. I don't claim very many techniques used as my own. I took inspiration from many other MOC's. Mostly Tony Sava for his #4449 Northern. A lot of the pilot truck and cylinder construction is based on his model. After serveral failed attempts trying to figure it out on my own, it was time for help. Here is picture of the real thing For fun I started a blog where I am going to document my LEGO builds. Right now there is a little history of the first 8 years I spent on this engine: John's Blog Thanks, John
-
Hi everyone Christmas Train22 by Cristiano Grassi, su Flickr This is my version of the Christmas Train and i think it will be perfect in any Winter Village projects and dioramas. It is based on the Constitution train set locomotive. When I project this train I think about Holydays and to what I wanted to find under my Christmas tree when I was a child. I hope you like and comment it. If you want you can also support this project on Lego Ideas following the Link. https://ideas.lego.com/projects/95546 Thanks to all.
-
Although I can't participate in the "Space Pirates" contest by using LEGO's Digital Designer (and changing colours etc.), I still felt inspired by the contest's theme. So I played around with some Ideas and created the first two members of my crew. You can find more pictures in my LEGO-Folder on my homepage!
-

Small locomotive shed and workshop + coal and water tower MOC's
Murdoch17 posted a topic in LEGO Train Tech
This shed was first built around 2005 by my father as a present to me. It was originally three tracks long, with no side workshop, until I was about to order parts to increase it's length to four tracks. I suddenly decided that while I was at it, it should probably have a removable roof. It kinda snowballed from there into this design seen here. I added a workshop (with it's own removable roof) to the left side of the model. I then took the main section's roof off and made it detachable. The building is 100% build-able, but there is a catch: (Purists look away now!) I'm going to cut a 12 x 24 stud section of an already butchered 48 x 48 baseplate (It's currently in a 12 x 48 size strip, with thre rest being used on my father's own train shed) and replace the hodgepodge of baseplates seen in the picture. Basically, I'm keeping a 32 x 16 and two 16 x 16's for the main shed with the custom plate for the side work-area. The inside will be taken up by my dark green 2-6-0 "Mogul"-type steam locomotive number 4613. The workshop features tools from set 10027: (2003's Train Shed) a metal lathe, drill press and tool drawers, plus a coffee machine. The rear of the model. I only need to buy about 50% of the bricks. There are 833 total bricks in my new model minus the 418 in the original (unmodified) model, so 415 bricks to buy. (Those 3x4 roof slopes are going to be expensive!) My father built his original gray and black Water Tower way back in the 1990's, back when 9V was king. He made me my water tower in 2007, but I later realized that it needed a companion coaling tower. I made my first attempt at a much larger size than this using pictures from LGauge.com, a website of older Lego train models. Rear view of the refueling towers. I have these two models on my desk as we speak. (The coal tower was built in mid-December 2014.) Here is the LDD file for the shed + workshop: http://www.mocpages.com/user_images/80135/1424113318m.lxf And here is the LDD file for the coal + water towers: http://www.mocpages....1412536438m.lxf -
So I've been steadily increasing my collection of steam era 7 wide wagons over the last few months. Most of them came out remarkably well and remarkably quickly and needed little or no modifications to the original design, others (well the brakevan) needed a little work but didn't take too long all the same. Then there's the van conundrum. I just can't get these right, and it continues to bug me that the most simple shape a railway wagon can be is causing me the most issues. The original design took a lot of time to perfect, and in LDD looked pretty good, but it turned out to be less than solid in the bricks, and whilst it basically looks really good, it's also a bit too short compared to the other rolling stock I have and am designing. After a fair bit of faffing, I was still not altogether happy, so I decided to pad around the net for other people's ideas, and I stumbled across H.A.Brick's PF battery van kit. It arrived, and I enjoyed building it (there's an extra instruction book and some extra pieces to build it without the sensor hole), but it only served to highlight the problems with my existing design (too short, not sturdy enough). Never the less, it gave me some ideas, such as using some black Lego to represent the frames the van is sat on to bulk up it's height, so after slightly modifying the (upper part of the) build to closer fit my needs, I set upon one of my existing vans to have a look at the idea with my standard truck chassis design. The height was good, but the bufferbeam was terrible, in order to line up with the rest of my rolling stock, it needed to be lower than the 'frames' which just doesn't look right at all. The current line up, L-R: modified H.A.Bricks van, modified version of my cattlevan MOC (with some random colours and random gaps), my original standard van MOC. The modified H.A.Bricks design. Internally strengthened and black plate/rail removed from between the body and the roof to bring down to my preferred height. (See also the rather ugly bufferbeam of the truck next to it.) Modified version of my cattle van. Although now the correct hight, I really don't like the fact the bufferbeam isn't inline with the 'frames'. Original design. See the less than perfect panel alignment due to less than perfect internal structure plus old and chewed bricks. ----------------------------------------------------------------------------------------------------------------------------------------------------- Still not exactly happy with any of the designs, I went back to LDD. First I married the H.A.Bricks design with my own frames, and it wasn't bad but I was still not sure it was right for my preferred style and level of detail. Another thought I had was to add an extra plank to my existing design (and drastically redesign it internally). I've come up with several variations, none of which feels like a complete winner to me. H.A.Bricks inspired vans, both short and long bodied (whichever style I settle on, I will eventually produce long and short bodied versions). Several variations on the 7 high version of my van and cattle van. At the moment, my preferred normal van is the one with the 1x8 tiles running down the side and preferred cattle van will probably be a long bodied version of the one with the 1x8 tiles hanging down the side (although I can't decide on plain doors (middle version) or slatted doors (other two). ----------------------------------------------------------------------------------------------------------------------------------------------------- Any ideas or suggestions are very welcome, also if anybody wants the LDD files to play with (complete with engine and brakevan), feel free to PM me.
-
Hi all. Here's my (WIP) first attempt at a steam engine. So far I'm pretty happy with the boiler and tender. The cab, wheels, centre coupling and some details need work but they'll have to wait until I can get more bits. The chasis isn't very strong when handled at the moment, may redesign from scratch. It's also having derailing issues on corners - I think the problems the current centre coupling. C&C welcome.
-
Hi all. I've just come across this wonderful model by someone called Michael gale. https://m.flickr.com/#/photos/michaelgale/15266799517/ (can't add a photo via mobile sorry). I've got lots of track from my younger days and seeing this I'm tempted to get back into trains. So where would I start? Where do I get the wheels and are there any instructions online for anything similar to get me started? I'd like to power it using the 'old' wheel unit (via the tender?). The ones from around the mid 90 ' s as that's what I have. On a budget so would prefer to use these new fangled infrared things if possible. Any help or advice would be greatly appreciated! Thanks ☺
-
For a while, I've been interested in trying to squeeze PF into a small british style steam locomotive. I'd played around with several ideas in my head but couldn't for some time land on a design that looked good. Eventually, I found an image of an Andrew Barclay 0-4-0ST shunter that had slightly more squared-off tanks than the usual short saddle tank locos. I decided that was the route to go down and set about putting a plan together, and here is the result: There's not really very much to say about it. It's somewhat shorter in appearance than the prototype, party because that seems to have become my style, but practically because, on such a short wheelbase, there is a limit to the overhang you can have at the front and back for cornering purposes. I plan on refining it, of course, so any comments are more than welcome. EDIT: Short video of it working and a self-indulgent snap of my steam locos built so far: Power Functions Steam Shunter by Srbandrews, on Flickr
-
Let me begin this topic with some of my latest MOCS: You'll find all my steampunk MOCs on my flickr gallery I hope you'll like them I'll post here my future new work and WIPs, so, soon!
-
I have just completed the modifications to incorporate the suggestions for my 6 wide power functions shunter. Please let me know what you think and I welcome suggestions for how it can be improved. Thank you all for your support on https://ideas.lego.com/projects/82031 I regret we have only 100 supporters now so I don't forsee this getting up as the 50th anniversary of Lego Trains train. Fortunately James Mathis has what I think is an even better idea https://ideas.lego.com/projects/86744 so if you haven't supported this one I can highly recommend his. The biggest change is the ability to now turn the battery box off and on by pressing the front of the forward dome. I have some pictures on Flickr that show how it works. https://www.flickr.c...57649279163680/
-
So a couple of people have asked for a more detailed look at some of my MOCs, and who am I to say no? Each gallery will come with the LDD file. Although the LDD designs are always my own work (unless otherwise stated), a lot of inspiration will have been taken from other people's work. I will endeavour to credit anyone who's work has inspired me. To make things easier, I'll provide a link to all my MOCs from this first post: Locomotives - Coaches - 6 Wide Pullman Wagons - More MOCs to come! 6 Wide Pullman The basic style for this build was very much inspired by youtube user technoandrew's Pullmans. LDD File: Click me! LDD notes: Roof is held on by friction alone. Turn tables fit into the smaller arched formed windows to make the toilet windows. The 2x4 black tiles (of which there should be 4, not 2) fit into the larger arch formed windows to represent the door windows (and hid the ugly stuff behind them). The frames under the coach are formed using some chopped 3mm hose.
-

[MOC] - Douro Historical Train (Steam 2-8-4 + Shunter + 5 old carriage
Sérgio posted a topic in LEGO Train Tech
Hello everyone, This is one of my greatest creations , the replica of the historic train River Douro , Portugal . Has two locomotives, one steam with the 2-8-4 configuration, the CP0186 built in Germany in 1924 by Henschel & Sohn and the CP1185 Diesel , a small tractor Sentinel which was painted black (originally is yellow ) nicknamed " Darth Vader " to ensure the reliability of the locomotive Steam in case of failure . Both have the engine 9V engines, need to pull the 5 wood carruages 3 are color lacquered wood , the other 2 are painted dark green on the outside and white inside . This train makes tourist trips in the summer , as a rule, travel always with the windows open , as such , I did not use any window or transclear panel , simulating that the windows are wide open and so I could get enough space to have comfortably seated 12 minifigures in each cars ( total of 60 minifigures ) . The train have more than 5000 pieces is 7 wide and 2.20 meters long, flowing smoothly over all the possible configuration rails. You can seem many photos of the original here http://trains.smugmu...Douro/i-mQQxwdG LEGO - Comboio Histórico do Douro by SergioBatista, on Flickr original size: https://farm8.static...46008e9b4_o.jpg Video -
It has been a bit quiet from my side the last weeks, so here is the latest version of this engine: It now features 2 medium power function motors. A version 3 has been build, with improved drive train [/url] USRA 0-8-0 version 3 [Main] by UrbanErwin(EPJL), on Flickr USRA 0-8-0 version 3 by UrbanErwin(EPJL), on Flickr And this is what happens when you aren't careful when handling an engine like this. oh crap by UrbanErwin(EPJL), on Flickr The complete timeline of this engine; [link to album]
-
Greetings Train Tech, I finished this a couple of months ago, but I've only just got around to posting it. This unusual locomotive was designed in 1900. The Gr670 is a compound locomotive, featuring two high-pressure cylinders on one side and two low-pressure cylinders on the other. While a cab-forward design seems like a logical way to build a locomotive, it doesn't seem to have been that popular, presumably due to logistical challenges, such as where to store the fuel (note the giant coal bunker behind the cab, overlapping the boiler). The Gr670 was apparently nicknamed "Mucca", meaning "cow". The locomotive is essentially two trucks (one containing the pistons and the drivers) pivoting under a rigid body. It took some messing around to find pivot locations that allowed the locomotive to clear curves without the flanges of the drivers scraping against the boiler. The tender is probably my favorite part of the model. The cab-and-tank appearance of the tender echoes that of the locomotive, lending weight to the theory that the locomotive was nicknamed "mucca" because the locomotive and tender together reminded some observers of a cow and calf. And some video: Full Brickshelf gallery More info on the Gr670 Wikipedia article (Italian) Let me know what you think!
-
I've been looking around for my next loco to tackle, and I've run into a bit of a problem. What ever I model, I want it to be from the Southern Railway, but the vast majority of the nice looking and/or recognisable ones suffer from the same problem, large wheel arches. There *are* a few Bulleids I could do, but seeing as I'd inevitably just copy the rather nice ones someone else has done, I'd like to do my own thing first (I know I'll break down and build at least one eventually). So, do any of you guys have any techniques for dealing with arches too big to get away with slightly undersized wheels/slightly too high footplates?
-
So, I finally finished the Q Class, and I'm really happy with it! Have a gander... The cab area. Tender detail I decided to design the tender so it looked good even without a load of coal. It doesn't go all the way through, but it looks like it does! I'm going to replace the random assortment of small black bits with 1x1 black cheese wedges (mainly so I can use all the other bits more usefully), but they haven't arrived yet. General shots on the railway. Next up the freight wagons for her to pull. I've just ordered the bits for the brakevan, so look out for that in the next couple of weeks hopefully.
-
Hey SteamWars-friends This is my interpretation of how the iconic Starfighter of Obi Wan might have looked in the Victorian Ages. Entry for the SteamWars-Madness on FBTB in the semifinals against Markus. And in addition i build a fitting HyperSteam-Ring for faster travelling through the SteamWars-Univsers: More photos can be be found here. All my SteamWars build will also be displayed in Skaerbaek. Probably the only chance to see them in "real". Good luck to Markus and thanks for stopping by. Best regards Jonas
-
I'm not sure if there as a thread for this yet but I didn't find one. Is anyone on Steam? I think it would be fun to share usernames and create a Eurobricks community. I'm sure there are some common multiplayer games between us (I don't own many myself though ). My username is montgocloud, what about you guys? EDIT: Perhaps this would be better suited for the Community forum.
-
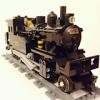
... or at least that was what it was supposed to look like [EDIT] V2 with LDD file [/EDIT] Hello all, This is my latest steam engine, based on a USRA 0-8-0. USRA 0-8-0 by UrbanErwin(EPJL), on Flickr It features BBB Medium drivers. The thing is powered by a M-motor, and receives current through a emptied 9V train motor (don't worry, it broke before I took it apart) It features some pressure gauges. USRA 0-8-0 by UrbanErwin(EPJL), on Flickr I originally intended to add a decoupler based on this design, but the tender would become too long to look good with the engine itself. The light gray area is for a logo which I still have to create and print. USRA 0-8-0 by UrbanErwin(EPJL), on Flickr More pictures Thanks for looking, improvement points are appreciated
-
EDIT: Instructions are now available on Rebrickable: https://rebrickable.com/mocs/MOC-102718/NonsenseWars/148-pennsylvania-railroad-t1-duplex-v3-power-functions You can see some new footage and an updated explanation in the following videos. Also cleaned up dead links from the original post.
-
Hello. I'm new to Eurobricks. Might as well show off my creations This is a pibed walker made for one minifig. It took me ~a day to complete, and it was a very fun build! It's harder than it looks to get the legs in it's right position at this scale to make it look good, but also to make it stand upright well enough. Please comment about what you think. Please do check my other sites as well!! (and follow me!) Instagram Flickr Reddit
-
Hello my friends!! this is my frist try to do a steam! its again a portguese replica, 7wide, lots of details, I hope to build it soon. hope you like it :)
-
Above the barren and obscure wastelands near the Imperial London rises an odd and huge figure. But it is not one of the giants of the old age. It is a machine and it is a house, in fact it is the homely home of Mr. Edward Higgs, eccentric inventor and gentleman who definitely respects peace and desolation. Higgs's home is a typical home of an bachelor (at least on some aspects). There isn't that clean as there's no one to nag about things. As Higgs's inventing projects take some room (one of the three floors) and the machinery of the house isn't that small neither (it is an old steam sawmill tower) he has his bedroom, toilet and the old boiler room all in the same space. Isn't that handy? He doesn't have room for chairs around his table, but fortunately he can sit on the stairs while eating. The sewer system is also very compact and helps Higgs to avoid the sewage costs. As it would be troublesome and time-consuming to climb all the 32 ladders when coming home, Higgs has built a fold-out ramp for his helipack on the first floor. There is also a big steamp-powered hoister above the ramp to make it easy to lift heavy objects into the house. Another of Higgs's homely inventions is the big propeller on the wall of the first floor. It is not an air conditioning system, but a wind tunnel propeller that helps Higgs to make his airs vessels as aerodynamic as possible. This is my entry on the Home Sweet Home contest, category A. The house fits easily on 48x48 baseplate. I'm happy to be able to take part on this contest as steampunk is definitely my favourite theme and contest allowing that madness are not that common. This MOC was built and photographed in two days; late bird catches a worm anyway. More stuff can be found on Cyclopic Bricks, Flickr and Brickshelf.
-
This is my first train MOC, and it felt like a big, complicated project. It’s based on inspired very loosely by the Jupiter train from the Lone Ranger film. I gave myself a simple brief when designing it- it must be fully compatible with the Constitution train, and have some interesting function. I took most of the time connecting together a complex trigger system for a light brick in the firebox, which is activated by a small lever in the cab. I didn’t actually look at any photos when building the thing, and I’ve now realised the actual thing was mostly silver, like most things in the Lone Ranger (Horse, gun, bullets, mine etc), but here we go with a red, dark red and gold-themed train. I built a coal carriage based closely on the Constitution’s and a few other carriages, but I’ll share those later. Anyway, I’ll let these amateurishly taken photos tell the tale best. Most of these pictures link to huge version, but this one goes to my Flickr. Front view, showing those headlights I'm quite proud of. A neat side view The train's back half, with the coals. Our cheerful driver works the controls here Here is the driver messing about with some vent on the side, which is only here because I found it fitted there. Finally, the "play function" I built into the model. Here is the cab's interior... ... And when that lever is pulled upwards by an enormous finger-thing of The Man Upstairs... It lights up! You have no idea how long that took. I had to rip out and reconstruct the interior many times before that would work. Anyway, that's it until I finish off and upload all the carriages I made to go with this thing. Building it was a new experience and it was fun working with all these new-to-me parts. Comments welcomed!
-
Here we have 3 railway treasures of years past: -Southern Pacific #4460: the only War Baby Daylight left and herald of the end of steam on the Southern Pacific. -The Aerotrain: a failed prototype from General Motors meant to save passenger rail, one of only two ever built (though both survive) -EMD FT #103: the diesel demonstrator that proved steam power could (and would) be forever replaced by diesel locomotives. All three can be built in real life, and the LDD File is included at the bottom of this post. Electro-Motive Division (EMD) FT type #103 diesel demonstrator Built by General Motors (GM) / Electro Motive Division (EMD) in 1939, this is the diesel that showed the way to the future, signaling the start of the diesel era. However, as one day must start, another must end. This two A & two B locomotive set got the ball rolling towards the end of steam as mainline workhorses by pulling a modern two steam engines backwards - while said engines were at full forward throttle. Anyway, this particular engine was originally owned by Electro-Motive as a demonstrator. It was sold to Southern Railway and eventually placed in the Museum of Transportation in St. Louis, Missouri. It was repainted in it's original Electro Motive colors for it's journey to Railfair '91 held in Sacramento, California. It is currently on display once more in the St. Louis Museum of Transportation. The FT class eventually led to the entire F series, one of which is presumably the basis for the Santa Fe Super Chief engine in set 10020. This LEGO model features the the round porthole windows and no interior. The windshield is supposed to be the printed version from the Horizon Express. The three exposed studs on each of the nose sides are for tiles spelling out "103". Here is it's real world counterpart in 1989. (photo by Wrong Main on Flickr, seen here: http://www.flickr.co...r-dDFRKh-dxsdeg ) Sadly, the B-Unit is now a rusted hulk, but the A unit is thankfully still in this pristine condition. Southern Pacific GS-6 Daylight #4460 steam locomotive Southern Pacific 4460 is the only surviving GS-6 Class steam locomotive. The GS-6 is a semi-streamlined 4-8-4 Northern type steam locomotive. GS stands for "General Services". The locomotive was built by the Lima Locomotive Works for the Southern Pacific in 1943. The GS-6 lacked side skirting and red and orange "Daylight" paint found on previous locomotives of the GS class, and were painted black and silver instead. This was because the US government controlled locomotive manufacturers during World War II and had turned down Southern Pacific's order of fourteen new Daylight locomotives. Southern Pacific re-designed the engine for general service and it was finally approved, but the government took four of them and gave them to the smaller and power-starved Western Pacific Railroad Their smaller size when compared to previous GS class locomotives and the fact that they were built during WWII earned them the nicknames of "War Babies" and "Baby Daylights". 4460 is famous for pulling what was to be the final movement of steam on the Southern Pacific Railroad in 1958. Following the final excursion, 4460 was donated to the Museum of Transportation in St. Louis, Missouri, on April 16, 1959, where the engine has since sat along with many other historic steam and diesel locomotives from around the country. The 4460 is sometimes called the "Forgotten Daylight", referring to its only surviving sibling, the very famous Southern Pacific GS-4 #4449. The LEGO version is supposed to have Big Ben Brick XL 4 flanged & 4 unflanged wheels. The one seen here are placeholders. The studs on the cab and tender rear are supposed to have tiles saying "4460" on them, while the tender sides are to say "Southern Pacific". Here we see Southern Pacific #4460 in 2009. (photo by Wampa-One from Flickr. Link: http://www.flickr.co...e-fWQ6dQ-fWQ6gW ) The Lego version is based on Anthony Sava's version of the GS-4 Daylight #4449, a related cousin of the #4460 and the only other Daylight left in existence. I was contacted by Jan Snyder on MOCpages who had this story to tell of his interaction with #4460: General Motors (GM) Aerotrain demonstrator consist The Aerotrain was a streamlined trainset introduced by General Motors Electro Motive Division in the mid-1950s. Like all of GM's body designs of this mid-century era, this train was first brought to life in GM's Styling Section. Chuck Jordan was in charge of designing the Aerotrain as Chief Designer of Special Projects. It utilized the experimental EMD LWT12 locomotive, coupled to a set of modified GM Truck & Coach division 40-seat intercity highway bus bodies. The cars each rode on two axles with an air suspension system, which was intended to give a smooth ride, but had the opposite effect. The two Aerotrain demonstrator sets logged over 600,000 miles (970,000 km) and saw service on the following railroads: the Atchison, Topeka & Santa Fe Railway; the New York Central Railroad; the Pennsylvania Railroad; and the Union Pacific Railroad. Starting in February 1956 the Pennsylvania Railroad ran the Pennsy Aerotrain between New York City and Pittsburgh Pennsylvania, leaving New York at 0755; the round trip was scheduled 7 hr 30 min each way. From June 1956 to June 1957 it ran between Philadelphia and Pittsburgh. In 1956 Aerotrain No. 2 was leased as a demonstrator to the New York Central, and ran between Cleveland and Chicago. In March 1956 the Aerotrain made experimental runs for the Atchison Topeka & Santa Fe Railway in California as the San Diegan between Los Angeles and San Diego. Its use ended because the trainset had to be turned after each trip and it needed helper locomotives on the Sorrento Grade north of San Diego. Starting December 1956 Union Pacific ran the ex-New York Central Aerotrain as the City of Las Vegas between Los Angeles and Las Vegas. The train was eventually relegated to Chicago commuter service on the Chicago & Rock Island Railroad. GM's "lightweight with a heavyweight future" was introduced at a time when US passenger train revenues were declining due to competition from airlines and private automobile travel. Although it featured a streamlined design, the Aerotrain failed to capture the imagination of the American public. The cars, based on GM's bus designs and using an air cushioning system, were rough riding and uncomfortable. The design of the locomotive section rendered routine maintenance difficult, and it was underpowered. Both trainsets were retired in 1966 after a decade's use. The Museum of Transportation in St. Louis, Missouri and the National Railroad Museum in Green Bay, Wisconsin each have one of the locomotives, and two of the cars. This LEGO version is to have a red number tile saying "3" (even though there were only two trains ever built! ) on the cab sides, and i'm not quite sure this will go around curves or switches. This version if based on a couple pictures I saw on Brickshlef. Oh, and the pieces on the front bogie between the wheels are CMF paint cans... has anyone else done that? Aerotrain #3 and it's two remaining cars from the original 10 car set in 2009 (photo by emzepe from Flickr. Link: http://www.flickr.co...s-dHVGkr-edHdNC ) Sadly, the other 8 cars were scrapped. The other Aerotrain set is in an enclosed space in Green Bay Wisconsin. Three Railway Treasures Here we have them all together. LDD file for all three: http://www.mocpages....1395015218m.lxf Comments, Questions, & complaints are always welcome!