Search the Community
Showing results for tags 'sBrick'.
Found 171 results
-
Hello everyone, bare with me as this is my first post and my make some newb no-no's I've been looking to order a set online with future hopes to install a Sbrick and have some fun with the kids. Now, i can't decide what to order...if i order anything at all. Was looking at Aliexpress and can't decide what to get. i want a good decent set that offers most of what i'm looking for in a bundle. Keeping in mind, most of the outdoor area here is either bumpy, grassy or parking lot. - maybe looking for racer, possibly F1. but i see that getting stuck a lot around here except the parking lot. - WHEELS and SUSPENSION ;) family are mechanics, this is the only way i get to keep my hands clean ;) - parts gearbox, 4wd... - was planning to get SBRICK, motor advice? With that being said, i'm thinking of a crawler/buggy type..... long suspension, big wheels, room for motors..... able to "take a beaiting" Any suggestions, I thinking along the lines of the 3335 or 3360?
-
[Reverse-Engineered] Downhill Racer + "Fireball" MOD
offroadcreations posted a topic in LEGO Technic, Mindstorms, Model Team and Scale Modeling
So, some users may remember that in Russia there was an event in June 2016. Some users, especially me, liked this one the best, so I decided to reverse engineer it. I did it at the end of July 2016, but I never posted it here. Here are some pictures of the initial version, which had some problems, especially the suspension. I decided to give it another go using the LDD file I made, and add my own details. So this is what I created... The rear suspension comes directly from @Madoca 1977's PF Buggy 2.^^ LDD: sorryitsconfusing.lxf Rebrickable: http://rebrickable.com/mocs/MOC-7147/offroadcreations/downhill-racer-reverse-engineered/ Enjoy! -
Skeleton Street Racer
offroadcreations posted a topic in LEGO Technic, Mindstorms, Model Team and Scale Modeling
Hi everyone, I'm showing you my newest MOC, the Skeleton Street Racer, but first, let me explain how it came to be... I was finishing up my 9395 4x4 Mod and thought it would be cool to have a car frame to tow around to show it's capabilities. I stole the wheels and tires from the 8041 on my shelf, and built a chassis. I thought I shouldn't stop there, so I made the rest of the body. I told myself I shouldn't make it really detailed, so it wouldn't distract from the truck, but that thought quickly left my mind as the car got more and more on the chassis, and later because @letsbuild wanted to see more of it. When it was finished, I pushed it around because it was manual then. The steering has Ackermann-like geometery, and the turning radius was small, so I knew it would be great as an R/C car. I added a spoiler last. After taking pictures of it with the truck, I took out the steering system and added a Servo, and rebuilt the rear with 2 L-Motors geared 3:1, and a differential. The gear ratio ended up being 2.143:1. It worked great, so the next day I filmed the truck with it, changed the rim and spoiler colors, and filmed and photographed it. So it went from a mock-up car to a great R/C one. Video: Don't forget that I didn't film indoors, but it goes really fast on wood floors too. Some quick outdoor shots: It is called the Skeleton because it is just the frame of a car.^^ The back, where you can see the SBrick location and spoiler.^^ Another one of the back.^^ Some normal photos: Everyone's favorite, the underside.^^ You can invert the spoiler for a different look.^^ Rebrickable: http://rebrickable.com/mocs/MOC-6745/offroadcreations/skeleton-street-racer/ LDD: https://www.bricksafe.com/files/Offroadcreations/fast-frame-car/Skeleton.lxf Thank you for viewing and have a great day. -

[HELP] Buzzing Motors with SBrick
Saberwing40k posted a topic in LEGO Technic, Mindstorms, Model Team and Scale Modeling
Well, I recently took the plunge, and purchased a few Sbricks for use in my creations. In order to test the setup, I connected some motors, and used a profile I threw together. The setup I used has 2 SBricks being controlled by my device at the same time, and my problem is that, with one of the SBricks, I have two M motors hooked up to it, and when I activate them, they run just fine, but when I let the joystick return to center, the motors buzz, almost as if the SBrick is not fully shutting them off. I'm not sure if it's a problem with the SBrick, or not, as it is one I tested before, and it had trouble with controlling my other motors. Is there a setting I am not aware of that would fix this? Has anyone else had this issue? Update: I tested it, and it seems to be an issue with the brick, although, in a bizzaro twist, I don't have the problem with sliders, only when those channels are controlled by joysticks. -

[MOD] 42042 inspired - full manual update
MangaNOID posted a topic in LEGO Technic, Mindstorms, Model Team and Scale Modeling
hey all, I thought I may share my Modded 42042 crawler crane. hopefully this presents as a little bit different than others (there is many ofcourse) this 42042 has 2 Sbricks, 6 M-motors 2 L-motors and sound functions! because I wanted a small challenge in the build (as this was my first Lego set in 30 years since i was 12) I decided to have a coaxial system integrated in the original chassis and keep all the motors etc up top. also I only used bits from 42042...well except the sound functions and motors and Sbricks :) I wanted to keep a few charecters of the original 42042 aswell such as ladder and continuous noise when operating. originally I was going to try running a motor with some cogs to get the noise but then thought of a pneumatic pump to get a more 'pop' engine sound. so I have one motor hooked up to a 8110 pump for continuous 'engine' sound. this is where i thought it got interesting as I was trying to amplify this sound with Lego bits and ended up with a whistle/beep sound! so now I have another 8110 pump hooked up to another motor connected to 'circuits' mode in Sbrick to operate it when the crane moves or slews. it all just squeezes in the original body size. I changed the slewing cog to be at the same plane as the turntable because the original setup would not let me slew even 200 grams without cog skipping. I had to fully plate the lower chassis so the cog could not work its way off. the coaxial drive took a while to get right too as I really had to stiffen the pre turntable bits up. there is a few photos of progressive attempts. anyway there is a whole bunch of changes and I'll just let the photos and video speak for themselves. hope you like. oh and also just want to say that after doing this video I really appreciate how everyone does videos here as they are a lot of work! I thought they would be easy compared to the animated short films I do but this vid was a lot of work so thanks to all for Video efforts. to skip to the sound function bits (if you dont want to see another video of 42042) go to 3mins roughly -
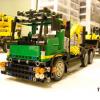
[MOC] Case 620 HD Tractor
Brick_Sticker posted a topic in LEGO Technic, Mindstorms, Model Team and Scale Modeling
Hello All, Since we now have tractor tires, let's build some tractors! Here is my version of the Case 620 HD farm tractor, rated at 620 hp and designed for large farms: First, the real thing: Now the Lego version: This tractor features 4 pneumatic remotes, as well as pneumatic steering controlled by a servo and switch. Other features include seperate PTO, drawbar, recovery cable, opening hood and pivoting center section. It is driven by one XL motor, and the pto and air pump are powered by M motors. There wasn't room under the hood for two receivers, so an sbrick is used to control all functions. Additional pics: Short video clip of steering: Thanks for looking, other pics and LXF file are available at http://www.brickshelf.com/cgi-bin/gallery.cgi?f=568801 Brick_Sticker -
 My MAN TGS 8 x 4 Cement truck has been upgraded from Power Function to SBrick, but rather than killing the old red truck, I made a new Bright Light Orange / Dark Red version with a series of small upgrades: In the video I go through the functionality and compare it to the old version: The truck was finished a couple of weeks ago, but I wanted to improve some details before making a video and posting it here. The most "controversial" change (at least when I it comes to changes which I'm unsure of) is the windscreen. To replace the 12x2x4 windscreen that I'm using in everything with the 12x3x3 does change the whole aesthetics of the truck quite dramatically. The A-pillars might be too massive now, but I have chosen to keep it. For the picture above I have also reduced the angle of the windscreen slightly in order to better fit the A-pillars than shown in the video. Another battle was to use either a single time or details in two plates width to cover the SBrick: I ended up using 2 plates (the gray 1x4 and 2x3 plates under the tiles) which protrudes just a bit too much on the side. Still I like it better than simply using tiles as seen on this earlier version: It doesn't look better, but it looks more realistic (at least in my opinion. It's the same rationale I'm using with the windscreen) And just for fun. Here is the same picture with a slow shutter speed and the barrel rolling: Here is how to program the SBrick for the truck: Here is the old thread for the red truck: BrickShelf gallery, once approved: http://www.brickshelf.com/cgi-bin/gallery.cgi?f=568737 Building instructions to appear once I have made all those I promised for the DAF.
 -
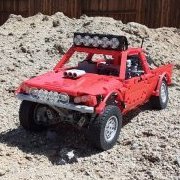
[MOD] Extreme 4x4 9395
offroadcreations posted a topic in LEGO Technic, Mindstorms, Model Team and Scale Modeling
Hi everyone, I've finished this and decided to post a [MOC] topic for it. Thank you to everyone who helped me out in the [WIP] topic. Here is the finished model, with: 4x4 drive steering 2 M-Motors 1 XL- Motor motorized pneumatic compressor pneumatic extending crane pneumatic raising/lowering crane Side view.^^ Extended crane.^^ A frame of a car I made to show the truck towing a vehicle.^^ Here it is again, I may add PF to make a fast car.^^ Thank you and please tell me what you think. -
[MOC] Personal Armored Tank
offroadcreations posted a topic in LEGO Technic, Mindstorms, Model Team and Scale Modeling
Hi everyone, I'm showing you this MOC now so it won't get immediately forgotten amid the Nuremberg Toy Fair and the new sets. So it's something I call it the Personal Armored Tank, because It has a seat for one person, a canon, tracks, and "armor" panels. It uses 2 L-Motors for driving, 1 M-Motor for tuning the canon, a 9V battery and MiniZip cable for power, and an Sbrick. Here are some photos: The connectors on the back are little "guns". ^ Bottom view. ^ Here is how the canon turns. ^ Please tell me what you think and have a great day! -
[WIP][MOD] 9395 4x4 Off-Roader
offroadcreations posted a topic in LEGO Technic, Mindstorms, Model Team and Scale Modeling
Hello, When I saw the very first preliminary image of the 42070, I was inspired to convert the 9395 Tow Truck into a 6x6 off-roader. After looking at some pictures, I realized it would be easier to make it a 4x4, so I've decided to go for that instead. I've had the idea in my mind for a few weeks, and don't have any current projects, so I'm going to start this one. Reference picture. ^^ Here is what the set looks like, IMO. This is what I want it to look like when I am done. ^^ The functions and features I want it to have are: 4 Wheel Drive with an XL Motor Steering with an M Motor 2 live axles pneumatic raising/lowering crane pneumatic extending crane I don't want it to be a rock crawler, but I want it to have off-road capabilities. Let's get started! I have built the truck with new axles and removed all of the inside functions. It has many problems, though, like the wheels rubbing the fenders and small range of movement for the suspension. Some pics: I'll be redoing the chassis soon but keeping the axles and changing them only a bit. Please tell me what you think. -
[MOC] M4A2E8 FURY Sherman Tank
Tommy Styrvoky posted a topic in LEGO Technic, Mindstorms, Model Team and Scale Modeling
Lego RC M4A2E8 FURY Sherman Tank by Tommy Styrvoky, on Flickr This model has been quite a challenge, and also a lot of fun to see come together. I think this has to be the longest time I have spent working on a model so far, it took 3 months to develop it, and over a week it was converted into physical form with 15 Bricklink orders and about $400 of parts. At college, I have been currently very busy Organic Chemistry, and has had little time to edit and compose photos I took in August. Over the last 3 months I have worked on animating the digital model in blender, and working on the video. Finally today, after a week of intense studying for an Organic chemistry exam I was able to add the final touches and post it prior to my Thanksgiving break. Enjoy. More information about the model and film here. Lego RC M4A2E8 FURY Sherman Tank by Tommy Styrvoky, on Flickr Lego RC M4A2E8 FURY Sherman Tank by Tommy Styrvoky, on Flickr Lego RC M4A2E8 FURY Sherman Tank by Tommy Styrvoky, on Flickr This rendition of the Sherman is very close to being perfect, though with an overlay of blueprints, some minor changes could be made, by shifting the upper half of the hull backwards one stud, and maybe replace the tracks with custom four stud wide versions. I would like to potentially modify the design, and create a modular system for the Sherman, as I originally foresaw prior to creating my Sherman crab variant of the M4A2. This would include the both HVSS, and VVSS suspension options;The choice between the early D50878 turret with the 75mm gun, or 105mm howitzer. A modified D50878 turret bustle for the 17 pounder used on the firefly, or The late T23 turret with the 76mm gun, and modified mantlet for the M51 Super Sherman's 75mm gun. The ability to modify the hull between the long, welded hull, early welded hull, and cast hull could also be options, though designing a cast hull may prove to be a challenge. Potentially the option to change the front transmission housing could be an option, though for the early three part housing, the structure may prove to be difficult. Finally different powerplants could be chosen, though there will be some serious design challenges to make the 30 cylinder Chrysler muiltibank engine, and a continental radial engine fit. Though a Cummins V8 engine wouldn't be too difficult to make for the M51 Super Sherman. Though this may be a long term project, due to the complexity of some of the designs. This project has been fun to work on, and it taught me a lot about the differences between the Sherman variants design. I am proud to have made major changes to my old Sherman Crab's hull design, and maybe a potential option for the modular system would be to replace the space with drive motors for the Crab version, and for a pneumatic bulldozer version. Lego RC M4A2E8 FURY Sherman Tank by Tommy Styrvoky, on Flickr Lego RC M4A2E8 FURY Sherman Tank by Tommy Styrvoky, on Flickr Lego RC M4A2E8 FURY Sherman Tank by Tommy Styrvoky, on Flickr Lego RC M4A2E8 FURY Sherman Tank by Tommy Styrvoky, on Flickr Lego RC M4A2E8 FURY Sherman Tank by Tommy Styrvoky, on Flickr Lego RC M4A2E8 FURY Sherman Tank by Tommy Styrvoky, on Flickr Lego RC M4A2E8 FURY Sherman Tank by Tommy Styrvoky, on Flickr Lego RC M4A2E8 FURY Sherman Tank by Tommy Styrvoky, on Flickr Lego RC M4A2E8 FURY Sherman Tank by Tommy Styrvoky, on Flickr Lego RC M4A2E8 FURY Sherman Tank by Tommy Styrvoky, on Flickr Lego RC M4A2E8 FURY Sherman Tank by Tommy Styrvoky, on Flickr Some scenes from the movie that were recreated. Lego RC M4A2E8 FURY Sherman Tank by Tommy Styrvoky, on Flickr Lego RC M4A2E8 FURY Sherman Tank by Tommy Styrvoky, on Flickr Lego RC M4A2E8 FURY Sherman Tank by Tommy Styrvoky, on Flickr Lego RC M4A2E8 FURY Sherman Tank by Tommy Styrvoky, on Flickr And an 8K image of the Tiger battle with Sariel's Tiger XL This was quite a challenge, as I had to rotate the entire turret in Gimp, and replace all of the covered tiles with either renders, or copies of other parts from the photo. Though the end result was worth it. Lego FURY vs Tiger scene by Tommy Styrvoky, on Flickr -

[MOC] MegaDozer V1
Systemtech posted a topic in LEGO Technic, Mindstorms, Model Team and Scale Modeling
Hey all, So this is offically my first MOC since coming out of the "Dark Ages" :p ALOT of refining can be done, and its not my best MOC ever but i think its pretty cool. First time every using Power Functions in a MOC. So here she is, A mega dozer. Features include a single sBrick with 2 XL motors and 2 M motors as well as 2 lights and 4 LA's and 8 soft suspensions. I will post a video in the next few days with the movements etc. 90% of the non-PF parts are from 42055 as thats the majority of my parts on hand. suspension is all independant based on a pair of verticle wheels. It can be refined and strengthened but works well. The front and rear both raise and lower and a XL motor drives each track, so with the sBrick turning and driving is awesome. Here are some pics : Access Ladder down Suspension : Easy battery access and removal : Flat 12 cylinder engine: Fronty lowered : Rear down : -

[MOD] FJ40 Crawler with SBrick
Madoca 1977 posted a topic in LEGO Technic, Mindstorms, Model Team and Scale Modeling
Hello everyone! This time I built a modification of rm8's Toyota Land Cruiser FJ40. FJ40 Crawler Weight: 1145g Propulsion: XL motor for 4 wheel drive Steering: Servo motor 2 speed gearbox: M motor Winch: M motor Headlights: PF light Powered by: SBrick and 8878 rechargeable battery box This is my third SBrick model. One SBrick and a rechargeable battery box fit well in the rear space. Unfortunately tumbler tires from 42050 cannot use for front axle. They touch the connectors when steered. So I used normal balloon tires. One XL motor has enough power to climb the slope of over 35 degrees even in high gear (4.2:1). It can climb much steeper slope in low gear (12.6:1) but less-grippy balloon tires would start slipping. You can see that situation in the second half of the video. Building process was not straightforward. First, I decided to adopt bigger wheels, working headlights, motorized two speed gearbox and winch. Also I was planning to keep the whole original bodywork as possible. Like rm8’s chassis, it has front and rear live axles with 3 links. In offroad driving, 81.6mm wheels require gear reduction after differentials. My first attempt was using central torque vectoring diff and rear portal axle like my Off Road Pickup. Front axle was not changed. Although it kept the same wheelbase as original, this version was failed. Every time I started driving, 20t bevel gear and diff disengaged. Second plan was using front and rear portal axle. I tried to make the wheelbase as short as possible. It became five studs longer than the original. So I needed slightly longer body. Building whole chassis was the most difficult. The problem was how to minimize the mechanism of motorized gearbox. I used new driving ring and red clutch gears. I felt that they were stronger elements than old version and they could handle more torque. Although 2 speed gearbox was simple, I had to hide the whole mechanism under the seats. I eventually squeezed a mini linear actuator into the left of gearbox. Changing gears is not fast, but it's easy to adjust lever in neutral position in case of using winch. The winch mechanism is the same as the original. It is powerful enough to help climbing steep hills. I have to say that rm8 had achieved perfect weight distribution. I recognized it when I was attempting to build various versions of chassis which had different motor locations. So in my final version, all PF elements are in nearly the same position as original. The bodywork needed some minor changes due to the new chassis and my parts assortment. In original “face”, it was impossible to put LEDs into behind the headlights and shine trans-clear parts. Moreover, Round tile 2x2 trans-clear seems not to be the official parts. My alternative was built out of available parts. I know the original looks far better and hard to change. But it was worth for me to find another solution. Original FJ40 is modular building. It has various options like doors, roof and snorkel. Since my MOD became bigger and heavier, I didn't add the roof. (Still, four soft shock absorbers are slightly compressed when it stands stationary.) Instead, I built detachable doors in two versions. Building instructions: http://rebrickable.com/mocs/Madoca1977/fj40-crawler I hope you like it! -

[MOC] Snowmobile With SBrick
KevinMoo posted a topic in LEGO Technic, Mindstorms, Model Team and Scale Modeling
EDIT: Building instructions available: HERE -------- I always wanted to build something different. Something not seen too much on EB. Introducing my latest MOC: Snowmobile With SBrick. Inspiration About two years ago I saw a video about Ski-Doo snowmobiles on YouTube. I really like the exterior design of its product and thought maybe I could build one in LEGO. But I wasn’t skilled enough to finish it at that time so the project got suspended for a long time. This finished MOC is not based on a specific model of Ski-Doo. It’s more like a combination of all my favorite parts from several models with my own thoughts blent in. Challenge: External Design Unlike most conventional wheeled vehicles, a snowmobile usually has a more complex bodywork (except for supercars). Considering its relatively small size, it’s even more difficult to recreate its aesthetics authentically. Some “illegal” connections are inevitable. Challenge: Internal Design An unconventional vehicle needs an unconventional framework. Here is a screenshot from LDD showcasing the frame. Servo Motor is used as part of the structure. Another problem goes to Power Functions. How do I stack them inside the frame? Here is a cross section view of the model: 2 L Motors geared 3:5 for propulsion. 2 pairs of LEDs utilized for headlights and taillights. Space is very limited, I have to use a pair of tweezers to tuck those cables. Performance Let’s take a look at a video: On hard snows it works fine for most of the time. Also, front suspension responds quite well. Compromises Due to aesthetics concern, Power Function parts were located at the front, which makes the model a bit front-heavy, resulting a relatively poor traction. I wouldn’t dare try testing it on soft snow... Also, the color scheme is a bummer. The white one is imperfect. Black one looks much better, but a bit dull. I still haven’t decided which color should I choose to make building instructions for... Last But Not Least This is a little off-topic talk: I just got to know about the Chinese company “LEPIN” and those dirty things they’ve done recently. As one of the very few Mainland China users on Eurobricks myself, I feel sorry for what my fellow people have done to this world. I feel sorry for Madoka. The only thing I can do is to share my original works with you guys, That’s the least I can contribute to this fantastic community. Anyway, so much for the sentiment. Hope you enjoy this MOC and stay tuned for the instructions. -
Managed to fulfill several things I wanted to do for a long time with this new model. First thing first - built in blue. This colour isn't very common in Technic area - part variety is limited and some are harder to obtain. Next thing I wanted to get my hands on, after seeing wonderful James Tillson builds, are these new Technic panels. Bought a bunch of them recently and finally had a chance to explore the possibilities. Ended up using 15 smaller and 4 longer panels. Some shapes are just wonderful thanks to them. Last thing I wanted to incorporate were RC motor with SBrick. Model is medium sized and thanks to smaller battery box everything is well hidden. Thanks to that model has interior. Oh and controlling model with smartphone is horrible (worse than running after model with IR stuff). Need to find a physical controller. Model features opening doors and suspension. Rear is nothing special - RC motor is used as arm with two hard springs. The front is a bit special due to lack of space - it has torsion bar setup. More pictures on Flickr
-
REVIEW SBRICK PLUSINTRODUCTION It feels like yesterday, but it's already over two years ago that Vengit introduced us to the SBrick! The SBrick is a versatile LEGO compatible component, used to control your PF elements via a smart phone or tablet. The Kickstarter project reached its goal and SBrick was born. Two years later a new family member is introduced, the SBrick Plus. Sounds like an SBrick with additional functionality. Well, let me tell you a secret...it is! The form factor of the SBrick Plus has remained the same. So have the four connectors. The SBrick Plus is fully compatible with the SBrick. The difference between the regular SBrick and the SBrick Plus is that the Plus version is able to communicate with the two available WeDo 1.0 sensors: Motion sensor Tilt sensor The following descriptions have been copied from LEGO Engineering.MOTION SENSOR The motion sensor (part 9583) can detect objects very roughly up to 15 cm away, depending on the shape of the object and other properties (reflection, colour, etc.). It is sometimes called a distance sensor. Very technical details: The motion sensor is an active IR (infrared) sensor. One of the visible parts emits a light while the other is the detector. The LED light is pulsed at 7 kHz. You might be able to see (and show) the flashing light using a camera phone. The sensor can work with 5 to 9 volts, with the WeDo set at 5 volts. TILT SENSOR The tilt sensor (part 9584) detects changes in position. It can detect six different positions: tilt this way, tilt that way, tilt up, tilt down, no tilt and any tilt. On occasion, the vibration of the motor will interfere with the accuracy of the tilt sensor. The fix for this is to design a construction in which the motor vibrations are isolated from the sensor. In this topic I will demonstrate several aspects of the SBrick Plus, starting with the WeDo 1.0 motion sensor. This review will be expanded with more information and videos later.TEST MODEL To test the SBrick I have made MOD of two copies of the 42035 - Mining Truck. The only extra parts I used are some PF elements: 1x PF Servo Motor 1x PF L Motor 1x PF Battery Box 1x PF LEDs 1x PF Extension Cord In the rear of the vehicle I have mounted the PF Battery Box. The SBrick Plus is tucked away in the middle of the vehicle.MOTION SENSOR For my first video, the Motion Sensor is attached to the roof of the model. For this video I have connected the SBrick Plus to an HTC running Android. In the introduction you can see the SBrick Plus test screen. Here you can connect to the SBrick Plus and test the ports. I have attached the Motion Sensor to Port A. The distance measured by the sensor as I move my hand closer is displayed next to the port. I have also attached a set of PF LEDs, which can be tested by sliding the Port B slider. In the profile designer I have created a sequence which will blink the LEDs a couple of times. Creating sequences is something you can do with the regular SBrick as well. So, we have blinking LEDs and we have a motion sensor. Now what?! Well, we need to create a circuit to let the sensor values determine the action. As you can see in the video there are different Logical options to make a circuit. For this demonstration I will use the "On change" option. When my hand is close to the object, the circuit triggers the sequence called "Flashing Lights". Let's take a look at the final result. As you can see the Flashing Light sequence is nicely started when my hand is close to the sensor. The WeDo sensors aren't very accurate, but they are accurate enough to detect an object in front of the sensor, which results in lots of possibilities. CONCLUSION I needed some time to get used to creating circuits and sequences, but when you have done this once or twice, it's really easy to accomplish. The profile editor truly is a work of art. I love the fact that you can modify the graphical elements of all controls, resulting in a personalized smart remote. Do you need to get an SBrick Plus instead of a regular SBrick?! That obviously depends on your need to use WeDo sensors. When you are creating demonstration models, the SBrick Plus adds a lot of value. When you like to manually control your model, the regular SBrick might suffice. Is your regular SBrick depricated now? No, it definitely isn't. SBrick can be mixed with SBrick Plus in the same profile, so there's alway use for your current SBrick. Controlling your model with a regular SBrick, while the SBrick Plus listens to the sensors and acts accordingly. That's a win-win situation. All things considered I really like the SBrick Plus, so I definitely recommend getting one, or two. I will add more information to this topic in a later stadium. More information about this project and the possibility to back it can be found on the Kickstarter page of SBrick Plus. SBRICK PLUS TESTED BY PAUL Here is another video made by Paul "Crowkillers" Boratko.
-
[MOC] "Madness" 4 Wheel Drive Truck
offroadcreations posted a topic in LEGO Technic, Mindstorms, Model Team and Scale Modeling
Hello, Today I am here to show my new creation, a 4 wheel drive truck. Here is the link to Rebrickable. Please Like it! Thanks to @JJ2 for helping me with the front suspension. It has 2 L-Motors for drive, a Servo for steering, 2 lights, and a SBrick. It has 4 wheel drive, which was the main purpose of this. I have lots of other photos here. Please tell me what you think! EDIT: Oops, almost forgot LDD! -
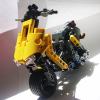
[MOC] Mini Trophy Truck
offroadcreations posted a topic in LEGO Technic, Mindstorms, Model Team and Scale Modeling
Hello all, While I was waiting for my BL order for my TC10 entry, I worked on a small trophy truck. It has indepentent rear trailing arms, drive from 2 L motors, steering from a Servo motor, power from a 9 volt battery through a Minizip cable, and an Sbrick. It isn't complete yet. Some pictures: Thanks for reading! -
[MOC] RC Off-roader With SBrick
KevinMoo posted a topic in LEGO Technic, Mindstorms, Model Team and Scale Modeling
Like I said in my last topic, I’m a big fan of Japanese cars. Today I’m bringing you a new MOC based on a popular off-roader. Inspiration & Goals This MOC was inspired by the Toyota Land Cruiser Prado series. I didn’t want to make an exact copy of the original car, but focused on the chassis and drivetrain. Also it should have a full-length body with five openable doors. Specs / Features / Functions Dimensions: 420mm(L) x 210mm(W) x 190mm(H) Weight: 2.1Kg Parts count: 2700 pcs Propulsion: PF XL motor x 2 2-speed gearbox Working steering wheel / headlights / taillights Rear alxe: live axle with diff lock Front axle has independent suspensions with positive caster angle. More Details Compromises & Inperfections 1. The model has about 2700 parts. Given the functions that I achieved, that’s a huge number. I was expecting it to be around 2000. 2. It is WIDE. Even with those beveled window frames it looks wide. (It is wide. The body covers the whole tyres from top view) 3. Gear ratios are 5:1 at 1st gear and 5:3 at 2nd gear(differentials not included). Safety fuse kicks in quite often when steering at full speed on 2nd gear(As shown at the end of the video). I have to use 9V AA battery pack instead of Li-Po and stick to 1st gear most of the time. 4. A real Land Cruiser Prado has central differential & central diff lock. They were on my prototype. Rear diff lock and central diff lock work simultaneously. But they are quite unreliable. 12-teeth half bevel gears inside the central diff got damaged after only a very short period of test drive. I have no choice but to remove them from the drivetrain. A short video showing the prototype: Anyway, I’m basically satisfied with the overall performance and looking. Building instructions will be ready in a while. Hope you enjoy! -
Controlling models with Sbrick
technic_addict posted a topic in LEGO Technic, Mindstorms, Model Team and Scale Modeling
I bought some Sbricks and connected them to an IOS phone using a slider profile for steering and acceleration and found it very difficult to drive. I had concerns this would be an issue but had hoped it would be ok. Does it take a lot of practise? I am driving a small quick go-kart vehicle. Any recommendations? -
[MOC] LEGO Technic Wall-e
falconluan posted a topic in LEGO Technic, Mindstorms, Model Team and Scale Modeling
Hello, all, I'd like to present you my third MOC: A lego technic Wall.E This MOC was motivated by Lego ideas wall e 21303. Since there is hardly any room left for motorized aside from the 2 tracks, I decided to make a motorized technic version from stretch. The goal is to make a motorized version as small as possible while packing enough motorized functions. The end result is a little bigger than the ideas one. It uses 7 motors and 2 Sbricks in total. The Sbricks can be substituted by 4 IR receivers of course. Though some parts at the back of the model need to be removed for the additional receivers. The motorized functions are: 2xL motors for propulsion (one for each track) 1xL motor for head rotation 1xL motor for head pitch 1xM motor for body lifting 2xM motor for the arms 1xAAA battery box It has some manual functions too: Like the ideas one, both arms can be moved back and forward. Since its arms are based on the large LA, they can extend and retract. It has three fingers on each hand. Its cargo door can be opened by hand, however, the cargo space are taken by the battery. Photo instructions and RB link is here: http://rebrickable.c...o-technic-walle Video: (please let me know if you can not watch the video) Now, photo time! I was trying to make it stand-able, but the result is not very good. The body can only be lifted by 4 units or so. The difference is showed below: Here is it comparing with 21303: Some details: The cargo bay is a little crowded... The motors used to control its head movement are part of its head structure. By doing this, 3 M motors, the battery box, the body lift mechanism and 2 Sbricks can fits in its body. The underside is very simple: More photos can be found at: http://bricksafe.com...lconluan/walle/ Hope you like it. Thanks for watching. -

Hardbody Stance Pickup
filsawgood posted a topic in LEGO Technic, Mindstorms, Model Team and Scale Modeling
Hi guys! Today I finished another lowwww project along with Drift Van and Subaru Forester. Now it's Slammed JDM pickup. At this time, I was inspired to build a pickup Nissan Datsun (Nissan Hardbody) mid-90's in D21 body The model is based on rear-wheel drive chassis with independent suspension front and rear axle. Buggy motor is responsible for the nimble movements of pickup space, and servo motor helps to dodge all of a sudden in the way of obstacles. Controlled all so beloved by me, SBrick, and electrician feeds LiPo pack. With the receiver from LEGO model is unlikely to make friends, because he would kill her at first dumb on turn - very high speed, but not so on the reliability front end :) The design of the rear suspension allows the use of one buggy motor and a pair of L-Motors, which are also good model piles, given that the pickup weight is 750 grams. More photos you can find on my blog and my flickr -
[MOC] Churchill Bridge Layer
Tommy Styrvoky posted a topic in LEGO Technic, Mindstorms, Model Team and Scale Modeling
Lego Churchill bridge layer by Tommy Styrvoky, on Flickr The Churchill AVLB (armored vehicle-launched bridge) has been one of my projects that I have wanted to see operational in Lego form. It is a rather unusual vehicle, as it's task is simple, no bridge, no problem, it brings a mobile bridge to where bombed out bridges are. There are many different bridge layers built in lego, though most rely on having power being routed to the bridge to unfold it. I wanted to replicate the original mechanics of the real vehicle because the vehicle utilizes a single large hydraulic cylinder to move the bridge into position. This cylinder is retracted for one full stroke to transfer the bridge, from the vehicle to at 90°, and then locks a lower carriage, and the cylinder extends for a full stroke. This mechanism is rather simple, but with the Lego system, this was a difficult challenge to solve. Lego's current array of pneumatics and linear actuators are too small and weak for this task, as I attempted to build this vehicle two years ago, but abandoned it, because two linear actuators weren't powerful enough to lift it. A custom brick-built linear actuator was utilized with a rack and pinion, powered by a L motor with a 1:24 reduction. This provided sufficient power to lift the ≈1kg bridge, though because of the length of the arm, the mechanism has to lift ≈9 kg. This required a robust design for the actuator, and it had to be rigidly connected to the hull. I am very pleased with the results of this model, and it performs great, and looks much better than my old Churchill VII. This is because I changed the spacing between the road wheels to 2.5 studs, instead of 3.This was the biggest issue with my old Churchill, I wanted to build another churchill, but build a different variant. I originally wanted to build a AVRE (armored vehicle royal engineers) with the spigot mortar, and small box girder bridge, thought that variant was too similar to the Churchill VII. I had thoughts of building the model at the same scale as Sariel's Churchill, as it would be a fun, compact build that could use linear actuators for the hydraulics. Though a larger scale version would be more of a challenge, and be more impressive, as the model can lift a 73 stud long bridge. This vehicle is based off of the hull of the Churchill IV, it has some minor external differences, the most noticeable is the crew hatches on the sponsons are square. One of the minor issues is that the tank is unable to cross the bridge, but that isn't a flaw with my model, it's just a lack of traction in Lego's tracks, maybe the rubber pads from the nexo nights would work, though It's inaccurate for most vehicles, as few vehicles had rubber tracks at the time, and it makes the tracks too bulky/expensive. This model may be my last model in light blueish gray, as I recently aquired a large purchase of DBG parts from Bricklink for future models, also this model used almost all of my light bluish gray tiles and 1x plates, for the bridge and sponson details. The old abandoned version from 2014 Lego Churchill Bridgelayer 1/15 (RC) by Tommy Styrvoky, on Flickr Lego Churchill Bridgelayer 1/15 (RC) by Tommy Styrvoky, on Flickr lego churchill Bridgelayer 1/15 (RC) by Tommy Styrvoky, on Flickr Lego Churchill bridge layer by Tommy Styrvoky, on Flickr Lego Churchill bridge layer by Tommy Styrvoky, on Flickr Lego Churchill bridge layer by Tommy Styrvoky, on Flickr Lego Churchill bridge layer by Tommy Styrvoky, on Flickr Lego Churchill bridge layer by Tommy Styrvoky, on Flickr Lego Churchill bridge layer by Tommy Styrvoky, on Flickr Lego Churchill bridge layer by Tommy Styrvoky, on Flickr Lego Churchill bridge layer by Tommy Styrvoky, on Flickr Lego Churchill bridge layer by Tommy Styrvoky, on Flickr Yes the bridge is strong enough to hold a variety of Allied armor. Lego Churchill bridge layer by Tommy Styrvoky, on Flickr My next MOC to present, though college has arrived, and I have a lot of editing to do for that model. I have to figure out how to get unofficial ldraw parts into my parts library, as I want to do some renders of the internals, and make instructions... it's packed inside with stuff. -
Hey there guys! I finally got myself an S-brick, i wanted to test it out so i built this go-kart. Functions: - 2 gears gearbox - auto clutch - braking system - differential The vehicle turned out to be pretty fast and with a great handling, unfortunately i need to wait some better weather to shoot a video of it and a bigger place as well. Like in a real kart there's no reverse gear so i'll probably need something like a parking lot to test it out. The gearbox is working great with the buttons of the S-brick operating the M motor I hope you'll like it!
-
[MOC] M18 Hellcat Tank Destroyer
Tommy Styrvoky posted a topic in LEGO Technic, Mindstorms, Model Team and Scale Modeling
Lego M18 Hellcat Tank Destroyer (Sbrick by Tommy Styrvoky, on Flickr With all of the posts about the new Porsche set, this vehicle would be considered the Porsche or supercar of tanks (it's a tank destroyer), this vehicle was the fastest armored vehicle used by the Allies in WWII. It can travel at 55 mph (88 kph)... now that's not some lightweight sports car that packs a 1000 hp engine, this is a 19.5 ton AFV with a 9 cylinder 400 hp radial aircraft engine... and a high velocity 76mm gun. This impressive weapon allowed the Allies to combat the larger and later war German vehicles such as the Tiger II and Panther. It was known to be the most effective Allied tank destroyer fielded, with higher kill to loss ratios than other Allied tank destroyers. With my model I attempted to copy the drive train and focus on the aesthetics of the vehicle. The most challenging parts of the model would be the upper glacis (topmost armored plate in the front of the vehicle), as where this part met with the "cheeks" above the sponsons. I think a brick solution would have worked here, but I lacked the pieces to build it and all of the available parts wouldn't have been steep enough to work. The open topped turret was also a challenge, as everyone who builds with lego will know round shapes aren't easy. I decided to omit some features on the turret, as they didn't look correct and they effected the smoothness of the turret. The open top allowed me to use an interesting compact turret traverse/gun elevation unit that is rather compact and functions decently (I would like to add more reduction to the traversing gears). This was difficult to mount into the hull, as it is already packed with full-length torsion bars, the torsion bars are 10 studs long, this allows them to be softer for the light model. Overall I am pleased with the amount of SNOT work on the hull and turret. I think I replicated the model to the best of my abilities, though I wish more detail could have been added to the turret, as the massive breech guard limited the gun elevation, and took up lots of space. I also compared the model to the blueprints, and it seems to be mostly faithful to the real counterpart. The most impressive part about this model is the size, I was able to put most of the functions of some of my larger tanks into a footprint smaller than a 32x16 baseplate. I wish Lego made parts for radial engines, as it is very difficult to build a functioning one at such a small scale, as I wished I could have included that in the model too, The only case where I was able to mount one was in my M6 heavy tank. Another interesting engine that would be very difficult to replicate is the Chrysler multi-bank, a 30 cylinder engine mounted in later versions of the Sherman. I would like to sometime replicate that and put it in a M4A3E8 "Fury" tank. I had a lot of fun with the editing, my new photography backdrop makes it easy to clean up photos, just by adjusting the RAW exposure, you can get a pure white. It also rained today, so no outdoors footage, but I had some fun with photographing the model in puddles, as there are interesting reflections. Lego M18 Hellcat Tank Destroyer (Sbrick by Tommy Styrvoky, on Flickr Lego M18 Hellcat Tank Destroyer (Sbrick by Tommy Styrvoky, on Flickr Lego M18 Hellcat Tank Destroyer (Sbrick by Tommy Styrvoky, on Flickr Lego M18 Hellcat Tank Destroyer (Sbrick by Tommy Styrvoky, on Flickr Lego M18 Hellcat Tank Destroyer (Sbrick by Tommy Styrvoky, on Flickr Lego M18 Hellcat Tank Destroyer (Sbrick by Tommy Styrvoky, on Flickr A comparison with blueprints, there are some minor perspective differences, but it is relatively close for Lego. Lego M18 Hellcat Tank Destroyer (Sbrick by Tommy Styrvoky, on Flickr Lego M18 Hellcat Tank Destroyer (Sbrick by Tommy Styrvoky, on Flickr an underside shot... not too much here to see, but you can see how the swing arms alternate between half-stud offset, and full stud offset, this allows for a 5.5 stud space between road wheels. Also note how the left side torsion bar is leading in front of the right side. Lego M18 Hellcat Tank Destroyer (Sbrick by Tommy Styrvoky, on Flickr A couple renders of the traverse/elevation mechanism, instructions for that will be comming soon. Lego M18 Hellcat turret traverse/gun elevation mechanism. by Tommy Styrvoky, on Flickr Lego M18 Hellcat turret traverse/gun elevation mechanism. by Tommy Styrvoky, on Flickr Lego M18 Hellcat Tank Destroyer (Sbrick by Tommy Styrvoky, on Flickr The unit markings for the Hellcat are from "Black cat" both of my cats were wandering around when I was filming. Lego M18 Hellcat Tank Destroyer (Sbrick by Tommy Styrvoky, on Flickr IMG_1591 by Tommy Styrvoky, on Flickr Turret details IMG_1597 by Tommy Styrvoky, on Flickr IMG_1601 by Tommy Styrvoky, on Flickr IMG_1602 by Tommy Styrvoky, on Flickr Suspension Lego M18 Hellcat suspension by Tommy Styrvoky, on Flickr