Search the Community
Showing results for tags 'robot'.
Found 315 results
-
Name: Gundam Barbatos Lupus Code name: ASW-G-08 Series: Mobile Suit Gundam IRON BLOODED ORPHANS Trailer: https://www.youtube.com/watch?v=cmPwBC3dXK0 LEGO Gundam Barbatos Lupus ASW-G-08 1/60 by demon demon demon, on Flickr LEGO Gundam Barbatos Lupus ASW-G-08 1/60 by demon demon demon, on Flickr LEGO Gundam Barbatos Lupus ASW-G-08 1/60 by demon demon demon, on Flickr LEGO Gundam Barbatos Lupus ASW-G-08 1/60 by demon demon demon, on Flickr LEGO Gundam Barbatos Lupus ASW-G-08 1/60 by demon demon demon, on Flickr LEGO Gundam Barbatos Lupus ASW-G-08 1/60 by demon demon demon, on Flickr LEGO Gundam Barbatos Lupus ASW-G-08 1/60 by demon demon demon, on Flickr LEGO Gundam Barbatos Lupus ASW-G-08 1/60 by demon demon demon, on Flickr Previous form: LEGO Gundam Barbatos ASW-G-08 1/60 by demon demon demon, on Flickr
-
I do not own to many Technic parts and I rarely look into drawers with them. But there was a day when I had to :P I found there many parts that I almost never use. So I started looking for more bricks which I rarely build with. And that way the mobster was born :) Read more » Bigger photos and full story here: LEGO Gallery - Shelby - mobster Follow my new MOCs and articles at: Facebook | Flickr | Google+ --- Notice: This is a shortened version of the post from LEGO Blog - Bricks' Treasure.
-
This is a recreation of the robot character GLaDOS from the game 'Portal', using Technic and Mindstorms. Just to answer a question some of you may have: Why Mindstorms? Why not PF? Well for a start, I don't own that many PF motors (only got 2 medium motors and 1 XL motor), and secondly, I don't own any PF IR receivers or remotes. The mindstorms kit has its own IR sensor and remote, so I used that. Functions: 1. Head elevation controlled by EV3 large motor 2. Head rotation controlled by EV3 medium motor 3. Body elevation controlled by EV3 large motor 4. Body rotation controlled by EV3 medium motor These may not be very many functions, but they allow for most of GLaDOS's movement seen in the actual game. The range of movement is quite reasonable. Regarding aesthetics, I don't own a lot of LEGO pieces, so the model may look a bit incomplete or strange in some places. But I think I did an OK job with what I had to work with, especially the head. Some more images: Video: More info about the robot can be found here: https://www.us.lego.com/en-us/mindstorms/community/robot?projectid=d1208d08-db8f-421c-9aa7-5f618912d7b0
-

Lego Mindstorms Ev3 Tank Bot CUBE
DamonMM2000 posted a topic in LEGO Technic, Mindstorms, Model Team and Scale Modeling
Hey Guys! I have been building with Mindstorms for just about 4 years now. To think of that is pretty mind-blowing! So I decided to re-create a video on a creation I built almost 3 years ago: My Lego Mindstorms CUB3. Description: "Built with LEGO MINDSTORMS and Technic components, this creation includes: 2 EV3 Large Motors, 1 EV3 Medium Motor, 1 EV3 InfraRed Sensor, 2 small linear-actuators, a pair of hidden caterpillar tracks, and more! With its insignificantly-looking cubic structure, CUB3 is engineered to look like your ordinary box just lying around. Decoration, anyone? Your neighbors will find out soon enough. Just watch!" Hope you guys enjoy! P.S. - Some of you EB users gave suggestions on my video editing of a previous video. I tried to follow that advice when editing this video. What do you think? Thanks! -

[Digital Renders] Logan McOwen's Slizers (Reimaginations)
The Mugbearer posted a topic in LEGO Action Figures
Here is a collection of Slizer/Throwbot MOCs that were originally designed by @Logan McOwen. His works inspired me to start my own little series of digital revamps, including both official Slizer sets and his original character designs. All of his creations, including the ones I picked, can be found in his Flickr Albums. Let's begin, shall we? (all images are clickable by the way and lead to my Flickr. The titles are links leading to Logan's MOC images) - - - Tremor Slizer - - - Construction Slizer - - - Chopper Slizer - - - Soldier Slizer - - - Cheetah Slizer - - - Doctor Slizer - - - Orbit Slizer - - - Patrol Slizer - - - Logger Slizer - - - Proselytiser Slizer - - - Comments and critiques are always welcome! - - - If you like what I do and you want to see me create your OC, a favorite Bionicle Character, or something else, feel free to look up my Commission Info! I also now have a Patreon page, so please consider supporting! -
[Digital Render] Toa Komas (Friends OC) by Artemiy Karpinskiy, on Flickr This is Komas, an OC of my friend Sue, who have recently pledged to my Patreon. Here's a rotational GIF as a bonus: * * * If you like what I do and you want to see me create your OC, a favorite Bionicle Character, or something else, feel free to look up my Commission Info! I also run a Patreon page, so please consider supporting!
-
PAIGE (Prototype Artificial Intelligence, Gynoid Expression) was created by robotics student Letta Arkwright to simulate the kinds of social competencies she struggled with in her own day-to-day life. PAIGE is powered by a digital brain with an unprecedented social learning engine. As PAIGE teaches her creator to relate to others and to understand her own emotional needs, she is also learning for herself what it means to be a person. This model of PAIGE uses over 830 pieces, stands 18.1 inches/46 centimeters/57.5 modules tall, weighs about 24 ounces/672 grams, and has 36 points of articulation. Her mouth, eyes, and eyebrows can be adjusted and/or swapped out to display different emotions.
-
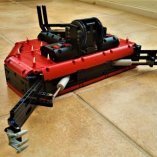
 Terminator: John Connor. It is time. John Connor: Are you here to kill me? Terminator: No. You must live. hello guys! I present to you my current project: T-1 Battlefield Robot a.k.a. Ground Assault Vehicle It's a robot from the 2003 movie Terminator 3: Rise of the Machines It is a fully autonomous ground offensive system, the first robot of the "T" class - Terminator, and the first prototype Hunter-Killer tank. Designed and produced by Cyber Research Systems for combat purposes to clean the battlefield from enemy soldiers. John Connor: Whatever! Either we go, and save her Dad, or so much for the Great John Conner. Because your future, my destiny, I want no part in it, I never did. Terminator: Based on your pupil dilation, skin temperature, and motor functions, I calculate an 83% probability that you will not pull the trigger. Movie events: The main objective of the positive protagonists in Terminator 2 was to avert a judgement day - to destroy Cyberdyne Systems. This corporation has been running work on the development of SKYNET - a supercomputing network using artificial intelligence - to replace people as pilots of commercial and military aircraft, and to control other military systems, including nuclear missiles. Teenager John Connor and his crew destroyed the building itself, but eventually Cyberdyne took over by the US Army, and the whole project was secretly assigned to another company: Cyber Research Systems. This company eventually succeeded (story in Terminator 3), completing the development of SKYNET. It also built the first aerial drones (A-Series) , but also the T-Series - Terminator robots who were supposed to replace the soldiers on the battlefield. Excellent scene from the movie: It is a pity that these robots were in the film for only a few minutes ... the film material was filmed more - other scenes outside after rebellion, but they did not get into the film, they were cut out. Terminator: Anger is more useful than despair. Real machine: For the purpose of the film, several of these robots were built in real size. Behind the result is staying None other than a great expert for film effects and animatronics - Stan Winston. His studio built five of these T1´s for scenes at Cyber Research Systems, of which 2 were fully functional. The final assembled T-1 was about 2.1 meters high and weighed more than 1.5 tonnes. It reached a speed of about 11 km / h. The belts used on the chassis were used by the company, producing belt sets for offroad pick-ups. The robot has a movable head mounted on the hinges, the body is mounted on a platform capable of rotating 360 degrees. The arms on both sides are capable of tipping and ammunition placed there. On both arms is a six-barreled General Electric minigun capable of firing 3000 depleted uranium rounds per minute. Of course, it really did not shoot, they were just sound and light effects. A perfect video behind the robot construction itself: I really like the overall design but also how it's all moving and spectacular ... great work. On the other hand, if I think if it was put into a real fight, I guess it life for a few minutes - the head that contains all the sensors, it is completely unprotected, the protective covers of the rest of the body are only in the front and in the back - from the side quite vulnerable, all hydraulics, electricity exposed ... And another thing is related to machine guns: minigun and its maximum ammo consumption - in its shoulders it has ammo-reservoirs, but in the course of continuous fire would be "dry" in a few seconds... An enhanced and more armed version of T-1 appeared in the sequel: Terminator Salvation. Terminator: Katherine Brewster? Have you sustained injury? Kate Brewster: Drop dead, you megablock! Terminator: I am unable to comply. Lego model: The functions are connected to 4 IR receivers. - Two main belts are driven: 2x XL Motor - left / right side - Main platform lift: XL-Motor - rotation of the upper body in a 360 ° range: 1x M-Motor - Head movement: 1x Servo Motor - Shoulder lift: 1x M-Motor - rotary motion of minigun barrels: 2x M-Motor - 3x LED lights in the head - 2x Battery Box: one at the front of the chassis at the same time serves as the counterweight, the other at the front of the upper body Dimensions: - chassis width: 29 cm - max. arm width in firing position: 44 cm - height: 45 cm - length: 58 cm Weight: 5 Kg SWAT Team Leader: Put down your weapon. And the coffin. Construction process: It is my longest developed model = it was a difficult birth. In my head I had planned it for a few years back. Finally, I started the test chassis construction in early 2014. The first thing to decide was the size of the whole model. There was no reason to think about the belts - I chose the biggest. This meant that they had to be doubled to fit proportional size into the plan, putting all the functions in it. I've been working on the chassis for a few months, I've built it up with the constant changes. Body structuret, wheel set. It worked! The main reason why I've been postponing my work for a few months, was that the track sprocket-wheels were quite small. It looked funny. After returning to this project, I started building a liftable platform on the chassis. First of all, it was the L-Motor. As time went by, additional pieces of equipment were added. And he does not get it anymore. Therefore, it was replaced by XL. At the same time I made the main body with folding arms. I have always had to tackle the problem of how to reinforce it while preserving its shapes. Repeated disgust was followed, another delay for a few months ...... After a while, I started to build two miniguns. The unpretty thing is that, after spinning, an elliptical movement occurs. Next I built the first version of the head. I started to solve the problem of small sprocket wheels. I started looking for their bigger version ... and I found it. The internet portal Shapeways is probably the best source of such all-round (not just Lego) custom-prints printed on a 3D printer. There are 12 and 14 tooth size. Lego has only 10 teeth. So I had the problem solved - big 14-teeth (8 pieces) go to the edge and smaller 12-teeth (30 pieces) to the remaining positions, as it is in the original. My enthusiasm was replaced by disappointment at the price. But without the wheels mentioned, it simply was not possible. I bought them about 3 times in the half a year and I have also used the discount, which they had on eshop. There was a whole reworking of the chassis again, because of course the new wheels did not fit in the original position. Sometimes they were shaking, the length of the belt changed, and the position of the center axle of the big wheels was not right because of the larger diameter. I totally split it up again and again. Six months passed like nothing, I started to improve shoulders and body. The chassis has already been tuned. I also try to connect the finished parts of the robot together. I find, that the body is proportionally a bit small compared to the original. For a quarter of a year, I tasted again and ordered the necessary parts. I stretched the entire hull back, shoulders completely reworked with the effort to use the Technic panels as they look best for rounded surfaces. I have completely redesigned the whole head - enlarged, added some details. During this phase, my long preconditions have been confirmed ... namely that the entire upper body (arms + guns, receivers, cables and all the details attached thereto) have the weight, that the whole robot overcomes backwards. This is also helped by the fact, that I made the bottom row of wheels swinging. I had to replace the two springs on both ends with the normal Technic-beam and it's firmly. Under the front B-Box was added another space for counterweights. John Connor: Do you even remember me? Sarah Connor? Blowing up Cyberdyne? Hasta la vista, baby? Ring any bells? Terminator: That was a different T-101. John Connor: What, do you guys come off an assembly line or something? Terminator: Exactly. John Connor: Oh man, I'm gonna have to teach you everything all over again. It still has a number of shortcomings: The primary problem lies in the final weight. The model is very heavy and the track drive wheels due to small grooves can not carry force = almost constantly slipping inside the belt. The second thing is, that the plastic is not iron. It's all springing like rubber. Further, with the upper body being seated so far backward and offset against the turning point, there is a great deal of strain. A large lever that acts on the fifth wheel, where it is fully attached. Turntable is the new version (MB Arocs) - without it I would not do it. I used the old version first, and the turntable was totally twisted. ... and I had only the basic skeleton done at that time ... in the final state - it would break it completely. Mini-Linear Actuators, that lift the arms themselves with the gun, are not powerful enough. The upper position, where the greatest force is needed will not be reached - the overload clutch is activated. IR receivers are inappropriate for this model. Large huge boxes ... They are positioned so, as not to disturb the design of the model, but there is a problem: as soon as there is an obstacle between the transmitter and the receiver (what happens always when the body is rotated), it does not work. I can not imagine this two big "boxes" somewhere up the shoulders. S-brick would obviously solve this. Conclusion: As a RC model, it is semi-functional. I was planning to shoot a video, but with these problems the result will not be very good (?) From a static model point of view, I am satisfied with the result. All photos in original quality are on FLICKR server. Terminator: Skynet has become self aware. In one hour it will initiate a massive nuclear attack on its enemy. Robert Brewster: What enemy? John Connor: Us! Humans!
 -
type : lego gundam name : Gundam Barbatos code : ASW-G-08 Pilot : Mikazuki August series : Mobile Suit Gundam IRON-BLOODED ORPHANS / (機動戦士ガンダム 鉄血のオルフェンズ Kidō Senshi Gandamu Tekketsu no Orufenzu?) Frame Building Instrucktion : Trailer : LEGO Gundam Barbatos ASW-G-08 1/60 by demon demon demon, trên Flickr _1st form : LEGO Gundam Barbatos ASW-G-08 1/60 by demon demon demon, trên Flickr LEGO Gundam Barbatos ASW-G-08 1/60 by demon demon demon, trên Flickr LEGO Gundam Barbatos ASW-G-08 1/60 by demon demon demon, trên Flickr LEGO Gundam Barbatos ASW-G-08 1/60 by demon demon demon, trên Flickr _2nd form : LEGO Gundam Barbatos ASW-G-08 1/60 by demon demon demon, trên Flickr _3rd form : LEGO Gundam Barbatos ASW-G-08 1/60 by demon demon demon, trên Flickr _4th form : LEGO Gundam Barbatos ASW-G-08 1/60 by demon demon demon, trên Flickr _5th form : LEGO Gundam Barbatos ASW-G-08 1/60 by demon demon demon, trên Flickr _6th form : LEGO Gundam Barbatos ASW-G-08 1/60 by demon demon demon, trên Flickr LEGO Gundam Barbatos ASW-G-08 1/60 by demon demon demon, trên Flickr My previous gundam moc ;
-

[MOC] 4 Axes Robotic Arm
camellia posted a topic in LEGO Technic, Mindstorms, Model Team and Scale Modeling
Hello, I have designed a 4 Axes Robotic Arm with LEGO bricks, LEGO servo motors and my DIY PCB. Fig. 1 The old design of the 4 Axes Robotic Arm. Fig. 2 The modified design of the 4 Axes Robotic Arm. Fig. 3 & 4 Bottom servo motor. The first axes: It rotates from -180 degree to +180 degree in the horizontal plane. Two gears are used to reduce speed. A Large Servo Motor is used. Fig. 5 Middle servo motor. The second axes: It rotates from -45 degree to 20 degree in the vertical plane to lift the robot arm. Two gears are used to reduce speed and keep robot arm's pose. A Large Servo Motor is used. Fig. 6 & 7 In the modified design, a more bigger gear is used, in order to provide better pose keeping. Fig. 8 & 9 A connecting rod is used to assist the second axes. Fig. 10 Top rear servo motor. The third axes: It rotates from -180 degree to +180 degree in the vertical plane to lift the robot wrist. A Large Servo Motor is used. Fig. 11 In the the modified design, two gears are used to keep robot arm's post. Also using a rod to fulfill larger scale movement. Fig. 12 Top front servo motor. The fourth axes: It rotates from 0 degree to 360 degree to make the robot wrist spin. A medium motor is used. The finger could be changed to a screw driver, a color pencil, a paw, or as you like. Fig. 13 In old design, a Gyroscope is mounted to record the trace of the robot arm. Fig. 14 This is very important. As we know, a lot of foundation bolts are used to keep a real robotic arm stable, especially during its operating. Four boxes are used to fulfill this function. Heavy or high density materials can be put into these boxes to keep this robotic arm stable. Fig. 15 My DIY PCB is hided in the bottom box. The block at side is the DIY wireless module. Connecting this wireless module to a PC, I can control this robotic arm in PC via wireless. Fig. 16 PC control panel. These 4 servo motors can be controlled by a logic program, or by real-time control signals. The speed, or the moving direction of each motor can be changed at any time. The axes can run in a pre-set time, or in a pre-set angle. Fig. 17 Family photo. Please kindly visit: http://www.camellia.xin/models/robotarm4.html -

Functional Wind-up Robot
Eddie_Young posted a topic in LEGO Technic, Mindstorms, Model Team and Scale Modeling
If you remember those little clockwork robots, which used to be toys and are now prized collection articles, than you will surely recognize my representation! I've been working on this for some time now and I'm proud to say that this robot walks as well as the real thing! It uses two pullback motors, a couple cogs (gears) and 623 LEGO elements to achieve (I only hope you agree ) both good looks and great functionality. The mechanism with the incorporated motors is made to fit exactly into the case and the case comes off all in one piece (I like my modularity). The mechanism for the legs is the most simple thing ever but making it was as complicated as any of my larger MOCs, because balance played such a vital role in all of it. You can still see it wobble as it walks (I find the wobble quite indearing though ) and a lot of work went into keeping it from falling when it does. I like to think this is my best work yet, so I hope you like it just as much enjoy!!! My Flickr gallery -
Below you can find some pictures of a robot I've built, that I've christened Oddbot. I'm not entirely happy with the final result though, so I'm hoping for some constructive feedback Thanks! Front view back view Angled view Closeup of wrist assembly. Albulm: https://flic.kr/s/aHsm1Py9wD Thanks for any feedback
-
[EV3] Mindstorms Star Wars AT-AT
The_Icestorm posted a topic in LEGO Technic, Mindstorms, Model Team and Scale Modeling
Standing 58cm tall and 59cm long, this AT-AT from Star Wars is probably my largest robot to date. It is controlled by an EV3 p-brick, and is capable of walking, turning its neck, and shooting balls from a twin-ball launcher located inside its head. Here is a list of the functions of the robot: - Walking: 2 EV3 large motors - Neck turning: 1 EV3 medium motor - Shooting: 1 NXT motor Also includes an EV3 IR sensor for use with the EV3 IR remote. After getting the BWE, I had a plentiful supply of grey beams and panels, which I used in the aesthetics of the model. The head design was the most tricky part of the build. I needed it to look good, while at the same time have enough space for the twin-ball shooter with magazines. However, I'm happy with the end result, as it looks quite accurate to the actual thing. With the amount of pieces I had, I was also able to achieve a (almost) full body cover, which although adds to the weight of the robot, looks really nice. There are also two flaps on top of the head that can be lifted up to access the ball magazines. Walking was especially tricky to achieve in this model, as it was so top heavy. Rubber bands had to be used to help pull in the legs when they bore the load of the robot, otherwise the motors would not have enough torque. All legs are controlled simultaneously by the two motors, so the robot theoretically can't turn. However, I doubt the robot could turn even if the two sides could be controlled independently, since it is so top heavy. The EV3 brick can be accessed through opening of the panels on the side of the body. This was the easiest way to access the electronics while keeping a full-body cover (The real AT-AT in the movies also had opening side body panels). Here is a video of the AT-AT walking, turning its neck, and shooting. More information about the robot can be found here: https://www.us.lego.com/en-us/mindstorms/community/robot?projectid=afba4def-3b6b-49f3-8e0f-f964224763d9 Hope you enjoyed this robot! -
type : lego gundam name : Gundam Bael - Base on the first from 72 demons of Solomon code : ASW-G-01 Pilot : McGillis Fareed, Agnika Kaieru series : Mobile Suit Gundam IRON-BLOODED ORPHANS / (機動戦士ガンダム 鉄血のオルフェンズ Kidō Senshi Gandamu Tekketsu no Orufenzu?) Youtube link : Non-weapon view : LEGO Gundam Bael ASW-G-01 1/60 by demon demon demon, trên Flickr LEGO Gundam Bael ASW-G-01 1/60 by demon demon demon, trên Flickr LEGO Gundam Bael ASW-G-01 1/60 by demon demon demon, trên Flickr LEGO Gundam Bael ASW-G-01 1/60 by demon demon demon, trên Flickr LEGO Gundam Bael ASW-G-01 1/60 by demon demon demon, trên Flickr LEGO Gundam Bael ASW-G-01 1/60 by demon demon demon, trên Flickr Weapon view: LEGO Gundam Bael ASW-G-01 1/60 by demon demon demon, trên Flickr LEGO Gundam Bael ASW-G-01 1/60 by demon demon demon, trên Flickr LEGO Gundam Bael ASW-G-01 1/60 by demon demon demon, trên Flickr LEGO Gundam Bael ASW-G-01 1/60 by demon demon demon, trên Flickr LEGO Gundam Bael ASW-G-01 1/60 by demon demon demon, trên Flickr LEGO Gundam Bael ASW-G-01 1/60 (pts just for fun) by demon demon demon, trên Flickr LEGO Gundam Bael & Gundam Kimaris Vidar by demon demon demon, trên Flickr LEGO Gundam Bael & Gundam Kimaris Vidar by demon demon demon, trên Flickr Some upgrade : Weapon set from RX-93 Nu Gundam LEGO Gundam Nu-Bael ASW-G-01-93 1/60 by demon demon demon, trên Flickr LEGO Gundam Nu-Bael ASW-G-01-93 1/60 by demon demon demon, trên Flickr LEGO Gundam Nu-Bael ASW-G-01-93 1/60 by demon demon demon, trên Flickr LEGO Gundam Nu-Bael and Gundam Kimaris Vidar Sazabi by demon demon demon, trên Flickr LEGO Gundam Nu-Bael and Gundam Kimaris Vidar Sazabi by demon demon demon, trên Flickr Thanks for visiting !
-

[TC11] THUMPER
heyitsdisty posted a topic in LEGO Technic, Mindstorms, Model Team and Scale Modeling
When I heard Eurobricks was holding a contest to build combat robots, I knew I had to join and give it a shot. This is my attempt, THUMPER - a completely Power Functions-driven bot with a spinning disc capable of approximately 1500 revolutions per minute. I was originally going to build a version of the BattleBots competitor HyperShock and call it HyperSuck, but eventually I decided on two wheels rather than four, and the rest of the build grew from there. Unfortunately I have a serious lack of Technic panels, so the armour mostly comprises of Bionicle parts. Thanks for taking a look! -
Hi everyone, First off, I'll do a little introduction. Even though I've been a member for many years I've mainly just lurked in the shadows, probably because I've felt I don't have the time to build or the expertise to make a contribution. But there was something about this competition that has me really excited, and so far I've followed all of the participants closely. Then at the weekend when the first entries started being posted, I thought "what the heck, why not". So (if I manage to complete within the VERY short time frame I've allowed myself) this will be my first MOC in nearly six years and my first ever posted to this forum! I've been building for just four days now, but nevertheless, meet Mr Cuddles. The drive is already working, except I haven't worked out where the IR receivers are going yet. It is very dense and compact; a total of 15 box frames so far! The ground clearance is less that 0.5 studs to protect it from flipper bots. I eventually hope for it to have two large pincers/claws on the front, powered by the LAs, to grip the opponent. This is where the name Mr Cuddles comes from. Then when they are caught and can't escape, a hammer mounted on the top will smash them from above. Wish me luck!
-

Liquid-handling Lego robots
Lukas Gerber posted a topic in LEGO Technic, Mindstorms, Model Team and Scale Modeling
Hi all, I'd like to share some information about our Lego liquid handling robots that we have built and tested in the past. Today, our publication in PLoS Biology went online (http://dx.doi.org/10.1371/journal.pbio.2001413. Gerber LC, Calasanz-Kaiser A, Hyman L, Voitiuk K, Patil U, Riedel-Kruse IH (2017) Liquid-handling Lego robots and experiments for STEM education and research. PLoS Biol 15(3): e2001413.) Overview movie: CAD files: http://journals.plos.org/plosbiology/article/file?type=supplementary&id=info:doi/10.1371/journal.pbio.2001413.s002 Software for running lego robots: http://journals.plos.org/plosbiology/article/file?type=supplementary&id=info:doi/10.1371/journal.pbio.2001413.s003 Let us know what you think! Happy building! Best, Lukas -
[TC11] The Reaper- COMPLETE!
offroadcreations posted a topic in LEGO Technic, Mindstorms, Model Team and Scale Modeling
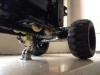
Updated with final model^^ Hey everyone, here's my TC11 Entry Topic... The Reaper I started my work on my contest entry the day it began. I built a chassis using red rims and the wheels from 42039. It had a giant hammer (made in LDD). https://www.bricksafe.com/files/Offroadcreations/wrath-of-mjolnir/bad-ideas..../Wrath of Mjolnir.lxf It was called the "Wrath of Mjolnir." (Mjolnir is the name of the Norse God Thor's hammer.) The chassis was much too big, so I scrapped the entire chassis built IRL. I started thinking of Ideas in my mind, the first being a half-track of sorts. 107mm Tractor tires in the front, and tracks in the back. After thinking more, I decided it would be better to just make it simple, with 4 wheels, and I built up the bodywork. I decided that the hammer was way too big, so I made 2 smaller ones. After thinking even longer and looking at other bot hammers I thought they were still too large, so I opted for a non-brick-built one instead. I remembered I had this piece, and knew it would be perfect. I also bought a bucket, because it looked good and I knew it would be prefect for trapping opponents inside. Here is what I have now, and the name was changed to The Reaper, because the piece looks like part of a scythe. The scythe is not attached yet. Also, after seeing @agrof's topic, I realized the bucket was too big for the maximum size. But I've figured out a way to move it upward into the box limitation and swivel it back down for battle mode. I still have much to do, like, Attach the scythe put the PF back in (it is in something else right now) make the bucket move fix the colors complete the bodywork So, it is definitely a WIP, but I hope to do it right and do well in this competition. Please tell me your thoughts! -
Let's start of showing you where I'm at now, then we'll talk about where I was and why that didn't work. The weapon is a horizontal spinner, driven directly by two XL motors, with two loaded battery boxes in the blade. I tried a couple variations of using belts and clutch gears to protect the motors but none of that really worked. Ultimately it's remote controlled so the driver is the clutch gear, I suppose. Because the spinner is fairly high off the ground, higher than I figure many of the other bots will be, I needed some way to reach out and touch those little guys. I was originally thinking of doing a retractable ramp that would extend out from the middle of the bot and force them up into the spinner. Then I decided to use linear actuators at the back and pivot the whole superstructure down. At maximum lift the blade gets within 4L of the ground. This approach sacrifices a lot of rigidity of the superstructure. Well, it's still rigid, but it is not solidly connected to the body. This means some of the impact when the spinner connects is going to be lost, but I like the idea of being able to target specific heights on the other bot. I think it's a worthy trade-off. When at max lift the bottom front edge of the superstructure rests on the top front of the base to help with this, as well as a lot of bracing on the vertical guides on either side of the superstructure. A side effect is that the superstructure is easily detached from the base with the removal of two pins, two 3L thin liftarms, and one electrical connection. I originally intended all the RC receivers to be in the back of the superstructure but once I added the lifting feature that would have required a ridiculous number of extension cables that I don't have. So I put one on either side of the base and tried to make it not look too out of place. The long panels unfortunately can't be any higher without getting brushed by the spinner. Drive is two L motors through worm gears, so it's not a speedy bot. The three wheel design with a lot of the weight on the third wheel almost directly under the center of the spinner makes it able to rotate almost in place. The plan is keep the other bot in front of you and let them come to you. It just has to be able to spin faster than they can drive around. Lift mechanism is an M motor. The base is pretty solid other than a few decorative fill in pieces. Battery boxes are integral but you can replace the batteries just by removing the black 15L liftarms on the top. Now we come to my tale of woe. The bot's name was supposed to be "The King". Bricklinked a bunch of 3L axles and yellow half bushes to make its crown. Two sets of inverted tracks mounted on springs to soften any blows. The King was quite proud of his sapphire in its bezel. The color cast by the dark trans blue on the yellow was the inspiration for using bright green on the base. There was just one slight problem once all the pieces came in and the crown was complete. Too much weight on the turntables. I guess I should have known. I tried running a liftarm inside the two turntables to support weight very early on in the build but that actually made it much worse. Anyway, without any complex drivetrain to protect the crown was much bigger than it needed to be and kind of pointless so its not the end of the world. It had personality though. So I changed the name to Regicide because The King is dead. Now I have to come up with something much lighter to make the top look finished. I'm not sure if I will even keep the yellow circle. Getting rid of all that would bring the weight down a lot and speed up the spinner. I have a bunch of the shorter bright green panels I could do something with. Oh, it was 45x45x40 with the crown. Now I think it's around 45x40x32.
-
Hello, sci-fi forum dwellers! I'm new to this subforum and this will be my very first MOC here! After watching Evangelion Neon Genesis and Mobile Suit Gundam: 08th MS Team, I was inspired to build a mech of some sort. Today, I proudly present my first mech: "Handyman". Handyman is a Utility Type mobile suit, built for a wide range of tasks. Its light armour allows for good articulation and agility. Handyman has counterweighted shoulders, to facilitate carrying heavy load around, a multi-tool left hand for salvaging, powerful light units, shoulder-mounted shooters and a retractable arm blade for minor combat. Aside from its utility programs, Handyman also has a recreational mode: All the Soldier Type mobile suits are envious of these breakdance moves! Bloody utility peasants... "Catch!" "You better keep your distance, mate! I have a power dagger and I'm not afraid to use it!" Handyman is operated by a single pilot, who is seated in the torso: Thank you for viewing! I thoroughly enjoyed this build and it has further awakened my interest in sci-fi builds. I hope you like it as well, C&C is very appreciated!
-
Prologue: I must admit, I’ve never thought to be able to reveal a proper entry that soon, but all the sparks came so suddenly and all of those fitted into the concept in my head, that the first digital model was ready in 1 night. Some fine tuning was done during another night, and now it sits beside me in it’s Brick Built Beauty. Excuse me for presenting via digital pictures for now, but this way I can give You nicer overview (according to my actual skills), live pictures and video will be done, of course. As it is basically ready, I decided to share it as inspiration to the community, I hope to see many awesome and fun creatures! Let me introduce my entry for the TC11 contest: Name: Bison - my robot is chubby, robust, has lot of power to push and for butting heads, and has biungulate heels to kick all around – just like a bison. My main objectives were to use 2 motors only (for intuitive control, which is essential in the battle arena), and to build a double sided robot, which is functional upside-down as well. Also, I wanted to follow the regular MOCing rules: ease of build, BB access must be simple, legal techniques (LDD compatibility). Parameters: Skid steering 4x4 drive via friction gears Motorized kick-heels via friction gears (signature move) Massive dozer blade (? signature move ?) Very robust structure (to survive rough beating) Modular build 439 parts (without batteries) 37x26x9 studs 1070 gramms (with Ansmann rechargable batteries) 0 gears The 2995 tyre works here very well, as it is more grippy than the average LEGO tires, and so is the 55978 too, as result I got a nice combo for my friction gear set-up. This can provide quite a lot power, but also works as clutch in extreme situations (motor protection). The only deviance what I had to apply (with staff approval): to fit the 2995 tyre to the inside of the 2996 rim lip (Click for picture - on the right), so I could fit them perfectly on the wheel hubs, without building those in offset with the housing. As here can be seen, it is pretty crowded in the inside, which I am very pleased with. After some minutes of test, I am satisfied with the result, it can easily push 3 kgs (milk cans), quite fast, and really works like I imagined. Let’s get to pictures, update will come! EDIT: video is ready, see post below.
-
I was really so busy that is a long time since i created a folder on brickshelf, and now it's time to add my remaining 8 bot: i'm also aiming to create a lxf file for each, but currently waiting for the first folder to become public. What i want to do is to keep this fist post simple with robots thumbnails, link to the future reply about them, descriptions and lxf files, let's start: Really hope that all the files and photos that i'll put there can inspire some TC11 competitors, unfortnately you can't fight bot in the entry video but i will really like to know how a fight between your bots and mine will end (despite my bot being ruled by different and more restrictive rules). Bot-focused replies will be posed one every day starting from tomorrow and then this first message will be updated with thumbnails, lxf files and more info, i'm doing this because i'm progressively dismantle all the robots and i want to keep them at least in digital form (so i'll have more pieces for my new ideas without loosing the previous ones). i also really want to thaks LRW (lego robot wars) group for the support that they gave to me while i was building and posting updates there: https://www.facebook.com/groups/105109289523663/?ref=bookmarks in order not no make this topic only a bunch of writings i have a small video about the first bot that will be showcased tomorrow (asap) so here all the robots: name: LIFTY description: this is the 2nd of the -ITY team, a series of simple robots made to show the archetypes of combat robots and also easy to replicate, they also fight each other but the winner wasn't this one. signature move: LIFTER weight class: 500g notes: despite being a lifter it is not really able to full lift the opponent but by going under it and pushing with the additive weight it can easily lift and flip up to 1kg bots! lxf file: lifty.lxf bot reply link(scroll down here): click here name: BITY description: this is the first of the -ITY team, also the most complex featuring a jaw that can be opened and rotate, it represents grabbers or control robots that aim to grab the opponent and push them into the PIT of oblivion due to the use of lipo BB (i have only one) and the excessive weight (700g) it didn't compete to the secret -ITY championship signature move: CLAW weight class: 500g notes: 4x4 transmission is really powerful but has a lot of friction while steering (even at smaller weight class) so the battle position of BITY is with the claw inclined down and front wheels lifted up and not touching the ground lxf file: bity.lxf bot reply link: click here name: FLIPPY description: 3rd of the ITY team it is a spring powered flipper! inspired by diotor this bot relies to a winch mechanism that is able to load and relase 4 9398 shock absorbers with only one motor! signature move: winch reloaded-spring powered FLIPPER arm weight class: 500g notes: unable to self right was defeated by lifty on the -ITY tournament lxf file: flippy.lxf bot reply link: click here name: CARBIDE description: replica of uk robot wars competitor carbide, grand finalist of series 8 and champion of series 9 signature move: horizontal spinner weight class: 1kg new technic motor used: 2x M for drive, 1x 9V motor (745699) for weapon drive: 2WD and can drive even if upside down! notes: the side armor is really tough but can be detached from th main body, also the bar has a quite good punch but luckily not enough to break lego pieces, it can remove armor and exposed wheels. also it is driven by an sbrick receiver so it has the advantage of PWM motor controls and no line of sight needed, may also join 3-robot matches due to not providing interferences with IR lxf file: carbide.lxf bot reply link: click here name: PULSAR description: again a 2016 competitor, smaller and faster than carbide, but equally lethal signature move:SPINNING DRUm with double single tooth weight class: 1kg replica new technic bricks notes: it requires only two channels to be controlled because the spinning drim is always one and a rubber band belt prevent the motor stall name: WITCH DOCTOR description: this replica is from BATTLEBOTS! unluckily i can't replicate the purple/green color scheme but this time i used old technic bricks so it is completely smash-able! but mind that its deadly single tooth disc smash bot before they can do anything signature move: single tooth SPINNING VERTICAL DISK weight class: 1kg replica with system bricks notes: my first inclined wheel drive (with chains) that really helps the bot steering even if 4x4 with all the wheels on the ground name: CARDIAC II description: the first fan designed bot that i motorized, it will fight witch doctor later this moth (hopefully) and it is armed with a deadly axe that can stop the 2000rpm disk of its opponent signature move: fast AXE weight class: 1kg replica with system bricks notes: it is the biggest bot i've ever built and has a pretty advanced weapon capable of rapid fire with a single M motor name: KILERHURTZ test chassis description: this poor bot was never finished (and used to test all other bots weapon) due to the armor of the original 100kg one being really difficult to replicate, but it's weapon really reflect the power of a 110kg machine signature move: rubber-band powered gearing reloaded AXE weight class: never finished notes: it can be operated with a full auto reload system and a tap firing button from the sbrick APP
-
ROBOT WARS: Pulsar vs Carbide
PKW posted a topic in LEGO Technic, Mindstorms, Model Team and Scale Modeling
hi all, some months ago i made this video of lego battlebots, and now i'm posting it there because maybe you could be interested also for TC11, you'll find all the bot info in the video but i'll clone them here too, hope to bring up a brickshelf folder asap for the two bots (but i have to rebuild them due to pieces and electronics being used for witch doctor replica, cardiac two, fanmade design, killerhurts and recyclopse chassis, and other 3 500g class bot an grabber a lifer and a flipper) PULSAR weight: 700g size: 23x27x9studs weapon: 73g spinning drum with two single teeth 1900rpm strenghts: really effective wedge shape used to go under the opponent and lift them with the drum energy weaknesses: the drum isn't enough fast to launch the oppnent on the air, wheelholders may break off easily, weak wepon belt CARBIDE weight: 730g size: 32x32x9 studs weapon: 84g spinning bar 750rpm strenghts: great power and though armor, effective rear wedge weaknesses: the armor can e warped or bent and increase friction in the drivetrain, hard to control, high battery consumption here a photos from Ellis (pulsar builder) about size comparison here the video: NB it is really long, if you want, after presentation, you can skip to 11:02 to skip the fist fight (a bit long and boring) and save time without losing the most of the action! i'm keeping editing this with photos and videos from my twitter, it is hard to find them back but i'll try: CARBIDE PULSAR -
[Render] Exo-Force Devastator Figurine by Artemiy Karpinskiy, on Flickr Devastators were elite warriors of Meca One in his war against humans of the Mount Sentai. Possessing limited sentience unlike their Drone brethren, Devastators were assigned to pilot the most advanced and dangerous mechs and vehicles at Robot Army's disposal. * * * If you like what I do and you want to see me create your OC, a favorite Bionicle Character, or something else, feel free to look up my Commission Info! I also now have a Patreon page, so please consider supporting!
-
[Render] Ice Planet Mech by Artemiy Karpinskiy, on Flickr An Ice Planet exploration mech based off the concept art from this page. Took me about 18 hours to render this monster. :D Back view | Cockpit * * * If you like what I do and you want to see me create your OC, a favorite Bionicle Character, or something else, feel free to look up my Commission Info! I also now have a Patreon page, so please consider supporting!