Search the Community
Showing results for tags 'remote control'.
Found 46 results
-
Let's start of showing you where I'm at now, then we'll talk about where I was and why that didn't work. The weapon is a horizontal spinner, driven directly by two XL motors, with two loaded battery boxes in the blade. I tried a couple variations of using belts and clutch gears to protect the motors but none of that really worked. Ultimately it's remote controlled so the driver is the clutch gear, I suppose. Because the spinner is fairly high off the ground, higher than I figure many of the other bots will be, I needed some way to reach out and touch those little guys. I was originally thinking of doing a retractable ramp that would extend out from the middle of the bot and force them up into the spinner. Then I decided to use linear actuators at the back and pivot the whole superstructure down. At maximum lift the blade gets within 4L of the ground. This approach sacrifices a lot of rigidity of the superstructure. Well, it's still rigid, but it is not solidly connected to the body. This means some of the impact when the spinner connects is going to be lost, but I like the idea of being able to target specific heights on the other bot. I think it's a worthy trade-off. When at max lift the bottom front edge of the superstructure rests on the top front of the base to help with this, as well as a lot of bracing on the vertical guides on either side of the superstructure. A side effect is that the superstructure is easily detached from the base with the removal of two pins, two 3L thin liftarms, and one electrical connection. I originally intended all the RC receivers to be in the back of the superstructure but once I added the lifting feature that would have required a ridiculous number of extension cables that I don't have. So I put one on either side of the base and tried to make it not look too out of place. The long panels unfortunately can't be any higher without getting brushed by the spinner. Drive is two L motors through worm gears, so it's not a speedy bot. The three wheel design with a lot of the weight on the third wheel almost directly under the center of the spinner makes it able to rotate almost in place. The plan is keep the other bot in front of you and let them come to you. It just has to be able to spin faster than they can drive around. Lift mechanism is an M motor. The base is pretty solid other than a few decorative fill in pieces. Battery boxes are integral but you can replace the batteries just by removing the black 15L liftarms on the top. Now we come to my tale of woe. The bot's name was supposed to be "The King". Bricklinked a bunch of 3L axles and yellow half bushes to make its crown. Two sets of inverted tracks mounted on springs to soften any blows. The King was quite proud of his sapphire in its bezel. The color cast by the dark trans blue on the yellow was the inspiration for using bright green on the base. There was just one slight problem once all the pieces came in and the crown was complete. Too much weight on the turntables. I guess I should have known. I tried running a liftarm inside the two turntables to support weight very early on in the build but that actually made it much worse. Anyway, without any complex drivetrain to protect the crown was much bigger than it needed to be and kind of pointless so its not the end of the world. It had personality though. So I changed the name to Regicide because The King is dead. Now I have to come up with something much lighter to make the top look finished. I'm not sure if I will even keep the yellow circle. Getting rid of all that would bring the weight down a lot and speed up the spinner. I have a bunch of the shorter bright green panels I could do something with. Oh, it was 45x45x40 with the crown. Now I think it's around 45x40x32.
-
Hello! Going through my parent's attic over xmas I rediscovered my old 12v train set, which I'm now trying to restore and get working again. After cleaning up a bunch of contacts with WD40 the actual train and power brick work, which is nice. However the remote control for the signals seems to be completely jammed and neither button will actually move. Has anyone successfully repaired one of these? I can't even see how to take it apart without breaking it. Thanks
-

[MOC/2016]Mercedes-Benz G500 Cabriolet
moonein posted a topic in LEGO Technic, Mindstorms, Model Team and Scale Modeling
Based on the Mercedes-Benz G500 Cabriolet design, and carried out a more radical modification. Two L motor drive, one servo motor steering, four-wheel drive, remote control. Using two special parts, one is above the 42043 logo, and the other is x85 (lamp bowl). Rear bumper design is still in the adjustment. http://www.moc-pages.../moc.php/430479 http://ein.cc -

Aircraft Tug XL (Pushback Tow Tug/Tractor Tug)
filsawgood posted a topic in LEGO Technic, Mindstorms, Model Team and Scale Modeling
HI! Today i want to present you my new work - Aircraft Tug XL I started this project a year ago, but bring to mind it succeeded only now. Meet Aircraft Tug XL (Pushback tug/Tractor tug). The model is an extension of the project Aircraft Tug 2014, many of which I am personally not satisfied, and therefore had an idea to build something more functional, large and attractive. Thus was born the Aircraft Tug XL. Machines of this kind is mainly used at airports when towing aircrafts to parking or vice versa - to the runway. I think everyone who has ever been in the large airports, have seen similar tugs. Less a similar technique can be found in seaports or any other freight terminals that require towing heavy loads. This truck has four-wheel drive by two XL motors, independent steering front and rear axle on two servo motors, lifting mechanism cabin, as well as a system of four mechanical jacks driven by two motors L. Full remote management for that answer 3 infrared receiver, and power models provide two large battery pack located on the sides, and of course, he has V10 on board! The functional copy of the tractor completely original machine. The layout of the indoor units I came as close to real. Dimensions: D / W / H 56/27/15 stud. 445/220/120 mm. The model is made of 100% Lego parts except stickers - I made them their own. The basis of design I took the logo of the Khabarovsk airport - in the form of a flying bear. In Russia bears do not just walk down the street with balalykas, but also know how to fly :) I also worked on the detailed cabin from the outside to the inside. Now, in contrast to the previous tractor, the door is open, there is a full salon, which are two fire extinguishers, driver's seat and the passenger, levers, steering wheel, and monitor devices. Tractor turned quite powerful, as you can see by watching video. In practice, it is able to move from his seat and dragged to drag a weight of not less than 6 kg, as long as the batteries have been good charge :) You may see more information and photos on my blog -
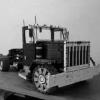
Little American Truck
Appie posted a topic in LEGO Technic, Mindstorms, Model Team and Scale Modeling
Here's another small creation I spend some time on the past few weeks. A small American truck: I had a few wishes before I made this model. - Had to be 7 studs wide. - Had to use these tires, because they are the only tire size I know of that have good looking "truck (double) wheels" for the rear axles and good looking single tires for the front wheels. - Small fake engine - Maximum steering range possible - Steering controlled from the 5th wheel (why will become obvious later) - Openable doors and interior I got this in the model, though some are not the most pretty. Especially the wheelarches at the front are a bit big. First of all, making the wheel arch a full stud lower would touch the wheels. Lowering it half a stud is something I didn't even really look into, because I am getting pretty tired of the "half stud issue" that plagues pretty much all my models The rear part of the wheelarch is that far behind the wheel due to the steering mechanism. There is space to move it 1 stud closer to the front wheel, but I wouldn't know how to fix it in place while still keeping room for the steering rack. Considering I have alot of "old Technic" parts I used some vintage steering solutions for this model combined with modern parts. On the other hand though I do kind of like this wheelarch, because it reminds me of the wheelarches of old cars I could have settled for a smaller steering angle, but I didn't want to. I also had to keep the steering solution low due to the fake L4 engine above it A known concept for a small engine that I crammed in here. The hood is open for 2 reasons: I like to see stuff moving and because the hood would otherwise be too high for the model. I tried to mimic a curved top on the hood by have it go from 2 to 3 studs. I did have a desire to make a openable hood, but I couldn't figure out a way to make that structurally sound. Openable doors and an interior. The chairs are actually linked to the red triangular half liftarms on the outside keeping them (and the chairs) at that angle. The belly shot, which also provides another look at the steering That 8T gear is actually connected to a 16T idler gear on the steering axle to transfer it to another 8T gear going to the L4 engine. The truck is only driven from the 2 left rear wheels, since I can't fit a diff in this scale I figured this was the next best thing to still keep a nice steering angle. As you can see the outer ring of the small turntable, the "5th wheel", is connected to a black bevel gear which controls the steering. The reason for the axle in the centre of the small turntable is for the trailer. The trailer is a loaded with liftarms, that's partially because I only had 2x 3x11 panels from my 42029 and because of the white line on the truck which I continued on the trailer. The white line on the truck was actually an afterthought. The truck was completely red before, but that looked rather dull imo so messing around with some lines I decided this pattern on the truck was a nice break from all the red. This isn't just a trailer. This is a trailer that gives the truck RC possibilties. This was another wish I had for the model. I wanted to build a truck that was a non PF model on its own, yet had the option of being remote controlled with a trailer. The small turntable was an obvious choice for me because with that the truck on its own looks like it has a pretty decent looking 5th wheel which also allows to be used as a control to steer the vehicle. It also allowed me to have 2 functions (drive and steer) crammed into one spot on the model. I didn't want to see universal joints at the rear of the trailer going to the truck for steering, because that has been done and I don't like the look of that, so it had to go through the 5th wheel. The black bevel gear at the front of the trailer is to secure the steering of the 8T gear. Of course the trailer turns as well, but since steering is done with a M motor you're basically "re-adjusting" steering every step of the turn. The length of the trailer is based on what "felt right". This meant that I had plenty of space in the trailer for all the stuff. I got pretty lazy and just used some universal joints to link the motors I also made a very small video of the model (battery of phone ran out ) I couldn't make a video of the model going in reverse. It does some gear grinding then. Something I can't seem to really fix, because Lego decided to make a square hole in the small turntable instead of a round one, which I could have used to secure that drive axle on the 2.5 stud high rear chassis some more. Considering I don't like driving it in reverse anyway (I am not a master of turning with a trailer ), I am just going to leave it. -

Hello! I am new. (And I need some help, please!)
sir_launcelot posted a topic in Hello! My name is...
How to Motorize the Mars Rover I am looking for some suggestions. My daughter is building the Mars Rover set (go here for the details: http://www.eurobricks.com/forum/index.php?showtopic=98222) for a presentation at school and I told her I would help make it operate by remote control with one of the power function kits. Problem is that it is a lot more complex than I thought. (I have no experience at the expert level building. (No building the rover is not part of the project, she is doing it as an additional part of her presentation on Rovers). I think I can maybe get it moving with a remote, receiver and simple motor attached to one wheel, but I do not have any idea how to do the steering and don’t know how to move any of the other functions (camera, antenna, robotic arm). see So, to steer, I use a servo? How do I operate the other things, more servos? And to move things slowly, do I need complex gearing? (I was looking at the SBrick which might work. I saw a few designed steering racks and chassis on Ebay, some simple, some pretty complex. Would I be better off buying another set that has a chassis and steering and drive designed to work with motors and then build it and adapt the Rover to it? Any suggestions to help me figure out what I need to do and what to buy to easily make this work would be much appreciated. Thanks! -
Here's my work in progress for the Sbrick contest. The plan to build this was actually before the contest was announced, but I didn't actually start building until januari, just had a rough draft in my head until then. I usuallly don't post WIP stuff, but since I solved the problems I had with this build (and there were many, but more on that later), I feel confident enough to post a little about it. It has the following functions: 2x L motor for drive (and steering obviously ) 2x M motor for the arms The M motors will also fulfill another role, but I am keeping that as a surprise for now. I tried to "hide" the 2 IR recievers in Wall-E's front. He has a display there too where the black tops of the recievers pop, though it isn't as wide as this and the battery meter suffered a little because of it. Of course with an Sbrick you can make a proper display, but I think this works pretty well for a purist As you can see I still need to make a neck and a head, but the groundwork inside is ready to build that so I don't expect much problems with it (yes, I totally jinxed myself). Also, the white wheels in the tracks are temporary. I ordered grey ones from BL, which already shipped and I hope to recieve them some time next week. A little glimpse of the insides: You can also see Jeroen Ottens' awesome little microphones. Why did I used those? The regular ball pins or balls with axle would touch and block each other if both M motors run, these do not. Besides cramming in 1 batterybox, 2 IR recievers, 2 L motors and 2 M Motors I also used a gearbox based on this principle: I found this type of gearbox while looking around on the web trying to figure out what would be cool (and compact) to use in my model. No need for me to come up with my own gearbox when there are so many good ones online after all I chose this one because it meant I could always control 5-6 functions without knowing which gear was selected in the gearbox, which adds to the playability imo. I am aware there alot of Lego Wall-E's out there, ALOT. I know, I saw most of them when looking around And of course the Lego Ideas Wall-E that is incoming. Though that guy needs to explain to me how 5L tracks fit in a 10L wide body when Wall-E wants to transform into a box. I do think however I made a Wall-E that's different than most, for the simple reason it is build 90-95% from studless Technic. All others either have Technic bricks combined with Sytem bricks or are build from System bricks. It wasn't a goal to design a studless Wall-E though, it just came to be during the build and I tried to solve stuff as much as possible with studless Technic since then while still looking clean. Though I am unsure if this studless approach works for the hands, perhaps I should make them from System bricks. The hands do function like Wall-E's real hands though and can be set in fixed positions thanks to friction pins and 3L axles with stop. For the top cover I didn't want to add another layer of liftarms since it felt "too high" for the scale of the model, but I couldn't used thin liftarms either unless I wanted a swiss cheese look for the top, so I went with Syetem tiles to provide a clean smooth top. I actually wanted to make a transforming Wall-E but still have drive and moveable arms and whatnot, but I simply can't build that at this scale (*looks at all that PF blocking the places where the tracks and head would need to go in to be a Wall-E box*). Speaking of scale, I took a little bit of liberty with that. Simple example: 5L tracks, 13L wide body. Which makes technical sense to me when looking at his transformation in the movie (I watched it again for "research" before I actually started this build ). 13L wide body means 1L for the sides and 1L for inbetween the 5L tracks, those spaces are there in the movie so they are there in my model. I also wanted the rear wheels in the tracks to be a little bigger. I even considered Unimog rims, but those don't play nice with tracks. I am open for suggestions for bigger rims that play nice with tracks, though I do consider these to be ok (hence why I ordered them in grey ). Fun fact: every (and I mean EVERY!) part has been at least rebuild two times. I think I even took the rear cover apart about 8 times, the centre 3 times, arm mechanisms 4 times, tracks have been rebuild 4 times. Though the last track revision was simply to scale it up with bigger rear rims, since I had smaller ones in there first which looked too small with the rest of the model. All other revisions were basically reinforcing the structure to prevent any gear slips. I solved the last of those gear slips today and the model is very rigid now and works perfectly. Sorry for the quality of the pictures, it's dark outside Hope you guys like it so far. More to come.
-
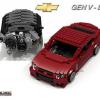
Dodge Challenger 1970 RC
tibivi posted a topic in LEGO Technic, Mindstorms, Model Team and Scale Modeling
Hello, Last summer, I build some MOC's that I haven't posted here yet, due to school. Well, here is one of them: The dodge challenger 1970! http://farm6.staticf...83caab960_z.jpg This scale model of the Dodge has following features: Remote controlled independent suspended Lights (2 pairs in front, 1 in the back) with switch hidden under the rear Rc motor for drive medium motor and hockey spring for RTC steering All pics can be found in my flickr set: http://www.flickr.com/photos/tibivi/sets/72157637671354815/with/11066720816/ Hope you like it! Best regards, Tibivi -

[MOC] Tracked Arctic Explorer
unimog123 posted a topic in LEGO Technic, Mindstorms, Model Team and Scale Modeling
Today I present a quick MOC, that I made. To start, let me just say that I actually made my first tracked vehicle exactly one year ago from today, so I thought why not make another one, but better. It features full suspension with trailing arms connected to a hard 6L shock absorber, two pairs of LED's (1 front/1 rear) connected to a switch in the cab, as well as a strong drivetrain using 2 XL motors geared 1:1. Also the Triple A battery box is placed behind the 2 XL's. Sorry for the shortage of pictures, but as I was taking them it was snowing. I will have more pictures on my blog once I post it later today. -
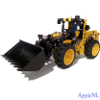
(WIP) CAT 525c Grappler
unimog123 posted a topic in LEGO Technic, Mindstorms, Model Team and Scale Modeling
Today I would like to began my most complex creation to date. A Caterpillar 525 Wheel Skidder: Here is what I have so far: This is the articulated joint. As you can see it has a Unimog ball joint for articulation as well as 2 mini LA's. The plan is that because this is going to be such a large vehicle I'll be using 2 M motors / 1 per LA but as if that weren't good enough, I decided to have an adjustable remote control RWD/4WD system. This transfer case is placed in between the mini LA's to save space for the crane arm motors in the rear. Also the switching will be carried out by another mini LA connected to a changeover catch which in turn will slide on a mounted axle horizontally. One more thing, I thought it was pretty funny how this one module of parts took 2 days to complete and modify, while my previous Trophy Truck model took 2 days to build altogether. -
The EMD trains frequent this LEGO Train Forum now and then. Of course there is the EMD E8 Santa Fe Super Chief, but others like Tearloch already made EMD's as well! Today I want to present my finished EMD E9 model: A video demo can be found here: I connected an Arduino Pro Mini to the LEGO LiPo, I also connected the normal IR receiver to the LiPo and connected the Train motor to it. B.t.w. I ran out of gray wheels so unfortunately one gray wheel. I use the small PF remote to enable / disable the Mars light / gyrolite (depending on the brand ;)) and the orange blinker. The Arduino uses a custom LEGO PF Remote receiver sketch and a typical 940nm IR receiver. The left one shows the gyrating light (2 SMD LEDs), the blink light also has a small SMD LED connected to a simple (insulated) copper wire. A peek on the inside: The IR receivers are at the right, the small one sticks out a little bit, enough to receive IR signals.
-

Custom Lego Hot-rod Hearse
octavspot posted a topic in LEGO Technic, Mindstorms, Model Team and Scale Modeling
This is a bit of an older MOC I did last Halloween - (it's long scrapped now) but I thought I'd share this here as well - especially for those with a small taste of the macabre. Just after building Lego's Vampyre Hearse, a new, slightly-morbid-yet-cool idea spawned in my mind; what if I build a bigger, RC version of this? At first, I wasn't quite sure what it'll end up looking like, since I couldn't figure out what to model it after - a Cadillac? a Rolls-Royce? a Lincoln? - so, I went with all three - sort of, lol. Hearse Front by Octav_spot, on Flickr What's interesting is that the headlamps are actually yellow elements, but mixed together with the blue from the LED's, it came out green. I liked the look so much, I kept it as is. Hearse Rear by Octav_spot, on Flickr The side-lamps idea came to me in the last moment - I wish I'd of made them look closer to actual lanterns (since that's what original hearse carriages had.) To my surprise, the light came out looking almost purple, which seemed strikingly accurate. Hearse Profile by Octav_spot, on Flickr Two Hearses by Octav_spot, on Flickr Just the V8 engine itself was literally half the Vampyre Hearse. I laughed. Hearse Speed by Octav_spot, on Flickr To see it in motion, here's the video. I thought the reaction from my cat was pretty funny, so I kept it in the clip Currently working on an actual Rolls Royce... just haven't decided what model year yet... In any case, enjoy! -
Hot Rod with mostly parts of 42000
tibivi posted a topic in LEGO Technic, Mindstorms, Model Team and Scale Modeling
Hey all, As promissed in another topic I present you my Hot Rod: It's made out of the parts of 42000 and some other. Features: Remote drive with 2 RC motors and differential remote RTC streering with servo motor opening doors independant suspension on all wheels powered by LiPo and V2 reciever With the RC motors it actually is fast because I have kept the weight down were I could. some pics: more pics in my Flickr set: Greets Tibivi -
Mini RC Tatra 813 - 8x8
Tamas Juhasz posted a topic in LEGO Technic, Mindstorms, Model Team and Scale Modeling
Hello! My newest mini moc is also a Tatra. My goal was to make a 8x8 813 model with realistic Tatra suspension: This was my first moc, which could be build with 1:1 scale from a paper: I always wanted to build a really small Tatra with the wheels from 8842. This wheel has a diameter of 43 mm, so the proportional width is about 11 stud. That's even not enough, too narrow, but I had success with the suspension and drivetrain in 13 stud width. The first and second axle has steering, and all axle is driven and suspended. With U-joint there is no way to build it narrower. I used 3 different shock absorbers. The first axle has harder ones to hold the weight reliable in the front. The steering mechanism only steers directly the left wheels, the right ones are steered by the 9L links: http://www.brickshel...y.cgi?i=5748589 The ground clearance enables 25 mm high obstacles under the truck. Of course it can go through much bigger ones, as can be seen below in the video. The drivetrain is pretty simple Tatra like, with assimmetric left and right side: http://www.brickshel...y.cgi?i=5748587 In the picture it also can be seen that the front 4 wheels are driven with a small 2L thin liftarm to prevent clacking(if it uses pins and pulley). There wasn't problem with that, in every terrain kept the front wheels the correct position. They look like the valve cover of the wheels.( I forgot to take them also in the rear wheels) Maybe from the pictures we can think that the 12 bevel gears can go out in the middle of the axles. They can't. The 2L red axles prevent that (I used strong 12 gears and loose U-joints). The suspension worked well in terrain, this Tatra doesn't carries tons of weight, stronger axles aren't necessary. The wheel travel is about 2 stud or a bit more depending of the axle. Technic inside: http://www.brickshel...y.cgi?i=5748652 The steering M motor is in the front, the driving M motor is in the rear part. The M motor is powerful with 6:1 final ratio. It can be, because the weight is only 761 g. The stability surprised me. In the video can be seen some test. The aesthetics was also important for me, this one isn't a trial truck, more civil version. I had to cut the mudguards to give space for the wheels, and of course it's a bit higher than the real Tatra to have wheel travel. The front grill has a Tatra logo and some covering sticker: The on/off button is in the top of thew vehicle: If you hit the PF connector, the front LED lights will work(video). I didn't want a PF switch, and wanted to try this out. And the video with infos: If somebody needs, I can upload the building instructions. -
 On YouTube, CamsPL / Cams posted of his yellow Lego Technic Walking & Turning Biped (W&TB) Mecha model. It uses three Power Functions (PF) Medium motors to walk and turn. More on his Flickr photoset, and on his Brickshelf Gallery (when moderated). He also made the red Walking & Riding Biped (W&RB). which uses four Power Functions M-motors to make it "ride, walk, skate, and turn" : ( ) (Flickr photoset) (Brickshelf Gallery when moderated)
 -
R/C Unimog
legotechnicblue posted a topic in LEGO Technic, Mindstorms, Model Team and Scale Modeling
Does anybody have instructions and a parts list of how I would fully motorize the 8110 Unimog U400 using crowkillers 4wd with reverse transmission/ gearbox? -

Project LARGE [car]
z3_2drive posted a topic in LEGO Technic, Mindstorms, Model Team and Scale Modeling
Hi everyone, have a good update. I abandoned my trial truck as it lost efficiency with many gears, and I have multiple WIP's on my desk, but at the moment i'm focused on my first large scale car, but it will be a fast RC, so no gearboxes or extra weight. This is mostly focused on performance..So far, I have done the rear axle and drivetrain. Special thanks to nicjasno, for making videos and pictures of his brilliant suspension ideas. I reverse engineered his rear multi-link suspension and reinforced it so it will stay together and work at high speed. This high speed will be possible with two buggy motors driving it from the 'slower' output, each powered by one of my rechargeable 10 volt batteries. Next I will figure out the front axle, most likely something from nicjasno again. One concern is the Remote...we really need a new remote, with proportional control (so I don't destroy my differentials) that has good response and maybe even radio control so I don't look like an idiot running after my MOCs! I realize a new remote/receiver would be expensive, but I'd pay for it because I'm annoyed by the poor response from train remote and the VERY low range of Infrared, especially outside. I know this is because Lego is an 'indoor toy' but some of us take playability to the next level, so maybe just release it as a separate power functions module? Here's pics and video BTW video (better camera but I screwed up the focus experimenting with various formats and such also, sorry) http://www.youtube.com/watch?v=YBpd_pYRSEs -
Micro RC truck
Tamas Juhasz posted a topic in LEGO Technic, Mindstorms, Model Team and Scale Modeling
I uploaded my smallest truck few days ago: Folder: http://www.brickshelf.com/cgi-bin/gallery.cgi?f=520763 My purpose was a very small trailer truck with remote control. The PF RC system rquired the trailer, in the tractor truck there is only space for one micromotor and the suspension. Total length is 42 stud, width is 5 stud in the truck, 6 in the trailer. The trailer's height is 10 stud at maximum. One old 71427 motor drives the rear wheel of the truck with universal joint: Then, 6 of the 12 tooth bevel gears make connection with the rear axle: The steering is done with micromotor. There is 4 functions in this moc: 1 driving 2 steering 3 Led lights in the back 4 suspension There is one receiver for the leds, so they(orange and red) can be controlled individually: Except the truck's driven axle, all axle has suspension. Front: http://www.brickshelf.com/cgi-bin/gallery.cgi?i=5733797 Trailer - the red suspension parts are from the city theme, I like these small live axles, they are perfect for here: The most tricky part was the tractor truck of course. Fortunately I have two large red doors from an old set, so I could do the truck with this looking: I know that the wheels are a bit small for this body, but who cares. If we take a look at this( http://www.autospies.com/images/users/cawimmer430/5678_1.jpg ), then it's not so big. The trailer is full with PF parts. From the front part there are: 71427 motor - AAA battery box - two PF receivers - leds. The few metallic silver grill plates cover the receiver's infra parts, so you can't see them, but the communication between them and the remote controller is still good: For the control the 8879 remote control is recommended, as can be seen in this video: Hope you like it. -

problem with lego technic 9398
samar posted a topic in LEGO Technic, Mindstorms, Model Team and Scale Modeling
I have a problem with the tires; can't go neither forward or backward ? I need to know why ? and where to check to solve this problem ! I have another question, please : how to rechange the batteries when flat ? I thank you in advance for your help ! -
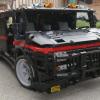
Smiling Pick up truck black (RC)
bmollema posted a topic in LEGO Technic, Mindstorms, Model Team and Scale Modeling
I wanted to build a modern black pick up truck. It can switch between manual play mode and a RC drive mode. In RC mode it has a 2 speed gearbox that can be controller via a M-motor, a XL motor is for driving and a m-motor is used for steering. In neutral position the truck can be played in manual mode, so normal steering via the HOG. The fake V8 is power by the wheel in manual playmode. The design is inspired by Nico71 his jeep. Any feedback is welcome. If you like check out my MOC pages or Brickshelf. See also: MOC pages Brickshelf Gallery I hope you like it! -
Scuderia Ferrari Transporter (Power Functions)
Ape Fight posted a topic in LEGO Technic, Mindstorms, Model Team and Scale Modeling
Thanks to those on this site who helped answer my queries about Power Functions : ) I've now finished the FIAT 682/RN2 Bartoletti. It's currently running one battery box powering 2 XLs and 1 Medium through 1 IR Receiver, but when it gets some race cars the whole setup will be doubled (except the steering the motor). A couple of pics are below - more on MOCpages at this address: http://www.mocpages.com/moc.php/278673 Comments welcomed : )