Search the Community
Showing results for tags 'powered up'.
Found 78 results
-
Piano is not my forte. The end. Oh, you're still here. Okay. Let me try again. The statement above is a joke but it is also true. No pun intended. This review is about the Grand Piano set, a LEGO scale model with ornate details inside and out. If you were around back in April, my last review was about the immaculate 1-piece LEGO white baseplate. Today, I am about to review a set with over 3600 pieces. Not much of a difference, really. Now, let's begin with my 32nd RA review, set# 21323 Grand Piano. Overview Name: 21323 - Grand Piano Theme: IDEAS Year: 2020 (2H) Pieces: 3662 Minifigures: 0 Price: USD 349.99 / EUR / GBP 319.99 Introduction I have very fond memories in my childhood wanting to play an upright piano whenever my mom and I visit my aunt's house. In fact, I have a picture of me pretending to play that piano -- it is one of my favourite childhood photo. Sadly, the untapped potential got wasted because I never had any proper training to play a piano, or any musical instrument for that matter. I don't think I could ever read sheet music as that take years of practice too. I only understand music alphabets - those 7 letters A, B, C, D, E, F and G. Regardless, I enjoy music and I am one of those person who could listen from rock music to gospel song, then to jazz, switch to EDM, then back to classical symphonies. I love music and that's why I appreciate this set that celebrates the art of music. With this LEGO set, I could fool you into thinking that I am also an expert musician. I am not kidding. I will be expertly playing Fur Elise like Beethoven himself, towards the end of this review, so keep on reading. Before proceeding, let me thank TLG and Eurobricks for giving me the opportunity to review this remarkable set. All opinion about this set is my own. Front Box Panel The new branding of 18+ looks very premium especially with the gold font used in the grand piano branding. It just exudes class. Side note -- for some reason, the gold and black colour scheme reminds me of a Belgian chocolate brand. Back Box Panel The classiness continues at the back. The back panel shows the dimension of the grand piano, as well as the Powered Up components featured for its auto-play feature. There are minimal text in the packaging so it is not explained how this feature works. More about that later. If you have not bought the set yet, I encourage you to know how the play function works first before making any purchase because it could lead to disappointment if you don't do any homework or research. Now, let's carry on. Carry on, it doesn't even matter... (for the mostly parts) The box is a lift-up type similar to that of the recent Technic sets such as 42115 Lamborghini Sian. While looking premium, the box is so huge that 4 tapes are needed to seal the box. I wonder how long the seals are going to last. What’s inside the box? There is a box within a box. I am not tracking how many such LEGO sets have this kind of packaging -- but when I do see one, it means serious business. Really serious. Below, you can see the contents of the smaller black box laid down. The other half remained inside the bigger box for the time being. There are are so many pieces that I cannot take picture of them all in one go. Instruction Booklet For a set this expensive, I already expected there is no sticker sheet. Indeed, there is no sticker sheet in this set, and I prefer it that way. The instruction book looks very good but I am not keen on using this for building reference. I thought that it would ruin the bindings because the instruction book is too thick and I don’t want to ruin it by flipping it over and over. As you can see from the picture above -- it is 2 bricks tall. I decided that I will be using the LEGO Instructions app for this round. So, looking at my phone, I now have more LEGO games and apps that I could ask for. That’s because in the last 24 hours upon receiving this set, I downloaded 3 more LEGO apps on my phone. I even have The LEGO NINJAGO Movie game on PS4 which my kids and I recently got platinum trophy. These LEGO apps and games just keep on coming. LEGO is everywhere. In the playroom, in the living room, and even in my pocket. Build Starting with the build overview, the screenshot from the instruction app is a very good starting point. From bag 1 until bag 10, the focus is mainly on the frame and body of the piano. From bags 11 to 15, the focus is shifted onto keyboard, while bags 16 and 17 are meant for the fall board, music shelf and desk. Then, bags 18 to 20, are all about the lid only. Finally, bag 21 is meant solely for the chair. Ready for the long read? Adagio. Bag 1 out of 21 The interior of the grand piano is mostly tan. I like this colour and it’s the obvious choice for the frame as the cabinet cavity is mostly made of wood. Dark tan makes sense here as well. Bag #1 progress - cabinet underside and spine The first in-progress picture and it looks odd because I oriented this the wrong way. The tan side should be flat on the ground because it is the bottom of our grand piano. The black flat wall of the piano cabinet is called the spine. While building this, I am curious as to how the ball joints will be used later. More on that soon...ish. Bag 2 out of 21 I was not too familiar with the newer battery unit / smarthub so when I learned I needed 6 AAA batteries, the AA batteries that I prepared were useless. So, I needed to get spares quickly. Bag #2 Progress - Powered Up smarthub, motor and motion sensor I felt that having these electrical components at bag #2 is too early in the build. So much bricks will be added on different directions and it is very likely that these component might be locked inside this build permanently, or until dismantled. Take a good look at the arrangement of these Technic beams. All the colours point in the same direction. Bag 3 out of 21 Bag #3 Progress - Damper wires The dark bluish grey pins are meant to be the damper wire. These damper wires hold the dampers which stop the note once you release the piano keys. Just remember this for now because it is a long way before we even get to the dampers. Bag 4 out of 21 So far, this bag is full of 1x6 tan tiles, and I really like the smoothness of the build so far. Bag #4 Progress - Soundboard At this angle we can confidently say that the studless to studfull ratio is off the charts already. Bag 5 out of 21 At this point, I got confused that I could not see bag #5 from the smaller box that I have unboxed. Then, I realised that it was outside the smaller box, and inside the bigger box. Due to my confusion I almost forgot to take the in-between progress after building bag 5. Bag #5 Progress - tail Bag #5 is essentially the buttocks of the piano. Remember the ball joints earlier? With technic pins connecting the upper parts (soundboard), the job of the ball joints below is to connect the piano tail on its belly. I know it doesn’t sound right but I did not make up the names of the piano anatomy... Just remember that in case you want to take the motor out of the piano’s belly, or perhaps even its motion sensor -- you need to remove the tail cover at the back first and detach the ball joints so you can pull the tail off to have access to the cabinet cavity. Finally, the chubby tail of the piano is completed. Bag 6 out of 21 I am very pleased that there are many tan and dark tan parts in this set up to this point. However, we are mostly done with the interior of the piano, so we will see more black parts from here onwards. Bag #6 Progress - Keybed Part 1 I hope that you are learning the parts of the piano as we go along this building process because surely, I am. This section of the build is part of the keybed. This is literally where the action happens in the piano and where the piano action mechanism is located. Bag 7 out of 21 Bag #7 Progress - Keybed Part 2 Bag 8 out of 21 Bag #8 is essentially the pinblock of the piano where you can find the pins, which are represented by the pearl gold tile 1x1 with open O clip. The pins hold the string securely with the right tension to produce the right frequency for the note. What's not included in the picture are the pearl gold hoses that serves as bass and treble strings. Those are attached to the pins, on top the pinblock, in the subsequent pictures. Bag 9 out of 21 Bag #8 & #9 Progress - pinblock, pins, strings, cheeks and bent side cover At first glance you can see the gap at the bent side part of the piano. At first I was very distracted by it, but as I finished the whole build, I grew used to it.. In case you don't know what are piano cheeks, those are the ends of piano keyboard. It is built with part # 6005 brick, arch 1 x 3 x 2 curved top. At this point, you are instructed to reset the gear by pressing the encircled icon in the Powered Up app. Missing this important step might cause frustration later. The reason is simple - if you don’t reset the gear, the technic beams will be in random position so they would obstruct the keyboard rear end. The gear reset will set the beams in neutral position so you can fully slide the keyboard in. Take my word for it, I learned it the hard way. Bag 10 out of 21 Bag #10 Progress - Legs These legs are chunky, but they look proportional to the chunky grand piano as well. You have to remember, the entire weight of the piano rests on these 3 legs so they need to be strong. Bag 11 out of 21 From bags 11 to 15, it is all about the keyboard. That includes the keyframe, as well as the individual keys, and the action mechanism. Bag #11 Progress - F4 to B4 Provided the middle C in this pretend piano is C4, as it is the widely accepted middle C, then the lowest register in this grand piano build would be C3. That would be the leftmost white key in this build. But let me step back a little bit. I thought initially that the build will start from left to right but it’s not the case. The build starts somewhere in the middle left. If that makes sense. These keys correspond to F4 - B4 range. Just play along for now. The keyframe itself would be the array of plates underneath which hold the keys. Interestingly, the only connection that holds the keyframe and the keys are those conical shaped parts, which is conveniently named “ice cream cone” in Bricklink. Technically, they are not even connected. The key is simply positioned on top of the keyframe, guided by inverted ice cream cone. The gap beneath allows someone to push down the key, and this tilts the key from the top of the dark medium flesh slope like a lever. Bag 12 out of 21 Bag #12 Progress - C4 to E4 + F4 to B4 We have just added 7 more keys. That is 4 white keys and 3 black keys. These 7 keys are added on the left side of bag #11 build. Bag 13 out of 21 Bag #13 Progress - C4 to E4 + F4 to B4 + (middle C) C3 to E3 Bag 14 out of 21 Bag #14 Progress - C4 to E4 + F4 to B4 + (middle C) C3 to E3 + F3 to B3 This is the most repetitive part in the build and it does not help that you need to do different variants of the keys. It is interesting nonetheless because the end result is beautiful. Bag 15 out of 21 The last key (C2) is found in bag #15, which also happens to include the keyslip. This is the part that runs across the front of the piano which protects the keyboard assembly from sliding out. Last look inside the empty keybed. Bag #14 Progress - Complete keyboard, range C4 to C2 For reference, you may compare the keyboard layout to the finished keyboard assembly below. With 15 white keys, this keyboard features 2 octaves and an extra C note at the highest register (rightmost). Attached to the keyframe, the assembly looks like the picture above, just before sliding inside the keybed. Provided you did not skip the crucial step found in Bag #9, sliding the assembly should be easy as pie. With the keyframe fitted in, we now have the keyboard ready for action. Note that the keyslip and the keyboard, are not connected by any studs. They just slide in together. To secure the keyboard, the keyblock is secured using a technic pin that locks the left and right side, underneath the piano cheeks. Since the keyslip is connected to the keyblock, this prevents the keyframe from sliding out, and keeps the keyboard safely intact. Bag 16 out of 21 Bag #16 is the fall board or key cover. The most interesting part for me here is the single inverted tile 2 x 2 with old LEGO logo circa 1934. Bag #16 Progress - Fall board The instruction wants you to slide in the fall board or the key cover while the keys and keyframe assembly are already fitted inside the keybed. However, I find it much easier to remove the keyblock, keyslip and the entire keyboard assembly and just attach the fall board on top just as how it is pictured below. Once the cover is fitted, just slide them back inside, then put back the pin locks underneath again. Now, enjoy the key covers. The cover has a slight friction preventing it from slamming onto your fingers. With the right push, it will stay in position as pictured above. As noted by the fan designer, the fall board is supposed to have a soft close feature. Meaning, it won’t slam on your fingers because closes down gently. Bag 17 out of 21 This bag contain parts for the music shelf and music desk - the one that supports the sheet music as well as your phone if you choose to use it for the auto-play feature. Apart from this, this bag also contains the parts for the dampers. Those are the black convex shaped things that are found on top of the strings. Bags 18, 19 and 20 out of 21 Frankly I am not sure why these parts are broken down into 3 separate bags when these bags are meant for the piano lid only. That includes the main lid, front lid, as well as the hinge which connects at the spine of the piano. The parts are all black. Here they for your viewing pleasure: Bags #18, #19 and #20 Progress - Lid This is the top of the lid. I don’t think you can find a build as straight forward and smooth as this in any LEGO catalogue. The underside is just as interesting, with technic bricks running across the lid that makes the structure rigid. Once attached, the cover does a really good job in holding itself even when fully opened. However, I suggest you don’t do this on purpose because the technic bricks with pins, which connects the hinges on the piano spine, will be stressed so much with the lid’s sheer weight. Now, the moment I am waiting for -- with the lid closed down and the key cover shut, join me in admiring the beauty of the piano case and its sexy body shape. Viewed from the tail, I can appreciate the chubby proportion of the build because it is a toy. If this is a real piano, the rim height is just too high for its body. For what it is, the proportion is very toy-like. Also, can someone please let me know if there is any other set smoother than this? I checked many times. Save the 3 legs which have 4 exposed studs each, I cannot count any exposed stud in this closed-lid grand piano body. There are 2 anti-studs at the spine edge of the lid but they do not count as studs, do they? Bag 21 out of 21 Finally, we came a long way to finally build the last part of the Grand Piano set. The ultra-luxurious looking chair with a lift mechanism. This chair looks more comfortable than the IKEA chair I am sitting on right now. While the piano itself only has 12 exposed studs on its exterior, this time, I could see 2 studs on the chair - one on each side, left and right. I have never been more excited to find exposed studs in a set because it is such a rarity in this build. Viewed from side to side, and top, this set is 14 exposed studs on top only. That is over 99% SNOT perfection. Maybe I am wrong. Let me know, please. Once again, viewed from a different angle, the studs not on top design in this build is topnotch. Overall, those who supported the project in IDEAS will be very pleased. Even though the interior is changed, I don’t mind swapping the strings with rigid hoses -- but I am not sure if there are grand piano with gold strings. Maybe the bass strings could use copper colour instead because those strings are commonly using heavy copper wound strings to generate lower bass notes. As for the treble strings, I think that pearl grey or silver would be more accurate. Not really a big deal as long as the build is sturdy. So, about its sturdiness -- it is strong and well put together even if the case has a hinge at the bent side. I don't fear that it will crumble into pieces at all. Surprisingly, it is very swooshable. It can race with LEGO Speed Champions. Just make sure you race on a smooth surface because a slight bump or level change could nudge or cripple one of its legs. To further support my point on how strong it is, I had no trouble putting the piano on its side or turning it upside down. Enjoy the underside of the piano Let’s talk about play features To begin with, turning the smarthub on feels awkward at first because it opens at the unexpected direction. In my opinion, it would be more natural if opening is on the other side because the green "on" button is further in. So turn the device on, connect the app via bluetooth, select a song (very limited list) and you have yourself an auto-playing piano. I like the novelty idea very much but I don't see myself playing the piano with the Powered Up phone app because I cannot put the app in background to keep it from playing. It is such a big flaw in the app design. That means in order to play the piano songs, you need the app to be running in foreground all the time. You can't do anything else! smh... Playing the keyboard is a good experience. It feels responsive but I can tell that it does not feel like a real piano key at all. For starters, it is very light because it is made of ABS plastic. You don’t need to be a piano expert to know that a real piano key feels substantially heavier. It gets A+ for trying. The GIF above is me, randomly pressing any key to generate the melody of Fur Elise. Just note that the whole key press action is only being processed by a single motion sensor that tracks the red technic beams as illustrated in the instruction below. When you press a key, the full-length of the black technic axle will move, along with the red technic beams, which is then translated as a key press in the app. Therefore, if you press a single key for the entire song, the Powered Up app won’t even know which key you pressed because the information is reduced to an up and down motion only. You may not know it earlier while building but the step shown below is responsible for all the notes you hear on the piano. As I said at the beginning of this review, I will be expertly playing Fur Elise. So, to demo this, I mustered all the courage to record this silly "press any" performance. First part is the app demo, and the the second part is about the performance itself. Enjoy the playlist. I don't think that the oversimplified "play your own" music is an insult to pianists or aspiring musicians. It is a limitation of the tech components included in the set. To be fair, the fan designer himself is a music teacher and piano tuner, while the wife of the LEGO designer who worked on this product is a pianist and piano teacher, too. Insulting or discrediting musicians would be the last thing they will do. Just keep that in mind. Parts While the new parts are not a stand-out in this set, there are exclusive prints and new colour of existing LEGO elements. Take a look at the list below. New part/recolour list: 6322630 (11203pb055) - Tile, Modified 2 x 2 Inverted with Gold 'LEGO' Pattern, exclusive to this set 6322624 (10202pb016) - Playday sheet music 6 x 6 tile, exclusive to this set 6322135 (part 65734 in black) - first appearance in this colour. 6310833 (part 32064a in dark tan) - first appearance in this colour. 6311104 (part 32124 in tan) - first appearance in this colour 6322138 (75c32 in pearl gold) - Hose, Rigid 3mm D. 32L / 25.6cm (first appearance in pearl gold?) 6322139 (75c26 in pearl gold) - Hose, Rigid 3mm D. 26L / 20.8cm (first appearance in pearl gold?) 6173281 (75c16 in pearl gold) - Hose, Rigid 3mm D. 16L / 12.8cm (appeared 3x) 6267914 (75c12 in pearl gold) - Hose, Rigid 3mm D. 12L / 9.6cm (appeared 2x) 11212 in dark tan - appeared in only in set 75317 so far 11211 in dark tan - appeared in only in set 75317 so far 6312473 (part 15068) in medium dark flesh - only appeared in 2 other Mario sets 6294492 (part 9563 in metallic gold) Money / Gold Bar - appeared in 2 other sets only. They look like golden spaghetti strands Conclusion When Donny Chen submitted the original design to LEGO IDEAS, he outlined his main goal in the project. He wanted to capture the mechanical details of a genuine piano, featuring: Removable keyboard with 25 independent working keys, each key connects to its own hammer. Working damper and pedal function. 25 strings. Realistic piano lid which can be open either half stick of full stick. Realistic fall board with a soft close. Removable music stand. Height adjustable piano bench. Self-playing function enabled by adding PowerFunction, which allows keys to play at different tempos and rhythms. Realistic piano wheels. Overall, the final commercial product by the LEGO designer Woon Tze Chee is very close to Donny’s goals, and to some degree exceeded them even if there were some changes made in the interior and exterior design, for better or worse. To highlight a few, these are: The omission of LEGO strings for the treble strings. Likely, looping around strings does not meet LEGO standards so they were replaced by pearl gold hoses instead. The bent side is definitely better in the commercial product despite having a gap, which is necessary to open the door easily. The height adjustable piano bench is actually adjustable. The original design was not. Grand Piano legs design is slightly better because it uses plates and tiles for added detail. No chromed parts. Sadly. On the flipside, there is no paint coat that is going to crack or peel off ever. If you are a music enthusiast or a musician, there are many things to like about the set. The highlights for me are: Great representation of the parts of piano, both exterior and interior. 25 keys, which captures the essence of the piano action mechanism, such as hammer, damper and sustain pedal. Majestic looking set, which is possibly the smoothest set LEGO ever created thanks to the extravagant use of SNOT techniques. Some of the nitpicks I could think of are: The play feature is there, but it is not mandatory to enjoy the set -- majority will display this set only and may not even use the play feature anyway. The strings are not angled inside the piano cabinet, like how a modern grand piano might look like. However, thinking more about the last point, I don't think this LEGO set is trying to be one. I know that the modern grand piano design has 2 bridges, one for the treble and another one for the bass strings. These 2 would cross each other, one on top of the other at an angle, using a wiring method called overstringing or cross-stringing. This has become very common in the modern era as it allows longer strings in a shorter cabinet design. However, grand pianos before the 1800s use a single bridge scale design, without criss-crossing of strings. A simple Google search of Erard grand piano will show that this antique instrument uses an old string wiring method, similar to this LEGO model. As this set alludes to being an antique grand piano design, this is probably the reason why the LEGO designers used the oldest LEGO logo. Finally this leads me to list down some caution before buying (or not buying) the set (soon). The key press does not correspond to the right note or any particular note for that matter. Using the LEGO Powered Up mobile app, pressing any key will play back the correct note in the phone app regardless if you are pressing the correct piano key or not. Some people may find this misleading because one might think it is capable of doing that due to its hefty price. I understand the argument that a cheap electronic toy piano can play correct notes using the right key, so why can't it do the same? Not my own words, but I am just saying that some people might think this way. You cannot play your own song in the app, even if it is all pretend play. The app is also quite restrictive. As one could be building this model to display only, without the intention of ever playing it, the set could have been cheaper if the electronic parts were not included and made as an optional add-on. However, these components were included so you might as well use them for another project. Don't trap them inside the piano if you won't use them for that purpose. There are some reports that this is hard to get because it is in limited availability status at the moment. I am not sure if the stock will normalise after few weeks but keep this in mind. Do check with your local retailer for availability first. The inspiration Review summary Design / Building Experience: 10/10 - I really appreciate the countless SNOT techniques and effort to make the mechanical parts functional depicting that of a real piano. Highly detailed and educational build. My design "complaints" are very minor and easily outweighed by extremely positive results. Playability: 7/10 - In my opinion, this should have been a display model first and foremost, with optional Powered Up add-ons only. The auto-play does not really add much because the app is restricted to very few songs only. You can’t even add your own song even if it is just a pretend play. Some might think that the pretend play is misleading, especially when someone is not familiar with the limitations of the components inside. Minifigures: N/A - Not applicable / not scored Price / Value for money: 8/10 - The price per piece ratio is highly reasonable but the set could have been cheaper if the electronic components were not included. Overall: 8.33/10 - A premium set that is best displayed even if it has very functional parts. It suffers on playability and value but it is a perfect artistic model for music lovers and LEGO fans alike. Full Flickr album could be found here.
-

BuWizz and Powered Up
mudseason posted a topic in LEGO Technic, Mindstorms, Model Team and Scale Modeling
Hi All, title is already self explanatory. I know that it is possible to connect powered up motors to a buwizz using dedicated adapters. What about controlling a powered up servo with buwizz? Is that possible? I did I quick search but did not find anything so specific. Thanks. -
 I would like to introduce my own control Solution: >>My Radio BLEuS << ( Bluetooth Low Energy useful System) Powered by Arduino Nano 33 BLE Sense, 4 x Power funtions port - 9V/1.5 A, each (optional updatable by that: Adafruit DRV8871 DC Motor Driver Breakout Board - 3.6A Max) --> Keep in mind the technical requirements to provide ~ 130W by using max, current simulanoiusly , at all ports ! Not realy needed for an ordinary Brickset Car. In A MOC i would recomend; Battery, ESC, and BL Motors taken from "real" RC Motor Sports section. power supply by PF Bat. box or internal 9V/ 1000 mAh Accu Internal Akku has USB charge connector. Control options: Infrared, by using PF IR Transmitter RC Transmitter(up to 4 channel) supporting, "AFHSD2A" LEGO Powered Up App LEGO Control+ Profiles Because of S-Brick published their protocol , it can be used with their mobile app , too. Because of, Brickcontroller 2 app works with any PU Hub, that is emulated by using profiles here, you can use Brickcontroller 2 app, also. Additions: SD Kart Slot for storing profiles , used by PU or Control+,...... Programming via USB Port, or JTAG connetor. Supported Frameworks: Arduino, MBED,Nordic SDK Note about Arduino Frameworks: Works with ArduinoBLE, as well as Adafruit BLUfruit Libraries by using Adafruit Bootloader. It is my new development base for next projects to come ;-) Greetings Marc
 -

[Powered Up APP] Some MOD possibilities
Ast7 posted a topic in LEGO Technic, Mindstorms, Model Team and Scale Modeling
This post to share some MODdings that can be done to the Powered Up Android APP interface (Create mode with controller). I searched the forum but didn't find a similar post. With the actual version, it's possible to change the size and positions of the widgets, and mix on the same interface the widgets of the 2 controllers It's even possible to add the widgets of the Play mode controllers (Te trains and Batman), and access more code blocks. So theorically, it should be possible to control several trains/cars with one interface. After creating a new project with controller, go to "/android/data/com.lego.common.poweredup/files/Activities/<xxxxxxxx>/" to find the associated files (if you open the metadata.json file you can verify in the "name" if it's the right project) In the "playCanvas.json" file there's all the actual widgets, identified by their "widgetId", with their positioning informations. It's then possible to add/modify them, and restart each time the App to see the results. To find out the widgetId, you can create a new project with the other controller and open it's "playCanvas.json" file (the positioning should hint on the concerned widgets). To exploit the added widgets, we need their associated code blocks. For that, in the powered-up-metadata.json file, replace the "Controller" value by "00000000-0000-0000-0000-000000000000". Thus, the palette.json file will be used to display the needed code blocks by replacing "/widgets/widget-(.+)-block-(5[5-9])" or "/widgets/widget-(.+)-block-(3[7-8])" by "/widgets/.*" The App has to be restarted after the modifications. To go further and use the Play mode widgets, you can search the widgetId in their playCanvas.json files at "/android/data/com.lego.common.poweredup/files/PredefinedActivities/<xxxxxxxx>/" and change the playCanvas.son as above, and do those modifications in the "palette.json" file : - add the following at the end of "TabDefinitions" : {"Name": "Dev", "HexColor": "CompositeBlock3"} This will add new category "Dev" in the code blocks - in "contents", disable all the blocks with "null", and add the following at its end : {"Field": "TypeName", "Value": ".*", "Tab": "Dev"} After App restart, a new tab (red) will appear with new code blocks. The ones to use has the same icons as the global variables but are orange with a red "P" written on them. The parameter to use is the widgetId. Don't consider this as a tutorial as it needs some clarifications and I surely miss other informations. Also, this may not work with the comming versions of the App -

European 8x4 Dump Truck inspired by Scania
functionalTechnic posted a topic in LEGO Technic, Mindstorms, Model Team and Scale Modeling
Hi This weekend I could finsish the 8x4 dump truck project which I started somewhen in February. It is a simple 8x4 dump truck inspired by Scania G450XT. The functions are driving, steering, dumping and automatic tail gate locking. Everthing is controlled via Powered Up. I control the model with the brickcontroller2 app. For propulsion I used 2 x PU L motors and for steering and dumping one PU L Motor. I'm really happy with the PU system. For this moc it works great and the model is powerful. At the front axle I developed a new supension system. it is inspired by leave spring systems. However, there are no leave springs since I haven't found a proper solution for LEGO. Anyhow, the suspension works great. The model is built in scale 1:16.5 and fits to my telehandler and other mocs and Technic sets (42043) -

About powered up compatibility
seekersu posted a topic in LEGO Technic, Mindstorms, Model Team and Scale Modeling
I like to power my Technic models to make them move. However, I am very confused about current powered up compatibility: 1. I've read that Lego powered up family include spike prime system (such as Lego 45678 and 51515), and Boost creative toolbox (Lego 17101) 2. If above is true, there are total 4 categories of hubs in powered up family: large "move hub" (88006), common hub (88009), "tech hub" (88012) and "spike prime hub" (45601). They all have Bluetooth function 3. There is one Remote controller (88010) which can control common hub (88009) by Bluetooth. This remote controller is standard component in Powered up Train series (60197/60198). I'am very curious if we can control other powered up family hub such as Tech hub (72099/72109) or spike prime hub ? 4. There are also many motor in powered up family: Boost Medium Linear Motor (88008), Simple Medium Linear Motor (45303), Technic Large Motor (88013), Technic XL motor (88014), Spike prime Technic Large Angular Motor (45602), Spike prime Technic Medium Angular Motor (45603). There is one train motor in powered-up family, too: 88011 5.I wonder if all these motors could be used in all hubs? For example, can I use Technic Large motor (88013) with Spike prime hub (45601)? Can I use Spike prime Technic Large Angular Motor (45602) in Move hub (88006) or Tech Hub (88012?) 6.If I want to control with these motor/hub combination by app, control + app seems to be the most restrictive because it only provide 3 original Lego set panels without user define interface. Powered-up app seems to be more flexible choice? -
One of the biggest issues I find with building in 6 wide is hiding PF/PUP elements, especially when I want to have walkways down the side of the locomotive. A few years back, I started on a locomotive design to put the battery pack partially below the base, between the two sets of wheels. I never finished this design, so when I wanted to create a switcher a few days back, I thought of this old design (as I didn't want the loco to end up being huge to conceal the battery box and end up looking bloated). This is what I came up with. The engine is essentially symmetrical front to back, so it is meant for going in and out of sidings all day in a yard. The cab comes off in one assembly below the 1x1 cheese slopes. Inside, there is a seat that is directly on top of the PUP box, so easy access for power/linking. Unlike some of my other models, I did not make space for a PF receiver so it can only be powered by PUP or 9V. I felt this was ok though, as I really wanted the electrical components to not dictate the shape of the engine too much. I have never tried putting the battery box in this location and since it is not above the powered wheels, traction may be a problem? There should be enough open space to put a ballast brick in above the wheels, should there be any issues. Overall, I'm pretty happy with this MOC. I feel the cab looks off in the side view, but other than that, I think it turned out nicely. As usual, there is a download for the Studio file. From now on though, I will just be putting all of my files into one folder so any links on my posts will grant you access to all my models. Thanks for reading! File Download: https://bricksafe.com/pages/Legownz/legownzs-train-mocs
-
 I think we can all agree that Lego's own 42109 Top Gear Rally thing wasn't really all that. In order to improve it a bit I set out to build a rather popular car with it. Turns out someone beat me to the punch Some trickery was used to create the GIF- the Porsche itself is stationary, while the light moves. Functionally, the model is identical to the 42109, with some added lights. Luckily, performance has been improved by using Imurvai's Brickcontroller app. In a pinch, Lego's own app will work as well if you don't mind about the lights staying off. The dimensions are the based on the 42093 Corvette, so it should work with the 42098 car transporter. Underside with differential. (What, like it's hard?) Also note the extremely tidy cable management Given my typical production speed I should have a video out somewhere around christmas.
 -
.thumb.png.ac42fe5bf808b68722d021abc3bc5691.png)
PU and PF hybrid... PROWLER
Aurorasaurus posted a topic in LEGO Technic, Mindstorms, Model Team and Scale Modeling
The idea with this is project is to get speed from buggy motors, and torque from PU XLs, which have a very convenient shape. Powering the hungry buggy motors from 2 buwizz units and the PU XLs from the big technic hub, which will be in the rear and controlling it with the buwizz app. Servo for steering, PU L for fake v8. Perfect car. I would enter it in the mad max contest but 2 things stop me. 1, I doubt I will finish in time and 2, I don’t have any real buggy motors and will be using fake ones. -

[REVIEW] 42109 - App-Controlled Top Gear Rally Car
mostlytechnic posted a topic in LEGO Technic, Mindstorms, Model Team and Scale Modeling
Technic App-Controlled Top Gear Rally Car Thanks to Lego and EB for this review set - I'd seen the rumors and leaked images, so I was thrilled to get to try it out. Name: App-Controlled Top Gear Rally Car Set Number: 42109 Pieces: 463 Price: $129.99 Minifigs: 0 Theme: Technic The Box Front There is a LOT going on here. Logos everywhere, and not just on the car. But overall, that's a pretty nice looking set. I'm worried that it's over-reliant on the stickers though. I get the Top Gear branding - it makes sense for a car. Except they've never had a rally car on the show driven by the Stig. There were SO many opportunities for a more fitting car - any of the "reasonably priced cars" that they had stars race in (but that would've required more licensing deals), or the Reliant Robin, or the ridiculous P45, or the Hammerhead Eagle i-Thrust, or best of all, the indestructible Toyota Hilux. This feels more like Lego designed a rally car set and then got TG to do a licensing deal and just slapped stickers on it. The Box Back Yep, it's the Stig. With so much Top Gear branding, I feel like this set is Euro-targeted. Yes, people here in the USA have sometimes seen Top Gear on the internet, and there was a few episodes of "Top Gear America," but it's still not a popular thing here. I think the average person seeing this on a shelf won't know the reference. And sadly, no sign of a B-model.... even worse, no Stig is included. This would have been a GREAT opportunity to bring back the Technic figures and have an all-white one. The Box Side Here's the electronics included. You get a Powered Up hub, a large motor, and an XL motor. Yes, this is the bigger hub that has FOUR ports. It's previously only available in the Off-Roader set and the massive Leibherr Excavator. That alone will probably sell some of these sets. The Contents Nothing shocking - a manual, sticker sheet, non-numbered bags of parts, and an inner box that has the electronic stuff. The Stickers Yep, there's a lot of them. And they're full of puns and TG references. But being Lego, not the inappropriate TG jokes (sorry, no Penistone or anything like that) The New Parts Yes, there is a new differential in the set. It's actually pretty nice - it's easier to use than the old one, since you don't have any of the inner gears falling out while you're trying to put it in place. And it's the same size, but with a double-bevel gear so you've got more flexibility in driving it. As for other new parts, the only thing I noticed was the mudguard panel in white, which you get FIVE of. The Build, 1 The build starts with the simple drive system. It's upside down in the photo - you've got the rear axle with the differential. It'll take advantage of the new diff gear by using a simple drive. The motor will get a gear attached and directly drive the diff. I also appreciate the new cable management clips, which come in a couple colors in this set. The Build, 2 Here is the chassis basically done. It has a fair bit of decorative bits - brake discs on the rear axle, engine components up front (around the L motor which handles the steering), and dual exhausts. The Build, 2B The steering is directly done, like the drive setup. The L motor has a small gear that meshes with a gear rack to steer. The Build, Done All that was left is adding the body panels. And stickers. So many stickers. There's big ones, little ones, all over. The car looks really naked without them. The Underside From the bottom, the car looks pretty boring. There's no drive train, suspension, etc. Having the two motors so directly driving their functions makes it mechanically a pretty simplistic set. The batteries are easily accessible, and you can see two of the new larger 7x11 frames in white. Those give the car a lot of strength without needing many parts to reinforce it. The Side View There's a few cosmetic misses, IMHO. There is a gap in front of the black panels at the rear, behind the "door" - it's necessary due to how the beams behind it are placed, but that panel with "The Stig" on it would look better a stud or two forward. I don't like the different tire sizes either. It's partially to give the car an aggressive posture, and it's partially for easier clearance on the steering mechanism. The larger tires do fit the front wheel wells, but they just barely rub when the steering is turned to the max. I just think the littler tires look too small. The App Yes, you MUST have an Apple or Android device to use this set. Well, perhaps the Powered Up remote could control it, but I didn't test that. They completely expect you to use the app. So before you buy the set, make sure you can get the Technic Control+ app on your device (I don't know how old of devices it'll work on). This is the primary interface. You use your left thumb to steer, on the corner steering wheel. Your right thumb controls the throttle on the right. There is a handbrake, but it doesn't do much (the car stops pretty fast on its own). And you can switch to "manual transmission" where you select one of 3 gears, which do affect the car's speed. There are also some "races" you can do, driving the car following onscreen prompts and trying to beat a set time. The Video So how does it drive? Well... it's a mixed bag. Personally, I think it's too slow. It's a race car, Lego. Not a piece of construction equipment. It does maneuver well and the app works well to drive it. One perk is that the new motors have position sensors built in, so the steering automatically returns to center. It's not perfect though - it would typically be still curving slightly any time I tried to go straight. The Results Overall, how is the set? I think it's a nice set. The cost seems high, but that's driven by the new Control+ system. Lego doesn't currently sell any of the included parts alone, but for comparison, the smaller PUP Hub retails for $50. The Medium motor retails for $17. So I'm sure Lego would value the hub and motors from this set at $90+. Given that, the value of the set is good. However, on Bricklink, the current selling price is $25-30 for this hub and $15-20 each for the motors. There's a lot of people parting out the Liebherr set! One huge benefit to Technic builders is that there's now a car in the app. You could easily design your own car, and as long as you have an L motor for steering and an XL for driving, the app would work. There are definitely things that I think could be better on the car, it needs a B-model, it's expensive, and I seriously wish it came with a Stig to drive it. Overall though, I'd give it a solid B. Whether it's a good buy for you depends on your wants - do you want a Technic app-controlled car? If yes, go buy it! Then mod it to go faster -
Hi! One year ago create this MOC. You can see working in https://www.flickr.com/photos/blackfalcon81/ Thanks!?
-
It's a bird, it's an App-Controlled Batmobile, it's a... oh it is an App-Controlled Batmobile. Ok then! Set Name: App-Controlled Batmobile Set #: 76112 Theme: DC Superheroes - Batman Parts: 321 Minifigures: 1 Year of Release: 2018 Price on Release: 100 USD, 140 AUD, 90 GBP, 900kr, 100 EUR (varies by country) Flickr Set LEGO Brickset Bricklink (not yet) Thank you to LEGO for providing this set for review. The review is an expression of my own opinions. INTRODUCTION The latest in a long legacy of stunningly gorgeous remote-control LEGO sets, 76112 App-Controlled Batmobile rolled out to much skepticism and bewilderment when information first became available, at least from what I read online. "$100 for that weird looking thing? You've gotta be joking mate!" But actually, if you check that handy link to a list of remote-control sets on Brickset, you'll see that this one lines up perfectly with what's come before in terms of cost for content. And while I'm clearly being a bit sarcastic about some of the horrendous-looking RC models that have come before, it seems from the user reviews that at least a few people quite enjoyed them. So, how does this stack up? As a Powered Up (tm) set, one you build and then drive with your phone because you needed more screen time with your LEGO, is it worth your hard-earned pennies? Let's find out! BOX I don't think I've ever seen a LEGO box with a picture of human hands holding a smartphone on the front before, so that's very striking right off the bat (geddit?). They've also used a completely different colour scheme than the rest of the DC Superheroes line and a modern stylish Batman logo that evokes the Rocksteady Batman games logo because this set feels vaguely "inspired" by the Arkham Knight Batmobile. All-in-all, it's a design that will surely stand out on shelves for its uniqueness. However for a 100 USD product the box is quite small, compared to another recently released 100 USD product. It's interesting to highlight the difference, but this isn't a regular set. The back is quite sensibly all about highlighting the functions, though I have no idea what some of those symbols near the bluetooth hub are meant to be because they don't appear in the app or anywhere else. I do appreciate that it opens like one of the more premium sets, and it forces you to Hashtag because all of the kids these days are Hashtagging and LEGO is for kids didn't you know? In other words if you don't have Instagram don't bother buying this. PARTS and THE BUILD Inside the box you'll find three numbered bags (ymmv on if all of the numbering styles will be the same), four loose balloon tires, the bluetooth/battery box hub, and two motors. Plus the instructions of course, but honestly there's nothing worth photographing in these instructions so I'll just say that I found it interesting that there are no written directions for how to download the app, just a page showing the app logo and an arrow pointing to your phone, and the name of the app to search in your app store. Bag 1 contains a bunch of technic-type stuff, random bright colours you didn't expect, the minifigure, and the juicy bat-cessory pack which I've covered in depth in this separate article. When you're finished with Bag 1 it's quite a colourful mess that could be anything (besides like a castle but ok you get what I mean). Bag 2 contains parts to start building up the shaping and look, and also one 1x2 teal tile for no reason whatsoever besides that the designers seemed to get a mandate this year to use as much re-introduced teal as possible I guess. There's also a sand green hinge base and tan cheese slopes which in combination remind me of Harry Potter, and the opaque black windscreens which are slightly but not all that rare, especially compared to many of the other opaque colours for that part. Here's that teal plate sticking out quite conspicuously: And then it's gone, never to be seen again unless you're looking down into the open cockpit from behind. Bag 3 finishes off the model, so naturally it contains mostly black and grey, and of course the red windscreen which has come in three sets in that colour so is nice but not particularly rare. I was surprised to see that the Nexo-shield On button was printed, though it's a kind of raised print application that has the resultant effect of looking like a sticker. But we know it's not, so it's great! The single technique that stood out to me most in the build was the on button. It's activated using just the natural give in long plates - no hinge, technic bit to push, or anything. The button on the bluetooth receiver is designed to be pressed with just the lightest touch, so depressing a plate with a boat plate attached is enough to activate it. On the less nice side of things, the back struck me as messy right away even with the wires as neatly folded as I could get them. MINIFIGURE Sadly for Batman minifigure collectors, this set contains an exclusive, very detailed Batman, so people who fit that collector description will have to buy it just for the minifig. Or, y'know, Bricklink. I do love the level of detail here from the torso all the way down through the toes. From glancing at images I expected both torso and legs to be gunmetal grey, but the torso actually is moulded in black. The figure looks perfect from the front, but the difference in colour is a bit more noticeable and jarring from the back. The face has some nice stubble originally made for grimdark Batfleck, but now good for grimdark other Batmen as well. Batman comes with the typical one Batarang and one spare, which he brandishes with a grimace. THE COMPLETED BATMOBILE Putting aside the functionality, which of course we'll get to, the model looks... weird. I'm not super-up on Batman vehicles throughout the years, but I know that Batman has had a wide variety and recently several tank-like cars like the Tumbler and the Arkham Knight Batmobile. This one certainly isn't out of line with those completely. Still, it looks a bit awkward in person. From the back things get worse as it becomes apparent that the set is more built for the RC functionality than for aesthetic purposes, though it doesn't have a huge antenna sticking out of it so that's good! You probably wouldn't look at it from this angle ever in real life, but this isn't real life. From this low angle it looks quite aggressive. The bigger Bat-symbols don't do much for me but the little one on the front is ace. It's quite tank-like when viewed this way. Aaaand it's a bit stubby and odd when viewed straight from the side. The back also sticks out in a strange way. Like in lots of vehicles, Batman has to lie down quite dramatically to fit in the cockpit. Luckily in this instance he doesn't have to operate his Batmobile though, since the human overlord (namely, you) does it for him from the app. The cockpit also dangerously opens down into the wheelbase which is surely quite loud and unpleasant for Batman, but the tan trim and printed control panels are nice details that let you know at least a little bit of design work went into it. APP-CONTROLLING THE BATMOBILE By this point I've established that the parts in this set aren't too interesting, the minifigure is great, and the completed looks of the thing are so-so, but obviously the real test and also point of interest of this set is how it functions. It's easy to find the LEGO Powered Up app in the app store, which will hopefully work with whatever smart device you have, and once downloaded and opened it gives you the option to choose the train control app or the Batmobile control app. There's space on that screen for more, so I presume we can expect more sets coming with the Powered Up control system. I've never had any motorised LEGO before (besides ZNAP... don't ask), but I've watched the development of the various systems over the years and the amazing thing that strikes me with this set is how it relies on so few specialised motor-parts for the functionality. A battery box is a given, but most previous RC LEGO cars have had some sort of big base, while this just uses two motors which can be used for anything that needs rotation really. I know nothing about app programming but I know that obviously these two motors have to be rotating in opposite directions to get the Batmobile to drive forward as they're mounted 180 degrees from each other. That in itself is probably easy to achieve but to a newb like me it feels really built from the ground up out of parts that could do anything, which is exactly how LEGO should be. Of course, that all fails if it doesn't run well or isn't fun to play with, so that's what I'll be looking at now. The app has two different modes for controlling and driving the Batmobile. I haven't found official names for these, so I'll call the red one the Driving mode and the blue one the Function mode. Here's the Driving one. You can slide the controls up and down to change speeds, and hit buttons to pop a wheelie, sort of turn around, or quickly drive forward and then turn around. Unfortunately you can't use the button functions in conjunction with driving, so if you want to pop a wheelie you have to stop, pop a wheelie, stop again, and then continue driving. In Function mode you can't pick a speed but the Batmobile actually controls more easily. Every tap of the plus or minus buttons makes it lurch, or if you hold them down it will go forward or back, as you would imagine. The function buttons here allow it to kind of shudder backwards in a fright, pop a wheelie (of course), or vibrate and jitter around. But you want to see it in action, don't you! That's why I've put together a couple of different videos. The first shows me demonstrating the app with minimal editing so that you can just see how it runs. Overall, as you can hopefully see, it is fun to drive, but there are some annoyances. In Driving mode it won't run at any speed under 40, which makes the numbers under 40 a bit misleading (they're effectively 0). Also when trying to drive just one of the sides it only works sporadically. I've tested this on a nice carpeted surface too and it has the same result, so it's not a problem of it having too little traction on my smoother studio surface. Driving in Function mode works better and is therefore more enjoyable, but I wish the Driving mode worked better because in theory getting to choose speed is the way you'd want to drive. As far as the pre-programmed functions in each mode go, the ones in Driving mode are more useful in theory because it's nice to do various turns at the touch of a button. The various jerks in the Function mode are cute novelties but would get a bit old. Like I've said, though, you can't continuously drive and touch a button and have it go straight from driving into the pre-programmed turn. Instead, you basically have to take your fingers off of the drive controls to properly hit the button, and no matter what the Batmobile stops before doing the function. Therefore the turns are rendered a bit useless, and I think kids will have a better time with the blue Function mode overall given the problems with the red Driving mode. Perhaps LEGO will work on making the app better with updates, but we'll see. The other major thing to mention is speed. In either mode, at full throttle it just doesn't go all that fast. Now, you wouldn't exactly want it to because it's made out of lots of fiddly bits that definitely will fall off if you crash, unlike those old not-really-LEGO RC cars that were super sturdy and could survive crash after crash from what I've read. So on the one hand, I'd get frustrated if it went fast and I had to fix it all the time. On the other hand, you just kind of want an RC car to go fast. It's a conundrum. But don't get me wrong. It still is fun to drive it around especially given that you've just built something out a bunch of parts that looked nothing like a drive-able car when you opened the box, and now you're controlling it with your phone! What a world we live in. CONCLUSION & RATINGS Ultimately having built and tested the App-Controlled Batmobile, it's no longer perplexing to me like it was when I first got wind of it. It's proving the versatility of LEGO's newest motors and battery box system, and I can see the wisdom in LEGO making their newest RC car a tie-in because, while a plain RC Car is somewhat cool, an RC Batmobile for (every kid's favourite character) Batman to drive around in is awesomesauce!! The exclusive, highly detailed Batman minifigure is icing on that remote-controlled cake. The price, while high, seems justified in the context of LEGO's previous RC offerings and of RC toys in general. I did a few quick searches for other remote-controlled Batmobiles on the market, and you can easily spend more for a toy that you can't deconstruct and turn into something else, or at the very least customize with other LEGO parts! Still, there are drawbacks. First of all, the model just doesn't look that good and it isn't really recognizable as anything. I get why it has the short wheelbase and big tires that it does, but without those slapped-on new bat-cessories it wouldn't even look like a Batman vehicle. We'll see how it fares on the market, but I can't help but feel that if it was based on a Batmobile from some media, any media, it might have a better shot than it does now. The driving functionality and app also have a variety of negatives, as I've detailed above. Parts: 8/10 - Nothing exceptional, but the new Bat-cessories and a few other parts like the windscreen are nice, and the battery box and motors are obviously where it's at. Minifigures: 9/10 - The minifigure looks great from the front but odd from some other angles due to the colour difference between torso and legs, and an additional villain minifig would've been nice so you'd have someone to run over repeatedly! Build/Design: 7/10 - It's quite frustrating trying to fold up those wires while building, and the finished thing doesn't look great from a variety of angles. The fact that it doesn't look very Batty besides the Bat-symbols also brings this down. Functionality: 7.5/10 - Obviously as far as LEGO sets in general go this one has amazing functionality because, y'know, it drives, but the driving functions have a number of issues and the car just doesn't go all that fast. Value for Money: 9.5/10 - It can't be judged against regular sets; as a whole package, building a solid vehicle (without any particularly specialised parts) that you control from your device, plus a great minifigure, makes it actually fair for the money especially compared with other RC Batmobiles out there. Overall: 8.2/10 - Ultimately this score reflects that the App-Controlled Batmobile is not without faults in both model design and app functionality, but it's conceptually and functionally a strong and fun enough set that I would recommend it even at full price if an RC LEGO car or LEGO's Powered Up system interests you. They've come a long way, though there are improvements to be made yet. Until next time!
-
We’ve been working on redesigning and improving our web interface to control multiple trains using one tablet / phone. Besides the trains, you can of course also control all the other devices in your layout: switches, lights, boom barriers, etc. We added the following features: Support for SBrick We have added support for SBrick controllers, so now you can control LEGO PU hubs, SBrick and our 4DBrix WiFi controllers with our system. Just like for PU hubs, controller SBrick requires a BLE112 dongle and an software license. Touch Controls You can now control the speed of the train by sweeping the power control, see video below. It’s a very intuitive and effective way to control the trains, especially to position them. Skins We have redesigned the multi-train interface. It now uses skins so you can customize the look of the app in function of the train you’re controlling. We’ve tried to give it a LEGO feel. At the moment you can use a number of pre-defined skins. The goal is to support custom skins in the future. Emergency button We also added an emergency button so you can immediately stop all trains in case that’s needed. You can see it at the bottom of the screen capture of the control app. Let us know what you think and don’t hesitate to get in touch with us if you’re interested in controlling your LEGO train layout this way. ---- P.S. the initial post had an incorrect link to the YouTube video, this has been fixed now.
-
MOC: Vossloh style "DSB" locomotive with remote decoupling
Selander posted a topic in LEGO Train Tech
As regular readers of this forum well know, I have an interest in onboard remote decoupling, see for example my (old) article in Railbricks. Recently I updated the decoupling bogie design to be more mechanically robust, to have wheels with lower rolling resistance and (hopefully) to look better. With the deoupling bogie ready I needed a new locomotive to try it in....so I designed a new locomotive around the bits and pieces needed…. This time I decided to make a build solely with bricks already "in stock"....hence not the normal shopping rounds on bricklink. I found the german Vossloh locomotives and liked their light grey / green livery which also matched my available bricks and elements. The green cab really cried for white decals so I used some Danish DSB that I already had….. But DSB + Vossloh is not a combination from real-life, as far as I know, so please see this as a product of my own imagination… The locomotive is quite full of PF Components: Battery box, IR receiver, M-motor + gearing for driving the mini actuator plus a regular train motor for propulsion. -
We've been working on adding support to control LEGO Powered Up hubs directly from our train automation software. One of the goals is to be able to support more advanced ways to control your PU hubs in LEGO trains: Control multiple trains from one device. If you save the project as a web interface, you can control all the trains from a phone or tablets. If you have PF trains, you can use our WiFi controllers to control those from the same device as your PU trains. Link two (or more) hubs so you can create trains with multiple powered locomotives. Control locomotives that have two motors. Both motors will automatically spin at the same speed but in the opposite direction (because that's how you have to mount them in the train). The video below illustrates what we're able to do at this point. I used a little demo setup so it's easier to see what we're doing. Let us know if there is a potential application that we missed.
-
 It seems like individual LEGO Powered Up and Boost elements are going to become available for sale via shop.lego.com as separate products shortly. I was sent a sample page consisting of: - 88006: LEGO Boost hub - 88007: LEGO Boost color/proximity sensor - 88008: LEGO Boost interactive motor - 88009: LEGO Powered Up hub - 88010: LEGO Powered Up remote - 88011: LEGO Powered Up train motor A short overview and a few impressions:
 -
Here is the Bio-containment Armoured Transport - Mobile, or "B.A.T. Mobile" for short. It is based on set 76112 App-Controlled Batmobile, with aesthetic changes to fit the M:Tron style. Instead of being only black (and sometimes very dark grey), it adopts the lovely M:Tron red-and-black with trans-neon-green colour scheme. I also extended the wheel axles to allow the addition of disks for a more futuristic look. Some of the changes were dictated by the lack of versions in the correct colours of some of the parts, most notably the black Tilted Corners 4X4 W/Angle (design ID 43708) in the front and the trans-red Cockpit 6X6X2 (Design ID 35331). Since this is M:Tron we're talking about, obviously I also had to remove the stud shooters. Other changes were mandated by the parts I had at hand... The bio-containment unit window at the top glows when the vehicle is loaded and ready to roll. I intend to bring it to Skærbæk Fan Weekend this year, for you to see it if you're interested.
-
Greetings. Presenting my 0-4-0 Camelback, aka Mother Hubbard, toy steam locomotive. Camelbacks were not designed for crew comfort but to burn cheap anthracite coal waste (culm) in the eastern U.S.A. That required a wider larger firebox and moving the cab forward for the engineer to see. Being next to the boiler didn't leave much room for the engineer. The fireman was in the rear exposed to the weather. The camelbacks provided big fuel cost savings. Thus, they were popular with the eastern U.S.A. railroads with thousands built. Camelback Steam Locomotive by dr_spock_888, on Flickr This is my first LEGO Powered UP MOC. The PUP train motor is in the engine and the PUP hub is in the tender. Our fireman is really hoping for good weather. I made the cab cramped for the engineer like the prototypes. Engine shakedown: For this MOC, I experimented with 3D printing my own drivers. The bigger the driver on the PUP train motor, the faster it goes. It can be way too fast for speed level 1... It was fun build for my LUG's train contest.
-
 Hi I'm L, still mainly play with PF1 motor even PF2 has been released for now With the PF2(new electrical system that broke the old lego paradigm) PF1 motor are no longer likely to come out anymore Imao So I'd like to make compatible motor for the PF1 electric building system myself consider the proper shapes, specifications, and placement of the wires and while im making it, i wanna make it really good and nice to use, over lego motor to acieve it, I want to hear the user's reaction or wish. I look forward to hearing from your idea Question here 1. Which is more important (1) Torque(strength) (2) Speed 2. Size(Size and torques are in semi-parallel relationship) (1) 2x2(Micro motor size) (2) 2x4(S size) (3) PF Series's was fine, just need more torque 3. Shape (1) Round (Like XL Motor) (2) Square(Like Old Lego Motor) (3) Oval(Like M Motor, Flat Bottom Type) 4. Building type (1) Pin & Hole (2) Stud & Tube (3) Axle & Axle Hole 5. the unit of length (1) odd number(etc. 3x5x5) (2) even number(etc. 2x4x4) 6. Power Supply Method (1)PF1 (2)PF2 and last, I'm going to post it on the crowdfunding site if it's a good response after I've made the motor brick prototype. So what if there was a third-party motor with better performance? 1) If the performance is good, it can be purchased. 2) Because it is not Lego, it is not purchased. thanks for your asnwer and have a nice day~ and any critical, basic ideas are always welcome from L
 -
in this topic i wanns hear about the shortage of Lego motor and your ideas the subject discussion will be based on the Powerfunctions series motor & Powered Up Series motor and the contents are here 1. Size Compared to Old Motor, Powerfunctions & Powered Motors are bigger with planetary gear(to get more torqe However, instead of getting enough torque, sometimes the size of motor is too big and need your idea or opinion about it(like problem with big size or nice experience) 2. Shape(or design) there was an idea(M motor was oval type, and L&XL Motor were difficult to hold conrrecly because of the round shape) the Old lego, on the other hand, close to rectangle write any idea on it please :) 3. Building system(Coupling method) its really nice for me but sometimes the rc car's wheel was disassembled while running because of coherence weakness and hope the coherence of Pin & hole was more stronger. write any idea or your experience on it too please :) 4. specifications Imao the most frustrating part is specification especially torque i saw that many ppl use motor in parallel to get enough torque or just satisfied with just moving even slowly I'd like to hear your opinions. Thank you.
-
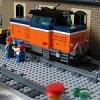
This is a Swedish T44 diesel locomotive, in two color schemes, and both equipped with the "new" Powered Up system. The PuP battery box withg it's slimmer height is better for locomotives with limited space heightwise like the T44. Also it means battery change is quite easy.
-
Review: Powered Up! 88006, 88007, 88008, 88009, 88010, 88011
mostlytechnic posted a topic in Special LEGO Themes
Lego 88006, 88007, 88008, 88009, 88010, 88011 Powered Up! components Thanks to Lego and EuroBricks for making this review possible! Since Lego is switching to a new system instead of Power Functions, they wanted people to check out the new parts. Name: Powered Up Set Number: 88006, 88007, 88008, 88009, 88010, 88011 Pieces: n/a Price: varies, see below Minifigs: 0 Theme: Technic, Train, Boost, and Creator Year of Release: 2019 These sets are technically new, but the parts aren't. They've been available in the Boost and Train sets for a while now, so lots of people have already looked at them. Sariel did x-rays of all the PF and PUP devices (and older too!) JopieK did a teardown of the PUP parts and posted it here on EB. treczoks is putting together documentation on the protocols and others are doing similar. This review will be different than my normal ones, since it's not a standard set. It's not really a "set" at all. I want to compare the new parts to the old PF system, both in function and design. So first, here's all the PF and PUP sets: A couple of them don't have any prices that I've seen online yet. The highlighted prices are ones that I saw listed on the Lego US site, but they're not online now (12/20/2018). Obviously, all the Lego electronics are pricey. But for comparison, to get a full train setup (speed remote, battery box, motor, IR receiver) you'd be at $55. The equivalent PUP setup (motor, remote, hub) would be around $90 (guessing at the train motor price). The bluetooth electronics are much more complicated and expensive than infrared is. A simple motorized set (something like the new Vestas windmill, or the Roller Coaster, or similar) would be very expensive in the PUP ecosystem, since there is no "dumb" battery box. It's possible that Lego will add one at some point for those set types, or they'd need to keep PF alive. There's also a few gaps in the lineup. The WeDo motor, which is PUP compatible since it's in the Batmobile set, is not available standalone. I'm actually really curious why they used that motor in that set instead of the "PUP Medium" motor. Also, there's only the one motor so far. There's no XL or other "big" motor, so we'll have to see if the PUP Medium motor is powerful enough to handle the XL's loads. The switch is not really needed anymore, since the hub has controls built in. I can see extension wires coming - I'm sure builders will want them, and it'd be simple enough. As for the much-desired adapter wires, that's a bit tougher. It'd be great to control PF motors from a PUP hub. However, the PUP system identifies the motors, so the adapter cable would have to identify to the hub that it's a PF motor. The hub would not know which motor it was. Enough of the talk, let's look at the parts. The Box Bags IMG_4289 by mostlytechnic, on Flickr These parts come in individual bags. Anyone who's ordered PF components individually will be familiar with them. These aren't sets that you'll find on a store shelf (except maybe a Lego store), so the outward appearance and extra space taken up isn't worth the cost to box them. The Contents IMG_4291 by mostlytechnic, on Flickr Here are the parts themselves. The Interesting Parts IMG_4291 by mostlytechnic, on Flickr I always have an "interesting part" section in my reviews to highlight new molds, colors, rare parts, etc. But here, they're all interesting so I just repeated the photo. If that annoys you, just keep scrolling and see new images below. The Manual IMG_4290 by mostlytechnic, on Flickr For a company that normally has zero text in their manuals, wow. Here's some of the paperwork that comes with these, because they have electronic parts. Each document is in THIRTY FIVE different languages, so each paper is only a couple sentences. Each of the battery-powered parts has a "how to put the batteries in" flyer. Every item had a paper saying "Protect the environment by not disposing of this product with your household waste. Check with your local authority for recycling advice and facilities." Yes, every single item had that included. Battery Boxes IMG_4307 by mostlytechnic, on Flickr Here are the current Lego battery boxes. From left to right is the 6 AA box, mostly used in Technic, then the Boost Hub, currently only used in the Boost robotic set which holds 6 AAA batteries, then the PUP Hub, also holding 6 AAA batteries, and finally the PF 6 AAA battery box, commonly used in trains. The new hub is the exact same size as the 6 AAA box, and it has the green power button in the same location. However, the new one has the connections on the end instead of on top. The Hub IMG_4302 by mostlytechnic, on Flickr First, we have the basic Powered Up hub. This is the 6 AAA box, which is 3 parts. The batteries go into a "cartridge" which snaps into the base. It might be possible for a rechargeable module to become available at some point, but there's no external charging port like the PF rechargeable box, so it'd require taking the box apart still. The Boost Hub IMG_4293 by mostlytechnic, on Flickr Likewise, the Boost Hub uses a battery "cartridge." However, it's part of the base so it would be possible to have a rechargeable battery module with a port in the bottom. The Motor Lineup IMG_4295 by mostlytechnic, on Flickr The new PUP motor (sometimes called the Boost motor since that's where it's currently available) is almost as large as the PF XL motor, but it's studded. The only pin connections are on the face of it. The PUP motors do have a big feature that the PF ones don't. They have built in rotary encoders, like the Mindstorm motors do, so programmable systems can see how much they've turned. The motor can actually be used as an input sensor too - put a tire on it and have a dial control! This only works with the Boost hub though since you need the programming capability to do anything with the information. The Train Motors IMG_4308 by mostlytechnic, on Flickr The new train motor is identical in shape and size to the PF one. The only outward difference is the cable- it's shorter and wider. The Plug IMG_4298 by mostlytechnic, on Flickr As you can see, the new plug is smaller, but the cable is wider. Overall it takes up less space, since once it's plugged in, the hard plastic sticks out one stud. The old connector was fully exposed all the time. It'll take a little different building design though, since the new plug sticks out from the battery box. The Sensor IMG_4300 by mostlytechnic, on Flickr This, to me, is the oddest part of the inclusion in this shipment. This sensor comes with the Boost robotics set. In that setting, it makes sense, and I understand why people would want to buy it alone (to add more sensors to their design). However, without the Boost set, it's usefulness is limited. It does nothing useful when connected to the regular Hub. When it's connected to the Boost Hub, it's a great color and distance sensor with lots of usage. I'm actually now trying to piece together a Boost set out of my parts collection to try all the Boost designs, since I have the Hub, Sensor, and Motor here. But to the majority of people using the new PUP system, they won't see any use for the sensor. Yet. What if, down the road, Lego sells a train set that includes the sensor and some software updates to the basic Hub? It'd be trivial then to have some colored tiles on the train tracks so that the train could be programmed. Make noises at certain locations, stop, etc. The current Duplo trains do that! So why not bring that functionality to the older kids and AFOLs? This DOES need a software update from Lego though, since like I said, the smaller Hub does not allow any programming or recognize the sensor, as far as I can tell. And the Boost Hub is too big for a standard 6 wide Lego train. The Remote IMG_4304 by mostlytechnic, on Flickr Speaking of trains and controlling them, here's the new remote. It is TINY! Granted, I'm a big guy (6 foot 3) with big hands, but this is small. It's certainly smaller than the PF speed remote. And personally, I'm torn on the functionality. If you're not aware, the Hub can detect what motor is connected and act differently based on that. If you connect the Medium motor, this remote acts like the old small PF remote - the buttons give you 100% power for as long as you hold them. Release the button, and the motor stops. If you connect the train motor, this remote acts like the PF speed remote. The + and - buttons step through speeds and it keeps running. The red button stops it. This makes sense for kids and keeps the line of parts simpler, but it removes advanced functionality. What if I want to run the medium motor at lower speed? I can't. The top center of the remote is an RGB LED. It lights up the same color as the hub to show what units are paired together. The PF system allowed 4 "frequencies" with 2 channels each. The PUP system has 5 "frequencies" with 2 channels each. This remote also removes the need for the PF switch. You can turn the button sections of this remote. So if you want one motor running reversed, just turn that set of buttons upside down. If you want to steer left and right, you can turn the buttons sideways. One thing you cannot do is modify the remote, the way the PF remotes would be modified, with addon parts. Lego themselves has done this - like the 9398 Crawler set: The new remote has some pin holes on the sides, but no way to attach to the buttons. The App IMG_4311 by mostlytechnic, on Flickr The big new function with the new system is the app. There's the Boost app, which allows programming the Boost Hub, and the PUP app, which controls the basic Hub. This app is very limited. You pick which set (currently the Batmobile, Freight Train, and Passenger Train), and then appropriate controls appear. It's all preconfigured and not modifiable. It doesn't allow you to design your own controls the way SBrick and others do, so if you want to make a new vehicle, you have to control it like it's a train or Batmobile (using those particular motors, since the hub knows what is connected!) I strongly suspect Lego will come out with another app (or a major update to this one) to control custom builds, and frankly, I don't know why they haven't yet. The Performance, Speed IMG_4573 by mostlytechnic, on Flickr I mounted a tire on each motor (both PUP and PF) and checked the RPM at full speed. Here's the results: As you can see, the PUP M motor is closer in speed to the XL than the other PF motors. The PUP train goes slightly faster at full speed than the PF train motor. I checked all the speeds, and it ranges from about 500 to 1800. The Performance, Power IMG_4574 by mostlytechnic, on Flickr I also checked the force each motor can generate. As I don't have a proper torque meter, I made my own rig. In the photo, it was trying to lift a heatsink from a computer. That was too easy, so I moved on to a heavier weight. The XL motor was still able to lift that, but none of the other motors could. The measurements on the train motors were at full speed. One thing I noticed - the PUP train motor would cut out after a few seconds at a stall. When I hit stop, it would be immediately ready to run again, so I don't think this was the internal thermistor cutting it out. I think the hub is monitoring the speed and shutting it off when it wasn't rotating. I should try having an actual train drag a load and see what happens... The Conclusion So, what's my conclusion? Overall, I see what Lego wanted to do with the new PUP system. It eliminates the IR weakness, removes the need for a separate receiver, and updates the system to be "app-enabled" like all the cool toys are now. I think that also brought some new limitations that Lego CAN remove, but hasn't yet. I'm looking forward to seeing the PUP system appear in Technic sets to see how Lego handles that. That will be a while though, since the only motorized Technic set in the first half of 2019 is the Stunt Racer, and it still uses the PF system. That COULD have been a great set to use PUP in, similar to the Batmobile, but for some reason they chose not to. I'm guessing the M motor doesn't have the speed for the stunt racer and they didn't want to put the WeDo motors in? That doesn't seem like great logic to me, and I really hope there's more motor options to come. The PUP M motor is too big and too slow for a lot of Technic applications. Right now we're in the transition phase and I hope Lego is listening to the various categories of users. AFOL train users want to connect multiple motors on the same channel to run big trains. Technic users need smaller motors. Creator needs a simpler, cheaper system. And almost everyone needs customizable app interfaces -
LEGO Ideas: RC LEGO Brick project
Sariel posted a topic in LEGO Technic, Mindstorms, Model Team and Scale Modeling
Sooo, here's my first Powered Up MOC which also happens to be another LEGO Ideas project, and if you find the concept of racing your brick against your friends interesting, please support it here: https://lego.build/2E7QW7P -
Hi All , I want to start this one with thanking JopieK for his powered up tear down ! Without this info I would have had to do a lot more work before doing this. So instead of having a lazy sunday afternoon , I decided to take up one of the challenges TLG gave us with powered up. I'm in the proces of modifying a 60197 with longer bases and 7 cars at the moment. I wanted to power this beast with 2 motors so I could add even more cars in the future. So I took apart 2 PUP motors and removed the wiring from the PCB on the motor. I then soldered a piece of flatcable in place to get me through the base plate. I had to modify the base plate a little (...) to able to fit 1 motor as a jacobs bogie. Then i soldered the 2 flatcables to one of the removed motor cables , effectively switching both motors in parallel. In one of the motor assemblies I also turned the electrical motor around 180 degrees to get both motors rolling in the same direction. Some heavy mechanical modding had to be done to achieve this. I can probably find a better way if I put my mind to it. Anywayzz... without further ado, 2 pics of the result below and a WIP of the beast itself :) Have fun doing this for yourselves and don't hesitate to ask !
-

[LDD-MOC] Powered Up passanger train and FLIRT3 crossover
Ashi Valkoinen posted a topic in LEGO Train Tech
Recently our LUG got the new Powered Up passanger train which was a great fun for the kids at the holiday LEGO camp to assembly. However it seems that TLC will keep the big, one-part train fronts for all upcoming passanger trains, in other details the new City set seems a really good deal even for my AFOL-eyes. The color scheme, the easily removeable battery compartment solution is really nice, and the improved remote handles the speeds better (train not stopping at curves with speed 1). It is a real drawback, that only two outputs can be handled by a single battery box and connectors can't be stacked, but I hope there will be an official solution from TLC to put more motors on the same port (and maybe AA battery box). But back to colors... this bright orange, dark blue and light bluish gray combination is just perfect, I think it looks better than the 75% of real train colors. So I decided to make a try in LDD how this color scheme would look like on my Stadler FLIRT3 EMU (which was build for real recently). I had to change bright orange to simple orange - bright orange parts are still very limited. So, here are some screenshots from LDD: 1. The overall look: 2. Front pattern (light bluish gray cheese slopes missing but could be fit for real): 3. Overall look focusing on front: 4. Next to my GySEV FLIRT3: Basically only small details have been altered - the hinge connection by the front needed to be changed since the 1×2 plate with bar (closed ends) doesn't exist in orange. Also the side detail next to driver's cab and front window have been changed a little. However FLIRT trains have two different levels (upper one next to driver's cab and articulation, lower one anywhere else) I kept all color patterns horizontal through the train. Some lines with 1 plate height in Powered Up set have been increased to two plates (white on side and darb blue on the top), and made the full-orange front to have a line back at the bottom just like Railjet locomotives are painted with the red pattern curving back to the bottom. The doors became orange, sincs new TSI standards require to make doors with outstanding pattern to be easily identifyable to people with damaged vision. For this train I decided to make the plan with 3 cars - most LEGO passanger trains are given with 3 cars. Battery compartment could be hidden at toilet section. Tell me your opinion. :)