Search the Community
Showing results for tags 'power function'.
Found 35 results
-

[MOD] PF Conversions for C+ sets - Directory
Ngoc Nguyen posted a topic in LEGO Technic, Mindstorms, Model Team and Scale Modeling
I already planned to open this topic back in March or April, but I got caught up in work and stuff. Recent discussions in the 42129 thread makes me feel that inow is the good time to start it. My vision for this thread is that it will be a directory that contains the PF conversion mods for all of the Control+ sets so far. I have created a few mods myself as well. And I'll try to keep the information organized by updating this first post. If you have any mods, feel free to contribute. This thread can also be the directory for Studio models for the C+ sets, so that anyone with a mod idea can give it a try. ------------------------------------------------------------------------------------------------------------------------------------------- 42099 Available PF mods on Rebrickable: https://rebrickable.com/mocs/MOC-28766/olivierz/4x4-x-treme-off-roader-42099-power-functions-base/#details ------------------------------------------------------------------------------------------------------------------------------------------- 42100 There is currently no PF conversion mod available on Rebrickable. I've designed two PF mods for this set in Studio, but I haven't published yet because I haven't made the mod instruction. They will be published later this year. The mods are: - Full RC PF conversion: This mod replaces two hubs with two PF battery boxes, replaces all motors with 7 L motors, and adds 4 RC receivers. - Motorized PF conversion: Because a big empty box with 7 motors engaged in direct transmission is boring, I want to add something more Technic-ish, more mechanically interesting. This mod removes all hubs and motors for the base, which makes slewing and driving manual, and add 1 PF battery box, 1 L-motor, and a gearbox with 4 multi-directional switches for the functions of the super structure. Thanks efferman for sharing the base 42100 Studio file. ------------------------------------------------------------------------------------------------------------------------------------------- 42109 My free mods: - L-motor steer: https://rebrickable.com/mocs/MOC-84883/nguyengiangoc/42109-pf-conversion-l-motor-steer/ - Servo-motor steer: https://rebrickable.com/mocs/MOC-84884/nguyengiangoc/42109-pf-conversion-servo-motor-steer/ ------------------------------------------------------------------------------------------------------------------------------------------- 42114 My free mod: https://rebrickable.com/mocs/MOC-85933/nguyengiangoc/42114-pf-conversion-servo-motor-steer/ ------------------------------------------------------------------------------------------------------------------------------------------- 42124 My free mods: - L-motor steer: https://rebrickable.com/mocs/MOC-84954/nguyengiangoc/42124-pf-conversion-l-motor-steer/ - Servo-motor steer: https://rebrickable.com/mocs/MOC-84955/nguyengiangoc/42124-pf-conversion-servo-motor-steer/ ------------------------------------------------------------------------------------------------------------------------------------------- 42129 My free mods: - L-motor steer: https://rebrickable.com/mocs/MOC-84984/nguyengiangoc/42129-pf-conversion-l-motor-steer/ - Servo-motor steer: https://rebrickable.com/mocs/MOC-85004/nguyengiangoc/42129-pf-conversion-servo-motor-steer/#details ------------------------------------------------------------------------------------------------------------------------------------------- 42131 My free mod: https://rebrickable.com/mocs/MOC-92919/nguyengiangoc/42131-pf-conversion/ ------------------------------------------------------------------------------------------------------------------------------------------- 42160 My free mod: https://rebrickable.com/mocs/MOC-161275/nguyengiangoc/42160-pf-conversion -
Looks like LEGO have retired the LEGO® Power Functions Rechargeable Battery Box 8878 according to the product pages. Does anyone know if they are replacing this with anything new or whether we just have to use the AAA standard battery box going forward?
-

[MOC] Rock Crawler "Hornet" [free building instructions]
keymaker posted a topic in LEGO Technic, Mindstorms, Model Team and Scale Modeling
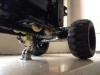
Hi, Here is my take on rock crawlers – I present to you an unstoppable and fully customizable rock crawler: „Hornet”! I called it unstoppable and fully customizable not without a reason. You can find out why in the video and in extensive list of features, details and links below the video. Instructions can be found HERE, they are free of charge, I hope many of you will be able to build it and have fun playing with it outdoors as I did. Without further talk, please enjoy the video! Details and main functions: • dimensions LxWxH: 36x22.5x19.5 cm • weight: 1.55 kg • 4x4 drive (3xL motors) • steering (M motor) • live axle suspension, front and rear • openable doors • easy removing the whole body with locks hidden in bumpers • it fits Lego Technic Figure Configuration options: 1. Drive and steering • Power version: 3xL PF motors for drive and M PF motor for steering front axle • Agile version: 2xL PF motors for drive and 2xM PF motors for steering on both axles 2. Body • „Hornet” – default body, more build-up, with opening doors • „Red Ant” – alternative body, more open one, 25% lighter than „Hornet” body 3. Suspension • Four independent, clearly visible mounting points available for each shock absorber • Multiple mounting points allow to configure four parameters of the suspension and the whole MOC: - suspension stiffness (from soft to hard) - suspension travel (from long to short) - body height (from low to high) - body style (from rock crawler to monster truck) • suspension can use both long and short shock absorbers Other features (which you may or may not spot on the video): • both bodies are equipped with two seat simple interior with steering wheel and some minor details • both available bodies are prepared in a way to avoid visibility of blue pins • frame is also prepared in a way to avoid blue pins • blue pins in frame are used mostly to high light mounting points for suspension and point out the front of the frame • frame prepared to be allow easy pairing with any new bodies • frame is equipped with simple cable management to avoid damaging motor cables during off-roading • changing connections of shock absorbers to the frame is fast and easy • MOC can be easy carry on both via body or accessable handle at the bottom of the frame • center of the mass is located at the center of the MOC • center of the mass is located low, most of the weight is present in axles • drive doesn't use differentials to maximize off-road capabilities • both axles are secured with panels to protect axles and drivetrain against any dangerous objects (grass, rocks, etc) • high ground clearance for both axles even with using planetary hubs • L motors are connected to planetary hubs without any reduction – this provides both speed and necessary torque • approach angle is 90 degrees, front and rear More photos you can find HERE -
Hello I like to share the result of Spark Industries' new side project. The company produces modern locos and cars, but wants to salute the old times. So designed a steam engine with enthusiasm and love. She is a 4-6-4 Hudson type loco: There wasn't a particular real loco for modelling, but the main shape based on Canadian Pacific 2816 and Union Pacific 844. She looks best on bigger turning radius, but deals with the standart lego curve and switch. The built width is 7..8 studs. The loco is 54 long, and with the tender it's 83. The Big Ben Bricks' XL wheels fitted mostly for the desired scale. Some curiosity: The steam valve is a built in little pneumatic cylinder. PF cable used for pipeline imitation: The handrails on the boiler's two side made of the very old technic flex system's inner cable. Electric side: 2 PF train motor 1 PF L motor 1 PF IR receiver (v2) 1 PF battery box 1 PF extension cable (50cm) 1 PF polarity switch The tender contains all the PF elements, except the L motor and the extension cable. Two train motors are attached to one output of the IR receiver (of course, one of them with the polarity switch). The L motor is in the loco, connected to the other IR receiver out. That way, it's possibble to start the loco with full voltage, the big wheels slipping, and then turn on the main drivers in the tender. Some more pics: Hope You like it!
-

Wheel Loader 1:17 scale inspred by volvo
functionalTechnic posted a topic in LEGO Technic, Mindstorms, Model Team and Scale Modeling
Hi everyone After one year I finished another MOC. Here I present my wheel loader inspired by Volvo wheel loader L120H with technic chassis and creator style body. The model is controlled by two Sbricks an powered by one small PF battery boy. The boom and the bucket are controlled with pneuamtic cylinders coupled to a geared servo motor with the newest pneumatic valves. Like this it is possible to control "heavy" loads precisely. Furthermore, the model has an auto compressor which is controlled via the BrickController2 app, where it is possible to add one port of the Sbrick (here the compressor) to two independent other functions (here the two servo motors with the valves). Like this the pump always switches on as soon as one of the pneumatic function is selected. But check the functionality in the following video: Instruction is available on rebrickable: https://rebrickable.com/mocs/MOC-64106/FT-creations/wheel-loader-inspired-by-volvo/#details -
Hello everyone! Here's my version of a suspended monorail train, hope you'll enjoy it I'm introducing it here because this forum has been quite helpful to me while building this, especially for the doors design. To see more of it please head to this page: http://www.moc-pages.com/moc.php/423851 You can see hi-res pictures and a short video here: https://www.flickr.com/photos/23071566@N02/sets/72157663217856521 Cheers!
-

Atlas Copco Minetruck MT85
Superkoala posted a topic in LEGO Technic, Mindstorms, Model Team and Scale Modeling
Atlas Copco Minetruck MT85 - powered by Buwizz The MT85 was a prototype of a 85t truck built by Atlas Copco, which could have become the world’s largest articulated underground mining truck. It was presented in MINExpo Las Vegas in 2012. The truck was articulated at a maximum angle of 40° and has a rear steering axle. Unfortunately, the prototype never came into production and very limited information and pictures of it are available. Even Atlas-Copco website no longer has a dedicated page of the MT85. The MOC Design The MOC is based on the design of the initial prototype. We have so a 6x6 low profile articulated truck. A tiny cabin with an opening door and a seat can be found on the left side of the forward part. The center is mostly occupied by the engine hood. It is not very detailed but hides 2 of 3 motors used in this truck. Forward axle is rigid (no suspension) and equipped with a differential. The articulation is built around a steering ball joint, it accommodate the axle for steering and propulsion. The technical part of the truck is located at the front part of the rear chassis. Here are installed the 3 mini linear-actuators for steering and the motor for tilting the tipper. Rear part of the main chassis accommodates the two rear axle (1 fix the other steering) both equipped with a differential. The tipper support is fixed at the rear end of the chassis. The tipper is a separated part simply clipped on its support; it is a technical choice here to ease the access below. It has a low profile like on the real truck and a rear opening door. Functions There is only 3 functions in this truck. The first one is the propulsion. It is performed through a PF-XL motor installed in the nose of the truck. The reduction is 3:5 and it powers all 6 wheels. Second function is the steering, divided in two parts: articulation and rear axle, both powered by the same PF-M motor installed above the forward axle. The articulation is actuated by two mini linear-actuators. The steering of the rear axle is actuated by a third mini linear-actuator installed under the belly of the truck. It slides a series of beam back and forward that creates the rotation of the rear axle. Third and last function is the tilting of the tipper, combined with the opening of the rear door. Tilting is actuated by a single Linear-actuator powered by a PF-M motor. The opening of the door is “simply” done by two string linked to the chassis. All the functions are powered using a single Buwizz brick. For this MOC the it was the best compromise between the number of function. (Note: This post is a partial copy-paste of the complete article on my website https://superk-technic.com/minetruck_MT85) Thank you for reading -
 Hello everybody, during this holidays I purchased the 42081 and decided to build it a little different. First, I made some minor changes in design, to look a little more similar to the "real" Zeux. I changed some color here and there; the yellow panels in the middle are different; the placement of the "02" adhesives is on the lower DBG panels instead of the upper ones. But the biggest MOD was to add the pneumatic system, with motorized pump, instead of manual LAs. The valves are located on the sides of the loader, 2 on the left and 2 on the right. There are 2 big cilinders (to rise the arm and the rear axle) and 2 medium (old) cilinders, to operate the bucket and the counterweight. Here you can see the last cilinder, the pump and the motor, located below the battery box: And here is a short video:
 -
Sandvik Toro 60
Superkoala posted a topic in LEGO Technic, Mindstorms, Model Team and Scale Modeling
Hello Eurobrick, It’s been a long time I haven’t posted here, for many reason. Now I’m back to Lego, let me present you my latest MOC, a Sandvik underground mining truck. (Please note this review is also posted on my own website Superk-technic.com) The Toro 60 is a 60t truck buit by Toro/Sandvik. It is a new approach of the underground mining application, by using a rigid frame truck instead of an articulated one. This allows to have a larger payload for a similar size truck. The Toro 60 is 6×4 truck, with a steering rear axle allowing to take sharp turn in gallery. Here is a presentation video of the truck. The MOC: This MOC is a simple reproduction of the main function of the real truck, as well as a cosmetic challenge to reproduce its unsual aspect. It is not mounted on suspension because I’m lazy because the rear steering-driven axle was a huge mess to create. And also because I’m lazy. It is powered by a Lego rechargeable battery and a SBrick bluetooth controller. All images are available on FLickR Propulsion. Axle 2 and 3 are powered through a PF-L motor. It was the best compromize between compacity and power. It fits well in the chassis between the two axle, but unfortunately there is a little lack of power for the outside run. A PF-XL motor would have been a better choice, but harder to integrate int he structure. Steering. The front axle is a classic Ackerman steering, and the rear axle is rigid and mounted on a turntable, like the real truck. Both axle are powered by a single PF-Servomotor. If you already played with a large turntable you should have noticed that if you gear directly a PF-SM on it your turntable isn’t straight, it has a slight angle. To compensate that, I geared the control axle with a 16t/16t: there is no onger an angle but it reates some slack in the direction. Tipper operation. On the real truck the tipper is actuated by to large and very (very)(very) long hydraulic jack on the forward part of the tipper. This kind of part doesn’t exist in Lego so I used classical large Linear Actuator. It works well when the tipper is empty; It’s a lot more difficult to raise it when fully loaded. Some Details. The front part of the MOC has been worked (more than usual) to represent as accurately as possible the original Toro 60. There is some asccess point and handrail on both side of the face. The massive front radiator shows the big fan, and the cabin is simple but includes a seat and a (on-functionnal) steering wheel. Footnote: The “official” color of Sanvik truck is red, but some parts are not available in red, in particular the panels. This is what the truck could have look like (visual made with Bricklink Stud.io): Thank you for reading ! -
[MOC] Hot Rod - Lucky 13
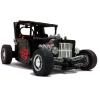
sm 01 posted a topic in LEGO Technic, Mindstorms, Model Team and Scale Modeling
Hello everyone, I made this pick-up almost two months ago (before I joined Eurobricks) and I would really like to hear your thoughts about it. It is 50 studs long, 28 studs wide, 15 studs high and weighs 1285g. Motorized and remotely controlled - 2L motors (driving), stereo motor (steering), 8878 battery, V2 IR receiver. Front tires from 8070 supercar, rear from 42000 Grand Prix Racer. Working V8 fake engine with some details to make it resemble real V8 engine, connected directly to the driving motors - works at the same speed no matter what gear you choose (in neutral also). Suicide doors with working door handles, Rear doors and roof window can be opened. Fake fuel tank and chrome stripes in the cargo area. Power is transmitted to the rear wheels through 4 gears manual gearbox. Leaf spring suspension with height-adjustable rear (manual with levers in the cargo area). Working turn signals (front and rear) - connected to a servo motor via coupled PF switches. Working steering wheel. Other details and functions that I would like to point out: Retractable license plate (simple manual mechanism). Lights (front and rear) manually controlled with a lever behind steering wheel - connected to a speed dial of 8878 battery (on/off and low/high beam). Working radiator fan, connected directly to a V8 engine. Video of functions: Video of driving outdoors (added 14 August 2014): More photos can be found at: MOCpages - http://www.mocpages.com/moc.php/391803 Flickr - https://www.flickr.c...57645075634267/ I hope you`ll like it… -
Сокол-80M crawler crane.
Superkoala posted a topic in LEGO Technic, Mindstorms, Model Team and Scale Modeling
Some month ago, I discovered the Сокол -80M (Сокол = Falcon), a heavy Russian crane with a lifting capacity of 80t on a two stages telescopic boom, thanks to another couple of hour spent on Youtube instead of working. See the video here (starting at 1:38) After some difficult search, I found that two variant exists, the first one is Falcon 80.01 and is mounted on a wagon for railway crash salvage and recovery, the second one is Falcon 80M which is mounted on a self-propelled tracked vehicle equipped with outriggers, able so to be also used in hard off-road environment . It is this version that kept my attention. The Lego Version This MOC is ‘inspired’ by the Сокол-80M more than a real scale reproduction. All the pictures are availavle on FlickR The transporter part is mounted on two track and equipped with deploying outriggers adapted from the 42009 Mark II Mobile crane. I had to modify them in order to avoid clash with the tracks There is 4 functions integrated in the transporter: Left track + Right track with a PF-L motor each Deployment of the outriggers through PF-M Extension of the stabilizers through PF-M These functions are controlled by a SBrick and powered by a single rechargeable battery installed in the cabin. The superstructure supports the main mast which is erected using two linear actuator. Due to the gear reduction (PF-L > short worm gear > 20T > LA) it moves very slowly but it works. I would really love to see one day Linear actuator twice the length of the current ones. Superstructure is installed on a 60t turntable and integrates all the functions required to operate the crane: Rotation of the superstructure through a PF-M Erection of the mast through PF-L Deployment of the telescopic part through PF-M Cable operation through PF-M These 4 functions are also operated through a dedicated SBrick powered by the battery. The only cable passing through the turntable is for the electrical alimentation The transporter and the superstructure are independent and can be separated. The assembly is done by simply clipping the turntable onto the transporter. A video : Good and to improve: Good : It’s like a mobile crane but more badass. Each transporter and superstructure can be controlled independently from the other Could have been done better : The visual aspect of the transporter and the crane cabin are not really perfect. I won’t lie, reproduce real machine at a mid scale is still not my cup of tea. What could be done better: Upscale it. Bigger, more space, more possibility. Thank you for reading -

Mercedes Arocs trial truck
Myhre posted a topic in LEGO Technic, Mindstorms, Model Team and Scale Modeling
-
KING OF THE ROAD
9 fingers posted a topic in LEGO Technic, Mindstorms, Model Team and Scale Modeling
Hello to all. I present you my latest build. SCANIA R series Long Line. This model was build for the local exhibition, which was organized by Kocke Klub in Slowenia. It is build in the scale 1:22 Power Functions: 1 XL motor for Drive 1 Servo motor for steering 3 pairs of LED lights. And the video. Thanx for watching. With best regards, Valter -
[MOC] The Crusher XL, inspired from CITY set 60188
Superkoala posted a topic in LEGO Technic, Mindstorms, Model Team and Scale Modeling
At the beginning of 2018, TLG has released a new series of Lego City sets, including the 60188 Mining Experts Site with a big drilling machine called The Crusher. It’s some sort of a hybrid between a tunnel drilling machine and a bucket wheel excavator. #Makeitbigger I’m not a big fan of re-build/improve official lego set but a take one CITY set and #Makeitbigger in TECHNIC is surprisingly challenging. (A good idea for a contest in my opinion). The Crusher XL’s MOC is not an exact upscale of the 60188’s Crusher, I built it like a “bigger” one, but still at minifig scale, with Bluetooth control through 2 SBricks and some power function elements: - 1x Battery Box - 6x PF-M Motors - 2x PF-L Motors - 5x PF-LEDs - 3x 15cm cable extensions - 1x 50cm cable extension The main differences with the original model: - The tracks are doubled and driven by a PF-M motor each. - It is composed of two parts. The lower part is the vehicle. It is built on a cross structure with track at each side. The 11x11 rack from set 42055 are reused to rigidify the assembly and support the upper superstructure. (LDD on google drive here) - The upper part is the superstructure. It can rotate nearly 300 degrees (the limitation is here to preserve the PF cable) and contains the electrical heart of the machine. The small PF-B battery box is place at the rear to be used as counterweight and completed with two boat weight (73090b);There is 4 motor and the 2 SBricks fitted in this little space to control the mains function. - The cabin is a reuse of the 42055 set. It fits well to this model and defines the minifig scale of the vehicle. The position has been forwarded for the operator to have a better view. - The arm is raised and lowered by cable actuated by a PF-M. A single cable is used between the two winches so it can accommodate the difference of position. - There is no moving counterweight (‘cause it is ugly) - The drilling head can tilt. It is mounted on a turn table and can turn to 360 degrees. The turntable is old and jam a little so the movement is not very smooth. Both drilling and tilting function are powered by a PF-L motor each. The Video : Possible improvements There are some points I initially wanted to include in this MOC but they wouldn’t have fitted in this scale. So I keep them in mind if one day I decide to build a Mk.2 : - 360 degree rotating track instead of a rotating superstructure: the challenge here was to find a means to control each 4 tracks separately (see picture below) - Telescopic arm: why not ? - Material belt conveyor between the dual drilling head like a bucket wheel excavator Thank you for reading :) -
The Commander Tri-Axle, 8x8 Oilfield Truck
Superkoala posted a topic in LEGO Technic, Mindstorms, Model Team and Scale Modeling
Foremost is a Canadian company specialized in oil & gas, heavy oil, mining, water well and construction equipment. You can have here on Foremost’s website a complete overview of their activities and product. Note that @Erik Leppen is also working on a Foremost truck; the Delta III, which can be viewed here to discover a great modular big MOC. On myside, I prpose youthe Commander Tri-Axle. The main and only goal of this MOC was to test the “tri-axle” design. The Commander C Tri-Axle was launch in 2011 and is a 8x8 evolution of the classic 6x6 Commander C. “by adding a third axle to allow for an extended oilfield deck while maintaining low ground pressures. This also increases the maximum payload capacity from 60,000 lbs (27,216 kg) to 80,000 lbs (36,287 kg).” says Foremost. In the main line the truck is an all wheel drive articulated truck mounted on Terra tires, equipped with a 500hp Cummins engine, a 11m bed and a 58t winch. The full documentation of the Commander Series is available here. The MOC. The truck is a 8x8 articulated RC truck. The full Album is available on FLickR There is three power function controlled through a SBrick controller plus a manual one: 1 PF-XL motor for propulsion (redution 1:1) 1 PF-M motor for steering (12t-36t-Worm-24t) 2 PF-LED for headlight Manual winch with locking system The tires used are 68.8 x 40 Balloon Large. The front axle is only pendular, just to simplify the construction. The 3 rear axles are pendular and independent from each other. The forward axle has stiffer shock absorber to support the weight of the 2 motors and the battery box. The winch is manual and equipped with a locking mechanism. There is only few details in the cabin, it is actually hard to find pictures, it is a simple three seats cabin. The driver’s seat is equipped with some instruments. (the music in the video may not work properly ) Some Bonus. The Commander fitted with a "special" load for delivery: The commander fitted with gopro mount for outdoor filming: Nose 360 degrees mount Lateral 360 degrees mount (can bee fitted on both side) bed upper mount The aft cabin support used in the video has been included later so picture available Thank you for reading ! All my other MOC available here below ↓ -
 Hello everyone! I present to you the first ebouch of work that will occupy this summer: a recycled truck of European type. At the exit of my dark age this was my first subject that I treated in lego technic. The model of the time had a awful design and many (too) features Here is my program for this model: Its scale will be granted to my latest creation. Size medium. No RC on this model The manual functions will be the steering on two axles, already realized and functional, a fake engine V6, already realized and functional, a cabin liftable. At the powerfunction level, I will use a simple medium engine coupled to a reverting gearbox for four functions. These four functions will be: the rear loading of the trash bins, a compactor with two synchronized movement, the lifting of the rear part (compactor) and a scissor ejector. The ultimate goal is to have a model that can be left without worries in the hands of a child. The carrier frame is fitted and already shielded for this purpose. At the level of functions I will use mini actuators and for the compactor a system that I still have to test but based on what is done in GBC. Here are the first photos of the current progress, I will post the update as and when progress. Your comments are welcome. As you see, the build is not symetrical. Fuel tank on one side and fake compressor of the other side. The lighting is already incorporated. Placing it later is one mistake i will never do anymore... To be continued...
 -
Dear All, This is my first post in Eurobricks. May I introduce this MOC in my amusement park, The Space Octpous I picture worth thousand words and a video worth hundred pictures. Please check this out! More pictures You may notice that the style is quite allied with the Mixer (10244), no matter the colour and the ticketing kiosk. Yes I designed to pair up with Mixer and place in front of the Ferris Wheel (10247). Unlucky(or Lucky?) that I don't have the Merry Go Round (10196). Yes you may guess and you are right... It is on Lego Idea now. I am not coming for vote my project (Thanks if you like too). Because of some regulation from Lego Idea, I cannot give more detail on their page. I come here to share further about the mechanic inside, not that complicated but some points to note! More important, I just realize from last week It could be play with Starwar Microfighters!!!! I am working on this to support those heavy fighters! I will keep update it here! Finally thanks for watching!!!
-
Hello ! Some words about me: my main Lego theme is technic, but I like trains and city also. I decided to make some train releated MOC under the aegis of Spark Industries. There are many plans, but one came true, and another one is almost finished. So I'd like to show the products (and plans) in this topic. The goal: Build not too complex (meaning: not display only), fresh and recognizable MOCs with good functionality for the existing Lego train world. Please comment, advice... (I'm from Hungary, sorry for my bad English)
-
Just found out that the 8866 Train Motor is now a retired product by LEGO. Does this mean that LEGO is coming up with something new to power engines in their Train Sets (like 60051, 60052, 60098, Yellow Cargo, Maersk, etc.)? My bad - confused 88002 with this product. Sorry. Perhaps, a thread with retired parts/sets is not a bad idea. If mods do not think so, please delete.
-
Hi, This is my smal Moc, requirement was to fit in a 16x16x16 studs. I used power function: - 1 battery box, - 2 sets of lights, - 1 control swich, Flickr. And movie: Enjoy :)
-

LEGO 42043 LED Lighting Kit
sives1 posted a topic in LEGO Technic, Mindstorms, Model Team and Scale Modeling
Hi All. I want introduce You our project. It's Lego Led kit prepared to 42043 Mercedes Actros, just watch what the result is and what I will introduce: As You can see it's controlled by LEGO Power Functions IR Remote Control (item no. 8885). It's supplied by Lego PF Battery Box. There are used two channels, 1ch is used for driving, lights will turn on automatic. 4ch is used to turn on and off programmed Led lights. First I will explain what is happen when you modify your model to be driving by lego PF. 1CHANNEL: When You first time move Your model the parking lights turn on automatic. 1. If You want to turn on right side You have just tu move control button right up to blinked for right. After You turn it blink 3 times and turn off automatic. For the left is, right channel down. 2. For moving forward You move left control button up, when leave it stop lights will turn on for few seconds (imitation car brake) 3. For moving backwards You move left control button down, reversing lights turn on, when leave it stop lights will turn on for few seconds (imitation car brake) 4 CHANNEL: 1. First time left control button up: Parking lights on; Second time left up: Xenon headlights on; Third time left up: Xenon headlights off; Next time: Xenon headlights on (program is running in loop until reset all 4th function) 2. First time left control button down: Beacon lights 1 program; Second time left down: Beacon lights 2 program; Third time left down: Beacon lights 3 program; Fourth time left up: Beacon lights 4 program; Fifth time left down: Beacon lights off; Next time left down: Beacon lights 1 program (program is running in loop until reset all 4th function) 3. First time right control button up: Hazard lights on: Second time right up: Hazard lights off; Next time: Hazard lights on (program is running in loop until reset all 4th function) 4. One time right down: ALL RESET. This is just my idea about what channel, which control button is responsible for some functions. It could be programmed differently, it depends on our mind :D It's not finished, We have to put it in small box, finish the connectors and produce some parts like PF connector. Remember it is IR so the range is not long. Sorry if I made some English Mistakes. -

Hello! I am new. (And I need some help, please!)
sir_launcelot posted a topic in Hello! My name is...
How to Motorize the Mars Rover I am looking for some suggestions. My daughter is building the Mars Rover set (go here for the details: http://www.eurobricks.com/forum/index.php?showtopic=98222) for a presentation at school and I told her I would help make it operate by remote control with one of the power function kits. Problem is that it is a lot more complex than I thought. (I have no experience at the expert level building. (No building the rover is not part of the project, she is doing it as an additional part of her presentation on Rovers). I think I can maybe get it moving with a remote, receiver and simple motor attached to one wheel, but I do not have any idea how to do the steering and don’t know how to move any of the other functions (camera, antenna, robotic arm). see So, to steer, I use a servo? How do I operate the other things, more servos? And to move things slowly, do I need complex gearing? (I was looking at the SBrick which might work. I saw a few designed steering racks and chassis on Ebay, some simple, some pretty complex. Would I be better off buying another set that has a chassis and steering and drive designed to work with motors and then build it and adapt the Rover to it? Any suggestions to help me figure out what I need to do and what to buy to easily make this work would be much appreciated. Thanks! -

4x4 crawler ''Spider''
Toni-23 posted a topic in LEGO Technic, Mindstorms, Model Team and Scale Modeling
Hi! Today i would like to show you my rock crawler,but first characteristics: 1 L motor for drive(geared 1:9) 1 M motor for steering 1 AAA battery box 1 Receiver V2 4 link suspension custom shocks Angle of elevation:51 degree Angle of side tilt:55-57 degree photos The real ptototype and of course good suspension travel Video : (video on russian,but all characteristics i show here)Waiting for your comments -
Hi everyone! Tooday i would like to show you my trial truck 6x6. 3 XL motor for drive. 1 m motor for steering. 2 AAA battery boxes. 2 v2 receiver. 3 pf light a few photos: Goog suspension travel worked steering weel and piston engine and of course video indor test: outdor test : what you think about it?
-
Lego robot wars: recyclopse
PKW posted a topic in LEGO Technic, Mindstorms, Model Team and Scale Modeling
As promised (I know I'm a bit late ) my new project! Recyclopse from robot wars it was a big roundish bot with an exendible tongue that has a flipper hided into it, Made with recyled materials: recycl-opse As usual i start building from the aesthetics, because i have few pieces to make that green shield, this is the shield with the tongue and a try to put electronics inside I used dark green bricks (the only i have) that has the same color of the real one but the result is a piramidal shape, fit everything in will be an hard challenge I thought about three options: -one RC motor (pump+valve) for the flipper, L/M motor for tongue extension -one M motor for the flipper; one L motor for tongue extension -one XL motor for tongue extension, at the end of the travel two strings linked to the chassis will act the flipper (M motors are for the wheels, trough chains) hope I can make sole tries asap, last hope is to make a 2 section angulation for the shield (=more space) but this means gray shield or maybe with mixed pieces... receivers will replace that green transparent brick