Search the Community
Showing results for tags 'pneumatic'.
Found 155 results
-

[C-Model][MOC] 42008 Bus
Samer posted a topic in LEGO Technic, Mindstorms, Model Team and Scale Modeling
All of a sudden while at work, this idea came to me and I got so interested. Objectives: Bus as 42008 C Model Good looking as much as I can include bus details as much as I can pneumatic door and baggage driven by pump compressor motorized drive as a 3rd function (what else a bus has to offer?) manual steering easily removable battery Parts: approximately 930 parts out of 1276 Build time: around 3 weeks Limitations C Model, hence no parts outside 42008 allowed 42008 presents the folloing challenges: not enough lift arms to build a floor in the passenger area managing the available quantities of Green and Red beams to build the bus body and make a good choice where green and where red goes. weak pneumatics I'm new and this is my 1st serious try, I only built 42008 before this. In general I'm satisfied by the end product. Next are things I think could be better: hiding the pneumatic hoses, got lazy at that. sliding baggage door, (couldn't figure out how to do that) more sturdy/smooth steering two doors rather than one using the white gear I may try to enhance this later (as a free MOC), but for now I will go to build some car sets to learn more about vehicle functions. I will start with 42029. Thank you for having a look. Remaining parts (around 340) -

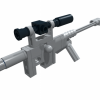
Technic Pneumatic "mini pump?"
technical posted a topic in LEGO Technic, Mindstorms, Model Team and Scale Modeling
I bought this blue item advertised as "Mini Pump Double Valve" on eBay http://www.ebay.com/itm/301854575416 It does not seem like a pump to me. It works like an actuated piston. Is the blue cylinder supposed to be a pump? -

[WIP] Another Truck
Rishab N posted a topic in LEGO Technic, Mindstorms, Model Team and Scale Modeling
Well I started work on another truck. It all started when I was trying to build a car, and wondered why no one puts gearboxes in truck MOCs. So, I decided to make a manual truck with a 2 speed gearbox. I also wanted a pneumatic crane on the back, but wanted all the wires/functions to be routed to the middle of the truck. Something like this Here's the chassis. Its quite sturdy and can take some abuse. I added a bed and the Unimog crane as a test. Current progress is looking much messier as I have not had any time to order new parts. The front axle has been moved forward one stud and the truck now has Ackermann steering (based off this http://www.moc-pages.../moc.php/320971) Excuse the messy colors and such, but I was able to wire all the pneumatics and turntable rotation. I plan to have 3 pneumatic functions: 2 cylinders for the crane and outriggers. I wanted the sides to be studded and smooth as I liked the tile look. Its quite cramped in the middle but everything works out. Right now, I've hit a road block for the last several weeks. i simply don't know how to design a proper cab or crane for that matter. As of now I've reverse engineered Efferman's knuckleboom crane(http://www.brickshel...ry.cgi?f=477568) in order to gain some inspiration. As always any feedback or ideas would be much appreciated. Thanks Rishab -
[TC9] Pneumatic Forklift/Bucket Truck
Appie posted a topic in LEGO Technic, Mindstorms, Model Team and Scale Modeling
Well here's my entry for the contest. I wanted to play a little with the new pneumatics so: A-Model: pneumatic forklift. It features: - Fork lifting of course - Fork tilt - Hog steering and functional steering wheel in the cabin - 4 piston boxer engine driven by the front wheels with differential - Pendular rear suspension - Forks width adjustable (manual function) Couple of images: I don't like cutting original Lego rope, so that's what you see in front of the front wheels. I used about 70-80cm of the 1 meter rope. The 8T gear in front of the seat was something I'd rather not do, but the 12T bevel gear for the drivetrain is right below it. The hog steering axle going right through the middle of the chair is also something I'd rather not have, but in the given space I had 2 choices: place the chair a whole stud forward and have it be too close to the steering wheel or move it a full stud back and have an axle sitting right in the middle of the chair. I decided on a compromise with the chair slightly angled. I used this part in the top of the chair so it wouldn't touch the hog axle, but still made both sides of the chair connected. Fitting the pneumatics with the drive axle and the steering above the drive axle meant I didn't have much room to play with, but it fits perfectly and to protect the pneumatics from the drive axle I added a 2L pin connector and 1L liftarm to the drive axle. Pretty straight forward manual function. I wanted to make the forks foldable too if I couldn't fit in the 10,000 stud limit, but considering the model is 34x14x17.5 (that .5 doesn't really show properly in the images, but the forklift mechanism is about 1/2 stud of the ground) I didn't bother with folding forks. So then the time came to make a B-model. Time to duplicate the main model so I knew for certain I had all the parts: The parts in front of the left one are the things I didn't install when I rebuild it, because I either forgot (diff) or bricklink came later (pneumatics). B-model: Bucket truck I really don't like making B-models, but I think this turned out ok. Of course there are things I'd like to do different, but that's the challenge of a B-model. It features: - Bucket lift (why do I even list this ) - 4 Outriggers - Hog steering - 2 cylinder boxer engine - 170 degree turning crane (manual function, radius only limited by hose length of pneumatics) A couple of more images Outriggers are handled by the small pump, I wanted to use both, but the lengths of hoses I had left were a limiting factor. Doesn't really matter, using the 16L axles to power the rear and front outriggers was already planned and I tried the system with 2 small pumps and they weren't able to really lift the model either, not more than 1 pump managed. One pump manages to get the wheels to have slightly less friction. Speaking of friction. For the outriggers I had to switch some pins on the A-model for LBG 2L frictionless pins to make it easy for the outriggers on the B-model. This change isn't shown in the photos of the A-Model, but can be seen in the images of these 2 models together (6 are easily visible on the front wheels of the forklift) and in the video. No parts were added. For every LBG pin added, one black pin was removed from the table. I find no fun or challenge in cheating the rules of the contest. I also didn't want to use more pins than really needed, where 2 were enough to fix a liftarm, that's what I used on the A-model. I already expected that re-using the A-model's hoses would be a problem, but it worked out ok (even for the turning radius of the crane). Ok, I cheated Lego's current hose code a little (2x black on 1 cylinder is old hose code), but the grey hoses were too short or far too long (which I used on the handpump). Speaking of the handpump, thanks 2LegoOrNot2Lego for your handpumps on BL, both used here Not intended, but this model fits in the same box as the A-model: 35 studs long, 13 studs wide and 17 studs high. A and B model and the parts remaining: Of course I'd like to have made a roof for this B-model, but I didn't really see how anymore with the parts I had left. I then decided to make an open truck like the old american fire trucks. Not that this is really intended as a fire (bucket) truck, but I can't deny that with the white and red it could be used as such (maybe reverse the colours). Here's the video of the models. I combined both into one video: Thank you for your time reading this topic and in closing this image: -

[MOC/MOD] AROCS SCV:pRC
Pluto_MkII posted a topic in LEGO Technic, Mindstorms, Model Team and Scale Modeling
After my fork rake and the tractor I present you the AROCS SCV:pRC - Specialized Construction Vehicle: partially Remote Controlled Today I would like to present my modification of the Lego 42043 MB AROCS to you. Yes, the setup is unusual for a typical construction truck. I decided to choose this setup because I like the crane setup from the old 8868 truck. The room between the specialized setup, which is inspired by the 8868 crane cabin, got filled with a side tipping bed. I moved the original tipping bed to the trailer. But first, let me tell you what functions it has inside and which of them can be controlled by RC. 1) RC package, supplied by one AA battery box: Driving (XL-Motor, RC) Steering (Servo, RC) Supporting stand (L-Motor, 2 small linear actuators RC) Tipping (L-Motor, 1 big linear actuator for each tipping bed, RC, switching between the two tipping beds possible through gearbox) The RC functions are limited to functions needed while driving the truck or getting ready for working with the clamshell. Because of the heavy weight of this model and the strong XL-Motor I had to replace the cv-joint with a cardan joint. 2) Clamshell package, supplied by one AA battery box: Compressor (shares the M-Motor with the rotation) Rotation (shares the M-Motor with the compressor) The rotation of the clamshell setup can be changed or stopped through the red lever, which you can see on the right side, slightly under the cabin. If you switch on the battery box the M-Motor will run permanently and so will the compressor do. Only the rotation can be turned off through the gearbox. All functions of the clamshell setup are integrated, so there is no cable or tube running through the turntable to the truck. There is no limited turning radius. More pictures are available at my brickshelf album. Please use the thumbnails below, because the brickshelf album is not yet public. -

Ideas for a small pneumatic pressure regulator
Kumbbl posted a topic in LEGO Technic, Mindstorms, Model Team and Scale Modeling
Hi guys, can anybody recommend me / point me to a really small pressure regulator based on current PF switch (which cuts off power until pressure drops)... i know the basic principle but my question is mostly for size, SMALLEST possible size because in my MOD i have just very small space left... Thank you in advance! -
[MOC] “ShowTime” Crawler with Red Tubular Body
SevenStuds posted a topic in LEGO Technic, Mindstorms, Model Team and Scale Modeling
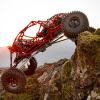
This MOC is inspired by Tim Cameron's 700HP rig called "ShowTime". A one-off custom built rig made specifically for "Southern style Rock Bouncing" events. These machines are all about insane horsepower, near impossible climbs and pure strength. The chassis design uses over 60m of steel tubing as is often criticized as being ugly and "excessive", but the design is exactly what keeps this rig together after repeated crashes, rolls and torque-driven rock bouncing. The LEGO version is made to closely resemble the original at 1:10. It features a powerful driving and climbing ability from 4 XL motors, geared 1:3. It uses 2 SBricks for control and, just like the original, it includes 4 wheel drive, 4 wheel steering and 4 link suspension. During the outdoor driving, the MOC was very enjoyable to drive. Let's start with the video: Control: 2 SBricks Drive: 4 XL (1 independent motor per wheel) Gearing: 1:3 Steering: 1 Servo (4 wheel steering) Batteries: 2 AAA battery boxes Length: 60 studs Width: 30 studs Height: 28 studs Ground clearance: 6 studs Weight: 1.6kg (with batteries) Tires: Interco IROK 1.55″ from RC4WD The 3'rd party tires gave very good climbing traction over rock and loose dirt. The motors had no problem with torque. It was only the batteries that lost power very quickly with the high drain setup and the cold weather. The suspension could also benefit from harder springs in the front as the center of gravity is placed between the front tires and seats. The tires performed beyond expectation on the climbs, but did put strain on the single servo motor. The tread pattern having grip on the sides also makes them grip the body if there is not enough clearance provided when they reach steering lock position. The biggest challenge in this build were the axles. 4 wheel drive and 4 wheel steering was a requirement, as well as a look that resembled the original. After several attempts to include the motors in the chassis, a compromise was made to have 1 L motor directly driving each wheel. This gave the "compact" look I was looking for but performance was disastrous. After finishing the build, I decided to restart the axles using 1 XL motor per wheel and a portal hub with 1:3 gearing. The results in the end gave good clearance and enough torque to overcome some steep rocky climbs. The most exciting part of the build was the fully tubular body, in red! Since I didn't want to convert the colour scheme to blue, grey or black, I had to find 3'rd party hoses compatible with LEGO. The build ended using 3.5m of hoses, all cut to standard LEGO lengths. All the hose connections as well as the rest of the build was made using 100% LEGO parts. Hope you like it. Feel free to comment or ask questions! Thanks, Mik -

[HELP] Pneumatic Valves
DK-Brickfan posted a topic in LEGO Technic, Mindstorms, Model Team and Scale Modeling
First of all, this is my first post. But I've been looking a long time and are very inspired by sheos RH400 I am working on an excavator with 6 V2 pneumatic pistons for the boom, arm and bucket. And 2 small LA to open the bucket. Same principle as RH400 and other large excavators. So far I have made the valve battery with 3 major LA which opens and closes the valves. But it does not work as intended. So I need ideas for a new valve battery. I hope you can help me with this project. Regards Jonas. -
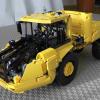
[MOC] - Volvo A25d 4x4
deAraujo posted a topic in LEGO Technic, Mindstorms, Model Team and Scale Modeling
Hi everyone, I would like to present you my new creation, the Volvo A25d 4x4 remote controlled. The functions and characteristics are: -4x4 drivetrain powered by one XL motor; -Steering is achieved with a medium motor and one small linear actuator; -Tipper bed controlled by pneumatic and compressor by another medium motor; -Full articullated and big ground clearance. I am very happy with the way I found for the mechanism regarding the tipper bed in which it is only required one motor to operate simultaneously and synchronously the compressor and the pneumatic switch. Since there is a differential between the two, when the motor starts, the power goes to the easier side which is the pneumatic switch. When the switch reaches its end, then the power goes to the compressor. The same is true the other way around. This mechanism is realy helpfull when trying to reach dificult and/or distant places from the battery box because you have the advantage of the lenght of the pneumatic tubes. The link to all the images is here: http://www.brickshel...ry.cgi?f=558887 Meanwhile, I am editing a short video to show you these functions. I hope you like it. -

[MOCs] [WIP] Fassi F1950 - Cormach 135000 (New Pneumatic V2)
TheItalianBrick posted a topic in LEGO Technic, Mindstorms, Model Team and Scale Modeling
Hello, as the new V2 pneumatics has been released I thought would have been nice to use them to create something amazing! I've been making swing arm cranes for more than 15 years and I love pneumatics aswell! So why not! - Scale of the cranes fits the 42043 Arocs, - Special sections designed for these cranes allow to have 4 extensions of the main boom in a 5X5 size boom!!! - They are WIP so although I've built them they need lots of tests to make sure work fine before make instructions! - they refer to real cranes, but obviously there are few compromises here and there! - Routing the hoses it's hard, but will get there don't worry! - There is a third and a fourth crane coming aswell so I'll update this topic time to time! - They will all be full RC cranes! - I'm designing a 8X8 MAN truck to suite the cranes, plus a subframe between cranes and truck as the real ones! (Huge subframes) Pics of the built ones will come soon, at the moment I don-t have all the parts on the right color so they look like a rainbow :tongue: (ordered parts so soon to complete them! There are both pics of the real crane and my LEGO version so you can compare them! Real FASSI F1950: Here my LEGO version: Real Cormach 135000: My LEGO version: The other one I'm working on it's a EFFER 2750: This will come shortly after! Enjoy, TheItalianBrick! -

[TC7] Bandits - Firehawk
lindr6 posted a topic in LEGO Technic, Mindstorms, Model Team and Scale Modeling
Here is my work in progress entry for [TC7]. Normal Mode: Bandit Mode: Story: The bandits were looking to develop a new vehicle utilizing a new engine prototype that allowed for huge amounts of torque and speed. This new vehicle, named Firehawk, would be lightweight and fast built for those missions that required the bandits to get in and out of a situation quickly. This new photon rotary engine pushes the limits on speed allowing the Firehawk to outrun pretty much everything of the known enforcers line of vehicles. Unfortunately, to keep the weight down, the Firehawk is not loaded down with big weapons, but just some basic weapons to get the job done. Naturally, a sports car body would be the normal mode powered by a conventional V12 piston engine, with the ability to transform into a supersonic plane powered by the photon rotary engine. Normal mode features: - Fully Independent Suspension. - Working Front Steering Using Steering Wheel. - Working V12 Powering Rear Wheels, with differential. - Special Gearbox/Transmission That Couples Two Separate Engines To Rear Wheels. - 3 Forward Gears + Reverse For The V12 - 2 High Speed Forward Gears For The Photon Rotary Engine (Car Mode When Transformed). - Working Headlights - Working Doors Bandit Mode (Still working on this) - Transform To Plane - Doors Turn Into Main Wings (Manual) - Rear Air Intake Into Rear Wings (Manual) - Photon Rotary Engine Extends, Lights Rotate With Wheels (Pneumatic Switch On Dash) - 2 Front Large Caliber Guns (Hidden Behind Headlights That Manually Fold Down) - 2 Rear Mini Missile Launchers (Launch Via Pneumatic Switch On Dash) Other: - Pneumatics powered by manual pump and air tank. - Front Headlights Powered By 9v Battery Box. - Photon Rotary Engine Light Powered By 9v Battery Box. I'm still tweaking a few things on this model yet, but wanted to share to gather any additional insights to potentially make it better prior to the contest deadline. Once I get the tweaks complete, I will shoot and post a video. -

Pneumatics General Discussion
9v system posted a topic in LEGO Technic, Mindstorms, Model Team and Scale Modeling
This topic is for pneumatic tips and tricks, how to use pneumatics and mocs including pneumatics or just general things about pneumatics. Ps mods if you feel this topic is not required feel free to remove. I just made this seeing there was no general discussion on pneumatics. -

Pneumatics: Pressure switch designs, and compressors
Nazgarot posted a topic in LEGO Technic, Mindstorms, Model Team and Scale Modeling
Hi, I'm starting this tread to gather different pressure switch and compressor designs. Please add your designs to the thread, or link to them. I've been tinkering with a pressure switch design for a couple of days (only have time for a few hours a day...) and have come up with a compact functioning design for relatively high pressure applications (will be presented soon). I know there are many other designs out there, and would very much like to see others designs to get ideas to improve my design, or maybe finding a design that is better suited. I also faced some problems with half stud alignment of the old small pumps to make a efficient compressor, so I would very much appreciate if you could show your designs here. I hope this topic can be a resource for the community on pneumatic ideas, especially pressure switches and compressors. -ED- -
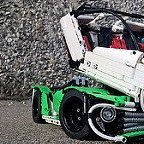
 As promised in the white excavator topic last month, here is a closer look at the red four axle truck from that topic. The trailer is nothing special, just thrown together for the fun of it. Now let's unload that loader and have a closer look at the truck! Key features: -Pneumatic crane boom raising -Pneumatic crane jib lifting -Manual crane jib extending -Manual crane winch -Mechanical crane rotation -Pneumatic dumping of bed -Tilting cabin -Proportional steering with Ackerman geometry and good pivot point (more details later) -Manual outriggers -Bed walls can be lowered As you can see, the outriggers are of an extremely simple design. Their geometry and the way they are stored is pretty accurate to real life, but they are entirely manual, not very strong, and there mostly for looks rather than function. At this scale, to make something mechanical or pneumatic that actually works, would have taken way too much space. I tried to make a detailed equipment tower, with an ACU, some tools and some storage compartments etc. The bed is dumped with a normal pneumatic cylinder. It also has the ability to dump sideways, by sliding a mechanical switch that frees the bed on the rear right hand side, while at the same time locks it for rotation around a point on the front left-hand side: The red parts in the above picture are part of the switching mechanism to from rear tipping to side tipping. The cabin tilts to reveal, well, not very much really. Due to the steering setup, I had to ditch the fake engine I originally had mounted. As you might spot, I had to use the old stye 14 tooth bevel gears for the steering. This because I used the older style 8L gear racks, and for the gears to mesh properly, this was the best solution. Last picture show the steering setup. While it provides a very good pivot point and fairly good Ackerman geometry, it is not as rigid as a more standardized solution. But I prioritized a good pivot point to keep the aesthetics of the wheel arches as nice as possible. Again, I reccomend taking a look in the appropriate Bricksafe folder for higher resoution more detailed images. Hope you like it!
 -
Hi, I posted this creation on the technic forum, but I suppose it might interest people on this forum as well. Here is the original topic in the technic forum And here is a picture of the MOC I'm talking about: @Moderators: I'm not sure whether or not I'm allowed to crosspost (couldn't find it in the guidelines), but feel free to close this topic if crossposting is not allowed
-
I've been playing around a lot with pneumatics lately, and want to show you one of my recent MOCs. This one has been made over the last week, from a smaller, more yellow prototype. It is fairly small (scaled to the tracks, as they are the size they are), and the width of the body is 15 studs, compared to 8043's 19. Also, it's manual. No compressor or anything. I'll go ahead and show it off in "Excavator mode" first As you can see, the range of movement is quite decent, and it folds up pretty nicely for a transport configuration. The boom is lifted by two of the old style long pneumatic cylinders, and the dipper and bucket are each controlled with one normal cylinder. There is a third pneumatic circuit going to the end of the boom, but it's not in use when it only has a normal excavator bucket mounted. There is also a dozer blade on the chassis, operated by two small pneumatic cylinders. Next I have fitted the material handling claw, and as you can see this is where the extra pneumatic circuit comes in to play. The claw is operated with two small pneumatic cylinders. An added feature present is many material handlers is a lifting operator's cab. This has been implemented with a normal pneumatic cylinder. Next up is a picture of the top of the superstructure, with the pneumatic lines and some detail of the cab lifting function Now, if you've made it this far. you might wonder where the pneumatic pump is ? As I said, the model is afterall manual Well, it is actually mounted horizontally inside the superstructure. The 2L black pin connector (on the right hand side of the grey "air filter") in the above picture is connected to it, and by pushing it forward, you pump air into the system. Here is a picture from an early stage in the build that shows the principle: Also the valves are hidden on various places inside the superstructure. Well, that's it more or less, hope you guys like it. Like I said, this was put together fairly quickly, so there is definitely room for improvement both aestethically and build-wise (the inside is per now a mess of reinforcing and pneumatic tubing with not much system to it Lastly, another picture with one of my other recent pneumatic MOCs (still a WIP): EDIT: All pictures, as well as some others, can be found in a lot higher resolution in this Bricksafe folder I have recently started using my aging DSLR again, so it might be worth a look if you want to see more details
-

[MOC] X-wing
Jeroen Ottens posted a topic in LEGO Technic, Mindstorms, Model Team and Scale Modeling
Hi, It is time to stop teasing, sorry for that. Here is my latest creation, a lego technic X-wing. All functions are pneumatic: 1 canopy 2 targetting computer (moving forwards & rotating) 3 hatch (in the sloped bottom of the hull) 4 wings 5 photon torpedos (tilting outwards & shooting) 6 landing gear + landing gear bay doors The 6th function is giving me the most headaches. It is a pneumatic sequence function. That is, if you select to deploy the landing gear it will first open the landing gear bay doors and then deploy the landing gear using two switches operated by pneumatic cilinders. If you choose to retract the landing gear it will first retract the landing gear and then close the doors. Unfortunateley my ~20 year old pnauematic hoses appear to be somewhat leaky, so halfway through the sequence all air leaks out . I have a half dismantled X-wing on my desk now . All other functions do operate as they should Edit: I have solved most of the leaks now (only one nacelle is still a bit rusty and somewhere a last tiny leak is still hissing). Some pneumatic facts: 2 air tanks 8 switches (old type) 7 big cilinders (studded type) 16 small cilinders So again, I am on a crossroads. Should I continue trying to solve my leaking tubes, or should I leave it at this and work on my next MOC? -

[WIP] 1:50 NASA Crawler Transporter
OzShan posted a topic in LEGO Technic, Mindstorms, Model Team and Scale Modeling
I am getting close to the end of this long term build and it's time to share some pictures and a bit of the story. Even before I had finished putting together 10231, I decided I wanted a Crawler to go with it. Being a Technic fan it had to at least drive around and lift the launch platform and shuttle. Those two basic goals spawned a project that has lasted a little over 2 years so far. Some ideas have stuck around since their inception, others were a bit optimistic (like building a peristaltic pump and hoping I could find a way to control the pneumatics hydraulically). February this year marked the 50th anniversary of when the two crawlers went into service, so recently there has been extra motivation to finish. The base equipment; - 16x M-motors (drive) - 4x L-motors (pneumatic jacking and leveling) - 4x IR Receivers (V1 as the V2s do not like driving multiple m-motors on a single channel) - 4x NXT servo motors (steering) - 4x RCX rotation sensors (measuring jacking level between truck and chassis) - 2x NXT bricks (one master and one slave. The master communicates with the Android Tablet and coordinates itself with the slave. Programmed in LeJOS) - 1x PF IR-Link sensor (link between master NXT and all PF motors) - 2x PF Battery boxes (with thermal overload removed) - 1x Android Tablet Future add-ons - Accelerometer (automatically detect the crawler is on a gradient and adjust the leveling to suit) Bricksafe folder is here: http://www.bricksafe.com/pages/OzShan/Crawler Firstly, a couple of my favorite reference pictures; The build itself started with the trucks, thinking that the pneumatics and LAs would dictate the scale. First proof of concept - build a coupling to give height, pitch, roll and yaw to the truck. The pneumatics need to be on their own gimbals too. The reinforced 2x2 rounds slide and rotate in the 4x4 macaroni's. It is on the limit of what will hold together without glue, but it does hold. The two 1x2 technic bricks at the base of the 2x2 column are helped a little by a string (not pictured) which runs up through the 2x2 rounds with the axle. Initial prototype of the drivetrain. I would have liked a higher ratio but there was just no room at this scale. When the gearbox was married with the truck chassis I had to juggle positions, so you will see in later pics the crown gears are facing in not out Best laid plans.... Marry studded and studless they said. It will be easy they said... Showing what will eventually be the steering between chassis and truck. The guide tube and pneumatic cylinders are all on gimbals with the pneumatics coupled together. The average height is preserved during any tilting. With prototypes sorted, it's time to bricklink some parts and quieten down the colour scheme! (thank you 42030 for providing 5L thin liftarms with axle hole in LBG color) You can see the relationship between "guide tube" and cylinders here. The pneumatic system was overhauled too many times to remember but this is what it arrived at. It is all controlled by the direction of the motor. Running forwards drives the pump. When running backwards, the lobes operate the pneumatic valves in series, letting small amounts of air escape each rotation. This lowers the chassis in a slow and controlled manner. The motor can be turned on or off and run in either direction at any time due to the valve timing. Early attempts with PF Servo and NXT servo just couldn't park the valve reliably and after a few operations I would hear a slow leak. I have been trying to keep up with the LDD but it's hard to stay motivated when I know I'm just going to have to suck it up and move over to LDraw if I want to include all the motors, pneumatics and LAs Works so far; (I'll make the files available if anybody would like them). I found LDD essential in the early days to plan ahead and simply find parts, but later on the build overtook it. Original 'box' pump. 1x PF XL motor, 4x 6L pumps running at 90 deg to each other. Very smooth but bulky. Flatter attempt in the same vein. The truck itself. The final design for the height control modules. I hope you enjoy the build so far. More pictures to come of chassis, steering, leveling and interior details. I'll leave it to others to decide what 'theme' it belongs to . -
[HELP] Pneumatic GBC Module
9v system posted a topic in LEGO Technic, Mindstorms, Model Team and Scale Modeling
I have just finished a pneumatic compressor but I need a gbc module that runs on pneumatics Anyone gots some instructions or cad files? -
[GBC] Hybrid Construction Site Module
LegoGBC posted a topic in LEGO Technic, Mindstorms, Model Team and Scale Modeling
After months of building (well, life got in the way) I've finally finished building my biggest, most complex GBC module. It's a hybrid GBC (uses both mechanical and pneumatic functions) of a construction site-like-crane operation. Here's the video. A detailed description of how the crane works is written below The 6 step movement of the crane is done without using any sort of programming and no mechanical timers - it uses 3 differentials (one heavy duty) to power 4 outputs: 1) The crane rotation 2) The crane's claw (a pneumatic switch) 3) The crane's boom (a pneumatic switch) 4) The PF switch used to reverse the motion The 6 step movement: 1) Close the claw 2) Lift 3) Rotate 4) Release 5) Rotate back to original position 6) Lower So how does it work? Differentials send the power to the 'easiest' output. So the first, easiest function is to close the claw (rotating an axle which then changes the position of a pneumatic switch) -to grab the crate The second easiest is to open the boom's pneumatic switch -to lift the crate After that, the crane rotates until it's blocked at it's final position (the drop position). The power is then sent to the PF switch, which reverses the movement: -The claw opens -The crane rotates -The boom lowers Notice how the boom lowers AFTER the crane rotates back to it's original position (while it lifts BEFORE the crane rotates) - this is done so the boom won't lower in the wrong position (where it drops the crate) - a rubber band mounted on the boom's switch makes sure this happens: -It's easier to change the switch to it's lift position than it's to rotate the crane -It's harder to change the switch to it's lower position than it's to rotate the crane back. There are many (really, many) more small mechanisms in this module, but I think it's better to see those in the video :) Thanks for watching! -
The idea was very simple, to make some real juice with Lego 41035 Friends Heartlake Juice Bar birthday present for my granddaughter Laura (will be three on this Valentine day ), so I added some more Lego parts, including 12V pneumatic pump machine, and two (non-Lego) bottles as storage canisters for apple juice and apricot ice tee. Hope this will be great fun at her birthday party. Bottles can be easily refilled from the back if children will be thirsty. Some Juice Bar photos (with hi-resolution links, where appropriate): (http://www.bricksafe...ar/DSC06244.JPG) (http://www.bricksafe...ar/DSC06249.JPG) (http://www.bricksafe...ar/DSC06273.JPG) And also a short video:
-

Oshkosh 10x10 PLS
Zerobricks posted a topic in LEGO Technic, Mindstorms, Model Team and Scale Modeling
Here's what I've been working on in the past few weeks... Features: 10x10x8 wheel drive 6L motors for driving 2 Independent dual gear tranmsissions 2 Steerings motors Very long travel torque sensitive double wishbone portal independent suspension on all wheels Working hook arm with a total of 8 pneumatic cylinders Two newly designed autopumps Interrior with 3 seats For more info please check the video: Now all I need is to get the money to build this 3500+ parts monster... Anyone willing do donate? -
Hello! I am new member here and I wanted to share my ultimate MOC so far: More than a year I am planing, building, disassembling Toolcat 5600. Why so long? I want to make it functional, completely RC. Some time ago I ordered few S-Bricks, that changed everything I had in my mind, so I still have only chassis and some body work lines to understand how big it will turn out. My Toolcat will have: 1) RC drive, no gearbox (I think I will not be able to fit one in) 2) RC steering with different steering modes 3) 4x4 4) Independent suspension 5) RC dump bed 6) RC front jib 7) 3 point hitch in back 8) On board compressed air distribution system (autovalves) 9) Pneumatic and PTO connection points for auxiliary units 10) Quick release system for fast front attachment change 11) Few attachments to play with I do not promise to end it soon but I will keep posting progress reports. If you are interested or have some questions please feel free to post. I will post some pictures soon ;)
-
Little Pneumatic Wheel Loader
Appie posted a topic in LEGO Technic, Mindstorms, Model Team and Scale Modeling
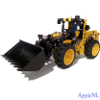
Omg more wheel loaders?! Well, yes, it is the "Year of the Wheel Loader" after all This idea originally came about after my Mini Wheel Loader from the Mini Contest. I didn't want to leave the smaller scale of building things just yet (and still don't ). This model actually took some time to realize. Which was mostly due to a knee injury that made sitting at my desk and working on this model not as enjoyable. But since my knee has been getting better and I wanted to start working on my C-Model Contest entry, I wanted to finish this model. Building it was a joy, provided plenty of challenges for me to overcome. So here it is: Considering I went up in scale due to the size of the pumps I also wanted alot more functions than my previous MOC. It has the following functions: - 4WD (with diffs) - Pendular rear axle - Fake L3 engine - Articulated steering (and moving steering wheel) - Pneumatic bucket and I wanted the controls in the cabin (though in hindsight there would have been no other place to put them than in the cabin ) Some functions I wanted that I didn't manage: - Opening doors - Fully adjustable seat in height and forwards/backwards (had an idea with worm gears and whatnot). This function did make it into the model a little bit, the chair can move up or down manually Something I am still thinking about: - Ladders to reach the cabin. I want to built these out of "normal" Lego, but not sure how at the moment. I am open for suggestions Anyway about the model as it is now. Some more images: Lego's huge diffs taking centre stage in this bottom shot Not much I can do about that. I was determined to put diffs in the model and obviously I wanted to use real Lego parts and this is the best Lego gives me, so I worked with it. I kind of wish I could move the arm back one stud to be closer to the wheels, but they end up touching the wheels then. Since I never designed a wheel loader from scratch I spent quite some time figuring out the liftarm of the bucket to provide enough lift and tilt while still looking good when it actually has to scoop up dirt. Originally I had planned to use the big Pneumatic hand pump (I even have an image of this further in this post), but I needed more precise control of the pump that tilts the bucket. So I went with the 6L compressor pump instead. Now while this does provide the control I need for the bucket tilt it also means I have to turn the knob for the pump about 11 times to fully lift the arm, but I take comfort in the fact that a mini LA needs about 19 turns to fully erect Also in hindsight I don't think I would have been able to hide the handpump in the model, while the 6L sits nicely besides the driver's seat. While using 3 mini pneumatic cylinders was my original plan at one point I did try to put in a big cylinder for the arm lift, but I simply couldn't make this fit with the diff and the cylinder for the tilting. In the end I am glad it didn't fit because I really like how the cylinders and their hoses came out in the end I love how this looks (I like seeing the guts of a machine), but I also find it a shame I couldn't cover it up a little, the diff and the hoses prevent me from using that space. Figuring out how to route the hoses so they wouldn't touch the wheels or the diff was quite fun by the way, but they sit there perfectly in between The cabin houses the 2 switches, 6L compressor pump and steering mechanism. It was fun to built assymetrical, since the pump is on the left of the vehicle I only had room on the right to make a steering mechanism. It turned out to become a simple but effective liftarm steering mechanism on top of the pneumatic switch but below the seat, linked to the steering wheel in the cabin. The turning radius isn't really awesome, but it will do in my opinion. It is slightly less than the turning angle of the 8459. Earlier in the built I was afraid the engine would be too long and that I might have to use only 2 cylinders. They might look a little too big obviously for the model's size (much like the diffs), but I like how it turned out. Maybe I make it green when my second copy of the Volvo Loader comes. I think this is also the first time I actually used the big holes on the bent lift arms The rear diff and the fake L3 engine was fun to combine too, especially with the pendular axle. As you can see the pendular axle has (almost) half a stud of movement. At first I thought it didn't look as much, but looking at my Volvo Loader, it has half a stud of movement, so I guess it is ok. I had to use Technic half pins in the 5x7 frame, because if I didn't the differential could touch the crankshaft of the fake L3 engine if the pendular axle was at an angle. I also have some in progress pictures of this built (originally I wanted to make a WIP topic ) This was basically day 1 of the concept, with the big handpump, which I had planned to run from the bottom of the chassis to the top of the rear part of the cabin. Here you can also see I originally had 1 stud less for the cabin part of the model. I added another stud to better fit the scale and the fact I had a whole other stud of extra space didn't hurt either These 2 pictures are a little dark sorry: Here's "the heart" of the loader, its pneumatic guts. While the hoses are brand new (from a 42008) I decided to use the old school pneumatic colour scheme And here's an image of the loader without its "heart". Kept plenty of space so the hoses don't touch the drive shaft and have room to let the air flow freely without being obstructed. Hope you all enjoy this post and to finish up, here's a picture of my Wheel Loader "family" (seems I missed some corners in cleaning up the background of my photos ) -
Hi, I was looking for technic set with starter pneumatic parts, what could you recommend for me? I kinda like that 9641 pneumatics add-on set