Search the Community
Showing results for tags 'motorized'.
Found 88 results
-
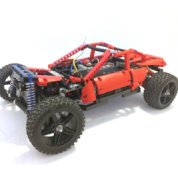
 Hi.. everyone.. I'm a new member subscribed last week. So this is my 1st posting here. Now I want to introduce my own renovation (or remodeling) of TECHNIC 42039 racing car that is capable of 4WD and 2 or 4 speed transmission features and so on... With a desperate that I need to go finish the TECNIC 42039 racing car renovation (or remodeling) going on for several months, I start a review about the result of my 42039 renovation version 3.0. First, through the video below we will introduce an overview of 42039 renovation version 3.0. The next additional video introduces the previous version 2.2 with features of 2WD and 2-speed transmission etc. The main feature included in renovation version 3.0 are listed below. -. RC engine room hatch opening feature of the original 42039 model -. Front axle renovation for 4wheel-driving (4WD) -. The reinforcement of power transmission path to the rear wheel axis -. Optional 2 or 4-speed transmission function In the following content introduces a modification information for each part. 2 or 4-speed transmission feature For the purpose of extended range, a four-speed asynchronous sequential shift gearbox option is added, 2-speed synchronous transmission as well. (With a minimum of effort adapted in accordance with the object, 2-speed vs. 4-speed selective transmission) In particular, our 4-speed sequential gearbox is inspired by the 4-speed compact transmission that is designed by SARIEL and that of TECHNIC 42056 PORSCHE 911 GT3 RS original model. In the video below, it shows the assembly of 4-speed sequential gearbox. (Sorry, the assembly of 2-speed gearbox is not ready yet) The pros ans cons of 2-speed synchronous and 4-speed asynchrosous transmissions described herein are appreciated as follows Division 2-speed synchronous 4-speed asynchronous High torque drive suitable inadequate Shift range narrow wide-range Shifting function stability low hight In conclusion, Choose 2-speed synchronous transmission, if you seek to improve the driving force Choose 4-speed asynchronous transmission, if you pursue a variety of speed and a technical completeness The challenge is 3 or 4 speed synchronous transmission upgrade. 42039 chassis renovated Sometimes with rear-wheel axis of the original 42039 models, transmission gears are impatient for a large force drastic departure or steep slopes in the progress of strong torque being transmitted to the rear wheel through a transmission shaft. So as to compensate for this problem in the renovated version, the rear-wheel axis structure has changed as the following video. The renovated 4WD front axis is at the heart of the renovated version 3.0. In other words, it describes the steering and front wheel drive shaft modifications as possible at the same time. The under-body of the renovated version compared to that of the original 42039 model is modified as follows -. Fake engine is replaced by 4-speed gearbox -. S- motor mounted under the hood -. Installations of the renovated chassis etc. In the video below you can see the renovated chassis production process using four L-motors. The final assembly process By combining each part-specific modifications result described above, the following video of the last shows the final assembly process of 4WD 42039 racecar bodywork. By finishing the renovation of RC motorized 4WD racing car, I could try another renovation with 42056 PORSCHE 911... I hope to introduce the renovated version of 42056 in the near future.. Thanks to you all reading this review to the end... Bye
 -

MOD - 42024 Container Truck Full RC
Chilekesh posted a topic in LEGO Technic, Mindstorms, Model Team and Scale Modeling
Hi everyone, Here's my modification of Lego Technic 42024 Container Truck set. In addition to original functions (steering, outriggers and container lifting) it has: - 6x4 driving, - 90° tilting of the driver's cabin, - Working & tilting steering wheel, - Fake V8 engine (working), - Led lights, and is completely remote controlled. I used: - 1 L-motor for 6x4 driving - 1 Servo motor for steering - 1 M-motor for outriggers - 1 M-motor for lifting the container - 1 M-motor for tilting the cabin - 1 rechargeable battery box - 3 IR receivers - 1 set of led lights - 1 x 20 cm extension cable Bricksafe: http://bricksafe.com/pages/Chilekesh/42024-rc (*.lxf file can be found here). Rebrickable: http://rebrickable.com/mocs/Chilekesh/42024-container-truck-motorized-rc Any suggestions on improvements are very welcome. Cheers and happy building! -

[EV3] Mindstorms High Performance SUV
DamonMM2000 posted a topic in LEGO Technic, Mindstorms, Model Team and Scale Modeling
Last month marked the second anniversary of my YouTube channel, so I decided to recreate the first video I posted: a high-speed Sport Utility Vehicle. In different ways, my production skills have improved, and in other ways, not as much. I think I still have a lot to work on... do you guys have any suggestions? I'd like to know how my videos are perceived. Thanks to all who have been watching my videos and have subscribed! -
Hi there, I just wanted to interact a little more with the community and I thought I would start by sharing my Lego model I designed and built based on my favorite carnival ride; The Tilt-A-Whirl. However, my model doesn't tilt, and the cars don't spin freely, and in fact they are connected to a gearing system so they are always turning while the ride is in motion. This was done because I really like to add motion to my Lego models, and allowing the cars to spin freely was't providing a lot of action. The deisgn on the ride has a platform planetary gear system that revolves around a single solar gear seen here in the center of the ride pavillion Here is a shot of the underside of the platform that shows the gears that move while the platform spins around the fixed gear. After marrying the platform to the base, the result looks something like this And in its current state, operates like this The first design could only be operated by hand (and at a time when I owned a really crappy camera) I then added a Lego motor, and after a bit of trial-and-error on how to attach it, found that using a worm gear to drive the entire platform was ideal. Finally, I submitted it to Lego for consideration to become a real mode at their Cuusoo site: http://lego.cuusoo.c...deas/view/18203 I hope that you like it and let me know what you think.
-
Do you want to do ropes ? I have a solution ! I want to precise this braiding is not 100% reliable. Sometimes, a coil can block the machine. After the first prototype, I done a lot of modifications to have the best reliability, but I have not so mutch experience with this type of MOCs, and a V2 is necessary to upgrade this creation. There is a clutch to stop this machine if it is blocked. The objective was to do a braiding machine having a continuous operation, and to have a not too low speed. I had not objective concerning the number of strings. There are 8 strings + 1 central. I also really wanted a buttom to be drawn to start te machine and down to stop it. How does it work ? You can separate this machine in 3 parts : The braided wire winder The rotation of the trays The movement of the arms moving the coils You can have more tight braids by changing a gear ratio of the winder. But they are less beautiful. The rotation of the trays occupies the top of the machine. (The 24t that you can see can be easily used to coordinate the arms and the trays) Here you can see the mechanism of the arms : The linear clutch stops the machine if a coil blocks it. More picture here : http://www.techlug.f...43.html#p179043 The difficulty was to coordinate all the mechanisms and to counter stress and flexion of the parts for the machine can work without too much fails. Finally, the machine can be locked because of a coil, but I’m satisfied because it works correctly and the braids are very regular. I’ll done other MOCs of this type because I like it ! The video will show you the operation :
-
[MOD] Formula Off-Roader 42037 fully RC
Tomik posted a topic in LEGO Technic, Mindstorms, Model Team and Scale Modeling
I've bought PF servo motor about one year ago and I haven't got chance to test it. Then this ugly buggy 42037 appeared and I realized it's good volunteer for testing it. My goal was to make it fully remote controlled with adding just PF parts and keeping original look as much as possible. So after two days I've got this result. It's powered by one M-motor, steered by servo motor and even uglier than before. It rides well on smooth and solid surfaces but it's pretty slow on carpet. Main issue was to find room for battery box. Front of buggy is almost unchanged and rear is rebuilt much. It can still open cab and fake engine works. It lost just seat and lights. If anyone is interested I'll share its LDD file. -
[MOC] Top Fuel Dragster
sm 01 posted a topic in LEGO Technic, Mindstorms, Model Team and Scale Modeling
Hello everyone! This is my newest creation: It is a result of a strange process - I usually know what I want to build before I start building, but with this one it wasn't the case. I was tinkering about limited slip differentials – trying to find some compact solution, one that can fit regular LEGO differential. Then I needed some vehicle to test it… One thing led to another and I had this top fuel dragster on my desk. It is build for speed - has great power (RC 5292 motor) to weight ratio (weighs 450g). It is rather simple creation. The only function, besides motorized driving and steering (servo motor), is manually adjustable rear wing. Dimensions: 48cm long, 12 cm wide, 14.5 – 16 cm high I hope you'll like it! More photos: http://www.flickr.co...157669238024110 Please check the video to see more about its speed - after all, it is the main feature of this model (I filmed it in my building's garage - my apartment is too small for that thing ) and tell me what you think about that limited slip diff. Also, now I'm wondering, do you always know what are you going to build from the start or did you have similar experience like me with this MOC? -

Hi ppl, new to the forum, mainly technic fan willing to dig around and
dasjones posted a topic in Hello! My name is...
Hi all, i've just arrived at the forum, very nice place. I'm mainly into building and customizing lego tecnic, got 42008, 42009, 42035, 42043, also i've build some parts to build 42009 ultimate (haven't arrived yet, looking forward to this) and planing on getting a 42006 and some parts to fully motorize and rc it. I'm also looking for some custom builds using those sets and to motorize and rc them, will dig around the site, to get a nice idea on customizing, and them i'm planning on starting trying my own (looks pretty difficult at the start, hope to get the hang of it). Goog luck all, plz don't hesitate to contact me if i can be of any help, or if you have anything to share related do rc and motorizing these and other related models, i'm looking for some free manuals and tips to have some fun, but i'm also willing to pay for some good instructions that will help tune those babes, as well as help get experienced in modding. Regards, cya all. -
2 Lego Technic Supercars - 2 Bros - 12 functions
Lox Lego posted a topic in LEGO Technic, Mindstorms, Model Team and Scale Modeling
its been a while since I posted so I decided I'd post 2x the content. Focus was on maximum motorized functions including front rear clam shell, doors, shifting (via broken servo motor), 2 speed transmission, steering, sbrick and drive. Enjoy! Youtube: Flicker: https://flic.kr/s/aHskAxCnKJ To see the different build styles, Lox built the red supercar, and Dugald built the white one. The red car has actuating doors, V10, working steering wheel and rear wing when turning, 4wd & rwd. 1 servo, 2 xl for drive, 2 m-motors for opening doors, 1 Sbrick. The white car has 1 servo for steering, 2 xl for drive, 2 M-motors for doors, 1 servo for gear shifting, 1 M-motor for rear clam shell, 1 l-motor for front clam shell. Red supercar: White supercar Which one do you like best? :) Interior: Interior x2 Lox's V10 front suspension built by Dugald rear suspension built by Dugald Lox framework Dugald's bottom of car Lox's bottom view View from above: Rear wing: 2 speed transmission: I really like this front hood design Nice flow from top view: Custom seats modular design 2 servos and 1 m-motor - the broken servo sticks left and right (perfect for shifting) complete framework with 8 motors V10 and interior Under the hood: This is the axle that lifts the rear lid for the white car. Slightly too much torque -

42005 Monster Truck - Motorized and RC
Splat posted a topic in LEGO Technic, Mindstorms, Model Team and Scale Modeling
I would like to present my motorized and remote controlled (IR) version of this year's Monster Truck set (42005). My first goal was to keep the overall look and dimensions the same as the official model: The wheels, chassis and body are in the same positions, Only the axles, inner workings, and battery box have changed. My second goal was to somehow get the vehicle to have both steering and 4WD: As you can see above, I achieved the steering by making the entire front and rear axles turn via the use of gear racks and 6L links, while the drive goes through the ball joints, differentials, and portal hubs. Steering is handled by a PF Servo Motor, while drive is handled by a PF L motor. It is powered by a PF Rechargeable Battery, and a PF IR Receiver V2. My third goal was to increase the vehicles clearance as much as possible: And my last goal was to maintain a good amount of articulation: I had to modify the suspension attachment to allow an extra degree of movement to allow the suspension to operate smoothly. It runs quite well over small obstacles, however it is very top-heavy, so it does roll over quite easily. This isn't helped by the fact that as it turns, it leans outwards (opposite to how a skateboard works). Here are the parts (guts) that I had to remove from the original model: All pictures can be clicked on for larger versions at Brickshelf (once moderated). Here are some more pics: And last but not least, here is a link to the LDraw file: 42005_motorized_monster_truck.mpd Overall I am pleased that I was able to get this motorized given that there was only a small space to work with, and the model is very sturdy. I hope you like my motorized and RC 42005 Monster Truck. Any and all feedback/constructive criticism welcome. Edit: I have submitted this MOC to Rebrickable. Edit: I have created a quick video: Sorry about the audio quality - it was a very windy day! -

[MOC] Fury Road Heavy Buggy
Djinn posted a topic in LEGO Technic, Mindstorms, Model Team and Scale Modeling
Full Album: http://imgur.com/a/YdL5x Specifics: 4x L Motors RWD (Geared Up 1.2x) Full Independent Suspensions 6x Shock Absorbers 2x AA Battery Box 2x V2 IR Receivers Frontal Led Lights Differential Weight: 1250g (with batteries) The Idea is to create an Heavy-Weight Buggy with good performances using no expensive pieces (Buggy Motors, SBrick..). The final speed is acceptable, the torque has some difficulties in uphill but for the plain is sufficient, and the maximum speed is reached quickly. I called it Fury Road because it reminds me so much the style of Mad Max vehicles. I know it's a little be "naked" but I like it in this way. I putted in it some lateral exhaust pipes, a little spoiler, a cabin and some lights to improve the aesthetics. I tried to put the IR receivers in a position that seems a big engine that comes out. Hope you like it! ;) -
Hello: This is my 5th gen crawler that I designed to be extremely robust and powerful. It features full suspension, 4x4 drive, a kingpin inclination, and 3rd party tires. IMG_5253 by JJ2Sam, on Flickr The suspension is full floating axle suspension that has a maximum flex of about 90 degrees and 2 inch of up-down travel. After many revisions of the suspension I found that the 1x16 link can serve as a suspension arm nicely and can bend without breaking making the suspension less likely to break of stress. The springs are triangulated making the suspension softer. IMG_5268 by JJ2Sam, on Flickr Many hours when into the "drive chain" because at first I wanted to have a actual drive shaft going to the axles but that did not work out so I went back to the old motors on the axles. The XL motors produce amazing torque but amazingly no parts were damaged in when driving over rocks, the only thing that can be considered damage in scratches. IMG_5257 by JJ2Sam, on Flickr When I first built this crawler I new that with the 3rd party tires + pivot outside of the wheels would = BAD! so I decided to build in a kingpin inclination to solve this issue. I used the 4L U-Joint's because I did not want to break any of my 3L's. IMG_5267 by JJ2Sam, on Flickr The wheels are 108mm and are slightly bigger than the 105mm power puller wheels. More photos are on my Flickr account Hope you enjoyed!
-
[MOC] Hot rod - Black coupe
sm 01 posted a topic in LEGO Technic, Mindstorms, Model Team and Scale Modeling
Hello everyone, I present you another motorized and remotely controlled hot rod – Black coupe. My goal was to make mid-sized model with realistic suspension and working engine. Regarding size and functions it is somewhere in between my models “Fire bucket” and “Lucky 13”. Dimensions: 41 studs long, 19 studs wide, 13 – 14.5 studs high and weighs 804 g. PF components: 1 L motor - driving, 1 M motor - steering, 1 8878 battery, 1 IR receiver As you all know, with motorized creations, it is always a problem to place PF parts so they don't influence overall appearance of a model. In my previous hot rods, I used place under the false engine to put PF motors and as a result, false engine had to be higher than in a real car. That was a little bit frustrating but I didn't see any other option. So with this hot rod, I wanted to avoid that at any cost. Some compromise had to be made so I decided to use just one L motor for driving (accepting the fact that it won’t be very fast) and to put it under the driver’s seat. M motor for steering is placed next to it, under the passenger’s seat. As a result, smaller custom made V8 engine is placed lower on the chassis - right where it would be in a real model. Other functions: Working suspension - I wasn’t 100% satisfied with the suspension of my previous hot rods (they worked but weren’t realistic enough) so I really wanted to make improvement in that area. Development of the front solid axle and rear live axle, leaf spring suspension (with all the links and dumpers) was, at least for me, most important and most challenging part of this model (considering the scale). Front: solid axle, leaf spring Rear: Height-adjustable, live axle, leaf spring Working steering wheel – drag link steering Development of the small custom V8 with moving parts (working pistons, radiator fan and a generator) was the most satisfying part of this build Working door handles – openable suicide doors Trunk door can be opened – behind it is a mechanism for adjustment of rear height of the vehicle (manually controlled gear) and battery (easy to turn on/off and charging). Roof can be removed easily Retractable rear license plate – controlled with a fake handbrake lever inside the cabin I just love this function, I had it already on my Lucky 13, but for this build, I wanted it to be controlled from the cabin (driver's seat) for more realistic appearance. Features: Custom chrome parts – wheels, headlights, radiator grill, door handles and rear view mirrors Interior – red seats and dashboard I hope you'll like it, please comment and tell me what you think More photos: http://www.flickr.co...157666582891052 -
It has been almost 15 months since I finished building my last "friends-themed" amusement ride, the teacups. Now, I happily present the latest addition to my amusement park: the tourbillion! Tourbillion is a mechanism widely used in vintage watches. A tourbillon aims to counter the effects of gravity by mounting the escapement and balance wheel in a rotating cage, to negate the effect of gravity when the timepiece (thus the escapement) is stuck in a certain position. It is also a kind of training given to astronauts so that they can be get used to the Outer Space. Now, the girls are sent to the machine: Tourbillion has recently become a kind of amusement ride. It is just invented in Switzerland in the middle of 2015. The first launch (which requires you to buy tickets), however, is in HONG KONG!!! Want to see it rolls? Here are a few still images: Of course, you may find a video more helpful to you: Want a virtual ride? Watch this video: As usual, before I have completed my work, I suffer quite many times of failures. ^^ My former works of the Friends' Theme Park for your easy reference: 1. Grand Carousel: http://www.eurobrick...topic=87068&hl= 2. Ferris Wheel: http://www.eurobrick...topic=87882&hl= 3. Gyro Drop: http://www.eurobrick...topic=88256&hl= 4. Bumper Cars: http://www.eurobrick...topic=88770&hl= 5. Teacups: http://www.eurobrick...ds +theme +park I wish I can build part 7 of this park before long.
-
[MOC] Hot Rod - Fire Bucket
sm 01 posted a topic in LEGO Technic, Mindstorms, Model Team and Scale Modeling
Hello everyone, ever since I bought RC buggy motor, I wanted to build a hot rod around it , so this is it: General info: Dimensions: 35 studs long, 19 studs wide and 18 studs high. Weight: 703g Motors: 1 RC buggy, 1 PF servo 1 8878 battery, 1 PF IR receiver, 1 PF switch, 2 PF lights Custom chrome details: wheels, engine parts, radiator grill, door handles, side mirrors… Custom stickers: Doors, license plate, dashboard. Drive: RC buggy motor (5292), RWD; Steering: Servo motor Suspension: Front - independent; rear – dragged axle Lights (front and rear) manually controlled with a lever (PF switch) behind steering wheel Doors with working door handles Battery (8878) easy accessible for charging: Red interior: Engine details: Comparison shots with Lucky 13: I hope you'll like it... For more information: Flickr: https://www.flickr.c...57649528635925/ MOCpages: http://www.mocpages.com/moc.php/401411 -
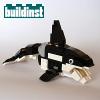
[REVIEW] Timmyton 5.5 Robotic Shark (by Builderdude35)
DamonMM2000 posted a topic in LEGO Technic, Mindstorms, Model Team and Scale Modeling
Here is my model review of the Timmyton 5.5 robot shark built by Builderdude35. It is built using only one 31313 LEGO Mindstorms Ev3 set. Technical features: 1 programmable Intelligent Brick, 2 Large Motors, 1 Medium Motor, 1 Color Sensor, 1 InfraRed Sensor -
[MOC] 2010 Cadillac CTS-V Coupe w/Mindstorms Ev3
DamonMM2000 posted a topic in LEGO Technic, Mindstorms, Model Team and Scale Modeling
Hey guys, I've built several Lego vehicles with MINDSTORMS® and decided to use my experiences with previous vehicles to build a real car. I was originally looking at building a Ford Escape, but the blueprint scaler measurements came out all wrong, so I turned to a Cadillac CTS-V. I'm a fan of the CTS-V, mostly because of the luxurious ride and smoking performance fused into one car. Here's a picture of the real-life vehicle: Please note beforehand that I am building a model based off the Cadillac CTS-V, but not necessarily an exact replica, partly due to less than a total of 2,000 pieces and partly because I don't have a lot of pieces of just one color I'll try to share the blueprint with measurements tomorrow, and because I am already working on a few builds at once, starting this work on spare parts will be a bit slow for a couple weeks. I hope you guys enjoy the progress! If you'd like to, please check out my previous vehicular builds: Outland3r - Outland3r 2.0 - RX2 Thund3r Truck - AWD MiniKart - Chopp3Rod - -
[MOC] VW T1 Fire truck
sm 01 posted a topic in LEGO Technic, Mindstorms, Model Team and Scale Modeling
Hello everyone, I was looking for a way to make a smaller scale rc model and then I remembered the “electric motor with steering mechanism and receiving unit” ( http://alpha.brickli...lor=86#T=C&C=86 ), which LEGO made back in 2009. For those of you who havn't already seen it... This is my first experiment with it: More photos: https://www.flickr.c...157659388973900 I hope you like it -
[MOC] M4 Sherman Crab tank (RC)
Tommy Styrvoky posted a topic in LEGO Technic, Mindstorms, Model Team and Scale Modeling
Lego M4 Sherman Crab (RC) by Tommy Styrvoky, on Flickr Finally after 2 months of work, I present my latest model, a 1/18th replica of a M4 Sherman with a mine clearing flail. This model is one of my most complex models I have built. It houses 7 Power functions motors (2XL, 2L, 2M, 1 servo), 3 IR receivers, and a 8878 rechargeable battery. Photo of real vehicle with flail in operation Design of model This vehicle has been a dream of mine to replicate a M4 Sherman ever since I began building tanks. There was a lot of planning over the past year to the design of this, there are different components from other tanks of mine that I combined to build a ultimate version of a Sherman. There is little space left inside, as the transmission, electronic clutch braking mechanism, and flail components take up all of the lower hull space, there was little space for the turret's mechanisms to be routed into it. The gun's elevation is controlled by a mini linear actuator that is located below the turntable and rests on top of the mechanism that shifts the gears for the transmission, and elevates/depresses the flail. The first Sherman I built was my 3rd tank of a larger scale, it was designed to replicate a British version of the Sherman, the Sherman Firefly. It was flawed in several locations, but I wasn't pleased with certain components of it, the suspension was inaccurate for the early version of the Sherman, as it uses VVSS(vertical volute spring suspension). My model had HVSS (horizontal volute spring suspension), this version of suspension is only used on later variants of the M4A3E8 Sherman(vehicle used in Fury). I attempted to build another version of a Sherman in the fall of last year, but it suffered from the same issue, the suspension was incorrect in size, I decided to scrap the project and build other vehicles instead until I found a better, more accurate solution. I decided to use the Torsion bars from the Hetzer, as it would provide the proper angle for the suspension swing arms, and be low profile, so the hull could mount the Transmission from my Tiger I. The transmission takes up nearly the entire 3/4 of the lower hull of the vehicle, it fits between 10 studs of free space, and has 2 gear ratios, a 1:2084, and a 1:1.3474. The remaining space of the lower hull is taken up by the electronic clutch braking mechanism (this creates the effect of the real steering mechanism of the M4 Sherman, to steer one track's power is diverted to the other track, and the unpowered track is braked). The space behind that is for the 8878 rechargeable battery. Another complex component for the Sherman is the turret and the transmission housing cover, these pieces have a complex shape to them, and are both round. The transmission housing cover is situated at the front of the vehicle, where the final drives interface with the transmission. It took 5 revisions of it to cover the knob gears behind it, and retain the proper shape. The turret was difficult too, but I broke it up into 4 different shapes that could be replicated in bricks and be combined to produce the proper round shape. Those components being the sides, top, mantlet, and rear bustle. The sides and bustle were the most difficult to replicate, as the bustle has a complex protrusion off of the back of the turret that is used to house the radio. The sides were difficult as they had to slope upwards to to roof of the turret. Sherman Firefly from over 2 years ago The current model isn't entirely perfect, the major imperfections being the height of the center portion of the hull, and turret size. The hull is 2 studs too tall, as it needs to mount the flail's L motor for power, and the main axle that powers the flail's Linear actuators has to have a directional change. The turret is slightly too tall, but this was to compensate for the height of the hull, it looked too small, and the mini linear actuator made it taller. If a standard version of a M4 Sherman would be built, it wouldn't have these issues, because of the internals, though I am pleased with how it looks, it could still be improved. History The Sherman crab was designed to clear minefields the Allies would encounter during the Normandy landings, there are several other Flail vehicles used too, but I chose the Sherman variant.I will spare the remaining bits, as this post is getting long, more information here if anyone is interested in the history of it. http://www.dday-over...g/crab_tank.htm Photos Lego M4 Sherman Crab (RC) by Tommy Styrvoky, on Flickr As some may know I will have college coming this fall, so this will be my last MOC for a long time, I am uncertain if I will have time to build something large over any breaks, though there is LDD and Ldraw , it isn't the same as working with real bricks. I do have big plans for next summer, as I suspect that will be the next time I can work on a model.... 1/15 MAUS... but more information on that come in a couple weeks. -
Hello All! This is one of my favorite Useless creations I have ever built As you can see it is a couch on steroids with tanks treads Top view Back view Bottom view Sort of side view Let me tell you some days you just need to take a break Or have a party Homers Favorite ride! Looks like Sariels Hamster has evil plans for this Video thank you for reading!
-
Hello, when I have seen the new LEGO City Town Square (60097) first in Nuremberg at the international toy fair, the Tram of this set was really the highlight. Since then, I thought about, how to motorize this train - and if it is possible. The good answer is: It isn't a big deal - and looks really cool. Now, the tram is a kind of 9V highspeed-train - if you want. This is my video - lets start the journey: What do you think? Best wishes Andres
-
[This is a LEGO Ideas' project and it awaits your support: "]https://ideas.lego.c...rojects/102064] Hello everyone, I have been away from LEGO Town for quite a long time. Here comes my MOC... not 100% a sort of new work but a refinement of my previous one: http://www.eurobrick...l=+bumper +cars (LEGO Friends' Theme Park (4): Bumper Cars) Since then, I was advised by a number of people that such a girly MOC was far less desirable than a boy one. That's why this comes out: It takes me for more than a year to make improvements -- virtually a new start except the use of magnets is retained. There are so many stages of transformation; there are simply many trials and errors I have experienced... The cars looks more resemblance to real ones. I use a tiled baseplate even though a normal baseplate with studs do not affect the smooth running of the cars. I also make the turntable much more handy, so that it require much fewer bricks. In the meantime, I still keep the delay function (In case you don't know what I am referring to, please check the video at the bottom of this page) In order to make the set more playable, there is a manuel mode: you can pick up the axles placed at the top of the set and use them to control a car and smash the others. Hope you enjoy my work and think this is much fun! A video is better than 1000 words. Most likely you will understand all my words above after watching it: Finally, yes, this is my project of LEGO Ideas. If you really want to own this set, please come to the following link and become one of the 10,000 supporters. Every vote counts! ^^ https://ideas.lego.com/projects/102064 Thank you very much!!!
-
[MOC] Tiger Porsche Heavy tank (RC)
Tommy Styrvoky posted a topic in LEGO Technic, Mindstorms, Model Team and Scale Modeling
Lego Tiger Porsche heavy tank (RC) by Tommy Styrvoky, on Flickr I present my first model as an AFOL, a Tiger porsche or Tiger (P). This vehicle, and the Tiger I (H) (the more commonly known Tiger tank) was built to meet the requirements of a 45 ton vehicle that could mount a 88mm flak inside a krupp turret. Durning the testing of the two vehicles, the Porsche version struggled with teething issues in the electronic drive motors that drive the rear sprockets. This vehicle has an interesting means of propulsion, there are 2 V10 engines that drive generators, that in turn provide power to the rear drive motors. This eliminates strain on a mechanical transmission, and allows for ease of "shifting" between different amounts of power supplied to the rear drive motors. Because of the issues with the over-engineered drivetrain, the vehicle lost the competition, and it was not put into production. There had been a total of 100 hulls built by Porsche, and only 5 Tiger (P)s were finished. This vehicle is one of the few that saw actual combat, the markings of it are from the Panzerjäger Abteilung 653rd. I got the inspiration for this model from Sariel's Tiger XL, and I decided it would be cool to utilize his turret (like the actual tiger (P) used the same Krupp turret). I have made a couple small changes to the turret, as it was slightly too long, and the sloped portion was too short. The hull of the tank is packed with motors and details, as I replicated the entire engine bay, and that alone takes up at least 1/3 of the entire vehicle. The rest is filled with the 5 motors inside of the model. Lego Tiger Porsche heavy tank(RC) by Tommy Styrvoky, on Flickr Lego Tiger Porsche blueprints (RC) by Tommy Styrvoky, on Flickr IMG_7980 by Tommy Styrvoky, on Flickr Lego Tiger Porsche heavy tank(RC) by Tommy Styrvoky, on Flickr Lego Tiger Porsche heavy tank(RC) by Tommy Styrvoky, on Flickr Lego Tiger Porsche heavy tank(RC) by Tommy Styrvoky, on Flickr Lego Tiger Porsche heavy tank(RC) by Tommy Styrvoky, on Flickr Lego Tiger Porsche heavy tank(RC) by Tommy Styrvoky, on Flickr Lego Tiger Porsche heavy tank(RC) by Tommy Styrvoky, on Flickr Lego Tiger Porsche heavy tank(RC) by Tommy Styrvoky, on Flickr Lego Tiger Porsche heavy tank(RC) by Tommy Styrvoky, on Flickr Lego Tiger Porsche heavy tank(RC) by Tommy Styrvoky, on Flickr I like how all of the SNOT work fitted together very nicely Lego Tiger Porsche heavy tank(RC) by Tommy Styrvoky, on Flickr Lego Tiger Porsche heavy tank(RC) by Tommy Styrvoky, on Flickr Lego Tiger Porsche heavy tank(RC) by Tommy Styrvoky, on Flickr -

Mini Tatra 10x10
Zerobricks posted a topic in LEGO Technic, Mindstorms, Model Team and Scale Modeling
I was inspired by this model, which was originally inspired by my old mini tatra from 2011. The major difference is that my model uses 9L links as leaf springs which allows is greater flexibility and much more less sideways tilting when steering. Download LXF: www.bricksafe.com/files/Zblj/Mini%20tatra%2010x10/Mini%20tatra%2010x10.lxf -
[EV3] Chopp3Rod - Motorized Hot Rod Convertible
DamonMM2000 posted a topic in LEGO Technic, Mindstorms, Model Team and Scale Modeling
I went retro this time around and decided to build something as big as I could without compromising the look. Chopp3Rod is the result of many hours of work, sporting both an attractive interior and exterior. The wheels are driven by independent direct drive via two Large Motors. A complex program allows the drivetrain to mimic a differential since a real differential was not used. Therefore it has an electronic differential! It sports many details, including a V12 engine, transparent lights, a Color Sensor headlight, comfy seats, clear quarter-panel windows, side exhaust, curvy wheel arches, rear tonneau cover, custom wheel hubs, and more! I am really happy with this model and how it turned out.