Search the Community
Showing results for tags 'motorized'.
Found 88 results
-

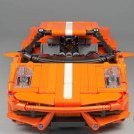
1:10 Scale Motorized Acura/Honda NSX Supercar
Zerobricks posted a topic in LEGO Technic, Mindstorms, Model Team and Scale Modeling
After building the 1:8 scale Spano GTA, I wanted to make something more compact, yet even more functional for the BuWizz camp 2021, which got postopned to 2022. The rules behind this model stated to build a 1:10 scale representation of a real existing car, which has to have a working gearbox, fake engine and working steering wheel. After researching different types of super and hypercars, I chose the Acura/Honda NSX since it had several good pros compared to the more famous brands like Ferrari or Lamborghini: The real car has a smaller profile, which means a lower weight It uses a hybrid AWD system, which would come in handy for the LEGO model for accelerating and braking on all wheels Engine powering is a V6, which doesn't take as much space as the typical V8, V10 or even V12 Since it's a less known supercar, my LEGO version could be the first one in such scale I used a simillar technique as with Spano GTA where I imported the 3D model into the Lego Digital Designer and used it as a 3D reference. Using this technique I ended up with a really close representation, and it really shows: As you can see in the gif above, not only does the model look very good, it's also full of functionality: 4x BuWizz motors for driving All wheel drive 2 Speed gearbox Working fake V6 coupled directly to the drive motors Working steering wheel 2x BuWizz 3.0 for control Double wishbone suspension on all wheels Dimensions and weight ended up as following: Length: 45 cm Width: 20 cm (without mirrors) Height: 12.5 cm Weight: cca 1,5 kg Here is how the model's underside looks like, drive motors are driving two independent gearboxes in order to evenly spread the mechanical load. This kind of a setup also cancels out any side forces on the central drive axle, thereby reducing friction and wear: In order to cram all the powertrain components in the rear the drive motors are placed in a V shape. This way there is just enough space between them for a functional V6 engine and a PU medium motor which switches the gearbox: Thanks to the compact powerline and driveline, the interrior is very spacious and both seats are almost 1:8 scale sized, measuring 6 studs wide. There are even stoppers and interrior details on the doors themselves: ž The end performance of the model is higher than what I expected, there is enough torque to freespin all 4 wheels, jump over ramps and top speed in high gear is almost 20 km/h! You can see how well it performs the video: To conclude, this is my first 1:10 scale supercar which also ended up extremely compact, functional, robust and good looking. I also think a 1:10 scale may be beneficial when it comes to reliability and robustness, since models tend to weight half the weight of their 1:8 counterparts while still incorporating a simillar level of functionality and details. Having said that, this will not be my last 1:10 supercar and I think for the next one I will ditch the gearbox and simply drive the wheels directly from the motors without any weak differentials. -
1:10 Large - scale motorized 4x4 Tow truck
Zerobricks posted a topic in LEGO Technic, Mindstorms, Model Team and Scale Modeling
I don't usually post my work projects here, but every so often there is a special one that I really want to showcase more in detail. Today I want to show you one of my all-time favourite projects, which is packed both full of functionality and a very high level of detail. Before we go into the details, lets' first let's talk about the idea behind it. We (the BuWizz team) have been cooperating with Slovenian AMZS (Slovenian Automobile Association) for a while now and they are the ones who allow us to record the various speed breaking and such events on their polygon. An idea emerged for a project to design and loose replica of their existing Tow Truck which is to be used for education purposes. Here's how one of their tow truck looks like: I decided to use this specific model as an inspiration of my representation and here were the basic starting functions and features: 1:10 scale Capable of lifting and towing an actual 1:10 model like 42125 All Wheel drive Working gearbox Realistic suspension Highly detailed As with most of my projects, i first started working in LDD and this is what the first prototype looked like: I took some liberty with the shape, notably I removed the crew compartment in order to better the lift arm details. As the project progressed, so did the amount of functions, features and details until I ended up with this long list: Motorized with 11 motors Powered by 2 BuWizz 3.0 Pro bricks All wheel drive powered by 4 BuWizz motors Working gearbox with a high and low gear 3 differential locks Independent suspension in the front Solid rear axle in the back which uses 3x13 curved panels as leaf springs Working V8 engine connected to the drive motors Functioning steering wheel linked to the steering rack Motorized lift which can unfold, raise and lock onto thr wheels of the towed vehicle A motorized winch in the rear Working front LED lights Opening doors, hood and compartments Detailed engine bay with battery, air filter and washer fluid Compartments filled with details such as fuel canisters and various tools Other details include cones and fire extinguishers 3D printed braking discs in the front for show Total piece count is around 3060 parts Just over 3 kilograms 51 cm x 24 cm x 22 cm when folded excluding mirrors Capable of lifting and towing a 1:10 scale car like 42125 even up a steep hill Top speed of 10 km/h Here's an overview of the model and the basic mechanical functions: Driveline is powered by 4 BuWizz motors. The motors drive a 2 speed gearbox and a fake V8 engine: Gearbox is powered by a PU M motor and uses 2 mini linear actuators to switch between low, neutral and high gear: Each of the 3 differentials has it's own lock, actuated by a wave selector and powered by a PU M motor: Steering system is powered by a PU L motor and uses two steering racks in order to both steer the wheels and turn the steering wheel: Finally, there are several more PU M motors used to power the rear arm. The main actuators lift the whole arm and are powered by 1 PU M motor: Another PU M motor is used to unfold the lower part of the lift arm using 2 mini linear actuators: Finally another PU L motor is used to lock the wheels with two more mini linear actuators. The driveline is designed in such way that the arm can swing a bit while cornering: The lifting arm had to be designed to be as strong as possible, yet thin enough to slide under the car we want to tow. The final version was under 2 studs high and capable of lifting a 2 kilogram heavy model with ease: With all the details finalized and the parts omptimized in the LDD version, it was time to build the real deal: As mentioned above, the model is full of details that can be accessed by opening the various compartments: The rear view showing the folded tow arm and the 2 large actuators used to lift it: Few more pictures of the model next to the real deal: Of course no Technic photoshoot wouldn't be complete with the most important photo of them all, the underside: The underside was left open and exposed intentionally, so that the gearbox, the differential locks and steering system can be observed. Of course as with all the projects, this one also had some issues, the biggest being the use of 3x11 curved panels as the rear leaf springs. Originally only a single pair was used to support the weight in the rear and the additional load of a towing vehicle, but it soon proved too much for them and over time they ended up breaking. That is why for the final fix, they were doubled, to increase the stiffness and durabilty of the rear axle: Other than this, there were no other major issues with the model. The driveline has yet to skip a gear, the joints are holding (even the small CV joint used in the front left side) and the model ended up being robust enough for some really rough driving. As mentioned at the start of the topic, this is one of my best models to date, I'm really happy with the amount of sheer functionality, features and details I managed to cram in it and it will forever hold a special place in my heart. To wrap up this already long topic, here's a couple of videos of it in action: -

[MOD] Motorized Bugatti Bolide 42151
KirTech LAB posted a topic in LEGO Technic, Mindstorms, Model Team and Scale Modeling
Hi everyone! I'd like to share my new motorization project. This time I've modified Bugatti 42151: BuWizz 2.0 receiver as a power source, BuWizz-motor for rear-wheel drive and PF servo-motor for steering. As usually I tried to keep the original look of the set as much as possible and it was unexpectedly difficult to place all the electronic components. The main problem is a width of the model - the inner space between doors is only seven stud wide, so it's impossible to place the receiver between the doors as it's eight stud long. So I've ended up with pretty unconventional receiver placement. You can find details and test-drive in my video: Thanks for watching :) -
Ahoi and may the force be with you, pirate! Finally I present to you the MOC by my friend Jan-Hendrik and me: The Pirate Death Star some may have seen it in person in Skaerbaek last autumn but now I had time to post it... The different Death Stars are a building project invented by my LUG Steinhanse, so every year there will be several crazy Death Stars! Video Levels The death star consists of 4 levels and a big cannon, as the original lego set. The levels are devided as follows: Level 0: Deep Sea with fish and all the different sea creatures The Kraken Atlantis and more Level 1: Caves and shipwreck: The caves of the islanders, full of treasures. The pirates tavern under the hideout, partly in the old shipwreck. The dungeon of the redcoats The shipwreck Level 2: Island: The beach of the islanders The pirates hideout The Shipwreck bay The redcoats fort Level 3: Battle at sea : Ironhook and his Renegade Runner Revamp fighting Governor Broadside. Captain Redbeards crew on a treasure hunt, as well firing the big cannon. The redcoats lighthouse. The story of the plug. The caves have accessible stairways to the island. At sea level a technic chain powerd by a motor moves the boats and fish around. The big cannon fires a "Death Star cannon ball" All around in pictures: Level 0: Level 1: Level 2: Level 3: So, I hope there are not to much not not to few pictures.... I am really looking forward to your comments and hopefully some of you have seen it in Skaerbaek! All the best! Adrian
-

Motorised Johnny 5 MOC <Not an Alternative Build>
RJ BrickBuilds posted a topic in LEGO Technic, Mindstorms, Model Team and Scale Modeling
01 by RJ BrickBuilds, on Flickr Hello, Bozos! You can support Johnny 5 on Lego Ideas to turn him into an Official Johnny 5 Lego Set here: Johnny 5 on Lego Ideas Who is Johnny 5? Those who don’t know him, Johnny 5, also known as “S-A-I-N-T Prototype Number 5” or Number 5 for short, is a very lively and inquisitive military robot prototype who’s perpetually hungry for more “input”. He is the star of the 1980’s movies Short Circuit and Short Circuit 2 and a TV special called Hot Cars. He became sentient when he was luckily struck by lightning during a combat demonstration. Although he is designed to serve the military as a robot prototype, he has an adorable child-like behaviour and has a great respect for life. He is a peace-loving robot and refuses to use his military capabilities to harm others. Despite being very intelligent and inventive, his naivety and trusting nature has been taken advantaged of on several occasions. Design This model is fully motorised using Powered Up motors and hub and controlled through a mobile device using the Powered UP App. It uses Technic parts to ensure stability of the structure, and System parts to capture the look and form of Johnny 5. The following are the playable features of the model: Movement – This model can move around on tank tracks and uses skid steer to change directions. Body – Johnny 5’s body can tilt using a Powered Up L motor and controlled using a mobile. Arms – Arms can be raised and lowered individually using the Powered Up App. The fingers can be adjusted manually as well as the elbows. Head – The head can be tilted and turned using the Powered Up App. Eyebrows – Eyebrows can be manually adjusted to suit the desired facial expression. Laser – The laser at the back can be raised and lowered using the Powered Up App. Watch the YouTube video here to illustrate these functions better: Johnny 5 on Youtube Total Pieces: 2,711 Dimensions: Studs: W 68.4 x L 36.1 x H 73.5 Inch: W 21.5 x L 11.4 x H 23.2 cm: W 54.7 x L 28.9 x H 58.8 Weight: 99.8 ounces or 2.83 kg Johnny 5 MOC Pictures: 02 by RJ BrickBuilds, on Flickr 03 by RJ BrickBuilds, on Flickr 06 by RJ BrickBuilds, on Flickr 05 by RJ BrickBuilds, on Flickr 04 by RJ BrickBuilds, on Flickr 07 by RJ BrickBuilds, on Flickr 08 by RJ BrickBuilds, on Flickr 09 by RJ BrickBuilds, on Flickr 10 by RJ BrickBuilds, on Flickr -
Hi mates! It has been some time, I only teased differend WIPs but never showed a finished one the last months... No honestly, I just had no time - but now it´s here: Davy Jones, do you fear the Black Pearl? The ship is fully motorized accompanying my "Rolling" Dutchman: Motorized Features: Rolling movement caused by waves (1. L-Motor) Motorized movement for- and backward (1. L-Motor, switched manually) Motorized steering with simoultaneously rotating ship´s wheel, rudder and steering mechanism (1.S-Motor) Motorized sail trim with turning capstan and changing sail position of all square sails (2.S-Motor) All features can be controlled by rc-control via 4 channels and two receivers The battery box can slide out easily to switch on/off and change batteries EXTRA: The lower cannons can fire a broadside automatically! General Features: Two decks with cannons (one side the lower deck is closed to store the motors) The two tripple-barreld chasers can manually slide backwards and then the gun ports can be closed Handmade sails or original Lego-Sails Two functional anchors Upper cabin minifigure size (illuminated by light-brick) The ropes between the masts can be removed easily to take them apart for transport Some videos in the flickr album, showing the different fuctions: Black-Pearl at Flickr Black-Pearl Full Broadside Firing 2 There is also a video on youtube showing the ship and its functions (german): https://www.youtube.com/watch?v=35WEGDM8yYE The functions are shown at e.g. 04:55 and the shooting mechanism at 07:18. I have the ship with self-made sails fitting the style of my "Rolling" Dutchman as well: I hope you enjoy it! My dream is a video reassembling the popular footage in the maelstroom, I hope I can arrange something similar in the future... Yours, Captain Störtebricker
-
Mustang Shelby GTEX AWD (42138 MOD)
Zerobricks posted a topic in LEGO Technic, Mindstorms, Model Team and Scale Modeling
Few months ago I modified the set 42138 with one BuWizz motor for driving the rear wheels, one PU motor for steering and a BuWizz 3.0 to power the model. This MOD was really fun and all BUT, deep inside I knew I can do better, especially after being inspired by upcoming Bolide (and a bit frustrated by it's lack of AWD). So after a lot of trial and error, fiddling and trying literally all kinds of component placements, I came up with the following MOD: So you may be thinking, It's a different color, so what? It has a fancy diffusor, spoiler and a few body mods but what's different? Well... The answer hides on the underside photo: Yes, this small 1:16 model has all wheel drive with differentials! Not only that, but the rear axle allows for torque vectoring which allows me to fine tune handling, especially adjusting understeer/oversteer. The model has been assembled and tested with real bricks, I will post more media soon. AllI can say for now is that performance is excellent, there is plenty of torque to spin all 4 wheels and it can even do AWD powerslides. -
Stupid name, I know. It wasn't intended to stick, but here we are... This MOC started out as a chassis test and grew from there. I was trying to build as compact a steam based driveline as possible, similar to my Powered Up Shunter from a while back. While that was the smallest I felt I could go with a Diesel (using strictly LEGO parts and legal techniques only) this was kind of the same exercise but with a steam locomotive. Obviously I couldn't hide a battery box in the loco anywhere, so I made a tender. Not prototypical, I know, but this isn't based on anything in particular. It's fantasy for a fictional railway that doesn't really even exist outside of a couple of locos with the WFLR initials on them! That being said, here is my design process so far. Power Tank Engine MOC on Imgur. Sorry for the whole external host thing. Maybe I'll modify the post once I get time to manually resize all the images and embed them from the Imgur links. For now, the external link will have to do. Sorry! I may convert this into a proper tank engine at some point with a coal bunker on the back and a boxcar for the battery box, but I'm pretty happy with it for now.
-

[MOD] 10269 Harley Davidson Fatboy Remote Controlled
Cyrix78 posted a topic in LEGO Technic, Mindstorms, Model Team and Scale Modeling
Full RC Conversion of 10269 Harley Davidson Fatboy After many hours of trial and error, broken bits and gray hair I have finally a working Remote Controlled Harley. And it actually works wery well and are not more fragile than the orginal set. My goal was to create a slower motorbike that you can play with in your living room, so self balancing was not an option as this requires high speed to work. My bike runs on "training wheels" all the time that leans at the same time as the handlebar stears. Have tried my best to hide the electronics an keep it as close looking as possible to the orginal set. Motorized wtih Buwizz/CaDa battery to save space and Power Functions motors. Youtube Video Instructions available at Rebrickable -
[MOC] Poclain HC 300
Leviathan posted a topic in LEGO Technic, Mindstorms, Model Team and Scale Modeling
Hi everyone, Today I want to introduce to you my latest MOC : a Poclain excavator, the HC 300. Poclain is a French company (bought in 2000s by CASE) leader in 60-70s in hydraulics excavators and engines. The HC 300 was the bigger excavator in the world in 1968 ! Specifications : I wanted to control the model with a smartphone so I used Control+/Power up applications. The excavator has also manual features. I used electrical linear actuators instead of pneumatics to enhance playability. The excavator must be able to rise one track from the ground by using the bucket and his motorized arm. Inventory is mainly based on #42082. The main design is based on 8043 set. The drive train is powered by 2 L motors and a dual differential drive : more informations on @Sariel video : https://www.youtube.com/watch?v=f5_OQooBxdY. This kind of transmission allows control by only one joystick one smartphone screen instead of two sliders. Configuration : 6 motors : 5 L motors (https://www.bricklink.com/v2/catalog/catalogitem.page?P=bb0959c01#T=C) and 1 XL motor (https://www.bricklink.com/v2/catalog/catalogitem.page?P=bb0960c01#T=C&C=85) 2 electrical hubs 2 000 parts Features : - Toggling cabin with mechanical locking system - 360° turret rotation : One battery box is placed in drive train and the other one is placed on turret. No cables through the turntable, only a shaft to transmits rotation from drive train to the V12. - Technical compartments : a lot of openable elements very useful to store tools and tracks components. The grid at the back can be opened to reveal V12 engine. - The entire bodywork is removable. It is only set on the turret by gravity. The entire of the excavator is modular in order to make disassembly easier. - V12 engine works when the excavator move. I add a maximum of details to make it more realistic. - The dual differential drive : Each motor drives one kind of motion, straight-line motion or rotation. Get more information here : http://groups.csail.mit.edu/drl/courses ... ldiff.html. You can also combine motions to get curved directions. Tension on tracks is maintained by springs. Originally made by @Anto : https://www.techlug.fr/Forum/viewtopic.php?f=5&t=11548 Inspirations : https://rebrickable.com/mocs/MOC-1312/yannmar/motorized-hydraulic-excavator/#detailshttp://www.techlug.fr/Forum/viewtopic.php?f=5&t=11548http://www.techlug.fr/Forum/viewtopic.php?f=5&t=11878&p=192932&hilit=excavatrice#p192932https://www.techlug.fr/Forum/viewtopic.php?f=5&t=11343&p=185867&hilit=excavatrice#p185867https://rebrickable.com/mocs/MOC-19850/Mowlwurf/42006-full-rc-mod-undercarriage-with-transverse-subtractor/#comments Conclusion : The video will come soon ! Building instructions too ! I hope you liked this creation, I tried to mix up realistic details and common excavator's features. Only displacement is slow because of a total weight of 2kg. HD pictures here : https://flic.kr/s/aHsmVM6rX2 -
[MOD] 10279 VW Bus T2 Remote Controlled
Cyrix78 posted a topic in LEGO Technic, Mindstorms, Model Team and Scale Modeling
Lego released a new Creator veichle and as a tradition I have motorized it with remote control. A bit easier to hide all electric parts this time as the car is really big. But it is also heavy and slow with only one L motor for drive. There are some small changes to the interior, but all details are still there. I have created instructions to build it with Powered Up parts, but if there are any interest I might add instructions for other power systems later. Rebrickable Instructions Youtube Video -
[MOC] [C-Model] RJ's Johnny 5
RJ BrickBuilds posted a topic in LEGO Technic, Mindstorms, Model Team and Scale Modeling
This is an alternate build of the Lego Set 42100, Liebherr 9800. Parts list used in the MOC is listed so you can opt to just buy the required parts instead of buying set 42100.Motorized features include: Tank drive for both tracks Arms upward/downward movements Head turn Head tilt Body tilt Manual play features include: Upper and lower eye flaps can be moved to show facial expressions. Finger movements. Limited manual arm movements Here's a link to the YouTube video to showcase its movements: RJ's Johnny 5 YouTube Video If anybody is interested, building instructions are available at Rebrickable. -
Johnny 5 is on Lego Ideas
RJ BrickBuilds posted a topic in LEGO Technic, Mindstorms, Model Team and Scale Modeling
Johnny 5 needs your support to become an OFFICIAL JOHNNY 5 LEGO SET. Click the link below to support and feel free to share. - Link Removed - Who is Johnny 5? Hello, Bozos! Those who don’t know him, Johnny 5, also known as “S-A-I-N-T Prototype Number 5” or Number 5 for short, is a very lively and inquisitive military robot prototype who’s perpetually hungry for more “input”. He is the star of the 1980’s movies Short Circuit and Short Circuit 2 and a TV special called Hot Cars. He became sentient when he was luckily struck by lightning during a combat demonstration. Although he is designed to serve the military as a robot prototype, he has an adorable child-like behaviour and has a great respect for life. He is a peace-loving robot and refuses to use his military capabilities to harm others. Despite being very intelligent and inventive, his naivety and trusting nature has been taken advantaged of on several occasions. Why Make a Johnny 5 Lego Set? In Short Circuit 2, Johnny 5 set up a new business with his old friend Ben Jahrvi that builds and sells toy robots made in Johnny 5's likeness. This little robot never made it into actual production after the film. Johnny 5’s popularity and the unavailability of access to these cute little Johnny 5 robots made people clamour for this toy. To date anyone can google sites for 3D printing Johnny 5 robots and websites dedicated to producing both life-like and miniature Johnny 5’s. Johnny 5 is one of the iconic fictional robots in cinema to date. He’s part of every child who’s lived through the 80’s like me who are now AFOLs and longed for the Johnny 5 toy that never came out. Design This model is fully motorised using Powered Up motors and hub and controlled through a mobile device using the Powered UP App. It uses Technic parts to ensure stability of the structure, and System parts to capture the look and form of Johnny 5. The following are the playable features of the model: Movement – This model can move around on tank tracks and uses skid steer to change directions. Body – Johnny 5’s body can tilt using a Powered Up L motor and controlled using a mobile. Arms – Arms can be raised and lowered individually using the Powered Up App. The fingers can be adjusted manually as well as the elbows. Head – The head can be tilted and turned using the Powered Up App. Eyebrows – Eyebrows can be manually adjusted to suit the desired facial expression. Laser – The laser at the back can be raised and lowered using the Powered Up App. Total Pieces: 2,711 Dimensions: Studs: W 68.4 x L 36.1 x H 73.5 Inch: W 21.5 x L 11.4 x H 23.2 cm: W 54.7 x L 28.9 x H 58.8 Weight: 99.8 ounces or 2.83 kg -
Northern Pacific Z-6 Challenger UPGRADE for Lego Ideas
Craig Strader posted a topic in LEGO Train Tech
It has been almost if not exactly or more than a year since I created the Z-6 challenger. I originally thought I could not improve it any further, but it turns out I was wrong in more ways than one. The model you see before you is a MASSIVE upgrade compared to the one I originally made. It features new trailing truck and tender bogies which have been needed to be worked on for quite some time. Those bogies that were once on the original model were both blocky and incomplete at the same time. The trailing truck is now more gradually sloped and the tender bogies now look like they were off the prototype. I also was able to number AND letter the locomotive where it represents an MTH version of the model (The MTH version of the locomotive was the source of my inspiration to constructing this behemoth and how I became a fan of this design). If you have noticed the display track the locomotive sits on, I bet you can guess what is going to become of it. But to leave no one on a cliffhanger, I will say that it will be going to the Lego Ideas website to become an actual product. If you wish to have this model on YOUR Lego train layout, be sure to support it. I will let you all know when it appears on the Lego Ideas website when I update this topic. -

[MOD] 76139 1989 Batmobile - Motorized with all functions
recklessGlitch posted a topic in LEGO Licensed
Hey folks, another Motorization: all Functions of the 1989 Batmobile (LEGO 76139) RC controlled - yep the Batman again... Without sacrificing any of the nice details: Cockpit is still there, steering wheel works, just all motor driven and I motorized the guns and the roof and even made a tailored sbrick profile. Building instructions: Motorized LEGO 1989 Batmobile on rebrickable Driven by 2 LEGO Power Functions L-Motors (1:1 transmission) steered by a LEGO Power Functions Servo Motor guns engaged/disengaged by Motor roof opened/closed by Motor special Sbrick profile with programmig and grafics included a lot of space for up to 2 battery boxes/control hubs easily reachable under the trunk hatch (details on my rebrickable MOC page) Watch a Review of my motorized 1989 Batmobile on youtube: The Batmobile from Tim Burton's Batman 1989 with Michael Keaton is definitely one of the coolest, it's not as funky as the 1960s TV version and not as tank as the Nolan version but in my opinion it's simply a beaute! The 1989 Batmobile is using over 3,300 pieces, and over 60cm long. I added a few hundred bricks, mainly LEGO Technic and reused some others. So I ended up with over 3500 parts and (batteries included) almost 3.5 kg. That's heavy! So I needed a powerfull drive. I was thinking about the buggy motors but these are large and I wanted to put the batteries into the trunk. So i went for a pair of LEGO Power Functions L-Motors. These are some of the strongest LEGO motors and very small and efficient for their power and speed. The 1989 Batmobile is sleak and lies very deep on the road so it is geometrically impossible to move up any small hills (or even carpets). It will get stuck with its floor height of less then a brick. So it will only drive on a flat surface anyway. So it can be build for speed instead of torque power which the 1:1 transmission of the two L-Motors will do: It's a speed build, literally. One reason to put the batteries into the trunk was, to reach it easily for changing/recharging or simply switching on. Another reason was, to not put them into the beautifull cockpit with its nice self opening windshield - self opening? Yes, now it is motor driven ofcourse. And you hardly see the mechanics on the floor. Okay, the Batman minifigure included is way too small for the car but I found a Batman LEGO LED light, that fits into the car. Just be carefull when closing the cockpit to not get stuck. Slide-open is no problem. The car’s turbine exhaust by the way does not drive the machine guns anymore (it does in the original) because now a motor engages them. So I could make the jet exhaust it look like a real jet engine - the only exterior I changed. To make the two machine guns hidden, under the hood pop up, just press a button now. The Batmobile comes with nice little Bat emblems printed on the wheel rim - try not to lose them while driving, they are rare parts. The set of specially designed tyres for the front wheels is steered in a very specific geometry. I took care to keep that working the exact same way because it works very well for steering. The Build was complicated, took me weeks to get it right. I didnt want to change the exterior and as few as possible from the cockpit. You shouldnt see the opening mechanics. And I wanted to have all the features working, even the steering wheel (though steering is handled by a servo motor now) Every time I thought I got it, something else made problems, untill finally it all worked out. You can skip the trial and error (and breaking old LEGO gears) part: I made instructions and made them easily readable, so you can have it speed build in no time. I believe everyone should be able to build a LEGO set and try to make my instructions like that. Now it's hard to say, which one is the best batmobile motorization I ever made: The Lego 76139 1989 UCS Batmobile has more functions: motor driven MGs and a motor driven roof, the remote controlled motorized Lego 76023 UCS Tumbler I modded however has a full steerable front suspension for the independen wheels. my special Sbrick profile with some automated scripts is included I even made a cable layout for the power functions cables and extentions if you ended down here you may also be interested in or -

[LEGO IDEAS] Motorized pirate ship: The "Rolling" Dutchman - New 1k+ Update!
Stoertebricker posted a topic in Pirate MOCs
Ahoy, seamates! I have started my LEGO-Ideas Project 2-3 months ago and now I want to present it to the specific lego pirates community! Would be nice to get your suppport but even more I am looking for some advice what I can improve on it. SUPPORT NOW Please take a look on the ideas website or at my flickr https://flic.kr/s/aHsmMnLn6a for more fotos! Here is the text from ideas: Welcome on board of The Rolling Dutchman! Since I have been a child I always wanted to control my LEGO Red Beard Runner without pushing it around and now my dream has come true. I have build a motorized Version of the famous Flying Dutchman which is my favorite pirate ship, too. I have seen the original swedish Vasa which has given the idea for the Dutchman with its marvelous bow and stern. So I managed to combine them with my own creative ideas into this "rolling" Dutchman! Please have a look at the features in the video and the pictures! Video: Update 2: Thanks for your 1k supports so far! I have worked on the main picture a bit and now added a picture of the crew and one showing the functions as well. Update 1: New rotten Sails! (Picture 7+8+Video still with the first sails) Motorized Features: Rolling movement caused by waves (1. M-Motor) Two motorized triple-barrelled chasers in the bow (1. M-Motor) Motorized steering with simoultaneously rotating ship´s wheel, rudder and steering mechanism (S-Motor) Motorized movement for- and backward (L-Motor) Motorized sail trim with turning capstan and changing sail position of all square sails (M-Motor) All features can be controlled by rc-control via 4 channels and two receivers All features use the Power-Function System but could easily be adapted to the new Control+ System which can lead to advanced handling of the functions The battery box can slide out easily to switch on/off and change batteries General Features: Minifigures: Davy Jones, Jack Sparrow, Elizabeth, Bill Turner, Barbossa and more. (I am not familiar with the movies in english so I would like to ask you to tell me the names in the comments section!) Two decks with cannons (one side the lower deck is closed to store the motors) The two tripple-barreld chasers can manually slide backwards and then the gun ports can be closed Removable deck at the stern to take out the steering wheel Removable lower balcony´s on both sides Handmade sails Two functional anchors Upper cabin minifigure size with Jack stealing the heart (illuminated) Lower cabin with Davy Jones organ (illuminated) Two torches at the stern (illuminated) The capstan can be removed The ship is based on the sturdy hull parts, the complete 2 lower rows of bricks can be removed with the steering and driving wheels to use it as "normal" push forward ship or display model The main mast and the mizzen are both slightly tilted backwards Correct rigging and sails due to the movies The ropes between the masts can be removed easily to take them apart for transport It would be an honor to receive your support. Aye! I have to thank my friend J-H to help me with some motorization problems and a special thanks to my girlfriend for not freaking out! Thanks, yours Störtebricker from Hamburg, Germany SUPPORT NOW -
[MOD] 10295 Porsche 911 Remote Controlled
Cyrix78 posted a topic in LEGO Technic, Mindstorms, Model Team and Scale Modeling
I continue my mission to motorize the Creator Expert fleet, have already done a bunch other of them. I always try to make the motorization as inivisible as possible, you should not be able to see any electronics without looking very carefully. As the Porsche is pretty big and heavy I used ad Buwizz and a Large motor geared up 20/12 to give it the power that a Porsche deserves. If you do not need Turbo Power it could also be powered with a cheaper CaDa system. Since the PF servo is so big and bulky, i have used an M motor with a rubberband return to center function instead. Also added 2 pairs of Power Function lights, altough I am not totally happy with the front lights, but this was the best I could come up with. Because I am creating instructions for other to build this, I have not used any rare/expensive bricks and tried to reuse as many bricks as possible in new locations. It only requires about 150 extra bricks and electric parts. If there are interest, I might create Power Functions and/or Powered Up versions later. I have some ideas to hide the IR reciever and there is still space for a slightly larger battery and motor. Youtube video Rebrickable Instructions -
Proud to present my latest moc. A motorized ATTE. Instructions can be found here it can walk, steer by articulation and control the main gun rotation and elevation.
-
[MOD] Motorized Tracked Loader 42094
KirTech LAB posted a topic in LEGO Technic, Mindstorms, Model Team and Scale Modeling
Hi! I'm glad to present my motorized modification of 42094 set. It has six remote controlled functions with two S-bricks. Here is exemplary part list: And here is short review and functions demonstration: Photos in high resolution: https://www.flickr.com/photos/141718063@N06/albums/72157705982003774 Thanks for watching! -
[MOC] Airbus Eurocopter EC135 (Police helicopter)
T Lego posted a topic in LEGO Technic, Mindstorms, Model Team and Scale Modeling
Hi everyone, I would like to present my latest creation to you: A lego technic helicopter inspired by the Eurocopter EC135, in particular the police version. The eurocopter is an iconic helicopter which is widely used by police, fire and ambulance services and for executive transport worldwide. In fact I see these fly over my city almost every day The model presented here is not a very identical copy of the real machine, because I always like to be a bit free with the styling. As a matter of fact this model is in the end more of a display model than something to play with. When I started this project I aimed for a relatively small and compact package with some PF comonents inside and A goodlooking bodywork. I think I found the right ballance between panels flex axles and connectors. - Dimensions: 47x13x22 Studs -Weight: 750 g -Rotor span: 47 studs -White and Dark Azure collor scheme -easy accessible PF AAA battery box -Motorized main rotor and tail rotor powered by a PF M motor -Clutch gears for safety -Tiltable rotor blades powered by a PF M motor -Controlled using a standard PF remote controller Designing the tail (rotor) was probaly the biggest nightmare of this model. All the curved shapes and angles made it very hard to put it together. On top of that, a driven axle had to be placed inside as well. The solotion regarding the tail rotor I came up with was to use a rubber band. I tried using gears as well but it turned out too bulky and very ugly. Another challenge was the Dark Azure collor scheme. Not many parts are available in this collor so that was a huge limitation as well, but in the end it looks much better then most other collors would on this model. And at last a shot together with my Audi RS1 which, despite being built in different scales, look very nice on the shelf next to each other. Also special thanks to everyone here on the forum who helped me with the design on my WIP topic. I won't make instructions for this model, but for my current WIP I will. Comments, feedback and questions are as usual highly appreciated! -
[MOD] Lifted and motorized 42110 Land Rover Defender
Zerobricks posted a topic in LEGO Technic, Mindstorms, Model Team and Scale Modeling
Here is my take on the motorization of the 42110. Basically the whole model was lifted to accomodate the bigger wheel, motors and BuWizzes. Model is powered by a total of 8 motors, 4L motors for RWD, 2L motors for FWD, one servo and one M motor. Total gear ratio is 1:3. It uses custom portal hubs in the front which have a pivot even closer than normal ones thanks to the new rims. Rear uses normal hubs and wheels, since they are sturdier. Axles use the original suspension's upper arms as mounting points along with a pair of 9L links for each axle. The original gearbox is connected to the rear drive, so it works normally. Steering is also connected to the original links, so steerign wheel and HOG also turn when steering Winch is motorized using an M motor. Video coming soon. -

[C-MODEL] 42030 Rescue Jeep
jyd80 posted a topic in LEGO Technic, Mindstorms, Model Team and Scale Modeling
Dear all, With the arrival of the new Volvo set, I felt like rebuilding my old 42030 front loader. The problem was that I still had a MOC built, standing in the cupboard since 2016 :s So I finally built some instructions for it (available at Rebrickable), and made a short video. Here is a presentation. The C-Model is a Jeep-like car (with Volvo colors ;) ) As the A model, it is fully motorized. The L and XL motors are connected to the transmission, and the servomotor ensures the steering (with Ackermann geometry, and working steering wheel): The two driving motors are connected by a differential, which allows combining their rotations. If we note x = 220 rpm the speed of the XL motor and y = 390 rpm the speed of the L motor), we can emulate 4 gears: L forward, XL backward: V = y - x = 390 - 220 = 170 rpm, XL forward, L off: V = y = 220 rpm, L forward, XL off: V = 390 rpm, XL forward, L forward: V = 390 + 220 = 610 rpm. The differential is also connected to a V6 fake engine, and the rear axle is pendular: Finally, the M motor is used to power a crane: Here is a small video to show it in action: Hope you like it! -

A sad story about failed project - Roller Coaster
teflon posted a topic in LEGO Technic, Mindstorms, Model Team and Scale Modeling
From my young age I wanted to built some contraption that would allow me to run down cars, marbles etc. Along the way I get familiar with Lego 7 mm ribbed hoses, however they slow down the cart quite a lot and were not useful for the purpose. Then a few years later I've seen Zerobricks with his idea for the track (https://www.youtube.com/watch?v=SydmBuTPnKo). A few years later guys from Brickride (http://www.brickride.com/) created their fully functional Roller Coaster so I gave it a try. I started about two year ago and in a couple of months I had some ideas: https://www.bricksafe.com/files/teflon/roller-coaster/Roller Coaster 01.mp4 ... and the majority of track ready to go: The idea was to have a gigantic tower on one side so track would go up on one side, then do slow 180°turn an fall into the abyss with complete loop at the bottom. However the tower was not very stable so I had to change to an A configuration The new tower was about 170 cm high and reasonable stable. After some testing I had a fully functional track with one looping, a 270° + 180° horizontal turns and even track going tough the opening of the looping (sorry for lousy picture, I have no other:-/) Then I started with motorized lift. I used Brickride's idea - chain in a ditch: The propulsion at the curve at the bottom was served with side wheels with synchronized drive (matching the curve of the track with the curve of the drive was a hard task): Here is the detail, where side wheels are pushing the cart to the chain: Ant the top part also needed some clever chain tricks: At least two L motors were needed to power the thing due to its size and some friction. However, all this effort just produced very good lift but managed to mess-up my track. Like Heisenberg principle - either track was working or the lift but not both at the same time. At the time a lot of my pins started to brake and replacing them cause almost a chain reaction, since some force is needed to dismantle the track. Due to that, I even shorten the track to have as little problem with pins as possible. After months of more or less serious attacks on the issue, I realized it's just to big to work properly (with a motor). I guess my support is just not up to the task and I just have to admire Brickride's. In the mean time, we have seen the Lego answer and it's nice enough. Some more pictures of my failed project: Looping: Through the support: And panoramic view: Please note massive girder to support the track. That was my last idea out of desperation to make this track stabilized. I have failed miserably. Well, the lessons learned: Bricks are stubborn, technic ones even more so. More engineering is usually not a solution Building with bricks is not all fun and games There is no such thing as too much pins More pictures here: https://www.bricksafe.com/pages/teflon/roller-coaster -
I finally have good pictures of the demonstrator model for my take on a cheap no-modification-required switch track motor. Have a look! The key that makes this work is that the servo acts on a slider, which pushes on the little spring-loaded switch point piece, rather than forcing the lever mechanism back and forth. As such, it takes very little force to change the switch from open to closed and vice versa. I'm using two of the 1x1x1 corner panels to trap the servo horn so that it pushes the slider back and forth, while a 2x2 corner tile pushes the point piece backwards and forwards. The actual switch lever needs to be in the 'open' position to allow the point piece to move back and forth properly; otherwise, the switch will stay closed even when the servo releases the point piece. I'm using an Arduino Uno, but you could use any Arduino or compatible clone as long as you get the pins hooked up right. It's a lucky coincidence that the servo is the size it is; two of the 1x2x3 panels form a nice enclosure that keeps it from moving about too much. It's important to get the older style that don't have the reinforcing ridges on the edges, as otherwise it won't fit. I used a small piece of paper folded on itself a couple of times to keep the servo wedged in tightly. I imagine you could use some of those 1x2 bricks with the vertical groove in them to help hide the servo cabling, but I didn't bother since this is only a demonstrator. Here's a better view of the setup without the track in the way. My servos came with a pack of three differently-shaped horns to put on them - I'm using the shortest one available to me (mine was 19.5mm long with six small holes in it and was the only one with one 'arm' on it). I also have not permanently attached it with the screws that also came in the package, mainly for the purposes of testing. Lastly, here's a picture of the support structure I built up to keep everything in place. I also made an LDD file of the structure as well as the slider mechanism and servo holder so that you can build your own! http://bricksafe.com/files/Phoxtane/digital-model-files/servoswitchtrack.lxf The hard part of this built is not the mechanism, but setting up the servo as well as the Arduino controller. If anyone is interested, I can do a more in-depth post on how these servos work and how to use them, but the basics go something like this: Attach the servo to the Arduino using the diagram on this page: https://www.arduino.cc/en/Tutorial/Sweep Test your servo to make sure it's working using the example code on that page (the servo should slowly move back and forth between its endpoints) Center the servo at 90 degrees - http://www.allbot.eu/build/allbot-arduino/centering-a-servo/ - this puts the servo at a known position for use in our mechanism Place the small one-arm servo horn onto the servo spline so that it's pointing across the servo body, not away from it. This allows the servo to reach the little pocket we've built and actuate the slider. This is the tricky part; you have to play around with the Arduino code to calibrate your servo for its switch track. These servos are mass-produced as cheaply as possible, so the actual physical position of the horn at the 0 and 180 degree endpoints will vary somewhat from unit to unit. For my servo, the two positions the servo should move to for a closed and an open switch are about 83 degrees and 113 degrees, respectively. The corner tile should barely touch the point piece when open, and should keep the point piece tight against the outside track piece without the servo struggling or forcing itself out of position. I made some minor improvements to this code for my demonstrator - the servo doesn't sweep between positions, but jumps between them, so it's faster to actuate. I also have the Arduino disconnecting the servo in between movements so it doesn't 'hum' while waiting to move to the next position. General improvements to this model would include building the mechanism out of DBG and black for the servo holder, as well as tidying up the wiring to the servo. The servo horns stand out quite a bit color-wise, but since they're nylon, they could easily be dyed black to match the servo housing, and the silver-colored screws that come with the servo horns could be touched up with some paint or nail polish to turn them black as well. The only downside to this mechanism is that you can't run a train backwards through the straight part of the switch when it's closed, since the point piece can't move out of the way. Since this is already being controlled by a microcontroller, it wouldn't be difficult at all to add some sort of sensor that would open the switch when a train is approaching it from the wrong side. As for overall cost, beyond the price for the pieces needed to build this barebones mechanism (I had all of the pieces in my collection): I bought a ten-pack of these servos for $2 apiece, and if you don't already have one, a small Arduino starter kit can be found online for $25. The Arduino Uno has six analog pins, so it can potentially control up to six servos at once. If you're starting out from scratch, the total cost for six motorized switches would end up being around $37 - which is much cheaper than the ~$125 it would take to build this out of genuine Lego parts (one battery box, six M-motors, three IR receivers, three IR remotes), and it doesn't take any PF channels.
-
[WIP] Ute supercar
Zerobricks posted a topic in LEGO Technic, Mindstorms, Model Team and Scale Modeling
I decided to start a new supercar project and after lots of thinkign decided to make an ute just because nobody else made one yet AFAIK. For those who don't know what an ute is, it's when a pickup and a normal or sports car really like each other and end up having a child like this: For this project I set myself the following goals: Unibody construction - The model will have no chassis per-se, the body will be load carrying, something @nicjasno is really good at. Convertible - If you have a sports pickup, why not make it a convertible? This will also force me to make the unibody extremely solid, since there wont be any roof support. Motorized with gearbox - I am using a new high efficiency gearbox idea. Power will be delivered by 4 PF trains motors Realistic suspension - High-gearing solid axle in the back and McPherson suspnsnion in the front Here's the current progress: The gearbox has a total of 4 gears. Wave pieces are used to switch between them. Here's a more detailed view of the setup. As you can see, I used a tilted axle for the overdrive gear: Since the wave selector pieces can't cope with high torque, the gearbox is designed to work with high speed and low torque. That is why it will be powered by the fastest currently available motors - 4 PF train motors spinning at over 2000 RPM generating around 10Ncm of torque. The rear axle is an inverted portal design. It' made to be low as possible so that the bed can be placed nice and low. The axle has a total of 1:12 gear ratio in order to get useful torque from the fast spinning gearbox. Double 24 tooth gears are used in final drive because I expect the car to be quite heavy. So that's the basic idea for now. I will update the topic as I build.