Search the Community
Showing results for tags 'motor'.
Found 136 results
-
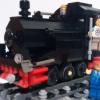
(Can't find the forum relating to PF components. Since it is about the Carousel, I guess it could be placed in the Town forum) Anyway, for the 10257 Carousel, Lego recommends the M-Motor. My M-Motor from July 2017 has already become weaker and worn out! I guess it is not robust enough. Has anyone tried the L-Motor with the set? The video shows the trouble I have.
-

faulty XL motor?
9v system posted a topic in LEGO Technic, Mindstorms, Model Team and Scale Modeling
hi all i have a XL motor from the volvo loader set which i used in the invisible lift gbc but after using it, the motor only runs in one direction now and needs a push to get it going? is there anything i can do? -

[TC13]Roadster 2
Zerobricks posted a topic in LEGO Technic, Mindstorms, Model Team and Scale Modeling
Here's my entry model for the TC13 competition: It was inspired by the real life Tesla roadster 2 both aesthetically and mechanically. The model uses 3 pullback motors in the following configuration: As you can see the rear two pullback motors power the wheel directly for best possible acceleration. BUT the front pullback motor is geared up. This additonal gearing gives the model a higher top speed and a greater range, which is a technique I have yet to see on any other pullback cars. Around 30 panels were used to give the car it's very smooth, organic shape. Notice the small yellow rubber band used to keep the front part tightly together: There is enough room in the back of the cabin to fit two or three small human beings: The rear boasts a difusor and a small spoiler in the back, just like the real thing: While this is one of my smalles models to date, I am very pleased with how it turned out. The shapes are very smooth and organic and the fact the car drives mere milimeters above ground, give it a very sporty feeling. Video coming as soon as I find enough space to run it -

Power Functions - Help with motors?
Shadow_ninja714 posted a topic in LEGO Technic, Mindstorms, Model Team and Scale Modeling
I've searched for an answer to this for a long time, and I'm hoping I can get some help here. I'm working on a Technic car that uses PF motors to be a mobile vehicle. However, I've found time and time again that the model ends up being just too slow for my liking (if anyone has owned the 4x4 Crawler set, you know what I mean by slow). I own 2 L-Motors, 5 M-Motors, 1 XL-Motor. My question is: How do I make the model have faster speed without it looking like a skeleton car, and also, does adding additional motors increase power? For example, if I gear together 4 M-Motors so that they all end up on one drive axle, is their power combined? -
So, good haul at Christmas this year for me. Among other sets, I was given 60051. While I never would have gone out to buy that set myself, now that I have it, I want to get a second one to make into three additional coaches. This would make this set 6 car-bodies including the locomotive. Have any of you done this and added a second motor? I'm wondering if it makes sense to modify the locomotive to take the second motor or run PF extension wires and have the 2nd motor at the end of the train. What are your thoughts of having one motor at the front and the other at the end so one pulls and the other pushes? What has the experience been of one motor pulling at the front and the other motor pushing at the rear? Thanks
-

[MOC] Camellia Servo Strandbeest
camellia posted a topic in LEGO Technic, Mindstorms, Model Team and Scale Modeling
Strandbeest is designed by Theodorus Gerardus Jozef who is a great Dutch artist. Today I make my droid with Strandbeest's legs. Each leg in this contraption has 11 movable rods and 2 fixed rods which form 8 joints. Camellia Servo Strandbeest droid model is controlled by CAPPUCCINO controller with ARM technology. Each body part of this droid has an individual LEGO motor to drive its moving speed, distance, time and direction. As 8 LEGO motors are used, droid's head, body, left leg, right leg, left arm, right arm, left hand and right hand are able to be controlled cooperatively! Left and right by two motors, each has 2 front and 2 rear legs. Upper body Left arm Right arm Left hand Right hand Head and eyes, One eye is a camera to record its view. Waist Back 40th LEGO Technic nameplate 1977-2007 Just make you own droid at home. Welcome to Camellia Café -
[MOC] Servo JEEP Wrangler
camellia posted a topic in LEGO Technic, Mindstorms, Model Team and Scale Modeling
Camellia Café presents a special designed SERVO JEEP model being controlled by Camellia Café Servo motor controller with ARM technology. ' This JEEP is a Full time or Part time four wheel drive car with shrink function and Servo running model. Front wheels and rear wheels are driven by two individual LEGO motors. When both motors are active, it is a full time four wheel drive car. When either is active, it is a part time four wheel drive car. The speed can be adjusted in a large range and with good accuracy via our motor controller. With an addition motor, the car body is able to shrink for easy parking, and extend to get spacious inner space. When using a mobile phone and Camellia JEEP APP, your children could control SERVO JEEP remotely. No matter turning, running back or running uphill, SERVO JEEP is mobile and powerful. In the SERVO mode, SERVO JEEP can run in a precise distance at a preset value. This plays a key role in autopilot and auto parking. The steering motor can be controlled with 5 degrees at minimum. Front differential and rear differential are used. Front wheels driven motor and rear wheels driven motor. Front wheels use double wishbone suspension. Steering system With an addition motor, the car body is able to shrink for easy parking, and extend to get spacious inner space. 40th LEGO Technic nameplate. Without car cover cloth. The car body cover. Open the front cover to see the front engine. Front engine - 6 cylinders V type. Rear engine - 2 cylinders V type. Rear of JEEP. Car lights: Daytime running light, Foglight, High beam and Red lights for break. Please enjoy Camellia Café servo motor controller and drive SERVO JEEP model. And make you own car at home. http://www.camellia.xin/models/servojeep.html -

Strange Motor Noise?
BrickWild posted a topic in LEGO Technic, Mindstorms, Model Team and Scale Modeling
Hi there, I've noticed whilst testing 'Electric Technic Motor 9V Geared 480rpm' (47154) http://peeron.com/inv/parts/47154, it was making a strange buzzing noise whilst going both clockwise and anti-clockwise. Could this mean one or more of the internal gears are failing? Thankfully, there are four thin screws on the bottom which allow the motor to be taken apart. Are replacement gears obtainable? If not, then I have to have them either 3D Printed or cast in a silicone mold. Thanks. -

[MOC] Lego Technic Motor Boat
makushima posted a topic in LEGO Technic, Mindstorms, Model Team and Scale Modeling
Lego Technic Motor Boat Lego Technic Motor Boat Lego Technic Motor Boat Lego Technic Motor Boat -
Barrier Racer! - instructions + parts list done (free)
Aventador2004 posted a topic in LEGO Technic, Mindstorms, Model Team and Scale Modeling
Hi, I noticed there are not a ton of pullbacks on this site, so here is mine: I tried to make it like a official Lego set, and color vomit. If it was a set I would include barriers like in this picture. instructions: https://bricksafe.com/pages/aventador2014/barrier-racer- -
To all LEGO train automation enthusiasts, This is a short clip of the final version of our LEGO compatible track switch motor. It has a digital servo embedded in a 3D printed housing. This is a 'plug & play' solution: the motor is strong enough that it doesn't require any modification of the switch (you don't need to open the switch and remove the notch to reduce the force needed to flip it). I also added a picture of the back side so you can see how it can fit onto a LEGO® switch. The housing is made in a custom dark bluish gray ABS filament that matches the LEGO® tracks. The motor has a 6 by 6 stud footprint and it's 2 bricks + 2 plates high. We'll be making controllers for these motors as well, so you can connect them to your PC. However, the motors are fully Arduino compatible, so you can integrate them in you own DIY control system. What do you think ? We're working on a full range of automation gadgets for LEGO trains. What other automation challenges would you like to see solved ?
-

What's The EV3 Motor Power in IR Control Mode?
StudRobotics posted a topic in LEGO Technic, Mindstorms, Model Team and Scale Modeling
Not really, but I found out that the motors in my GX EV3 peform better in IR Control mode than how they do in my program, and I believe that it is because the motor power is different. Each block in the EV3 programming software that moves the motors has a digit for how much power each motor should have. I'm wondering what this digit is in IR Control mode, because the motors act much better in this mode than how the do in the program. If anyone here knows the power of the motors when the EV3 brick is in this mode, please reply as soon as possible. It would be very appreciated. -
[HELP] Buggy Motor Price
Aventador2004 posted a topic in LEGO Technic, Mindstorms, Model Team and Scale Modeling
Sorry if this goes somewhere else, but I have a question for buggy motor owners. Do you think $100 is a good price for 2 buggy motors, a rc unit, controller, rc unit suspension, and cables, is a good price? And @mocbuild101, @Marxpek, @jam8280, and @TechnicSummse, you may have a new challenger soon... If I get the lot... -
This is an early prototype of a 12V style button to control our track switch motors. The button has all the hardware it needs to control the motors, it just needs a 5V power supply (from a brick we're still working on). It has 2 LEDs to indicate the state of the button (the LED on the left is not positioned properly in the prototype and doesn't show in the video). The LEDs are in a hollow stud so you can customize the color by adding a transparent brick. There are 4 studs in between the LEDs so you can add a tile with a label to mark the button so you know what it controls. There are power connectors on the side of the buttons, so if you connect them side by side they can power each other. We're planning on making similar button for the traffic lights, decouplers, etc. For those of you who prefer not to use a computer or want to build a control panel in bricks, is this an approach that would work for you ?
-
[MOC][RC] motor-selector with additional gearbox/output-selector
TechnicSummse posted a topic in LEGO Technic, Mindstorms, Model Team and Scale Modeling
Since i cant testdrive my newest speedracer because of the rainy weather, i decided to clean up my "in progress moc corner" and found this: A as small as possible electric doubleswitch, wich you can use, to control 2 different motors with the same RC output. You can simply select wich one you wanna use. At the same time you can use it to control a gearbox, or output-selector, as you can see in the video. The idea to invent this, was, to realise as much functions as possible in a rc-model, with a limited amount of receivers (in my case just 1 RC-unit). You can use the auxilary output of the RC-unit to control the micromotor, and thus switch between 2 different functions ( for example drive and a pneumatic compressor). The output-selector can be used, to switch for example a servormotors output between steering and pneumatic-switch. "Why so complicated, you could just use the auxilary output for the compressor" -> well... you could do that and beeing limited to the auxilary current limits (~500mA). Also you wont have the gearbox/output-selector then ;) While using this, you can power your compressor (or what ever you want) with the "unlimited" power of the RC-units buggy-motor-output. AND fine-controll it with the 3-step forward, 3-step-reverse-control. It is also possible to control this with the RC-units steering output instead of the micromotor... like that you still have the auxillary-output free for use. How it works: The trick here, is to angle the 2 switches axles by 60 degres (45 would be perfect, but this is ok ;)). But you need to try the right 60 degres angle... only 1 position works, otherwhise you will have 1 motor switched on in one position, and 2 motors beeing on in the other position. The gearbox/ output-selector in the video can be simplified a lot, this is just to show, how it could work. I am pretty sure, there are some more things you could do with it... also with regular power functions ;) -
This building was originally the Brick City Depot Winter Village - Victorian House model, while the car is inspired by Carl Greatrix's Rolls Royce Phantom Mk II, remade to look like a MOON motor car from around the mid-1920's. I removed the original house model's snow-and-sloped-plate roof, added a back half with stairs to the upper story, plus a revamped color scheme from medium blue and white to reddish brown, green, and white. Their is even a new front porch for lazy Summer days. The model is of the swing open type, complete with locking Technic pin to keep the model closed. The rear of the model features the chimney flue. The inside of the model features most of my standard details, such as a stove (which is supposed to look like it's hooked into the chimney), couch, vintage phonograph, table with lamp, curio cabinet, and twin-size bed. I have even included a grandfather clock to complete the early 1920's look. This car was originally a Rolls Royce Phantom Mark-II that got transformed into a MOON Touring car. (no, the the jalopy from the Apollo Moon missions, but a vehicle built in St. Louis, Missouri by the Moon Motor Car company) once I realized how close they were to each other in style cues. I guess I did the usual car building process backwards: build the car, then find a real life counterpart, instead pf building the car off a specific type. The rear of the car features the spare tire and license plate. This vehicle can seat one driver mini-figure. The LDD file for both car and house is available here. Comments, Questions & Complaints are always welcome!
-
Custom boom lift (pnuematic) [moc]
Aventador2004 posted a topic in LEGO Technic, Mindstorms, Model Team and Scale Modeling
Oops, @Milan can you close this topic, it double posted itself. Thanks! -

Programing 9V Elector Motors with EV3-G
Jarema posted a topic in Digital LEGO: Tools, Techniques, and Projects
What block and programing I must use, to properly handle management of 5119-1 9V Micromotor, and others ?!! -
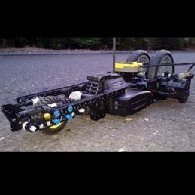
Bucket Wheel ExcEV3tor - a Mindstormified BWE (EV3)
The_Icestorm posted a topic in LEGO Technic, Mindstorms, Model Team and Scale Modeling
I created this modified Bucket Wheel Excavator some time ago, and I thought I would like to share it on this forum. After building the original BWE, I wanted to try to incorporate some Mindstorms functions into it. I managed to motorise all the active functions, using both an EV3 brick and motors, as well as some PF motors. Functions can be preprogrammed, or can be remotely controlled using an EV3 IR remote. Here is a list of the functions: Bucket wheel rotation and main conveyor belt - PF XL motor Lower conveyor belt - PF medium motor Boom arm elevation - EV3 large motor Lower conveyor swivel - EV3 large motor Superstructure rotation - EV3 medium motor Driving - EV3 medium motor Since I owned an NXT as well, I used it to motorise the small mining truck that was included in the set. There are also some LEDs that illuminate the 'work area', but they don't really do a good job, its just a nice thing to include. Here is a video of the excavator in action, as well as the mining truck (sorry about the poor resolution and bit rate): More info about the machine can be found here: https://www.us.lego.com/en-us/mindstorms/community/robot?projectid=3e125a5b-475c-4a4c-b3ed-e4b4f2192907 Let me know what you think of it in the comments! -
'ME-Models' markets metal tracks that substitute Lego's official 9-volt track, and 4D-Brix reproduces 9-volt monorail substitute parts (including track, motors, plus battery packs) as well, so why has nobody stepped up to the plate and tried to recreate/mass produce motorized 9-volt train bogies/trucks (serial number 590/70358)? A mint one currently goes for as much as 70 USD and used ones go for almost 40 USD, which is ridiculous since that's enough money to buy me food for a week.
-
Hello, I am reaching out to all 12v train users. I recently purchased and received a 12v train (the 7725). Unfortunately the motor is dead, I put it on the track after building the whole model and setting all the track up to find it not moving. At first I thought maybe if it hadn't run in awhile it would need a little help. That didn't work so I tried it by just connecting a wire to the motor itself and gently moved the wheels. The motor started to produce a light smoke so I immediately shut the power off and haven't tried anything since. I did see some life though at one point, it did move about 1/16 of a turn at best and I could hear it trying to move. If the seller is cooperative hopefully I can work something out with him. If not I was hoping many people on this forum could lead me in the right direction. Here is what I know about the motor: It looks to have been opened before. It is the version with the separate bogie pin. From what I can see there is some hair spun around the axles. I am wondering if I need to completely give up on the motor or if there is a way to fix or replace just the motor inside. I am really lost and would love any help that someone could give me. I looked for awhile but I haven't found a post about someone having the same problem as me. Even if someone has a broken lego casing for the motor but there electrics still work I could be interested in that as well. Thanks, -RailCo
-
To all LEGO train automation enthusiasts, Now that our track switch motors are out, I finally found the time to make a short clip of the first fully functional prototype of our level crossing motor. The main goal was to have a small motor specially designed level crossing barriers. We managed to pack a tiny digital servo into a brick that measures 2 studs wide, 4 studs deep and 3 brick high (16x32x28.8mm). In front, the motor has a 'square stud' to attach the barrier. In this setup I also added a prototype of our 'train traffic light' that I put on its side and added 2 red transparent 1x1 round LEGO bricks. The motor and light are controlled with our nControl software. The final motors would be printed in black, as I assume that would be the most requested color for barrier motors. Let us know what you think. This is not a final product, so all feedback/questions/suggestions are welcome!
-

Fragile wires or not
jorgeopesi posted a topic in LEGO Technic, Mindstorms, Model Team and Scale Modeling
Lately I have broken down 3 standar motors, all because of the wires, all my MOCs are very small and the place for cables is always low. How often do you break the cables?, I think that my case is normal, 4 standar motors and 1 XL broken in 7 or 8 years always using the same motors MOC after MOC It's understandable. -

LEGO compatible bricks for Arduino
Lowa posted a topic in LEGO Technic, Mindstorms, Model Team and Scale Modeling
I'm working on a range of bricks for Arduino - mechanically compatible with LEGO technic, electronically compatible with Arduino - which I plan to make available in our bricklink store early next year. Below you have a short video with a demo: a servo motor controlled by a rotation sensor, both are connected to an Arduino nano board. What do you think ? What else would be useful? Both the motor and sensor are fully LEGO compatible: Some technical details on the motor and sensor: Motor: 0-180 digital servo housing dimensions: 3 x 4 x 5 studs technic axle connection to motor 4 technic peg connectors on the front 4 technic axle connectors on the sides (2 on each side) Sensor: measures rotation with a resolution up to 1 degree variable resistor 360 rotation capabilities housing dimensions: 3 x 4 x 2 studs technic axle connection to sensor 4 technic peg connectors on the top -
Does anyone know where to find broken 9V train motors? I searched bricklink and ebay but i didn't find anything. I want to make it in to a custom PF power pickup.
(640x480).thumb.jpg.97b97cf52b621694f8ece5448230e728.jpg)