Search the Community
Showing results for tags 'moc'.
Found 5698 results
-

[WIP] Rate my axle setup
damian_kane_iv posted a topic in LEGO Technic, Mindstorms, Model Team and Scale Modeling
I'm trying to design a realistic 5-link axle for an upcoming crawler idea. I wanted to make a genuine 5-link with as much travel as possible and a differential locker. I think I have the geometry 99% there. I also plan to add pneumatic shocks to complement/dampen the coil springs. Lego's new springs were appealing and compact, but the 9.5L springs have much more travel needed for high axle articulation. Let me know what you think/how it can improve: Here you can see the coils, the shock and most of the suspension links. This is a close-up with the pneumatic cylinder removed. The axle is designed for ~1:9-1:11 sized mocs and can be fitted with either a portal axle mounts (pictured here), or traditional ungeared mounts. Here you can see the lower control arms, the panhard rod, and diff locker. Here's a picture of the underside. I based this design off of Madoca's Dacoma axle. This was originally designed to accommodate a power ball joint for a more trophy truck-like suspension, but I have converted it into a 5-link axle design and scaled it up for 1:10 models. Finally, the underside of the chassis contains the upper control arms, mounting for panhard (bottom), and the driveshaft As you can see, this was formerly a powerjoint setup and can be converted back if desired. -
-
-

[MOC] Kai's Elemental Fire Mech
Traykar the swift posted a topic in LEGO Action and Adventure Themes
Wanted to make the mech a bit more unique build-wise while also bringing in multiple elements from the Climber Mech. Also, I feel like the Elemental mechs released this year would have been way better if they had each come with an extra limb to further the mix and match gimmick. -
Hi, i built a modificated version of the Town Square set to make it look even better (In my opinion) :)
-
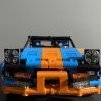
Hello Corvette and Speed Champions fans, The Chevrolet Corvette (C3) is the third generation of the Corvette sports car that was produced from 1967 until 1982 by Chevrolet for the 1968 to 1982 model years. Engines and chassis components were mostly carried over from the previous generation, but the body and interior were new. It set new sales records with 53,807 produced for the 1979 model year. Building instructions are available on the following link: https://rebrickable.com/mocs/MOC-176144/_TLG_/corvette-c3-stingray It is a studless build in the new, 8 studs wide Speed Champions style. I wanted to create a clean model which is as accurate as possible in this small scale. I prefer the brick built solutions to keep the flexibility of the used parts in further builds, and therefore only two vehicle registration plate stickers are used. My intent was to keep the width-length-height ratio of the real car and this size makes it possible. The model contains lots of details: for example the front bumper, the emblematic side grills, the side view mirrors, the embedded tail lights, the fuel cap etc... I tried to fill every unnecessary gaps and therefore some tricky build techniques are used. The instructions includes some modification ideas, for example front blinker and alternate side grill, see picture 6, and luggage rack, see picture 5. The model has space for two minifigures with helmets or small hairs. Thanks for visiting, _TLG_ Corvette C3 - instructions 01 by László Torma, on Flickr Corvette C3 - instructions 02 by László Torma, on Flickr Corvette C3 - instructions 03 by László Torma, on Flickr Corvette C3 - instructions 04 by László Torma, on Flickr Corvette C3 - instructions 05 by László Torma, on Flickr Corvette C3 - instructions 06 by László Torma, on Flickr Corvette C3 - instructions 07 by László Torma, on Flickr Corvette C3 - instructions 08 by László Torma, on Flickr Corvette C3 - instructions 09 by László Torma, on Flickr Corvette C3 - instructions 10 by László Torma, on Flickr Corvette C3 - instructions 11 by László Torma, on Flickr
-
 I'm planning to build a series of tractor mocs and here is the 5th of them: Massey Ferguson 7480 Index: Massey Ferguson 7480 CLAAS Axion 900 CLAAS Axion Terra Trac New Holland T7 HD Steyr Terrus #1 CLAAS Axion 900 Features: Pivoted solid front axle HOG steering Adjustable front hitch Adjustable rear hitch Rear PTO connected directly with rear differential Modular design: chassis, rear hitch, cabin are built separately So no front PTO nor 4 wheel drive due to its small size, sorry guys... Instructions are at: https://rebrickable.com/mocs/MOC-129921/ Video introduction: Some comparison photos with a Siku model: A little closer look at it: Exploded view: Hope you like it! Thanks for watching.
 -

[MOC][VIDEO] Jurassic Park - 30th anniversary - animation 4 (of 5)
Kalais posted a topic in LEGO Licensed
This is the fourth animation in the series. My favorite. Mainly because of the rain, which I animated for the first time, as well as the general atmosphere and the story loosely referring to a famous scene from a movie. Read more » Full story on my LEGO blog: [VIDEO] Jurassic Park - 30th anniversary - animation 4 (of 5) -
After buying Eldorado Fortress, and not having bought Barracuda Bay when it came out, my brother and I thought about making a pirate build to go up against Eldorado Fortress. After looking at the classic pirates hideouts and forts, we decided upon Rock Island Refuge. So we bought the Redbeard and crewmates from Barracuda Bay off of bricklink, and started building. Similar to Eldorado fortress, Rock island refuge can take its classic form or turn into an elongated shape, perfect for displaying. The fortress has a full interior including a kitchen, desk for Redbeard/mapping area, a treasure stash hidden under a trapdoor, an armory, sleeping quarters and a prison cell, which can be broken open using a lever. Outside there is also multiple docks with a cannon, a crane, two ratlines on the sides and two rope bridges. There are also 2 watercrafts, a raft and a small bluecoat rowboat Overall, we love the final product, and hope you do too
-
Hi everyone! I present to you the third module of the Medieval Village. Hidden in the forest among large trees with dark trunks, surrounded by vegetation, in perfect symbiosis with nature... there is an outpost, a stronghold where the Forestmen live! These famous archers, children of the forest, live hidden among their trees. Through ingenious secret passages they can reach the village to be able to fight enemy factions and grab gold to survive. This new module connects to the previous one (#2 medieval bridge and water mill) and represents an important presence in the Medieval Village that is gradually emerging. The module is composed of 4 trees typical of forestmen with black trunks. A large waterfall is the protagonist of the scenario which gives life to the stream already seen in the previous module. Next to the waterfall there is a tree with a special branch... if activated it opens a secret door in the rock that allows the Forestmen to reach their outpost through a tunnel carved into the rock that runs along the back of the waterfall. The Forestmen's stronghold consists of a ground floor with a main room with a fireplace, an armory and a wardrobe that can be opened revealing the secret passage to the tunnel. On the first floor we find a dormitory room and another room where the forestmen eat. Above we find a turret used to spot enemies from afar and where a powerful crossbow makes its presence to shoot arrows far away. With a non-LEGO rubber band the crossbow actually works! A further lever behind the base allows you to move two Forestmen children playing among the reeds. There are also Easter eggs. The base is made up of 5,800 pieces, the outpost alone is made up of around 1800 parts. The three floors of the outpost are separable to better observe the internal details. You can view all the detailed photographs of the moc in this Flickr Gallery: https://www.flickr.com/photos/sdrnet/albums/72177720315170655/ I hope you enjoy my latest work and stay tuned for module #4! Sandro, SDRnet Questions and comments are welcome!
-

Lego Mini Jeep Wrangler 1:15 MOC
dpi2000 posted a topic in LEGO Technic, Mindstorms, Model Team and Scale Modeling
Mini Truck Model 8, Jeep Wrangler 1:15.No play Lego in over half a year, now 'Jeep' coming...At the same time,I would pay respects to Madoca.L motor +new wheel hubs, BuWizz normal.Infomations:L28xW14.5xH15cm, Weight: 970G,Still, simple and good playability, like RC, like real Jeep. instructions for free: https://rebrickable.com/mocs/MOC-79593/dpi2000/lego-mini-truck-wrangler-115-moc/#detailsThanks, again! Trial video This chassis part was built last year. -
Hello everyone, The latest modular inspired me to make my own hotel with a theme a little closer to home, a Victorian era hotel. Some typical elements of the period I have included and some newer ones too. Arched windows, red brick, steep roofs and more. Anyway a couple of shots are shown below, as always any comments are welcome and any questions I'll try to answer! You can also view them on my flickr page here: https://www.flickr.com/photos/52656812@N04/
-
https://www.bricklink.com/v3/studio/design.page?idModel=523436
-

[MOC] 1:48 Pennsylvania Railroad T1 4-4-4-4 Duplex v4 (Power Functions)
Commander Wolf posted a topic in LEGO Train Tech
Hello all, almost ten years ago I posted the first version of my 1:48 scale T1. This was one of my earliest scale models and it was perhaps not that great and/or perhaps limited by the parts of the era. The model underwent many changes over the years, but at least from an aesthetic standpoint it fundamentally stayed the same. Having designed, built, and operated a ton more trains since then, I finally decided to do a complete rebuild of the T1, and this latest version shares practically nothing with the earlier versions save for the overall profile. Most significantly I moved the drivetrain from the tender to the locomotive, after testing a similar setup in my PRR Q2 (behind). This is a much simpler and more performant setup, and unlike the Q2, the T1 has coupled bogies and can navigate R40 geometry. It it also still an almost entirely purist build save for the BBB #11 and #5 wheels. Anyways, see the video for more details and running shots, and have a nice day! -
 This house was digitally built in 2018, really built in 2019, then languished in a WIP state for several years before being finished last month. Enjoy the pictures - this model has been a long rough ride since the beginning, but it was worth it! I was inspired to create this model from the 2018 Jurassic World set 75930, Indoraptor Rampage at Lockwood Estate, with some design cues from set 10228, Haunted House. The dollhouse-style model was built from the set pictures, with the play features removed and opening rear sections added to match the front half. The house folds apart, doll house style, with the rear section opening in quarters up to 90 degrees. (Technic pins hold the model shut for transport and ease of handling) The modular building compatible base is able to be removed from the building to facilitate access to the inside details. The rear of the mansion features a back door (perfect for escapes when the locals get feisty about the scientist playing god again!) and the chimney flue. Moving inside, The bottom floor features the living room and dining rooms, while the second floor is the bedroom, study and pipe organ rooms. The third floor features the laboratory for the study of time travel. The rear door to the outside is in the right rear section, while the safe containing the house's title and family paper work is directly above on the second level. This area also has stairs from first to second floors and what appears to be Frankenstein's monster on the third floor's operating table! The left rear quarter features the fireplace and telephone on the first floor and a bed for the second floor's master bedroom. The stairs to the third floor are also on this side. It seems the time stone from the Marvel Universe is also here... I wonder what the Doctor plans on doing with it? I built the roadster model by heavily stretching set 40532 - Vintage Taxi by about seven studs. This allowed for me to add in mechanical details. I added a covered spare tire at the rear of the car, and blacked out the back windscreen to give the impression of a fabric convertible top. As an added bonus, the car still seats two figures with room in the trunk for luggage. (Any and all resemblance in the mad doctor to moderators, living, dead, or otherwise, is totally coincidental. It is totally not @Professor Thaum in his younger years. ) The rear of the MOC. Inside view of the car, with seating for two and room for baggage. ...and that's all I've got. Thoughts, comments, complaints and suggestions welcome!
 -
After a busy last year I finally finished my Lego Lathe. I have a WIP folder sowing most of the changes through the year when I had time to build. I had wanted to do a machinist lathe, but not a huge build like the few videos I had found. So at this scale I was able to fit lots of functions into the build and still be strong. It has: 8 total speeds for the chuck 2 speed for the auto feed, plus forward, reverse, and neutral Moving and lock tail stock Can engage the apron (tool holder part) with 2 speeds or neutral Uses a wrench with a flat end as the cutting tool with the flat part I have made free instructions available here! More pictures here. Please enjoy!
-
It is a beautiful day. The shepherd just sat quietly by the flock. The sentinels on the wall peer across the fields, nothing to be seen. In the city, life goes on quietly. What a lovely, peaceful day. Inside the walls, life also goes its course. The worst thing that happens is that the little boy trips when he wants to run to his father who is working in the garden. The guards can enjoy it, but fortunately, his mother arrives just then. The other cottage belongs to a somewhat eccentric figure. Not unfriendly, but withdrawn, mysterious. Its signboard is also a mystery; there is nothing on it. But, oh, what a lovely, peaceful day it is! Or...
-
Hi all, I'm happy to present you my Airwolf 1:25 scale model ! I started this project in 2013, inspired by Lego's 9396 Technic Rescue Helicopter. Seeing its front end, I thought "at last ! It must now be possible to make a convincing Airwolf model out of Lego !". I used Technic panels to get the aerodynamic shape properly, and have had good fun since then improving the model with new parts (the curved slopes for the exhaust for example). The model is based on the Universal Studios blueprints. It accepts 3 minifigs inside - Stringfellow Hawke, Dominic Santini and Caitlin O'Shanessy. Weapons can be displayed in or out, like the landing gear - I considered making those articulated, but at this scale I just could not figure out how to do this so these are add-ons parts. At the time I wished Lego would accept it in their Ideas project, but I got a reply that "being a military vehicle, Airwolf would not be allowed Lego support". I was quite gutted and just kept it for myself. Anyway, I'm happy to share it now ! After completing my Airwolf model, I felt I needed to make a full set of toys to make it more playable. The Bell 206s are based on the factory blueprints - also at 1:25 scale - and my first version of the Jeep was loosely based on Zed's MOC Jeep Wrangler Rubicon. Since 2013 it has evolved quite a bit, though ! Also, it was good fun reproducing Archangel's limousine FIRM 1 ! As a Cadillac Seville owner in the eighties, it was nice trying to get the lines of this Fleetwood Brougham limo properly. I wish Lego would make studless wings for the front end, though !!! You will note that I could not resist creating minifigures for Archangel and his lovely bodyguards ! You might even recognise Marella and Gabrielle ;) I still feel compelled to show my models with Ukraine colours as the war is raging on. It must stop ! I remember watching Airwolf episodes where the Russians (the usual villains, the Cold War was still on) were pictured as normal people just wanting freedom and democracy. I hope this is still true ! You can see more pics Flickr album of course : I wish I could make nicer renderings, as the photos are far from perfect. But I still can't manage chrome and transparency properly with Blender. Talk about a learning curve... Anyway, I hope you will enjoy the pics !
-

DMC-12 Back to the Future
Ryokeen posted a topic in LEGO Technic, Mindstorms, Model Team and Scale Modeling
Hello everyone, As i'm kinda done with the exterior, cable management and stuck with the interior progress i'll just show what i got after around 4 months of work. I admit i took some inspiration from a moc on rebrickable from Mr.Platinum. I bought his instructions and asked if i could use some smaller parts like the idea how he did the back light so that's fine. It all started when i was a kid, watching that movie, loving the car and having lego :D and now that i'm older, the parts exists and i have the money i thought, yea let's build a DMC time machine. After gathering reference material and starting on a digital model my goals where set. Make it rc 4 speed gearbox Some light effects realistic interior Gullwing doors Hiding the electronic components Steering wheel should turn Possible leave it without motors as a display model So far i've more or less hit all my goals. Functional satisfied, aesthetically...to many cables. Since i wanted to maybe drive it a bit: Gearbox and lighting is remote controlled Lighting has 4 modes, off, only head/backlights, BTTF lights and both on. Ackermann steering geometry Independent suspension front and read The rc components components are similar to my tropy truck, but here i use a 540 80t brushed motor and 2 geek servos. One for steering, one for the gearbox. Full bircksafe gallery: DMC-12 First i started with building a normal stock DMC-12 so see if everything will fit and to make sure the base body looks good. Also i wasn't sure how to do the planned light effects back then. I tried to somehow mimic the layout of the original car and managed to place the motor above the rear axle. Sadly because gearboxes with lego parts are kinda clumsy i had to place that somewhere else. I thought about a few gearboxes but then just went for a linear layout hidden in the area between the seats. That also gave me space behind the seats to hide the esc, cables and the receiver. Also it served well as a reinforcement for the whole chassis as cars with gullwing doors have a problem to use the roof for stability, at least lego build ones. The real challenge started with the bodywork, especially the hood area, the doors, and the side area around the doors. I first tried to use panels but i didn't like how they were curved and the angles they gave me, also the bigger light blueish grey panels are quite expensive. So i made a rather complex structure to mimic the curvature from top to bottom and the front/back steep angles of the doors. From the shape itself i'm satisfied even though it's not as watertight as some other areas and resulted in quite heavy doors. That's also the reason why they lack a inner covering. But the gullwing doors are stable and with the help of some old lego dampeners(the transparent ones) they stay close and open smooth. The dampeners are placed left and right behind the back wheel arches. Making a time machine out of a Delorean Apart from all the sifi stuff in the back portion of the car a truly important feature, at least for me, was a lit flux capacitor and the blue light around the car during a time jump. The interior is still not fully finished, since i can't decide whether to go more in a modelling direction or just vaguely hint stuff. Flux Capacitor As i could not 3D print anything it was quite a challenge to make one that looks good enough and is actually lit. EL-Wires where one candidate but for that i would have needed a seperate inverter and those are not small nor quiet. So i went for optical fibres, similar to the old lego ones, some drilled holes and some glue. The fibres used are 1.5mm thick. Also i tried to make it like i saw it in the movie, a box with the recognisable Y shape stuff in it, shielded by glass. For the bluer parts of the lighting, when a timetravel happens, i use 3mm thick fibres which again fit nicly through pins so i could secure them well. The good thing for 3rd party parts here is, i could order them in 2m size so i didn't have to use put 2 24l lego fibres end to end and hope the light will transmitt well. 3rd party optical fibres are also way cheaper. I would like to have some cover to simulate the metal nature of those double lines, but no chance except i would 3D print or use modelling plastic sheets. But the cables for the led added to the realistic look as i could mount them where the original car had cables aswell. And of course the needed headlights for some night time driving. Simple 5mm leds fitted into pinholes. So far it was nice to combine all those techs to create something i wanted to build since i was a kid. And even if i need some of the metal parts or the servos and motors, i think i'll just keep it as a display model with lights Feel free to ask questions and have a great day. -

Jorgeopesi´s WIPs and sometimes even MOCs
jorgeopesi posted a topic in LEGO Technic, Mindstorms, Model Team and Scale Modeling
I decided to do this thread because I am tired to open new ones again and again, so enough speaking about me lets go for the almost MOCs. It seems that we are on dumpers time because I am working on this massive small truck. It will be very simple, only 2 axles steering and bed tipping but I had some problems... the angle and weigh of the bed due the lack of room when the steering work, bed itself also was a problem with technic parts and the scheme color will be a imposible to solve problem at least for the real MOC. I think I do not have to say which the truck is. -
(Afoland Castle Game. Meronia) After the end of the war, the question arose about the need to build guard posts along the border of the kingdom. One of them was the North Tower, which is located near the village of Kvynn. Its garrison consists of a dozen soldiers under the command of the always grumpy Sir Norman. While Sir Norman scolds the warriors for the chaos, Vigmar cannot contain his joy when the supply wagon arrives. And there will definitely be a bottle or two of Ormston wine in it! Technique:
-
Hello to community, below a small digital MOD / MOC, a redesign of the classic pirates set 6267 Lagoon Lock-Up from 1991. I'm also a bit in the barracuda bay hype, while waiting for the set I played a bit around with the pirates theme and also photoshop. ;-) Maybe you like the redesign. 6267 Lagoon Lock-Up Revisited by legolux1973, on Flickr Edit: I also created building instructions for the MOC, you can download them (PDF File, for free, no registration) at the Webpage of my local RLUG under the below URL: http://afol.lu/afol52/filebase/index.php?file/51-6267-lagoon-lock-up-revisited/ If you like the MOC and/or the Instructions I would be really happy if you would vote for my LEGO Ideas Project Queen Elizabeth II at the LEGO Ideas Website: https://bit.ly/legoqueenelizabeth I would really appreciate. :-) Happy Building. :-) Stay safe and healthy, legolux1973
-
I've always thought the concept of Batman keeping memorabilia from past adventures on display in the Batcave interesting - maybe because I like collecting things too. Is it out of character for the Caped Crusader to showcase artifacts from his personal victories over deviant criminals? I suppose it depends on your iteration of the character. In any case, it's always fun to see the Batcave trophies show up in various comics and media. The most renowned trophies, the giant penny and mechanical dinosaur, are ultimately recurring Easter eggs from Batman comics of decades past. In this MOC, I went for a small, simplistic take on the Batcave's most famous trophies, plus some lesser-known additions that I found interesting (or that translated best into Lego). Most of the ones I chose are reference to specific ones from the comics, namely the mechanical dinosaur, the giant wheat penny, the giant joker playing card, Deathstroke's sword, Two-Face's original coin, and the Mad Monk's hood (plus references to the Penguin and Scarecrow). As a bonus, I snuck in my own take on the Whirly-Bat, which uses an inverted arch to make up the helicopter's body. I love how Lego incorporated this goofy Bat-vehicle in Lego Batman 2 and in an official set since then. I've tweaked this MOC a lot over the years and finally decided to share it. Please share your thoughts below!
-
This MOD upgrades your 75331 Razor Crest as below: - add a toilet next to the sleeping room - removable front landing gear - retractable rear landing gears (they're strong as the original) - add a display stand (229 parts) - tidy up the front panel - add more details to the laser cannons - entirely flip the boarding ramps - enlarge the rear entrance so that blurrg can walk through it - fill gaps and holes around the body and engines 419 extra parts are needed. Instruction is available at https://rebrickable.com/mocs/MOC-131686/ Enjoy and have fun!
-
Here’s a love letter to one of my favorite ships of the Age: the absolutely terrific Téméraire-class 3rd rates by Jacques Noël-Sané. Without doubt this is my main inspiration for L’Anubis - god of the Underworld. The main obstacle for building larger ships in theme-scale is obviously the age old question: to prefab hull or not? Building the lower hull to Fer Maiden that mates up w/ the prefabs taught me a few ways to do a brickbuilt hull that can at least live in the same universe as them. That gave me the confidence to try this. I then used Fer Maiden’s dimensions to get a theme-scale equation and have my 3rd rate at 70x18 studs along her gun deck. Total width at her waterline is slightly more due to the SNOT curved slopes. Anyway, enough of that - I know you want the goods. This is still very much a work in progress with some gaps and test techniques so bear with me! I feel like you guys enjoy seeing a bit more of the process. This project has been progressing super quickly thus far (surprisingly) but I will really need to build her in real life and the instructions are going to take a massive effort.