Search the Community
Showing results for tags 'mindstorms'.
Found 225 results
-
Hello everybody, I am finished with my entry but I did not have time yet to post any WIP content. Nevertheless I took some pictures during building, so I can show you my design process now: The CRAB - ROV - Camouflage Robot for Arctic Biotopes - Remote Operated Vehicle The idea was to build a sideways walking robot with an appearance like a crab. The leg kinematic is based on the Klann linkage: https://en.wikipedia.org/wiki/Klann_linkage This kinematic is actually used in some underwater walking robots right now, so I thought it to be reasonable to use it in some arctic vehicle. At first I created a test vehicle with 8 legs: Crab robot WIP 2 by n8walker23, auf Flickr Crab robot WIP 1 by n8walker23, auf Flickr This proof of concept went fine, the legs can easily move, rotate and lift the vehicle. The gearing down of the drive motors is not even necessary. The next task was to shrink that mechanism, as a smaller vehicle would be even more efficient at moving as fast as possible without straining the linkage or overloading the motors. A kinematic for the claws had to be designed as well. My layout would be: one motor for back four legs, one motor for front four legs, and one motor for each claw. So this was the next stage: Crab robot WIP 3 by n8walker23, auf Flickr Crab robot WIP 4 by n8walker23, auf Flickr The motion of the sensors (the eyes) is coupled to the motion of the claws and it has some simple bodywork. The eye motion can cover an area of roughly 45 degrees. This design was followed by the next optimization loop: Crab robot WIP 5 by n8walker23, auf Flickr Crab robot WIP 6 by n8walker23, auf Flickr I am quite happy with the bodywork at this stage. The rear propellers are driven simultaneous with the rear legs and the front legs are connected to a two-cylinder fake engine. The weight of the robot was 787g. Roughly 350g of that are the electronic parts. Now it was time to streamline the construction, decrease part count and weight and improve building quality. At the next iterations the robot would be modular. This made it much easier to apply little modifications, as it is not necessary any more to disassemble everything all the time to get access to critical regions. Also, I replaced the fake engine by a fan, as i found a combustion engine not really fitting to the concept. Crab robot WIP 7 by n8walker23, auf Flickr Crab robot WIP 8 by n8walker23, auf Flickr Crab robot WIP 9 by n8walker23, auf Flickr Crab robot WIP 10 by n8walker23, auf Flickr This is the final stage of the robot. Weight is reduced to 738g. Now I need to do some programming to have a nice remote control and to get good pictures and maybe a video as well. Regarding the colour scheme, I tried some variants, but some choices are already set by the colours of the mindstorms parts: Crab robot WIP 11 by n8walker23, auf Flickr I think (e) is looking the cleanest, so this scheme is applied right now. Most fitting to the contest would be (d) i guess, with mostly white and yellow. But I think it is a good idea to use the turquoise of the mindstorms box somewhere else in the model so the box does not stand out too much. This leads to a solution like (b), but I think, that is too colorful. What are your thoughts on that?
-
(1).thumb.png.b4d6c907fe73903aec1adfd3cd481a19.png)
First? linear actuator engine I4
glowytheglowbug posted a topic in LEGO Technic, Mindstorms, Model Team and Scale Modeling
uses spike for programming and there are 2 versions using small and medium linear actuators, the code isnt perfect though and the small one skips easily, getting carbon axles for better accuracy when retracting and expanding the actuators so i dont get a big explosion of actuators and twisted axles again one medium actuator suffered :( planning to get some metal uni joints for turning this into some crawler beast -
Back in 1994, Bullfrog Productions created the video game Theme Park. Since 2016 I have been working on recreating the game... using LEGO. It has now been 6 years, and I am not yet done, so what is taking so long? Well. I want the visitors to try out the rides when possible - not just stay inside of a single ride. Rather than continuing posting a new thread for each module, I will use this thread for all the content regarding this project. This first post will contain an index of presentations, and will be updated as new rides and other content is finished. Presentations of Rides Bouncy Castle in separate topic Plane Flyer in separate topic Merry-Go-Round in post #5 Observation Tower in post #5 Big Wheel in post #5 Space Shuttle in separate topic Haunted House in post #7 Parasol Chairs in post #7 Roller Coaster in separate topic Shops Mr Walley Ices in separate topic Duck Shoot in separate topic Big Time Fries in post #5 Coconut Shy in post #5 Coffee Shop in post #5 Pokey Cola in post #5 Race Track in post #9 Balloon World in post #13 Saloon in post #16 Features All, but the Fountain in this post: Outhouse Boggy Crapper Super Toilet Apple Tree Birch Tree Castle Wall Lake Lamps Oak Tree Orange Tree Palm Tree Private Hedge Rose Bush Spooky Tree Tree Stump Fence Tropical Bush Weeping Tree White Fence Fountain in separate topic
-

Signed Set Boxes
Unbrickme posted a topic in LEGO Technic, Mindstorms, Model Team and Scale Modeling
This set was signed by the LEGO Mindstorms team. I also got a special letter from them. -
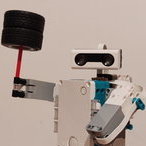
My OFFICIAL LEGO Mindstorms Neptunian Robot
Unbrickme posted a topic in LEGO Technic, Mindstorms, Model Team and Scale Modeling
Please let me know your honest opinions about my OFFICIAL robot Neptunian. I would love to hear some criticisms so that I can improve in the future. You can find it in the LEGO Mindstorms robot inventor app if you wanna learn more about it, but i will summarize its functions here. Basically it has two modes. In the first mode, it spins around randomly until it finds the target. then it will open its head and fire. In the second mode Neptunian enters the obstacle avoidance mode, where the robot avoids obstacles like walls normally. However, once it sees an unexpected obstacle, such as if you place your hand suddenly in front of the sensor, it will open its head and fire Here is my video of my robot Neptunian. It has even been featured by Sariel's Bricks & Pets in his review of the mindstorms set: -
[Mindstorms] Need help reparing or replacing MicroScout silicone buttons
ZeldaTheSwordsman posted a topic in LEGO Technic, Mindstorms, Model Team and Scale Modeling
The silicone buttons piece on my MicroScout from 9478 Droid Developer Kit has suffered tearing on two of the buttons, making it so pushing them takes poking a toothpick or similar inside. Does anyone have advice on repairing the piece, or where I might get a replacement? I tried calling Lego, no luck there. -
Tank base with 3DOF crane arm on top is done
glowytheglowbug posted a topic in LEGO Technic, Mindstorms, Model Team and Scale Modeling
im finally done with my tank moc! i hope you like it if possible like and share it on insta & facebook (links below) it comes with a detachable trailer and a 3DOF arm thanks @thealvacado for the arm I've improved the bracing of the 8 tooth to the 40 tooth gears as they were constantly popping out also changed positioning of some things there is a 4 pin connector on the end so that its much easier to change the attachment on the end I hope you like it :) spent quite a while making this https://www.instagram.com/p/CdnoQmspEut/?utm_source=ig_web_button_share_sheet https://www.facebook.com/544771685/posts/pfbid032Jr1QQfEXsTZbEqxBUDAR7LWMGfGzE9wpor93kkCivLbZfqt3ujtvHVqyUvEDkpzl/?d=n https://youtu.be/5j2kXYvjlAM https://youtube.com/shorts/PzlFRePGSP4?feature=share https://youtu.be/X7KmZLrbvlw https://flic.kr/s/aHBqjzQeX3 -

SOLD. Lego Mindstorms sets 31313 and Technic sets
HectorMB posted a topic in Buy, Sell, Trade and Finds
All sets were sold -

[MINDSTORMS] LEGO Mindstorms and Fischertechnik
fotoopa posted a topic in LEGO Technic, Mindstorms, Model Team and Scale Modeling
Connection Lego and Fischertechnik. By combining both systems we can enjoy their advantages. The data and command exchange occurs on 2 levels. There is a serial duplex connection via the hubE and the DE0-Nano_Soc board. On the other hand, the data lines of the other hubs are also read by the board. The latter can thereby process data in real time and without interaction of the running software. This data can mainly be used by the TXT Controller to display the results on the PC screen. Motor speed, position, sensor color information, distance information and pressure can all be read out. From the Lego side there is no need to write a program. The DE0 board simply listens in real time. The DE0 board responds very quickly ( only a few usec). The connection is via 115200 baud but can be much faster if needed. I now need to work out some protocols to build a large application. Lego-Fischertechnik by Frans, on Flickr With the DE0 board, I have up to 120 inputs available. I can now use those to send to the lego hub and process them there. Commands can also be sent from the lego hub to the DE0 board and so on to the FT Controller. The possibilities are immense. I hope to present a larger project a little later. On the Fischertechnik side, I have a lot of outputs. Now I can already connect 16 motors, 16 servos, various digital outputs, etc. Frans -

Help needed with simple rc program for 51515
whitepen posted a topic in LEGO Technic, Mindstorms, Model Team and Scale Modeling
So I was working on a simple rc program on my computer today with my new 51515 set and was trying to make it rc using the keyboard (up arrow=forward down arrow=reverse left arrow=left right arrow=right) But it is hard because there is no "when no key pressed" block to my knowledge. The robot I am using is THIS. Any help would be greatly appreciated. -
RI5 Biped with 5 control+ motors
CheungsLegoCreation posted a topic in LEGO Technic, Mindstorms, Model Team and Scale Modeling
Hi all, Just want to share with you a RI5 creation that I have been working on for a few weeks. It is a biped robot built with 5 control+ motor and the Robot Inventor hub. https://www.youtube.com/watch?v=qfAfLVE8jtw The next step is to build the same bot using Control+ and hopefully by the time the build is done I will be able to program it using the new PoweredUp App. Enjoy! -
RI5 Air Hockey
CheungsLegoCreation posted a topic in LEGO Technic, Mindstorms, Model Team and Scale Modeling
Hi all, My first post here. Just in case anyone wants to have a game of air hockey with their brick you can find a demo and build instruction at the following link. Have fun and looking forward to your feedback (build instruction and code is at the end of the video). /CheungsLegoCreation -

Odd NXT Servo Behavior
pdmarsh posted a topic in LEGO Technic, Mindstorms, Model Team and Scale Modeling
One of my NXT servos is exhibiting some odd behavior. I had to replace a servo for a different reason and this might be the replacement, but I'm not entirely sure as I didn't mark it as such. In any case, I'm curious if anyone else has seen this and knows the cause. With two servos that act as expected, I can place a single Move block in the program and use any of the duration settings and both servos will run and stop when programmed or run continuously if "Unlimited" is selected. However, when one servo is replaced with the misbehaving one, regardless of the duration setting, the latter servo will run continuously and the good servo will twitch as if it's about to run, but stops immediately. I have to end the program to get the "bad" servo to stop. If I place the Move block inside a Loop set to "Forever," the above behavior will be identical except for one scenario. If I set the Move block duration to "Unlimited," both servos will run and can be controlled by the Loop's "Control" setting, i.e. they will either run continuously or run and stop as set by the loop control setting. Simply using individual "Motor" blocks to control the servos does not solve the problem. There are good and bad programming scenarios with those as well with regard to the bad servo. The best guess I can come up with is that the bad servo is either not sending or not receiving a feedback signal, maybe both. I did wonder, though, if these servos have any firmware in them that might behave differently depending on when they were made. This isn't a fatal flaw as I can use the servo, but I am curious what might be going on. Thanks, Paul -

Can I finally program power functions?
AI toothbrush posted a topic in LEGO Technic, Mindstorms, Model Team and Scale Modeling
So I bought an rcx 2.0 and have some power functions extension cables that can also convert between PF and 9v. If I would connect PF to an rcx would it work? -

Mindstorms EV3+ Power Functions
Newest_Tech320 posted a topic in LEGO Technic, Mindstorms, Model Team and Scale Modeling
Does anyone know of an app or application that works with the old ev3 Mindstorms and technic power functions? -

Controlling the Rough Terrain Crane
Skookumjim posted a topic in LEGO Technic, Mindstorms, Model Team and Scale Modeling
I have for a while wondered about using robotic components to automate/control the Lego Rough Terrain Crane ... this has now happened using the Mindstorms Robot Inventor hub with 5 medium stepper motors and a distance sensor ....while keeping the original power functions large motor to avoid further destruction of the original model. One motor switches turntable rotation, another switches the drive from turntable to jib while a third switches power to the original motor. Two further motors switch the six way gear selector for hook and jib. the distance sensor is used to limit turntable rotation to accommodate the relatively short cable lengths. The resulting construction works well.... the crane can both remote controlled and programmed. https://www.dropbox.com/sh/82vqyjvd2zledp0/AAA736uPmlzo9hL-sIWdGS8la?dl=0 -
Using Spike Prime acceleration data
Skookumjim posted a topic in LEGO Technic, Mindstorms, Model Team and Scale Modeling
A small project has been to try to use the Spike Prime acceleration data and Newton’s Laws of Motion to calculate distance moved by a vehicle. The upshot of working through this has been: . that the Lego documentation is woefully lacking. ..it is not at all clear what the units are although given the the z acceleration is of the order of 989 I imagine that to be gravity in cm/s/s. . even though the hub is at rest it reports small accelerations on x and y. . applying the code ... integrating acceleration over time... the results are inconsistent even at standstill.... more so under movement. It is possible that there is a coding error but unlikely (famous last words!) So.... any ideas gratefully received! Thanks -
Using multiple Spike Prime/Robot Inventor Hubs
Skookumjim posted a topic in LEGO Technic, Mindstorms, Model Team and Scale Modeling
I have read all sorts of complaints about Robot Inventor and by inference Spike Prime. Some are valid (eg poor documentation)... some are less so (eg colour scheme). One thing seems clear is that the hardware is well thought out (yes there are issues with cables). Now in robotics three elements stand out as being super important: being able to use multiple motors (motors are basic building blocks), multiple sensors plus having the computational brain (and software) to hold it all together. Unfortunately Lego only provide 6 ports on each hub and have 2 versions of software both of which initially appear limiting. Whereas wireless Inter-hub communication could be very helpful enabling models to use multiple hubs and access both software platforms this is not something that Lego have explicitly provided at the moment. There is however a very simple and seemingly reliable work around available immediately that could help in cases where high speed comms and high data volumes are less important. This is to use optical communication. The idea which I have tested is to use the distance sensor to signal light flashes to the colour sensor. The number of flashes in a fixed time frame thus delivers information from Transmitter to Receiver. As expected using downloaded compiled code speeds the process up though not massively. This process could be 2 way, could enable daisy chaining of hubs and could be expanded to longer instructions (again high speed not being a limitation). On the downside the process sacrifices at least one port on each of a pair of hubs (if the requirement is for one way communication between the pair). The sensors need to be carefully and firmly positioned for reliability although there is no other requirement for any connection between them. In this context a model containing the one hub could “launch” the second. As SP and RI software can be easily swapped on any hub the user has the choice of using SP/SP or SP/RI or RI/RI platforms. Unfortunately size limitations prevent me from uploading images of the set up and demo code at the moment. -
transparent.thumb.png.64c75cc99e499bf757c13576b785e380.png)
[MOC] Reversible Robot Car - remote controlled
BrickDesignerNL posted a topic in LEGO Technic, Mindstorms, Model Team and Scale Modeling
This is my first creation with the Robot Inventor set, 51515-1 , created in stud.io using LDraw parts as custom parts. I hope you like it and it inspires you to build. The PDF building instructions and part list are available at Rebrickable for free. I haven't build it myself because I do not own the set, but greg10 did and posted a photo. In LEGO Studio the motor cables are not available so; I recommend to use the 49283 Wire Clip with Axle Hole (also available in the set) to manage them so that they will not end up in the wheels. -

Reverse Kinematics and Path Planning
ninoguba posted a topic in LEGO Technic, Mindstorms, Model Team and Scale Modeling
Hello, First topic post here. =) So I've built a 6DoF robot arm with a motorized end effector and have so far only done the basic programming of the joint movements using python (ev3dev). I have looked at implementations of reverse kinematics and RRT path planning on other robot platforms and would like to implement it for my arm. Anyone on here has done it before and would like to share how they've done it? Looking for collaborators on the programming side if there is any interest. Here's the link to my very basic code so far: https://github.com/ninoguba/ev3-robotic-arm Thanks, Nino -

How do you check two variables
Monsbot posted a topic in LEGO Technic, Mindstorms, Model Team and Scale Modeling
I did program something with two "own Blocks" wich work together, but for that I need to check if the text entered in the text parameter of the first block matches the one of the second block. Basically I need to know how to check if "Text variable one" matches "Text variable two". Please comment if you know how to do that, or if you have any good alternatives, currently I use numbers, but that's hard to keep track off. Edit: I program in Mindstorms Ev3 with the Ev3 brick -
 For delivering the candies to the visitors, we use four lockers. The ticket you have received at the beginning, is used to open the locker containing your own candy. The current version uses an iris-like mechanism, you can see it in the picture (click on it to see it on Youtube in action): I am planning to upgrade the lockers to a new door mechanism, the so called torggler doors. It is named after its inventor Klemens Torggler. Below you find a Youtube video containing the first proof of concept. The mechanism will be improved in the coming weeks. Stay tuned! Enjoy, Hans
 -

[MMM] Bouncy Castle from the game Theme Park
Lasse D posted a topic in LEGO Technic, Mindstorms, Model Team and Scale Modeling
Allow me to finally introduce a project that has been a source of many sleepless nights, frighteningly advanced hair loss, and multiple failures since 2016: Moving Minifig Machine Like GBC, "MMM" consists of modules. The module in this thread is a Mindstorms-powered fun fair ride where the minifigs move in, jump, and then leave. See the short introduction here: The idea was born at a LEGO event. The audience always loves GBC, but most builders prefer to build city layouts. MMM is an attempt at combining the movement from GBC with minifig-scaled buildings. Modules are based on raised base plates. This allows for the conveyors and mechanical components (such as a Mindstorms NXT as seen in this module). The front wall allows the builder to showcase the name of the module. It can also be left blank as seen in the adjacent modules, or you can tape printouts onto them with some interesting information of the modules. See building instructions for standard modules here: https://brickhub.org/i/themes.php?theme=MMM The design of this module is based on the classic game Theme Park by Bullfrog which was released in 1994. The "graphics" of the modules I have built are form the 1995 port to the Playstation. This screenshot is from the DOS version: You can see a very fancy version of the in-game model in the cut scene at 8:17 of this video: The module uses a single L-motor for the two tracks. It uses a mechanical "diode" to make the outer track go in a single direction, while the other can change direction. I show it in detail in this update: An NXT motor is used to raise and lower the jumping pillow, while the walls move in and out. Finally, an M-motor is hidden in the "pillow" to move the tracks on it that connect with the outer track at an angle which allows for entry and exit that works fairly reliably. You can see me testing it in this video: I have tried a variety of designs for the pillow which would allow it to be built in red. Designs include rolling cylinders and free-spinning wheels. All of these attempts failed horribly, and I decided on compromising with a gray pillow. I know it is not much, but I hope that you can see the idea behind this. The project might fail - it has done so many times - but I also think it has potential. I have more modules planned and hope that you will enjoy the presentation of them. And if you think that I'm exaggerating when I say 2016, I must begrudgingly say that it is true. Here is an unlisted video of the layout as it were in 2016. The modules have since then been redesigned: -
 Motorized model of a crawler crane with Mindstorms EV3. Features driven tracks, and superstructure functions controlled by an automated distribution gearbox. Functions/features: Driven tracks Boom elevation Boom extension Winch Superstructure rotation Ever since TLG released the rotary catch pieces from the Bugatti set I sought to incorporate it in a distribution gearbox so that I could control 4 functions with 2 motors. However, I did not want the play experience to be constantly interrupted by shifting the gearbox. For instance, if I used PF and installed a stepper mechanism to control the gearbox, I'd constantly have to count how many "shifts" I've done to ensure the right function is engaged. With that in mind, I realized Mindstorms EV3 is the perfect solution to this - by simply utilizing a touch sensor, the mechanism can detect how far the shifting motor has rotated thus automatically selecting the right function. The gearbox, which sits at the heart of the superstructure, features a cam attached to the shifting motor to hit a touch sensor. When a command is received from the remote, the shifting motor rotates until the touch sensor is pressed, then the EV3 tells the shifting motor to rotate a certain number of degrees to select the corresponding function. This utilizes a switch/case for the remote, and because it features up to 11 button combinations all superstructure functions are controlled from the same channel (channel 2 on the remote). This gives controlling the model a very natural feel, and sometimes I even forgot that I was controlling a distribution gearbox because the EV3 shifts it so seamlessly. As for driving, it too uses a switch/case for the remote. Because it's just a simple tank drive, the commands for this are much more straightforward compared to the gearbox functions. Driving is controlled from channel 1 on the remote. Additionally, there are sound effects that play while operating the crane. Pressing the left two buttons together in the 1st channel starts the engine (thus starting the program), and pressing the right two together stops it (thus ending the program). Because the PF IR remote uses levers instead of buttons, this effectively makes the model inoperable with only a PF remote. The EV3 remote feels more natural for controlling this model too, as some superstructure functions (boom elevation and superstructure rotation) involves pressing two buttons simultaneously. In the end, I'm pretty satisfied with how this model turned out. I was initially worried that this gearbox I had in mind won't work as smoothly as I imagined, but it turned out to work flawlessly. It often made me forget that I was even controlling a gearbox as the EV3 does the shifting for me. Of course, there's still areas that could be improved - for instance, the boom extension and winch operate pretty slowly. Not using a worm gear in those mechanisms probably would've helped, but that would mean the mechanism becomes "unlocked" as soon as the gearbox disengages it. Occasionally the gearbox would jam, making me restart the program, but overall the finished model met my expectations. Video: Photos:
 -

[MOC] Pinball 2.0
dawidmarasek posted a topic in LEGO Technic, Mindstorms, Model Team and Scale Modeling
Two years ago I presented you my first pinball. Today I want to show the second version, with changeable boards and an interactive Mindstorms board. If you like it please add your support on LEGO Ideas page https://ideas.lego.com/projects/4025655b-7b86-4aeb-bc91-57aa33c862e7