Search the Community
Showing results for tags 'instructions'.
Found 250 results
-

[MOC] 42099 alternate 'Jeepy'
gyenesvi posted a topic in LEGO Technic, Mindstorms, Model Team and Scale Modeling
Hi All, I'd like to introduce my alternate model for 42099. It was inspired by the recently released Jeep Wrangler, in that it has a small turntable based suspension on both wheels. Since 42099 has the two large turntables, I thought I'd try and build a similar suspension. Also, since it has yellow-ish parts, I thought I'd build a body with Jeep-like features. Of course, not enough yellow parts for a full body, so I focused on the front (hood and the grill to be somewhat Jeep-like) and used to rest to make a consistent body at least. Building instructions are available from Rebrickable: https://rebrickable.com/mocs/MOC-62435/gyenesvi/42099-c-model-jeepy Some details I have opted for a simple suspension design by moving the turntables as close to the two axles as possible. The drivetrain is also very simple, putting the drive immediately to the differentials, resulting in slow speed but high torque on the wheels. The left and right arms holding the wheels are fixed, the whole front and rear axles are rotating and are damped by the springs. Due to the large turntables, a single pivot point is enough to hold the axles at both ends. Naturally, the size of the turntables is a bit of a problem for ground clearance (about 3.5 studs in the front and 4 studs in the back), but not as much as I expected (see below).A major challenge was to mount the steering motor on the front axle in a small space under the hood and to create a strong enough steering rig using only one side on the front of the axle (as opposed to the two-sided rig in the original model). The next challenge was to create a chassis rigid enough to hold the end points of the springs in a small pivoting mount to enable the lengthening of one side when the other one shrinks. Naturally, the arched pieces available in the model are useful for this purpose, with further reinforcements later on. The battery is placed in the middle of the chassis, providing a low center of gravity with easy access to turn it on. It is not a structural part of the model, so it can be taken out easily after removing a few body panels. Also, there's plenty of empty space inside the chassis to hide the cables.On the outside, I wanted to replicate some Jeep-like features with the few available yellow-ish panels. I decided to focus on the front, creating an arched hood with a massive front grill and lights. I wanted a consistent yellow body, so I used all yellow pieces for doors and hoods, and none were left for a roof, so I decided to build just a frame. Luckily, the curved corner pieces and the long black axles available could be pieced together for a consistent frame, that matches the style of the front grill. I think the overall proportions of the model came out quite well. I was also able to include a quite clean interior. As for actual performance on real terrain, see the video for my own off-road tests. Surprisingly, the large turntables are less often a problem in terms of ground clearance as I expected. I suspect it might be because with the fixed-arm pendular suspension, as one wheel is lifted, it also lifts the turntable half-way, so it is less likely to hit something on the ground. Also, with locked differentials it can climb quite well. Be careful however, on real rocks, it is possible to scratch the bottom of it, including the motors.The model can be controlled with the Control+ App just like to original model. More pictures Let me know what you think! Cheers -
 Simple Technic Motorcycle (Building Instructions) Building Instructions: https://play.google.com/store/apps/details?id=max.moc.technic.instructions.prime Lego Technic MOC - Simple Motorcycle I think this is a legitimate entry for contest, isn't it? Lego technic, bike, two wheels, and even two gears are used!
 -
.thumb.gif.ad7c8d88b264ee812194946c07404504.gif)
[MOC] 2WD Drift Racer Chassis
mocbuild101 posted a topic in LEGO Technic, Mindstorms, Model Team and Scale Modeling
This was originally designed to be the smallest RC car to use a buggy motor, but it soon became an extremely powerful car capable of drifting. I refined the chassis design over 2 prototypes, and then tried multiple combinations of gear ratios and different sizes of wheels to achieve the best speed. The result: this MOC you are looking at right now! Driven by buggy motor, geared 1:1.25 Steered by PF servo Hidden power switch on underside LDcad/POV-Ray animation Video: http://bricksafe.com/files/mocbuild101/drift-racer-chassis/video.mpg Instructions: http://www.rebrickable.com/mocs/MOC-8835/mocbuild101/2wd-drift-racer-chassis 3D File http://www.bricksafe.com/files/mocbuild101/drift-racer-chassis/2WD Drift Racer 3D file.mpd -
Hello all! This is my first attempt at a UCS style MOC. I've been wanting to redo all my playset Star Wars sets, so I decided to start with the TIE Fighter, and I am really happy with the results. If you want to get the instructions, I posted them on ReBrickable for download. Here is the model from the front and back: And here it is with my other UCS sets: For those who are interested, here is some of the earlier versions of the model. First, this is what I dubbed the fat TIE. Then, the wings got slimmed down. At this point they were still plates instead of bricks. This was the last iteration before I built the physical model. It looks a lot like the final version, but it could not support its own weight, so the cockpit and arms were completely changed.
-
A long, long time ago I started working on a micro scale Millennium Falcon. To begin with all I wanted to do was add detail to the Microfighter but I kept tinkering and before I knew it I had a growing collection of micro Star Wars freighters and fighters, and here they are! Instructions for all these little builds are on my Rebrickable page. Since this all started with that Falcon Microfighter the cockpit piece (a light blueish-grey 2x2 truncated cone) became my yardstick for scale. Luckily trans-black 1x1 slope pieces work as fighter cockpits at the same scale so all the ships are, and will continue to be, as close to scale with each other as I can manage, at least based on these pieces and whatever reference images I can gather from Google. My Blockade Runner (April 2021) is the last ship on my micro Star Wars to-do list, although it’s hardly micro! The size and weight were a new challenge for me, I’ve never had to worry about a moc falling apart under its own weight before, but I enjoyed the challenge and managed to make it pretty easy to pick strong. I’ve put together instructions for the Tantive IV as well as the Liberator from Star Wars Rebels, which I couldn’t resist building for myself. Rather than doing new posts for each new ship I’ll edit the very long post below. All the instructions are on my Rebrickable page and there are photos and Studio renders some photos of the ships in this post, plus a few more on Flickr and Instagram. Thanks for looking!
-
The Havoc is the pirate Nym's Scurrg H-6 Bomber from the old Starfighter games on PS2 and Xbox. I've posted a couple of earlier models since 2018 and this is the final version of this ship - of which I am now happy to present building instructions for those who wish to include this powerful craft in their Lego collection - there are 1320 pieces required, most of which are very common parts. I've gathered as much data as possible about the ship and included every specification and detail that I could possibly find, so that the ship features stations for 2 astromech droid co-pilots, seating for 3 passengers, guns galore including a rotating roof turret, retractable landing gear and an energy-bomb dropper within the undercarriage. Thanks for looking and I hope you like my build! PDF instructions available from Rebrickable: https://rebrickable.com/.../MOC-55952/evilkirk/the-havoc/...
-

Axle Collection Thread
Sariel replied to efferman's topic in LEGO Technic, Mindstorms, Model Team and Scale Modeling
Just an idea, hope it helps someone. Instructions available here: http://sariel.pl/downloads/ -
I'm creating an Apple Store for my LEGO LANE project. Here's my simple technique to create the Apple Store logo. Feel free to use it in your city! Find out how to create the McDonald's logo here. Apple Store logo
-
[MOC] Build Instructions for smoothly switching 2 speed automatic gearbox
TechnicBrickPower posted a topic in LEGO Technic, Mindstorms, Model Team and Scale Modeling
Hi for those interested I have put the build instructions for my "smoothly switching automatic 2 speed gearbox" on rebrickable: https://rebrickable.com/mocs/MOC-51030/TechnicBrickPower/smoothly-switching-2-speed-automatic-geabrbox/ Here's the video about it: -
From the designer of fantastic UCS-scaled MOCs comes a Hammerhead Corvette. The MOC contains 3,606 pieces in total, and measures 35 inches long, 13 inches wide, and 14 inches tall. Take down Imperial Star Destroyers with a UCS-scaled Hammerhead Corvette from Rogue One: A Star Wars Story. Despite the fact that the scale of this model is unknown, the model itself does not disappoint in terms of both accuracy and detail. There is an instructions bundle available for this MOC which includes a 480 page pdf instruction manual, a parts list, and LDD files. All we ask is an exchange of 35 U.S Dollars ($35) for the entire bundle. For more details about purchasing the bundle, please either PM me or contact me at chrdvorak@hotmail.com via email. As for sticker, The manual includes a plate to where the sticker will go, but until more information is learned about the Hammerhead, a sticker will not officially be released. Here are some images from the manual that show the design and completed model: https://flic.kr/s/aHskUfjEMD Parts list: http://rebrickable.com/mocs/MOC-7593/cjd_223/dmarkngs-hammerhead-corvette/ Please use this topic to discuss anything about the MOC including the building process, questions, part substitutions, etc.
-
The Babylon Project was our last, best hope for peace. A self-contained world five miles long, located in neutral territory. A place of commerce and diplomacy for a quarter of a million humans and aliens. A shining beacon in space . . . all alone in the night. And if you're curious how big this is: Currently she sits at ~6300 parts; ~4kg weight; ~142 studs or 113cm long; 45 studs or 36cm height, ~25 studs or 20cm wide... Check out more on my Flickr! Built in LDD (modded with the additional parts pack - there are no collisions), then imported, fixed-up & rendered in Stud.io. I haven't figured out how to use Stud.io's renderer properly yet, so these shots have really basic lighting, etc. For details, colours & general inspiration, I'm using the awesome renders by this guy and reference images from here. It's surprisingly close to those last reference images! I also bought the 20 year-old Revell model kit recently as further reference IRL. Structurally, the cylinders are mostly based on the Saturn V internals, and it's built in interconnected modules, not along a single central spine, which works great digitally but might not in real life! Oh and there's a studless Lowell sphere at the front, of course. I started sketching this out in LDD 2 years ago then it went cold until about 2 weeks ago, when I picked it up and inspiration hit. Next steps will be to design a multi-point stand - she'll need a lot of support in 1Gs worth of gravity. Then test builds. I'm sure she'll evolve in that process. Before anyone asks, because cloners stole my Agamemnon design there won't be instructions or shared LDD/Stud.io files for this one - pics only!
-

[MOC] Ford Mustang Hoonicorn
Anto posted a topic in LEGO Technic, Mindstorms, Model Team and Scale Modeling
Here's a MOC on which I'm working since the end of the previous summer! After I have done the video of my DS3, I had the idea to do a new chassis with 4 wheel drive. I thought it would not be possible, but the first prototype was better than my DS3! Actually the MOC is not finished. The stickers are missing, and I'm continuing to develop the chassis (I'm adding a 4th L motor) Actually there are 1 L for the front, and 2 L for the rear. The great advantage of the 4WD is that it can take a great angle while turning, but it's always controllable. But, that can have an inconvenient: the understeering. For that, I did the same thing on the real RC drift cars: I added a free wheel. So when I do not accelerate, the front wheels are not braked and the car does not understeer. You can see this video on this video, done for BuWizz with Charbel. But this is one. It's the same thing, but there is only my car. The final gymkhana will be for the next summer, because that requires a lot of time, and with the school, I have not enough time at another moment of the year. -

Fast Black Buggy (FBB) With instructions.
Touc4nx posted a topic in LEGO Technic, Mindstorms, Model Team and Scale Modeling
It's time for a new MOC. This time it's a buggy. It is designed to be decently fast (considering it uses only two L motors) It features Full suspension. The rear axle is a live axle, and the front features double wishbone with caster angle. Sadly I don't have any Real life pictures... But I made a video. You can also buy the instructions on Rebrickable. I made them with stud.io. I added the cable in the instructions. https://rebrickable.com/mocs/MOC-50170/Toucanx/fbb-fast-black-buggy/#comments More pictures can be found on Bricksafe. -
3 Speed automatic transmission gearbox instructions
TechnicBrickPower posted a topic in LEGO Technic, Mindstorms, Model Team and Scale Modeling
Hi all, the instructions for an MOC automatic gearbox that I made a while ago are now available on Rebrickable. https://rebrickable.com/mocs/MOC-48521/TechnicBrickPower/3-speed-automatic-gearbox youtube video on how it works: : -

Need help on "reverse-engineering" part of a model without instructions
Transparency for Effect posted a topic in Special LEGO Themes
I'm trying to recreate the one model made in the LEGO Club Magazine for the first series of Collectable Minfigures that didn't come with instructions in 2010; the Clown car. I've basically been recreating it in LDD and so far the one area I'm having issue in is the round front section with the blue stud. The car looks like it uses this mudguard, but whatever the front rounded plate with the blue stud is connected to seems to collide with the studs of said mudguard and can't be placed down flat, meaning it may not be the same but red rounded plates. That or it's connected to a hinge piece at the back to "drape" over part of the car at an angle, but would there be enough stud space to do that length wise? It could also just be a matter of what's connected to the grey piece and the answer not being the same, rounded plate, but it does look like it's rounded like the front piece and I'm not sure of other similarly rounded pieces that are shorter to accomodate for the mudguard studs and still connect to the rest of car through SNOT. TLDR; I'm bewildered by the construction of the SNOT-based, blue/grey/red middle front section of the car and wonder if anyone here could take a crack at it. EDIT: Here's a link to the image I took from that might be slightly better quality: http://www.brickshelf.com/cgi-bin/gallery.cgi?i=4642125 -

HELP! Looking for Certified Professional Instructions
Blackpool posted a topic in General LEGO Discussion
So recently I learned about Lego Certified Professional promotional sets. I had no idea there was such a thing. They seem to be extremely rare due to very limited releases. I am trying to find instructions for the Christmas Elf Cafe that released in Hong Kong in 2016. I know its a long shot but I've looked everywhere I can think and have never found them. The set goes for $500-$600 on Ebay but thats simply not an option for me so I'd like to try and bricklink a version of this. Any help is greatly appreciated. -
From the designer of the most famous AT-AT MOC comes a UCS Tie Defender. The MOC contains 1,676 pieces in total. Despite being a relatively simple design consisting of a base with 3 identical wings, the model itself does not disappoint in terms of both accuracy and detail. There is an instructions bundle available for this MOC which includes a 162 page pdf instruction manual, a parts list, and LDD files. All we ask is an exchange of 20 U.S Dollars ($20) for the entire bundle. For more details about purchasing the bundle, please either PM me or contact me at chrdvorak@hotmail.com via email. For the sticker, I recommend printing it at 122mm width by 61mm height after downloading the original file in the bundle. Here are some images from the manual that show the design and completed model: The Rebrickable listing will be approved soon for an easy to access parts list. Please use this topic to discuss anything about the MOC including the building process, questions, part substitutions, etc.
-
Presenting another Danish train... DSB IC3 My model: Scale: 1:54ish Lenght: 140 studs (MFA 46 studs - FF studs 40 - MFB 46 studs) Width: 7 studs Bricks: 2.084 (9v) or 2.079 (PF) Powered: 2 x 9v or 2 x PF train motors with 2 x battery boxses Designed: 2017 Room for lights in all headlights and interior. Digital model but built by me (and many others) irl Very high setting render from Stud.io with custom decals done in the PartDesigner tool. Free building instructions: DSB IC3 9v variant here DSB IC3 PF variant here DSB original white and red livery of the 1990-2000s: View from the side - unfortunately the wide gab between the units is necessary to run through R40 curved tracks smoothly: Access to the interior with seating for 54 minifig passengers, 2 train drivers and additional space for 2 bicycles, standing passengers, stewards and 2 toilet guests: FF unit (PF) with 2 IR Receivers, 2 Battery Boxes and 1 Polarity Switch: Technique used for the sliding toilet doors - turning the Pneumatic T Piece 90° behind the seat keeps the door shut when closed: Youtube video from fellow Danish LUG member Knud Ahrnell Albrechtsen:
-
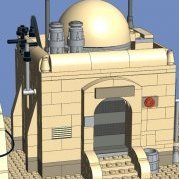
Hi all - I’d like to present to you my second interpretation of a Tatooine themed MOC building. It is the first of several planned builds I have for this 'theme'. I plan to label these as TATxx where xx increases with each build. It is based on background buildings seen in Episodes I and IV, whilst also drawing on the buildings in the SW BF2 game with my own spin/interpretation of it – i.e. what I think looks aesthetically pleasing and fits into the Tatooine 'world'. It could also easily feature in a Mandalorian background scene set on Tatooine. It contains two detachable roofs which allow for the empty interior to be filled as desired. The interior of both buildings are empty - mainly left up to your own interpretation, but I’ve previously created a Cantina bar which pops inside the second building and I've created this room as a Twi'lek "dance club" which might have pleased Jabba... The left room is a bounty hunter's hideout with a Boba presenting his prized catch to the other hunters. An additional suggestion is in the unused top area of the second building. Another of my builds (Jawa Junk Shop) is designed to fit into this area nicely, adding a shop to the area. The building really 'comes alive' when figures and details outside give it a richer experience. All posters/custom arm & minifig prints are from FireStar Toys. The Bantha is designed and by @BaronSat and the other vehicles are official Lego models. Any comments are welcome and please leave a message/query if you spot an error within the instructions. I shall try my best to quickly correct it. The instructions and other details are available here: https://rebrickable.com/mocs/MOC-45639/azzer86/tatooine-double-building-slums-tat02/ More photos are available here: https://bricksafe.com/pages/azzer86/tat02 To anyone who missed the post on TAT01, it is located here: TAT01 and TAT02 together Thanks for looking :)
-
Hi there, I'm going to be moving interstate next month and will have put my collection in storage for a few months. I was wondering if anyone had any great ideas on how to pack/store my building instruction manuals without them getting all crumpled up.
-
Anyone have LEGO Club instructions for the CMF Series 1 models?
Transparency for Effect posted a topic in Special LEGO Themes
So basically when the first Collectible Minifigures came out literally a darn decade or so ago, they had some mini LEGO Club magazine with images of five certain models you could make with pieces from your collection; a torii for the Ninja, a stage for the Magician, a saloon door for the Cowboy and Indian, a ramp for the Skater, and of course a display stand. They also had an image for a car for the Clown, but this was instruction-less. Of course, you used to be able to put in the "MINIBUILD" code into LEGOClub.com to get these instructions, but like other instructions of the exact same kind, they seem to be lost to time as far as I can tell. I personally had copies of these previously, but after a transition from the weird iPod place I put them or something, I could not find them anywhere I looked in my PCs or memory banks. And while I've found some LEGO Club instructions through the Wayback Machine, I've yet to relocate these when I've finally gotten the ability to Bricklink the parts to them. Should I contact LEGO about these missing instructions, perhaps? I also was able to find my instructions for one of LEGO Club models I'm not sure is online; the LEGO VIP Minifigure Christmas "BrickFig", to give it a name. -
I'm creating a McDonald's for my LEGO LANE project. Here are my simple techniques to create various McDonald's signs. Feel free to use them in your city! Find out how to create the Apple Store logo here. LEGO McDonald's 1/3 - Signboard pole How to create the famous "M" signboard pole from McDonald's in LEGO. LEGO McDonald's 2/3 - Rooftop sign Push the studs (part 87087) of the "M" into the holes and you have a McDonald's rooftop sign. Attach another "M" on the back for a nice 360 view. LEGO McDonald's 3/3 - Wall sign and Ronald McDonald statue And here's another way to put a big "M" onto your McDonald's build. I also created a very basic Ronald McDonald statue. The fries and burger are from official LEGO sets.
-
Hello to the forum, below a modern redesign of the classic LEGO Set 6364 Paramedic Unit. This MOC (or MOD) is a tribute to all the world's health workers battling the coronavirus pandemic. 6364 Paramedic Unit 2.0 Revisited by legolux1973, on Flickr I also created building instructions for the creation, if you like the MOC you can download them (a PDF file, of course no fees and no registration or similar) on the Homepage of my local AFOL Community afol.lu under below URL: http://afol.lu/afol52/filebase/index.php?file/38-6364-paramedic-unit-2-0-revisited/ If you like the MOC and/or the Instructions I would be really happy if you would vote for my LEGO Ideas Project Queen Elizabeth II at the LEGO Ideas Website: https://bit.ly/legoqueenelizabeth . I would really appreciate. Happy Building, stay safe and keep healthy. :-)
-

Introduction to Digital LEGO Interview with Pennyforge
Matt Elder posted a topic in Digital LEGO: Tools, Techniques, and Projects
G'day Everyone, long time lurker, first time poster. Recently sat down with @pennyforge for an interview following a presentation he did on digital LEGO at London AFOLs. He goes through an introduction to digital modelling, rendering and instruction creation, comparing the pros and cons of popular digital tools like LDD, LDCad and Stud.io. I learnt a lot from the presentation so thought it had to be captured so others could also see it. We cover his letters to LEGO script We also cover his Voxel script Would love to hear anyones thoughts. Anything you learned from it? -
I made this custom Walker for my nephew's 12th birthday (hence "M12"). It takes inspiration from the Power Miners theme (hence "Power"), set 8957. I released the .io model on Star Wars Day 2019 on Bricklink here. A backup is available on MediaFire here. Please let me know if you like it! I will post some pics of the real build soon.


.thumb.JPG.3c74c0d405dc1afb04b2fa216ebc79e6.JPG)