Search the Community
Showing results for tags 'flying scotsman'.
Found 6 results
-
Hi all, After finishing my first steam train MOC 6 months ago- the iconic Gresley streamliner 'Mallard', I was eager to get started on another engine. After digitally designing a large roster of engines to the same scale, I decided to stick with the classic LNER designs and build my own take on the iconic Flying Scotsman. The build has evolved slightly since the original design, but not by much. Below is the original render which included the bar along the and green tender wheels. The build began with laying out the wheelbase. This also matches the wheelbase of the Mallard MOC. Then, the tender- complete with all the power functions elements! The motor's proportions meant the tender has 3 wheels instead of the accurate 4. Note the clipped wheel cover on the front axle. It wasn't an easy decision but the details look so much neater because of it. The boiler was next, and after a swift bricklink order the pieces came together very nicely. Lastly, the wheels! I can't say I've seen any MOC's that have used Big Ben Brick's Green wheels before, but here they are, and they look fantastic. There is still plenty to work on, such as decals and working piston rods (that don't obscure the width of the build too much). Fr now though, I'm happy to call this finished. For now. EDIT: I recently made a Youtube video taking a closer look at the MOC, where it can also be seen in action. I'd love to hear your thoughts on the build, please feel free to leave a comment! I'll leave with a few more images of the build. - Isaac Info on the Mallard MOC can be found on this thread:
-
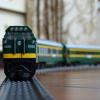
Long time since I last posted on Eurobricks (University sure takes it out of you). Last Winter I finished a new MOC for display at my local LUG, and here it is making its premiere on the Eurobricks forums: British Railways 60103 (formerly LNER 4472) A3 Class Flying Scotsman Most of the model is built with parts from set 10194 Emerald Night, with a few minor additions for purely aesthetic reasons. The entire locomotive is seven studs wide and adapted to run on 9V track. In addition to the 9V train motor in the tender, a separate motor powers the locomotive, connected to the tender 9V motor. She is as troublesome as the real Scotsman, but runs like a dream when given the proper care and attention. Front view of locomotive. Locomotive side view. Tender side view, with 9V motor underneath. Tender rear view, with corridor and porthole for light Tender top view. View in locomotive cab, with modified 10194 firebox, gauges, and regulator. Inside the firebox, with a view of the motor powering the locomotive. Rear view from the windows of a pullman carriage. Feel free to post any comments or questions, and thanks for viewing! Always entertaining, always inspiring, always:
-
Emerald Night Reborn - Flying Scotsman(update pictures of Coach)
marbleman posted a topic in LEGO Train Tech
As the prototype of Emerald Night, Flying Scotsman is very famous Steam engine in the world. After finished my QJ steam engine http://www.eurobricks.com/forum/index.php?/forums/topic/133621-china-qj-steam-engine/#comment-2572918, I begine to make it, here is my work. The Light can be lighten. Have a guess what's this? It's water tank made by lego parts for smoking. Here is smoking effect. This is water inlets. Big Ben XL wheel painted to green $100 bricks just for fun. Drived by one L motor The whole train with coach video link https://v.qq.com/x/page/s0361fjaxjq.html Put together with QJ My shelf for showing the train Thank you for visiting. Add some picture of Coach. -

A Lego 0 Gauge Scale LNER A3 Flying Scotsman Steam Locomotive
jamesed_1971 posted a topic in LEGO Train Tech
Since I was last active, I have enrolled in the 16mm Association of Narrow Gauge Models and with the next year will be build two models railways of which one will be a Lego model railway and a model Railway at 16 mm scale using SM32 track to represent 2ft narrow gauge track, while looking at Locomotives options as I still need to buy or build my 16mm scale locomotive, this gave me a idea, why not try to build a Lego 0 Gauge scale version of my LNER A3 Flying Scotsman Steam Locomotive which the design could be used to develop a 16mm scale locomotive using 32mm track to run on. Over the last view days I started to mess in Ml cad and LDD 4 to see if a chassis which will be able to run on 0 Gauge track, the proof of concept design was finished in LDD 4 this morning at 10 AM UK time The model when built will have a chassis frame 3 studs wide allow the locomotive wheels to be set a 32 mm Gauge to be able to run on 0 Gauge track, I also have worked out how to motorized the locomotive, the body I will build at 7 studs as this seems to a match for 0 Gauge Locomotive width. View of the new chassis frame with the gears set up allowing a easy way to motorize the locomotive. View of the new chassis frame showing the 3 stud wide frame and the distance between the frames and the trains wheels which need to be set like this to be able for the wheels to be set at 32 mm Gauge. The next step is to build a physical model and do a test once the Peco 0 Gauge track which I have ordered from Ehattons arrives in the post. -
Hi, over the weekend, I started work on building my new Lego LNER 4472 Flying Scotsman Steam Locomotive, as the final order from Bricklink arrived on Saturday, it took me a couple of hours to build the model, I had already built the chassis couple of weeks before The Lego LNER 4472 Flying Scotsman model is 19.5 inches long, 2.5 inches wide, just under 4 inches high, the front and rear lights on the Lego LNER 4472 Flying Scotsman work, two bricks behind the rear lights had to be modified to allow the power function lights to be used, the large train wheels are XL Big Ben Wheels The model just needs some extra details like pipes, lining, and lettering to be added, the wheels have to be dye green and other details to finish the model. I have taken new photos of my Lego LNER 4472 Flying Scotsman Steam Locomotive, including some other parts Couple of images showing closeup of the wheel hubs A Image of couple of modified Lego 1x2 Panels with Lego white headlights bricks A image showing the power function lights fitting into the modified Lego 1x2 Panels with Lego white headlights bricks a couple of images of the Power Functions Battery (AAA type) in the tender, show the wires packed around the battery box, Couple of Images showing the wire connections between the locomotive and tender A couple of Images showing the tender including the Lego Coal Pile (Lego 1x1 Black Plates) A couple of images showing the rear and front lights working, the second image is darker as the front lights don't show up well in bright light when on A image of the Flying Scotsman Tender with its wheel arrangement
-
Hi, on Friday 7th Feburary, my Big Ben Brick wheels package arrived, I started to build my new motorized chassis for my new version of Lego LNER 4472 Flying Scotsman Steam Locomotive using the XL flanged drivers and the XL blind drivers and the small flanged train wheels, it took me a couple of hours of finding the parts and building the model The reason the are two Lego Power Function Cables is the one on the left is the extension for the rear lights which are to be installed in the rebuilt LNER Flying Scotsman tender, while the other cable is from the IR Sensor. Saturday Morning I did the first running test, on the old Lego blue 4.5 Volt Train Track, the train ran OK, then I did the second test, adding some curves to the Lego track, when the train came to the curved part of the lego track, it either stalled or derailed. I found where the problem was, there wasn't enough clearance between the steam cylinders ( 2 x Lego Technic Cross Blocks 3M ) and the leading bogie, I rebuilt the front section and put the steam cylinders higher, with the result the leading bogie has plenty of clearance. I did the the second test, and the train can move around the curved section of track. the tender base is still being built. UPDATE I have made a virtual model of what the model will look like when finished in LDD 4, exported as a LDraw file, edited in MLCad, added the XL Wheels and flanged train wheels, opened in LView to take some snapshots of the model.