Search the Community
Showing results for tags 'ev3'.
Found 184 results
-

Technic Pneumatic "mini pump?"
technical posted a topic in LEGO Technic, Mindstorms, Model Team and Scale Modeling
I bought this blue item advertised as "Mini Pump Double Valve" on eBay http://www.ebay.com/itm/301854575416 It does not seem like a pump to me. It works like an actuated piston. Is the blue cylinder supposed to be a pump? -

FLL 2016 Fuzzy Logic Team
Technic Jim posted a topic in LEGO Technic, Mindstorms, Model Team and Scale Modeling
Hello all, Firstly, I would like to apologise about the text wall - I got a bit carried away I am writing here on behalf of a FLL (First Lego League-there website address is http://www.firstlegoleague.org/) team I am part of called Fuzzy Logic. For those of you who do not know what FLL is, it is a Lego Robotics competition for school children. There are four parts to winning the competition and they are as follow 1: Robot performance The robot you build has to be a Lego Mindstorms one (it doesn't matter what generation) and it will perform on a mat with various different challenges on. The more challenges you complete, the more points you get. 2: Robot Design This category is about how well built the robot is and what functions it has as well as how innovative it is 3: Core values How well you wok together as a team and with other teams 4: The project The project will be set around a pre decided topic which is decided by First, the people who run the FLL. This year the theme was trash and I will be talking about that later All of these aspects will be individually judged and you will be given an overall score. If you are the highest in your region (for Fuzzy Logic this is the south West) you will go through to the nationals that are to be held in Loughborough this year. We won our regional area along with a team called Tech HEds (I don't know if they post here but if they do, Hello!). So that means that on 21st of February we will be heading up to Loughborough to compete head-to-head with the 39 other best teams in the UK. Whoever wins that will go through to the internationals that are held in America as a representative for the UK. So what is the meaning of the post, I hear you ask and this is it: We would like some help with our project. Our project is called the Net Bag. It is a small, orange bag designed to replace the plastic grocery bags you get in shops. I'll explain it briefly here but there will (should!) be a PowerPoint explaining it more thoroughly attached to this post. EDIT: It turns out I can't upload a PowerPoit but if you do want to see it, PM me you email address and I will email it to you. The Net Bag uses less plastic than the normal one because it is a net and will be made from recycled plastic from the oceans. It is possible to make these, we have tried by shredding up, extruding and then weaving recycled plastic offcuts from our DT department at school. We came up with the idea because we looked at some plastic bag figures and realised how much we are drowning in plastic; we use 5 trillion plastic bags yearly for instance! We also looked at the 5p plastic bag charge and saw how that had created an 80% decrease in plastic bag usage at Tesco! However, the plastic vegetable bags are still free so people are stealing them (we have video evidence to prove this. The Net bag is a good alternative because safe for young children and very strong and long lasting along with other things. That basically sums up the Net bag but you should read the PowerPoint for more information. If you can't open it just tell me. The bit we would like your help with is an online SurveyMonkey we would like you to fill in to gather customer research about the Net Bag. The address is https://www.surveymo...co.uk/r/netbags and it would be really helpful if you could fill it in and tell others about it so we can get more balanced results and good publicity. The survey is self explanatory but if you have any problems please contact me via PM or the comment. Thank you for helping us and for reading that text wall but hopefully it will be worth it. If you have any ideas or suggestions please comment and leave any other feedback. Thanks again, Jim and the rest of Fuzzy Logic -
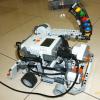
Floor-roving autonomous robot
technical posted a topic in LEGO Technic, Mindstorms, Model Team and Scale Modeling
Hi all. Here's a brief video of the EV3 floor roving robot I've been working on for the past few days. It's pretty crude but can go a long time without getting stuck. It makes use of one distance scanner in three positions by using a clutched IR sensor, has two bumper sensors that are padded by shock absorbing springs to reduce impact on the touch sensors. Behind the bumper is mounted a color sensor on the front that is used to measure near distance and ambient light. It appears to flash because it's rapidly switching between measuring these two things, With this sensor it can detect objects near to the ground that the main sensor peers over, and also back out of shadows so it doesn't get under furniture. Working on the software has been the long part as there is much debugging to do and each test run can take a long time depending on what I'm trying to improve. It makes decisions based on distances to its surroundings on three sides, so if it senses it's coming up on something in front of it, or a bumper strike is detected, it will choose to turn left or right depending on which direction is more open. -
I made a printer
technical posted a topic in LEGO Technic, Mindstorms, Model Team and Scale Modeling
This is an early proof of concept before rebuilding it completely: Running down the pen: I built this printer LEGO parts. It prints pretty well with markers. It prints in dot-matrix and line modes. I did this with an unmodified EV3. Some of the work was creating huge binary files to print from. Video: -
I made a scanner
technical posted a topic in LEGO Technic, Mindstorms, Model Team and Scale Modeling
I made a scanner from the printer I made earlier. I drew a test page and also scanned a print I made on the same frame from when it was a printer... re-digitized. It uses the color sensor. The digitized image is saved to the EV3 memory where I can download it on the computer as shown in the last image below. It's pretty crude but it's a good proof-of-concept I could improve on. Anybody else done this? -
 My submission for the crane contest: the candy crane. The candy crane has been inspired on a harbor container crane. The name points to its functionality: picking up candy and drop it in a wagon (it is part of a fully automated train layout, see siouxnetontrack.wordpress.com). The crane uses 5x EV3 M motors: 2 motors to move the body (X-movement) 1 motor for the Y-movement 1 motor for the Z-movement 1 motor for opening/closing the grabber Next to that, 6 sensors are used for the positioning: 2 touch sensors at the base 1 color sensor for the Y-movement (5 stopping places) 1 color sensor for the Z-movement (3 stopping places) 2 touch sensors to stop the hoist at the end positions Two EV3's (one to control the base, one to control the hoist). Using the EV3 daisy chain functionality, the crane can be controlled as one construction. It get's its input from a PC application, but it is easy to rewrite the software that it can be controlled by another EV3 brick. Images can be found at https://flic.kr/s/aHsjZ6uZix and a video at ./Hans
 -

[MOC] SharkBot - Mindstorms Ev3
DamonMM2000 posted a topic in LEGO Technic, Mindstorms, Model Team and Scale Modeling
The SharkBot robot is built with Lego Mindstorms Ev3. Modified version of Builderdude35's Timmyton 5.5 robotic shark. Features aerodynamic styling, mechanical upgrades, modified programming, and more. Autonomous and Remote Control. Styling change is dramatic. The model is overall much more streamlined. Both the sides and rear are now seamless, filling in gaps of the original model. This is accomplished by incorporating 0% grade panels. Along side of looks, the panels are used for additional structural purposes. Every single panel has been changed for another of different color, size, etc. Many Technic pieces have been swapped out for another of different color. The orientation of the tail is altered. The top of this model incorporates studded Technic, which enables use of slope pieces. Also noteworthy are the fins. Complex connections make up the larger side fins. Tires are of smaller size. These tires are of firmer nature than the original tires, and this model benefits from thus. This results in more torque but slightly reduced speed. Accuracy is also a benefit. Due to problems with the original Timmyton 5.5 touching walls and running into walls at an angle in Autonomous mode, the InfraRed Sensor is moved forward one stud, thereby increasing its proximity away from obstacles when detected. The program is also adjusted accordingly so that there is a reduced chance of this model running into and/or touching obstacles. Technical features: 1 Programmable Intelligent Brick 2 Large Motors 1 Medium Motor 1 Color Sensor 1 InfraRed Beacon / Remote 1 InfraRed Sensor Mechanical Features: Moving jaws Moving tail Tank drive Please again note that this model is not 100% MOC. This model's core is Builderdude35's Timmyton 5.5 robotic shark. -
This is Christmas Town built by me and my son. Regards Johny and Jack
-

[MOC] EV3 Cookie Icing Machine
touthomme posted a topic in LEGO Technic, Mindstorms, Model Team and Scale Modeling
I've been itching to build another EV3 model recently and my girlfriend suggested I try to build a machine that can decorate cookies with icing. This is the result, which we call the EV Icer. Right now the program can decorate three designs - a star, snowflake and angel. It's built using only pieces from the EV3 kit (31313), plus you need some icing material. :) It's actually a bit sensitive to operate, and performance depends heavily on the viscosity of your icing. I've written a bunch of notes about getting it to work well on my website. You can also find building instructions for it there: http://jkbrickworks....-icing-machine/ We also had way too much fun filming this mock infomercial for it. :) J -
[REVIEW] Timmyton 5.5 Robotic Shark (by Builderdude35)
DamonMM2000 posted a topic in LEGO Technic, Mindstorms, Model Team and Scale Modeling
Here is my model review of the Timmyton 5.5 robot shark built by Builderdude35. It is built using only one 31313 LEGO Mindstorms Ev3 set. Technical features: 1 programmable Intelligent Brick, 2 Large Motors, 1 Medium Motor, 1 Color Sensor, 1 InfraRed Sensor -
[MOC] 2010 Cadillac CTS-V Coupe w/Mindstorms Ev3
DamonMM2000 posted a topic in LEGO Technic, Mindstorms, Model Team and Scale Modeling
Hey guys, I've built several Lego vehicles with MINDSTORMS® and decided to use my experiences with previous vehicles to build a real car. I was originally looking at building a Ford Escape, but the blueprint scaler measurements came out all wrong, so I turned to a Cadillac CTS-V. I'm a fan of the CTS-V, mostly because of the luxurious ride and smoking performance fused into one car. Here's a picture of the real-life vehicle: Please note beforehand that I am building a model based off the Cadillac CTS-V, but not necessarily an exact replica, partly due to less than a total of 2,000 pieces and partly because I don't have a lot of pieces of just one color I'll try to share the blueprint with measurements tomorrow, and because I am already working on a few builds at once, starting this work on spare parts will be a bit slow for a couple weeks. I hope you guys enjoy the progress! If you'd like to, please check out my previous vehicular builds: Outland3r - Outland3r 2.0 - RX2 Thund3r Truck - AWD MiniKart - Chopp3Rod - -
This is haunted house built by my son and me. Powered by Mindstorms EV3. Regards Jack
-
At our Youtube channel, you'll find a video of our fully automated train layout. It will be displayed on Lego World Utrecht 2015 from October 25 (Sunday) until October 27 (Tuesday). The video shows the layout in our test room. The train layout contains eight EV3 bricks and one NXT brick to control all the Lego objects. The layout is controlled by a PC application (Microsoft.NET) that has been written by our team. Enjoy the video and maybe we'll meet in Utrecht. /Hans
-
Background With some colleagues of mine, I am working on a fully automated train layout. You can read more about this at our blog: siouxnetontrack.wordpress.com. The layout is always demonstrated on Lego World in Utrecht. We gave a demo at another event, as can be seen on the following Youtube video. One of the items I have been working on, is the Candy Rotation Stock. I made a working version, as can be seen on the next video: Redesign of the Candy Rotation Stock After building the final version of the Candy Rotation Stock, I transported the object to our office to integrate it with the other parts of the track. I found out that the CRS was not robust enough and it took some time before it worked again. Although the concept works, it was not good enough to run for a couple of minutes without problems. And I needed it to work for four days at Lego World! So I took the difficult decision to redesign it. In this thread you can follow the progress. The redesign will be based on the conveyor belt that I found on Youtube (user ssugawara1955): And this is my proof of concept: I have ordered some extra parts to make a complete square and two switch points: one switch point that will lead to the Crane Pickup location and one switch point where new containers can be inserted to the rotation stock. Some more photos of the progress can be viewed on flickr: https://flic.kr/s/aHsk8h6MAc . Enjoy. /Hans
-
Hi guys, Salut tout le monde, I'de like to share here some links to The NXT Step blog where is presented the ROBOT REMIX #1 challenge, where the MINDSTORMS team challenged some of the MCP (MINDSTORMS Community Partners) to come up with creative ways to remix a given Technic set and the Home edition of the EV3 set. for ROBOT REMIX #1 the Technic set is the brand new Sea Plane, a great Technic set that happens to be in the same color scheme ;) In this first post, is explained in a bit more details what is ROBOT REMIX http://www.thenxtstep.com/2015/08/robot-remix-1.html Then this week was presented the first of 4 remix, this one from master Isogawa http://www.thenxtstep.com/2015/08/robot-remix-1-exhibit-helicopt3r.html Stay tune for the presentation of the other 3 remix in the coming weeks. : . . baz
-
Mindstorms EV3 for kids question
JGW3000 posted a topic in LEGO Technic, Mindstorms, Model Team and Scale Modeling
Hey guys, I am serious considering getting the EV3 set for my kids, so they can learn a bit about robotics and coding - they are 10 and 7, so should be age appropriate. I am not at all familiar with the EV3, so hopefully someone can answer these questions. Can a Win 8/Win 10 PC be used to program the control brick? Will an old smart phone (deactivated) be useful for bluetooth control? Will this actually be a good introduction to coding? Aside from the EV3 set, should I get additional sensors or motors - we have plenty of bricks and technic parts already, of course. thanks! -
Hi, Here is my latest project that i have been working on the past 2 months. It's only function is to keep on rotating a platform or sphere. So it doesn't really have any purpose besides looking kinda cool. It can be used as a MOC display stand, but it has it's weight limit. I tried to have Gyroboy(from Ev3 education set) balancing on the platform but it was to heavy and it didn't really like the unstable platform. So it ended up with a borring box on top instaid. Lego Axis by Andreas Håkansson, on Flickr The build was inspired by a robot/machine i saw on the new season of battlebots. It's the one holding the trophy. After some research i found out that it was created by Mark Setrakian. I also found a video of his machine. (see below) You might notice that his moves alot more smoother. And that i stole the name becouse i couldn't come up with something myself. So this project was kinda software heavy compared to my other mocs so i figured i might aswell share i little about what makes it tick. For those that don't care how it works or just hate math should probably skip the rest. First off, what is the problem? The problem is to get the arm to follow i curved line at a specific height in space so that the 5 arms together makes a circular motion. What I need for this is a way to convert X,Y,Z coordinates into angles for the diffrent joint in the arm and then a way to plot a curved path in the X,Y,Z coordinate system. Converting X,Y,Z coordinates into angles (for 3 joints) The way i did this was to create two 2-dimensional views of the arm, X-Y and Z-Ys (not same as Y). YX by Andreas Håkansson, on Flickr So first of i calculate the value of Ys. This is done with the X Y positions that would be part of our desired position. Ys = sqrt(X^2 + Y^2) Now it is possible to get the angle between Ys and X. Angle Radians_YsX = arccos(X/Ys) (arccos = inverted cos = cos-1) Some calculators/softwares (EV3 original software) would directly give you the value in degrees. In labview you get the value in radians instaid of degrees so you have to convert it into degrees youself. The diffrence between radians and degrees is basically that for degrees 360 = full circle and for radians 6,28(Pi x 2) = full circle. I used labview so i had to add this. Degrees_YsX = Radians_YsX x 180 / Pi Now i have the calculated angle for the first joint. YsZ by Andreas Håkansson, on Flickr B and C is fixed distances in the mechanical design so they will be constants in this case. Ys i got from the calculations above and Z is part of our desired position so i know that value aswell. To get the angle for bc (third joint) i first need to know the lenght of V. V = sqrt(Z^2 + Ys^2) To get the angle for bc. Radians_bc = arccos((B^2 + C^2 - V^2) / (2 x B x C)) Degrees_bc = Radians_bc x 180 / Pi Now i just need the angle between B and Z (bz) for the second joint. First i calculate the angle between B and V (bv) Radians_bv = arccos((B^2 + C^2 - V^2) / (2 x B x C)) Degrees_bv = Radians_bc x 180 / Pi Then i calculate the angle between V and Z (vz) Radians_vz = arccos(Z/V) Degrees_vz = Radians_vz x 180 / Pi Add them together Degrees_bz = Degrees_bv + Degrees_vz Now i am able to generate the degree values for the 3 joint in the arm based on the XYZ coordinates. However the degree values of the joint is not the same as the degree value for the motors so i will have to account for that with some gear ratio calculations. (I have a feeling most people here in the technic forum knows the basics of gear ratio so i'll skip explaining that.) In the calibration sequence of the machine i then match the starting position for the motors with the appropriate degree value. Creating a curved path. The curved path is based of a circle that has it center in the middel of the machine. Each arm will move along 64 degrees of the circle. I used 64 degree instaid of 72 (1/5 of 360 degree) to avoid collisions of the arms when they do the transition. I had to use a separate coordinate system for the path based of the center of the machine, in the new coordinate system i use Xc and Yc. Path by Andreas Håkansson, on Flickr As you can see in the image above the path starts at 328 degree and moves to 392 degree. I keep going above 359 (instaid of starting over at 0) to avoid having make special code that would have to hadle the jump as it moves along the path. To get Xc and Yc coordinates for the path (based of th center of the machine). Yc = cos(v) x r (v = angle, r = radius) Xc = sin(v) x r Ex: 1/ (Yc) 127,2mm = cos(328) x 150mm (Xc) -79,5mm = sin(328) x 150mm 2/ (Yc) 150mm = cos(360) x 150mm (Xc) 0mm = sin(360) x 150mm 3/ (Yc) 127,2mm = cos(392) x 150mm (Xc) 79,5mm = sin(392) x 150mm Now i just need to get the path based in the center coordinate system to the coordinate system for the arm. The distance between the two coordninate systems is know (just measure). To get the Z and X positions. Z = P - Yc (P = distance between the two coordinate systems) X = 0 - Xc Ex: (Z) 122,8mm = 250mm - 127,2mm (Yc) (X) 79,5mm = 0 - -79,5mm (Xc) The Y value for the arm does not need to be calculated, it can be what ever i set it at as long as the arms can reach it. So that is basically the math for the machine. I use the same calucaltions for all 5 arms. To get it to move in the path i start at 328 degree and then every 100ms i add 1 degree until i get to 392. Then i lower the Y value to lower the arm and then start to subtract 4 degree every 100ms until it reach 328 again. Then change back the Y value to make to arm go up again then it kinda repeats that. Each arm starts at 5 diffrents points in this cycle so that when the first arm starts moving forward the last arm will start moving revers. This way there will always be 4 arms holding the plate. There is probably more efficent ways to solve this, but this is what i could come up with. :) Most of the equations could be used for a walking robot as long as its only has 3 joints / leg if you want all legs to pull in the same directions. But i have a feeling there might be some weight issue. Hopefully the explinations was understandable and not too boring. :) /Hknssn
-
Hi there, I'm new, and this is my first robot on this forum! So today, I'll be showing you the EV3 Camera Bot! This robot is controlled by remote, and it can move by wheels, and even press the trigger by remote! It IS actually a pretty practical robot, as it can get into places where humans can't squeeze in, such as under a bed. Anyway, just check out the video below!
-

GBC Module using an EV3 controlled train
bartneck posted a topic in LEGO Technic, Mindstorms, Model Team and Scale Modeling
This LEGO great ball contraption consists of a module that sorts the balls by its color and a train module that returns the balls to the start. Both modules use Mindstorms EV3s to control the motors. The train EV3 controls and original LEGO RC Train motor using a DIY cable. Enjoy! -
So we got the 31313 and build most of them. Great fun. I have search some but i cant find that many custom downloads for the standard kit of 31313. There is the education kit, but when i check i have to add part for almost 200 euro and there is only like 4 builds (If i dont add 100 more and get the expansionpack) Any place to buy or get more builds? Sure we done a few by our self, but the done once are far more fun to try out! Cheers
-
Communication between NXT and EV3 brick
Hanso posted a topic in LEGO Technic, Mindstorms, Model Team and Scale Modeling
Lego doesn't support a message protocol that is interchangeable between the NXT and EV3 brick. To overcome that problem, I have written a small program in C# to make the translation between the two different bricks. It works fine, but you always need a PC in between. At our blog (see https://siouxnetontr...pc-application/), I have written an article with a completely different solution, namely a 'motor communication protocol'. Enjoy. /Hans -

[MOC] EV3 climber/strong vehicle
Silvio posted a topic in LEGO Technic, Mindstorms, Model Team and Scale Modeling
I had two projects: to make a very strong/good climber vehicle and a fast one. This is the climbing one. I used four EV3 L motors and ten 32019 tires. Motors are an overkill, two would have been enough. The main problem was traction and weight distribution. As a climbing surface I used a "Kapa fix" board. That is a very challenging (slick) surface, but great for comparison since it is easily obtainable and same for everyone. The "car" does nothing special, it is just fun to watch it climb very steep inclines. Current "record" is 55°. -
[EV3] Super Stadium Truck – Motorized Short Course Vehicle
DamonMM2000 posted a topic in LEGO Technic, Mindstorms, Model Team and Scale Modeling
This is a large short-course style stadium truck built with Lego Mindstorms Ev3. It features independent rear suspension and a front live axle with steering. One Medium Motor controls the steering, and one Large Motor drives the rear wheels. It also uses the InfraRed Sensor for Remote Control. The reasons I used only one motor in this model are: 1. I was attempting to reduce weight, 2. The chassis of the truck is even studs wide, not odd; not allowing a very easy placement of two motors, 3. This vehicle was built as a test vehicle for the new 4-stud wide differential I got a while back but never used until now. The drawbacks of this truck are: 1. One motor does not exert nearly enough power, 2. The old-type differential makes it impossible to not use more gears in order to transfer the power, 3. All the gears used decreases efficiency massively, 4. The rear independent suspension worsens performance, 5. A 3:5 gear ratio was used (a 1:3 would have been better), 6. The truck is very large, bulky, and heavier than most other robots that I have built. I extremely apologize for the audio/video sync issues, I have no idea why the video turned out that way. Music: http://www.bensound.com [] Extra pictures coming soon! [] -
NEW YouTube Channel Trailer
DamonMM2000 posted a topic in LEGO Technic, Mindstorms, Model Team and Scale Modeling
Hey guys, I recently created a new channel trailer upon reaching 100 subscribers and decided to share it here -

[MOC] Mindstorms Skittles sorter
laggyluk posted a topic in LEGO Technic, Mindstorms, Model Team and Scale Modeling
Hello everyone, it's my first post here :) I wanted to show mindstorms robot I've build a while ago: skittle sorter. As name suggests it can sort skittles by color, very useful! video: