Search the Community
Showing results for tags 'decoupler'.
Found 6 results
-
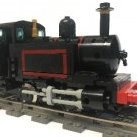
I wanted to share this simple decoupler with the community. The advantage of this type of decoupler is that it actually separates the magnets rather than just holding back a car by its wheel, so there is no chance of the train separating in the wrong place. Mine is activated by a hand crank, but the output shaft could easily be connected to a motor. The photos should give you a pretty good idea of how to build the mechanism. I hope others can make use of it! IMG_0649 by the chestertonian, on Flickr IMG_0650 by the chestertonian, on Flickr IMG_0651 by the chestertonian, on Flickr IMG_0644 by the chestertonian, on Flickr IMG_0647 by the chestertonian, on Flickr IMG_0648 by the chestertonian, on Flickr Soli Deo Gloria
-
For those who were wondering, yes, I’m still alive! I apologize for disappearing, things have been / still are pretty hectic with 4DBrix. However, I would like to try spending more time again keeping in touch with the community again. I haven’t had that much time to work on new products but I did manage to finalize the decoupler. We made a video to show the new decoupler in action! We redesigned it because the initial decoupler had a few shortcomings: when the train wheels are in front of the ‘claw’ of the decoupler, it cannot be closed. From a distance, it’s hard to see whether the train is positioned correctly or not. Therefore, we added a 'magnetic sensor' to the decoupler. That sensor can detect the magnets of the LEGO train couplings. As such it’s easy to verify the positioning of the train. the initial design had a detachable motor comparable to our track switch motors. That was a straightforward solution but it was 8 studs wide. That meant that, when integrating the decouplers in a rail yard, the motors were touching the neighboring tracks. To avoid that, we integrated the motor into the decoupler giving it a much smaller foot print; that also allowed us to reduce the height. Some additional remarks: For the video, we replaced the PoweredUp controller and motor of the 60198 train by a PF motor and our WiFi train controller. Controlling the PoweredUp trains is work in progress... Positioning the train on the decoupler is not that easy. Therefore we implemented a small script in a generic tile that positions the train automatically based on sensor feedback. In the video, we ‘manually’ parked the train with the first car on the decoupler and then activated the auto positioning: it slowly moves the train backwards until we get a +90% reading on the magnetic sensor. That turns out to work very well. It’s also intriguing to watch because it’s the automation system driving the train autonomously... The hardware is ready and we hope to be able to make a first batch of decouplers the coming weeks and the release it… From the software side we might have to make a few extensions to the train control panel to improve the control of the train at low speeds, but the basics are there. As usual, let us know what you think!
-

Button Control Panel: decoupler, boom barrier, switches and lights
Lowa posted a topic in LEGO Train Tech
This is a control panel made with our button controls. It controls a decoupler, two boom barriers, a track switch and a traffic light. The buttons interconnect and each button is powered by the previous button, the first button is powered by a power brick. The goal is to be able to automate all aspects of your LEGO train layout. It's inspired by the vintage 12V system but designed for PF and 9V track. We're planning on launching a campaign for these button controls on Kickstarter later this month. Decoupler is 3D printed and PF track compatible. It decouples the train by blocking the wheels of the cars that have to be decoupled. It's powered by a servo motor. The boom barriers are made with a small servo motors, they measure 2 x 4 x 3+1/3. Let us know what you think! -
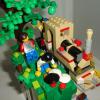
I've made this tiny decoupler rail car from spare parts I had at home. I am not sure but I think it could be the most inexpensive and simple decoupler which uses the pushing car system. It is also very easy to build and it has enough force to assure a pleasant play experience. More pictures could be seen here: https://www.flickr.c...157663113059113 LEGO small decoupler 4 by Severus A, on Flickr LEGO small decoupler 2 by Severus A, on Flickr LEGO small decoupler 11 by Severus A, on Flickr LEGO small decoupler 10 by Severus A, on Flickr
-
Hi all For our project "Fully automated train layout" (more information can be found here: https://siouxnetontrack.wordpress.com/), I have designed an automatic train decoupler. A video of the first test run can be seen here: .For our Lego World 2015 layout, we have adapted the decoupler (expecially more speed) but the basics remain the same: The wagon(s) behind the train are pushed away to overcome the magnetic force of the coupler Loco moves forward (this is needed otherwise the magnetic force pulls back the wagon if it is not too heavy like the one in the picture above) Because our train layout is fully automated, Mindstorms is used for the controls. But the same principle can of course be made using a PF motor and PF receiver. Enjoy. /Hans
-
After some recent interest in the MKIII decoupler, it made me think should I put it on Ideas ? Would it stand on its own, or should I group it with other track items or lighting ? If you look at what TLG has said over the years, that automated controls/lights and other stuff which would turn our train layouts into proper model railways is not going to happen. If you look at the interview with the designers of the 2014 trains in issue 15 of Railbricks magazine, you'll see the reasons why. So alone it is. I have no misconceptions that this very easy design could match the great models this program has produced (Ghostbusters, Exo Suit etc..) That's not the point, I'm glad they changed its name to Ideas, because this is one that fits the definition. Throw in a railroad minifig and you've got an Ideas Polybag ! So if you've built one, going to build one or just like the concept, please take a minute to register your support for the Simple Decoupler on the Ideas website. thanks CB This thread is where it all started