Search the Community
Showing results for tags 'custom'.
Found 426 results
-
I'd like to MOC a vampire-hunter minifig in a puritan outfit. The only thing I can't find is a black puritan hat, the same style as this one: http://www.heritagec...oduct-p586.html Where can I get a black puritan minifig hat?
-
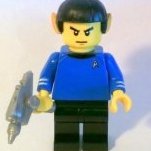
After a discussion with LuxorV and Dr Leg O'Brick, We came to a conclusion that Community was the best place to put this thread. Here Kre-O decals will be produced so that you can customize your Kreons to your heart's content. Kre-O themes are as followed Star Trek Transformers G.I Joe Battleship Dungeons and Dragons Cityville Invasion Decals will be made from that list of themes. Here are some I made earlier General Trelane (Retired) Harry Mudd These decals were inspired by Star Trek: The Original Series Kre-O decals are the same size as Lego decals at width, but are slightly shorter at the length I look forward to seeing what you can come up with, - END OF LINE -
-
Edit: Instructions are no longer available.
-

Sarertooth and Mystique Custom X-men HELP?
TristanLoganLoki posted a topic in Minifig Customisation Workshop
What can I use for Sabretooths claws? Any ideas? Got an idea for the hair, if I base him on the movie or Xmen Evolution. Also any Ideas for Mystique? ref or pictures for parts please. thanks sorry spelling mistakes ;/ -
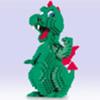
Hi everyone. I am ArtPromoterGuy from bay area, California. Sorry I don't know if this is the right place to post this. But I made this custom lego piece, about 7 and half inches tall. I would love for Eurobricks friends to check it out if you are interested! I apologize if this is the wrong place/wrong way to post this. But I am new here.
-
Any ideas how to make Bobby/Ice man from X-men?
TristanLoganLoki posted a topic in Minifig Customisation Workshop
ANy ideas on body hair etc? Want to base him on the film version, and not full ice mode. Any ideas with pictures would be great thanks -

Changing Color of Technic Parts
__________________________ posted a topic in LEGO Technic, Mindstorms, Model Team and Scale Modeling
Hey EBers, I want to change the color of the parts in 8110 Unimog. Any advice on what technique (painting, dyeing, etc.) would be best? I'm totally inexperienced with this stuff. This would be to enhance the look of the vehicle with an all-black bed, chassis, etc. Thanks, have a good day! -
Hello This is my custom Silver Samurai figure. It is made with all lego parts What do you think? http://www.brickshelf.com/gallery/TristanLoganLoki/X-Men/untitled11.jpg picture 2 http://www.brickshelf.com/gallery/TristanLoganLoki/X-Men/untitled12.jpg
-

[MOC] The Ghost Rider, Spirit of vengeance, Figure scale MOC
The Joker1 posted a topic in LEGO Licensed
Hey guys, As a massive marvel fan and motorbike fan I am naturally in love with the original spirit of vengeance from ghost rider 1. I have always planned to make the bike as a MOC but never got round to it. However with the release of the agents flame headpiece and with inspiration from ACpins fantastic creation I finally got round to it. Initially I had planned to go with something very similar to ACpins however i found that a tad large, So starting from scratch here's the result. The grievous head is sadly in bad condition as i got it in a trade many years ago. The ghost rider by Legocollecter123, on Flickr The ghost rider by Legocollecter123, on Flickr The ghost rider by Legocollecter123, on Flickr I have probably broken every legal lego part connection in the book but please let me know what you think anyway. Thanks -
Over the next few weeks Ill be upload finished customized lego figures. These will be from the X-men universe, either film or comic book, or a mixture of both if I cant get the parts. Here is a link to who im working on and will be updating that as parts get finished http://www.eurobrick...83#entry1900993 Here is Yukio from The Wolverine What do you think? Also can anyone recommend a good paint sealant to buy from the UK thanks.
-
How to apply custom decals on LDD renders
BEAVeR posted a topic in Digital LEGO: Tools, Techniques, and Projects
You may have encountered it: you built a nice model in LDD, but it looks surreal because it lacks decorations on e.g. the minifigs. This tutorial is here to help you with that. In this little tutorial, I will try to explain how you can enhance the POV-Ray renders of your LDD models with custom decorations. You can design entirely new figures for example, or you can apply the decorations that aren’t available in LDD. My example in this tutorial will be a stormtrooper minifig. This figure lacks all decoration in LDD, and is commonly used in digital Star Wars builds. It gives me the opportunity to explain how to decorate surfaces that aren’t directly accessible in LDD, how to fit custom decals and explain the general principles. This method doesn’t involve any hacking and doesn’t require any sick programming skills (although the custom decorations might need your artistic talents…). And the best of all: all programs I use here are entirely free! I’ll be using Lego Digital Designer, LDD2POV-Ray, POV-Ray and Inkscape. So let’s get started! Decorate the target pieces in LDD LDD2POV-Ray, the program that will eventually place your custom decorations, can only replace already applied decorations. So firstly, you need to give the pieces you want to decorate a replacement decoration in LDD. Make sure to use different decorations for each surface, so that you later can keep track of which filler to replace with which substitute. Also, taking a screenshot for reference is not a bad idea to support your memory. But wait a minute… Some parts don’t allow for any decorations at all in LDD! Minifig torso’s are not a problem at all, but things like helmets are a whole different story. But luckily, there is an easy way to apply decorations that will work in most cases (no guarantees though!). You have to export your .lxf file to the LXFML format (File -> Export Model). This .lxfml file is actually a textual representation of your model. Among others, it contains a list with the placed parts, including their color(s) and decoration(s). To find your part, use the search function (Ctrl + F / Cmd + F) and type in: in which you replace 30408 (the designID of the storm trooper helmet in this example) with the designID of the part you desperately want to decorate. You can find this ID by clicking on the part in LDD and looking at the bottom left corner. If multiple of these parts are available, you can give the specific part a different color and check for the one that says materials=”26” in which you replace 26 with the number of the color you used (you can find this number by hovering over the color in the color menu in LDD). The key part is then to change the part that says decorations=”0,0,0” in which the amount of zeros dictates the amount of surfaces that you can decorate. If the line isn’t present at all, you’re out of luck and won’t be able to decorate your part. Otherwise, replace the zeros with valid decoration ID’s. It’s best to take decorations that are square and detailed (I will explain why later), so I suggest using the decorations of the 2x2 flat tiles. You can find these ID’s by placing some of these decorated tiles in your model, and check in the LXFML file what number is filled in in the decorations line of those parts. To make it easier for you, here are some handy decoration ID’s you can use: 73023, 63708, 99825, 55350, 63404, 601245 Then, save your file, and open it with LDD. You’ll see your parts are looking very ugly with those random decorations, but you’ll be happy to have decorations. You can copy these parts to a ‘normal’ .lxf file, and get rid of the parts you used to find the decoration numbers. Now we can move on to step 2! 2. Open your model with LDD2POV-Ray LDD2POV-Ray is a program that converts your LDD model into a file that can be rendered with POV-Ray, a ray tracer that simulates the behaviour of real light to simulate a realistic effect. You can set lighting etc, but more importantly, you can set your own decorations. To do this, go to the “Decorations” tab, and check the box “Use custom decorations”. A list will appear at the bottom, showing all the decorations you used. Clicking on them will reveal a thumbnail. Now you’ll be happy that you used different decorations to know which is which. You’ll notice that the decorations (unless they are square) are a bit stretched out. That’s because the program only accepts square decorations. So to load your own decorations, you’ll have to make sure they are square. Otherwise, they won’t cover the whole area you intended. If you already have your decorations (you found them on one of the indexes of the customisation forum here, for example), you can skip to step 4. Otherwise, I’ll give a brief account on how to make your own decorations in step 3. 3. Create your own decorations Personally, I make my decorations with Inkscape. It’s an easy to use vector based program. That means you can easily create very clean, smooth and crisp shapes. I’ll leave it to others to educate you in this nice software, but I’ll show you some general strategies to make accurate decorations. When working on complex curved shapes, like the storm trooper helmet, you won’t know for certain how your image will be mapped to the surface. That’s when the screenshot you took comes in handily. Because you have used decorations with a lot of detail (if you’ve been following properly!), you can easily see how the image is deformed and placed on the surface. You can identify the regions where you want your details to come, look to what part of the placed decoration it corresponds, see what it looks like in its flat state (you can see this in the thumbnail in LDD2POV-Ray), and place your detail in the according place. So in the example of the storm trooper helmet, you can see that the mouth should somewhere at the center of the graph. LDD2POV-Ray shows that that graph is a bit above the, so now you know you have to place the mouth around the center of your decal. When you’ve finished your decoration, you have to make sure your decoration is square. This will most certainly occur when you’re designing decorations for minifig torsos. If you leave it in its actual proportions and plug it in LDD2POV-Ray, you’ll see that the image doesn’t fill the whole area, compared to the stretched out decoration you have to replace. So you resize your decoration. In Inkscape, simply go to the top, where you can enter dimensions. Then you go to File -> Export Bitmap and a dialogue box will pop up. Make sure to select ‘from selection’, and that the amount of pixels of your image is high enough. Otherwise it will look pixelated in the render. Finally, chose .png as file format, and remove the background color of your decoration. Because it might look like the right color in Inkscape, but in your render it will look like the decal has a different color than the body, which isn’t what you wanted. So now you have your parts temporarily decorated, and you got your custom decorations ready. So time to replace them and render them. 4. Render your decorated model Firstly, you have to load your new decorations in LDD2POV-Ray. There are multiple ways to do this, but the easiest method is to select the decoration you want to replace and then click on the empty canvas. A window will pop up to allow you to select your decoration. Just select it. Repeat for the other decorations, making sure you replace the right decoration with the right replacement (that screenshot will come in handy now, especially since you can’t have both LDD and LDD2POV-Ray open at the same time at this moment!). Then you can fiddle around with different settings like lighting etc. For test renders I suggest to place in the first tab the slider on the lowest positions: ‘LDD geometry’. This will result in slightly less good, but much faster renders, allowing you to quickly get feedback about your decorations, so that you can adjust placement and proportions. For flat parts this won’t be necessary, but it can help for curved parts. That’s why I included the TIE pilot in the render. You can see the ensignas are slightly deformed. That’s not my intention, but I already predeformed the circles in the decal, so that it looks more or less round on the surface. You’ll have to experiment a lot with these ones. Anyway, when you're satisfied and feel the need for a more glamorous render, you can turn 'render with visible bevels' on in the slider bar, and wait for some time. You'll get something like this. Hopefully now you know all about rendering your custom minifigs, making your models more realistic. I hope to see some around! Anyway: happy rendering of your minifigs! If anyone is interested in downloading the decorations I designed for the stormtrooper (for now without back printing) and the TIE pilot (torso printing already present in LDD), have a look at this page. Hope you've found this useful. -

Dragon Ball custom minifigs collection
Breakthrough Army posted a topic in Minifig Customisation Workshop
Dragon Ball custom minifigs collection by Breakthrough Army Please check our flickr for more photos. flickr user: breakthrough army Goku Kuririn Little Goku Piccolo Vegeta Super Vegeta Yamcha -
Hi, I just wanted to share my K-Wing with you. If you want this to become an official LEGO set, please support this project on LEGO Ideas (formerly LEGO Cuusoo). History The K-Wing was a heavy starfighter in the Star Wars universe. It was developed for the New Republic during the Yevethan crisis, replacing the B-Wing. In the Second Galactic Civil War, Commenor deployed K-wings for defense during the Battle of Commenor. (→ read more on Wookieepedia) The LEGO set The set I'm thinking of includes 3 rebel pilot minifigs and a R2-series astromech droid. It would fit perfectly to the other already released starfighters, like the official X- or Y-Wing sets. I created the model using Lego Digital Designer. My construction consists of 1020 pieces, the price would probably be around $100.00, but please consider that the final set design by LEGO could be different. Please support this project Again, please cast your supporting vote and spread the word, inform your family, your friends, and anyone you know who could be interested in supporting this LEGO set idea - the path to 10,000 supports is a long one and this mission needs any help it can get! ;) PS: I’m going to build one when reaching 1,000 supporters
-
Hello again! This time I've brought you something a bit special, A locomotive of my own type! I don't know if these exist or not, but I made a crocodile style steam locomotive! Here is a full view of it: As you can see, it is not that big. Only enough that it can hold one minifig who is driving it. Speaking of driving it, here is the controls! Well, it really Isn't that realistic compared to real steam locomotives :P Here is it turning: I also made a coal car from a similar time which I'm pretty proud of: Here is a side view of it. The problem about LEGO tracks are the tight turns so the 4 wheel design does not cope well on turns: That's about it! Feel free to critique it!
-
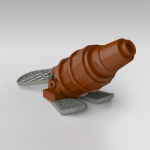
It includes: Trans-clear blue axe head from chima. Gold lightsaber hilt from chima. Trans-clear blue head from 2004 Millennium Falcon hyperdrive. Three pronged dager from Ninjago.
-
Here are the minifig superhero and supervillain MOCs of which I have pictures. I have a few more I haven't photographed yet. I'm mostly not into heavy modding but I'm also not a purist as you can see from the third party parts. Apologies for the rubbish photography. My only camera is my phone which dates back to the dawn of time. Wolverine! Hawkeye Riddler (already posted on EB - reposted for completion) Electro
-
Hey guys! I've just made my second MOC, this time it is an engine! The GNER HST 125 to be precise. I'm pretty pround of it because it is my first LEGO train engine MOC. And for my first one I thought that I would choose my favorite train And here is the LEGO version: I had trouble with the front because it uses SNOT. Which I'm not that good at: The reason that it is black and red is because I'm only using pieces from the Hobby Train 10183. And here is the back where you can adjust the I/R receiver: You can take off the top to access the batter box too: So, that's about it! I'm open to critiques!
-
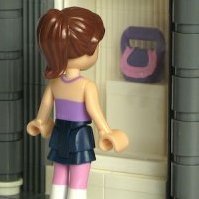
I thought I'd make a thread here for some custom superheroes I made with dyed hair pieces, which stops me posting them over in the Purist thread. The lack of certain hair pieces in particular colours can really limit the creation of certain characters so I have been obsessing over way to get hold of them since I started customising. My friend has been trying out various dyeing techniques (which is how I ended up with my version of Alpha Flight's Sasquatch) but he finally found one that seems to work OK on hair. It isn't super-robust - it wouldn't stand up to play - but it's fine for taking some pictures of. All the below are characters I created previously, but that look better with a custom hair piece. If anyone else has made any custom hair pieces, please feel free to add to the thread - not limited to superheroes either - that's just my obsession! Also, if anyone can think of any others I could try out, please suggest! Also, all design credits are on the Flickr photos themselves. She-Hulk: Psylocke: Black Widow: Polaris: Wolfsbane: Black Queen: Trevor Fitzroy and Bantam:
-
Over the last months, I designed some parts on my computer (I use CATIA), and I finally decided to share them with you. The first ones are Hero Factory / CCBS bones I created around October 2012 (which were presented on this topic last year) : Based on Aanchir's work, I created an upper torso part : I also created, this year, some System and Technic parts : (Originally suggested by Bamos) There are more pictures in the Brickshelf folder (available when public). If you have any question, suggestion, comment, criticism, or anything to say, feel free to post.
-
Dragon Ball custom minifig - Son Goku & Krillin
Breakthrough Army posted a topic in Minifig Customisation Workshop
Dragon Ball custom minifig - Son Goku & Krillin by Breakthrough Army https://flic.kr/p/nfiv8M Please check our flickr for more photos. flickr user: breakthrough army -
Captain America custom minifig by Breakthrough Army
Breakthrough Army posted a topic in Minifig Customisation Workshop
Captain America custom minifig by Breakthrough Army "I'm loyal to nothing, General... Except the dream" https://flic.kr/p/nagTwm Please check our flickr for more photos. flickr user: breakthrough army -
Captain America custom minigif by Breakthrough Army
Breakthrough Army posted a topic in Minifig Customisation Workshop
Captain America custom minifig by Breakthrough Army "I thought the punishment usually came after the crime" https://flic.kr/p/n2vVF9 Please check our flickr for more photos. flickr user: breakthrough army -
Custom Ironman MKII and War Machine
Breakthrough Army posted a topic in Minifig Customisation Workshop
Custom Ironman MKII and War Machine minifig Which one will you choose? Please check our flickr for more photos. flickr user: breakthrough army https://flic.kr/p/n2vVFQ Thanks for watching -
More detailed photo of Custom Robocop (2014) minifig Please check our flickr for more photos. flickr user: breakthrough army https://flic.kr/p/n2ucpi Thanks for watching
-
Thor and Ironman MKII custom parts and armor. Please check our flickr for more photos. flickr user: breakthrough army