Search the Community
Showing results for tags 'car'.
Found 718 results
-
Hello, I would like to present to you my latest MOC of a single-family home with garage: It is inspited by several projects of similar style that is apparently quite popular around the area of Warsaw, Poland. Could be not just here, but more widespread phenomenon. This is a a fully furnished two story building with small garden, garage and a fitting car (yes, it does fit inside, although barely :) ) The tree was built to finally use all those leaves I took from a PAB wall. And boy, is it part intensive... Here you can have another look at the tree and the side of the building: and yet another one: And now for the car: I am not a car expert, just wanted to have something to go with the building :) OK, so let's go inside. But just before that - a general areal view of the ground floor and surroundings: Here you can clearly see the plan of the ground floor. Once you enter the house from the top, you will see stair leading to the first floor on your right, underneath those is a kitchen area, on your left doors leading to the garage, bookcase, and doors to the toilet. Straight ahead door leading outside to the other side of the building. And here is a view of the kitchen: and the other side of the room: Let's climb the stairs and see what awaits us on the first floor: A living room with essentials like gaming console ;) There is also a bedroom with wardrobe, desk and a bedside table: More pictures can be found on my Bricksafe. I hope you like it :)
-
The Muppet Movie - Fozzie Bear's rusty Studebaker - real world MOC (updated 6/15/22)
Murdoch17 posted a topic in LEGO Licensed
"Ah, it feels good to be in a bear's natural habitat... a Studebaker" - Fozzie Bear Here is Fozzie's 1951 Studebaker Commander from the original Muppet movie in its original rusty condition. It should fit Fozzie Bear and Kermit the Frog, but I make no promises on the banjo fitting for the “Movin' Right Along” musical sequence. Sadly, the roof is very hard to remove (and this being reddish brown of unknown vintage) that I fear removing the roof to place the two figures inside will shatter parts. The Muppet CMF's my dad bought will thus just have to stand next to the car. (Its not like you can see inside the car to see them driving anyway!) Even if I could get the roof off, Kermit has to sit in the backseat as there isn't enough room up front for both side-by-side. In fact, they have to be centered in each row of seats to fit at all, due to arm constraints. In a show I saw about this film they mentioned the following factoid: The car seen in long-distance tracking shots was an identical second car, while the one with the closeups / scenes of Fozzie visibly driving had the steering re-connected to a wheel in the trunk, along with the relocated pedals and shifter. They also mounted a TV camera in the nose of the car, and a monitor in the trunk, so the driver could see where he was going. ...and that's all I've got. But before I go, I'll leave you with this: “Someday we'll find it, The LEGO Connection, The Designers, the MOC-ers and Me"- 2 replies
-
- 1950s
- automobile
- (and 13 more)
-
A new small compact car made by the Murata Electronics corporation. With an all new heads-up display. For sale in district 7, for only 20000 credits. Murata - C1E by Ids de Jong, on Flickr The pulsar Z1 is a small compact EV for quickly moving around in the city. For sale at your nearest dealer in district 7, 16000 credits (base price). Pulsar - Z1 by Ids de Jong, on Flickr For the building in the back see this topic: [MOC] District-7 - Ramen corner - LEGO Sci-Fi - Eurobricks Forums
-
[42125 Alternate] Ferrari Enzo
paave posted a topic in LEGO Technic, Mindstorms, Model Team and Scale Modeling
My next alternate model of 42125: Ferrari Enzo Features: - Opening doors, bonnet, trunk - Independent suspension - Fake engine - Working steering wheel Video: There's much influence of the 8653 set, which is my favorite one. So it's a kind of modern representation I made Rebrickable page: https://rebrickable.com/mocs/MOC-112172/paave/ferrari-enzo -
KAMAZ-4310 is a Soviet and Russian large-tonnage cargo, off-road vehicle of the Kama Automobile Plant. A significant part of these machines were produced for the Soviet Army. But despite this, a huge number of civil modifications were produced on the basis of this car. It is hardly possible to find industries where this car has not been used. On the chassis of the car, side bodies, cranes, manipulators, tanks, logging trucks, etc. were installed.I decided to choose a civilian version of the classic flatbed truck with folding sides. Like many of my recent works, this model is approximately 1:18 scale. It has a working suspension on all wheels: the front axle hangs on 4 trailing arms, the rear axles have a balancing suspension. The tires are from RC trucks. Unlike my previous KamAZ, this model is all-wheel drive. The drive is carried out by means of the L motor of the Control + system. The model is steered by the L motor in servo mode. There is a large Control + unit in the cockpit. In the future, I plan to build several modifications based on this car, such as a logging truck and a kung, I will be glad to hear your ideas. Instagram: https://www.instagram.com/legov94/ youtube: https://www.youtube.com/channel/UCZYK7_ZVxMqp85JoDGo85mw
-
I present to your attention a model of one of the most recognizable trucks in the post-Soviet space. KAMAZ-5410 is a bolster-type tractor, mass-produced from 1976 until the 2000s. The three-axle truck, designed to work as part of a road train with a gross weight of up to 26 tons, was equipped with an eight-cylinder diesel engine with a volume of 10.9 liters and a power of 210 hp. It had a spring front and rear suspension. Now, directly to the model. The model is approximately made in 1:18 scale.It has a working suspension on all wheels: the front axle is attached to the frame with four trailing arms and 2 gray shock absorbers are used as a shock-absorbing element; the rear axles are equipped with balancers. The wheels consist of a native Lego disc and scale tires (outer diameter 60mm) from RC trucks. The model is driven by the XL motor of the Power Functions system. The motor is directly connected to the axles via 12:20 gears. The steering of the model is carried out using a servo motor of the same system. Almost the entire cockpit space is occupied by a small battery pack and a Sbrick pack.A container semi-trailer with a 20-foot container from Maersk was also made to the tractor. The semi-trailer is also equipped with all-wheel suspension and has manually lowered "legs". Thank you all for your attention! Subscribe on all platforms!
-
Hello Porsche and Speed Champions fans, Porsche 906 aka Carrera 6 is a street-legal racing car from Porsche. It was announced in January 1966 and 50 examples were subsequently produced, thus meeting the homologation requirements of the FIA's new Group 4 Sports Car category to the number. The type would also compete in modified form in the Group 6 Sports Prototype class. For the year of the car's debut in 1966, it achieved numerous victories. The main inspiration came from a plastic toy car which I received as a child. Building instructions are available on the following links: https://rebrickable.com/mocs/MOC-106735/_TLG_/porsche-906 It is a studless build in the new, 8 studs wide Speed Champions style. I wanted to create a sleek model which is as accurate as possible in this small scale. I prefer the brick built solutions to keep the flexibility of the used parts in further builds, and therefore only a standard vehicle registration plate sticker is used. My intent was to keep the width-length-height ratio of the real car and this size makes it possible. The model contains lots of details: for example the emblematic front, the side view mirrors, the side air intakes etc. . Maybe the most challenging one was the iconic headlight, lots of solutions were tested before the final one. I tried to fill every unnecessary gaps and therefore some tricky build techniques are used. The model has space for one minifigure. I suggest to use a helmet or small hair. Thanks for visiting, _TLG_ Porsche 906 - Instructions 1 by László Torma, on Flickr Porsche 906 - Instructions 2 by László Torma, on Flickr Porsche 906 - Instructions 3 by László Torma, on Flickr Porsche 906 - Instructions 4 by László Torma, on Flickr Porsche 906 - Instructions 5 by László Torma, on Flickr Porsche 906 - Instructions 6 by László Torma, on Flickr Porsche 906 - Instructions 7 by László Torma, on Flickr Porsche 906 - Instructions 8 by László Torma, on Flickr
-
I digitally recreated this model on January 30th, practically the day pictures of set 40532 - Vintage Taxi were revealed. I then ordered the six new black brackets + about 295 other parts from Lego Bricks and Pieces (R.I.P.) and the rest from BrickLink. Most of the car was finished February 7th, but the black brackets only arrived today. (March 24th). Here is how I recreated the car without instructions by guesswork: For this model I used Rebrickable's inventory to get a parts list of set 40532, removed all the accessories' parts (taxi stand, mini-fig, etc.) and changed the color of the yellow parts to several other colors to see what worked before settling on dark red. As this was designed / built before the instructions were released, it was just a visible parts field at first. (Nothing but parts laid out in a grid in LDD.) I didn't want to wait for the instructions while part prices could go up and thus I reverse engineered it using only logical part placements from the list. I also used Brickset's review of the set for reference to things official LEGO pictures didn't give... although I did miss a 1 x 2 green plate part doing it this way, and had to get a black one from my own collection. I changed the wheels to be something I already have in the same basic size, and the front grille to be a different style for reasons of cost saving and individuality. (If everyone else is going to have that one-piece front grille, why follow the crowd?) Doing something similar, but yet not the same was a goal in this entire project to begin with anyway. I added a license plate to the rear of the vehicle. The car still seats two with room for some luggage behind the passenger. As for the other 295 parts I purchased that January day, they are going to this house build which you can see more of in it's own topic here. All the parts have finally been gathered, with construction to start VERY soon, possibly Saturday... eight months after I started looking for parts for it! Thoughts, comments, and or complaints welcome!
-
This model was originally used with Mister Incredible from the LEGO Incredibles II video game, and was reverse engineered by a builder named @hachiroku. The instructions for the original version remade by that user are seen here. I first recreated the car in LDD from his video instructions and revised it a bit, especially in the paint job department. I gave it a more current Incredibles look, instead of the original dark azure with red dot on the hood. This was needed because LEGO hasn't made a prologue / glory days version of the Mister Incredible super suit and I wanted it to match perfectly. I consider the car to be a post-Incredibles II repainted version as it is shown to be back in the Parr family's ownership at the end of that film, yet it was still in the original paint scheme. The redone hood logo looks pretty good this way, don't you think? Flaming exhaust is able to be placed on the rear tailpipe. I also added a small spoiler to the rear just above the tailpipe, as it looked weird with nothing there. The inside controls with a bunch of dials / gauges and a steering wheel. The roof is easily removable because it isn't connected at the front of the car. I've also created a color-based enemy and his vehicle for Mister Incredible to fight, which you can see here in it's own thread. Comments, questions, and complaints welcome!
-
- mister
- incredible
-
(and 7 more)
Tagged with:
-
I’m not a “car guy” by any stretch of the imagination. I couldn’t even tell you what type of engine my own car has. However, I like cool-looking sports cars as much as anyone and bought a fair amount of LEGO Racers sets back in the day. And while I haven’t bought any sets from Racers’ spiritual successor, Speed Champions, I’ve had my eye on some of the sets for a while. Each wave seems to be getting better and better, and this latest batch of sets looks especially good, so I was excited to get the opportunity to review the entire wave! So, fasten your seatbelts and join me as I do a full inspection of these race cars, starting with… Set Number: 76906 Name: 1970 Ferrari 512 M Theme: Speed Champions Year of Release: 2022 Ages: 8+ Pieces: 291 Price: $19.99 / 19.99€ Online Shop description: The Box TLG is kicking off the March 2022 wave with a classic from 1970, the Ferrari 512, and not just any version of it, but the modified one (hence the “M”) driven by Jacky Ickx when he won the Kyalami 9 hours race. The box features the same design as the Speed Champions boxes from the previous two years with the theme’s logo on a checkered flag in the upper left corner and the car manufacturer’s logo in the upper right. I’m glad they switched back to this type of background from that boring gray stripe they were using from 2018 to 2019. The flag fades nicely into the background of the box art which shows the 512 racing ahead of two other cars on a racetrack. What’s odd is that it seems to be nighttime in this scene. I don’t know during which 9 hours the Kyalami race took place, but I’m pretty sure it wasn’t at night. Correct me if I’m wrong in the comments. However, they correct this potential inaccuracy on the back of the box where it shows the classic racecar driving down the track during daylight, showing off the rear of the vehicle. It also shows a close up of the cabin and a reference picture of the real car along with another Ferrari logo. The top of the box features a three-quarter view of the car, some copyright info, and one of the shiny golden wheels for scale reference, while the bottom has the usual choking hazard warnings and other info. The same image of the set is shown on one of the sides of the box along with a holographic sticker of authenticity from Ferrari. The other side only has an ad for the Lego Life app. Contents Inside the box there are two numbered bags, a sticker sheet, and one instruction booklet. Instructions This year, Lego is making the instructions for Speed Champions sets available in the Lego Instructions app. They’ve had these interactive instructions for a while now for Lego City, but I guess they have debugged it enough now that they feel comfortable branching out into other themes. And they want you to know about it. Not only does every set list this as one of the features of the set, but they also have a full two-page ad for the app at the beginning of the booklet which shows the different options for instructions using a City ice cream truck as an example. Unfortunately, the instructions for these sets have not been added to the app yet as of this writing, so I can’t test them out for you, but if they are like all the other 3D instruction in the app, they will be a nice alternative to the physical instructions, especially for visually impaired people, as they allow you to zoom in rotate around the model, although the rotating doesn’t always work the way you want. Oh well, I prefer physical instructions anyway. The instructions are easy to read, and like all 2022 sets (AFAIK) feature a progress bar that runs along the bottom and shows you how far along you are in the build. Unlike in the City sets, the progress marker is not a minifig from the set, but a generic dot. However, they still managed to give the bar a unique flavor by making it gray to match the Speed Champions branding. There is an explosion of stars at the end of the instructions for the minifig and the car. Notable Parts There are only a handful of notable parts in this set, but they are good ones. There are three types of parts that are printed in this set: the windshield, a 1x2 tile in trans-black that has the top covered In red, and the 1x1 plate with a tiny Ferrari logo on the side which has shown up in a few other Ferrari sets before. There are six of these plates in the set, even though only two of them are visible in the finished model, so you could switch out the other four with unprinted ones from your collection and use them in your MOCs. This set also comes with the highly anticipated 1x5 plate that debuted last year and shows up in red for the first time here, along with the preexisting black version! The 1x2 plate with vertical clip also comes in red for the first time, and the new 1x2 inverted arch only appears for the second time in red after debuting in the Fender Stratocaster. This set comes with the old style of wheels with the newer dotted brake rotor lines which comes in pearl gold for the first time (although its predecessor with the solid lines did appear in 3 sets in that color). Minifigs This set comes with one minifig to drive this historic vehicle and you’d think that it would be a Lego version of Jacky Ickx considering that this is his car, but if you think that, you will be disappointed. Sadly, Speed Champions sets always come with super-generic drivers which is one of the reasons why I miss Lego Racers. As awkward as their faces may have looked, it was great to get minifigs of real racecar drivers like Michael Schumacher with their respective cars back in the day. So, instead of Jacky, we get this guy with tousled brown hair and a generic smirking face. It doesn’t even come with a wrench accessory like some Speed Champions drivers do. Not only is the face boring, but also misprinted in this copy of the set. The white dots in the eyes are too high, making it look like the minifig is wearing white eye liner. No judgement if the fig likes it that way, but I don’t think it’s intentional. Fortunately, it comes with a great, brand-new Ferrari racing suit that does match Jacky’s to make up for the disappointing head a bit. It’s nicely detailed with a Ferrari logo, zippers, and lines that continue down to the legs and onto the fig’s back. The Build Since I had never built a Speed Champions set before and the only cars I have built in recent years are the crappy ones that are included as an afterthought in Super Heroes sets, I wasn’t sure what to expect, but I was pleasantly surprised by some of the building techniques. It’s interesting how they attached the hinges for the wedge plates behind the cabin and more the headlights and some of the side parts are attached by sticking them onto little bars. The unique shape of the mudguards on the rear wheels is achieved by building sections with the 1x2 inverted arches and clipping them onto the side of the car upside down in order to un-invert them. It would have been nice if they had just made a non-inverted version of this piece, but it’s a clever workaround that works pretty well. Spare Parts There are only a few little bits left over after the build including one of the printed 1x1 Ferrari plates. There is actually one more round tile in trans-orange which isn’t pictured here as it was camera-shy and rolled away before I took the picture. The Complete Set Here is the finished car in all it’s boxy-yet-aerodynamic glory! Aside from the six studs on the wedge plates behind the cabin, there are no exposed studs on the model, making it look nice and smooth. The color scheme and shape of it remind me of the A-Wing. I wonder if Ralph McQuarrie was inspired by this car for the design of that ship? Compared to the real thing, it looks pretty spot-on. The Lego version is only missing the rearview mirror (?) on top and some decals, especially around the back, but I’m not gonna complain about not having to apply more stickers. I like that the headlights are brick-built on this model rather than stickered or printed on like on most Speed Champions cars, although the use of trans-black parts makes them look too dark in my opinion. I think trans-clear would have looked better. It’s interesting how they designed the headlights so that they go all the way to the edge of the car by capping them off on the sides with the translucent tiles with the red printing on top. Unfortunately, as is always the case when they try to print on dark parts, the red color on the print appears darker than that of the red parts around it, and there is a visible dark outline around the print, making the tiles look out of place. It’s a clever idea, but it doesn’t work very well. Otherwise, the nose of the car looks great as they recreated the wedge shape of it excellently by building the entire nose section at an angle. In fact, the entire profile view of the car looks great. Spoiler alert! The two little spoilers at the back of the car which on the real vehicle are only attached at the corners are held on by trans-clear round plates with handle which is a clever solution. What I don’t like, however, is that the back of the driver’s cabin is almost completely open. I’m not sure how they could have fixed this, but it’s not ideal. I like how they executed the air channels on the sides of the car that go down toward the rear wheels, under the hull, and out towards the spoilers. The windshield can be lifted up towards the front, so you can seat the driver inside without having to completely take it off like you do on most Speed Champions cars. This is not how it works on the real 512, but it’s a neat play feature all the same. The interior features a stickered double cheese slope with gauges which adds a welcome bit of detail. We have actually gotten this type of racecar before. Set 75876 included the Ferrari 512’s main competitor, the Porsche 917. Even though the Porsche set came out back when the Speed Champions cars were 6 studs wide and looks much inferior to this set, I think the Ferrari would look good next to the 917K. (Picture courtesy of Brickset) Ratings Design: 8/10 A slick looking vehicle that looks very accurate with only minor design flaws. Build: 8/10 An enjoyable build with several unusual SNOT techniques and not too many stickers. Playability: 6/10 The car is fun to zoom around and the windshield can be lifted up. Figures: 7/10 An exclusive, detailed body is bogged down by an inaccurate, generic, and misprinted head. Parts: 7/10 A few new recolors of fairly new molds and some printed parts. Not too bad! Price: 10/10 At 291 pieces for just 20 bucks, this is easily one of the best values for a Speed Champions set! Overall: 8/10 The March 2022 wave starts out strong with this accurate recreation of a classic LeMans racecar. It’s relatively challenging to build, fun to play with, and it looks good on display. The only things that detract from it are the generic minifig head and some printing quality issues. At such a good value, I can definitely recommend it. Thanks for reading and thanks to TLG for sending me this set for review. What do you think of the set? I’d be curious to hear from Speed Champions fans and car aficionados, so let me know in the comments and in the poll above. The set will release on March 1, 2022: https://www.lego.com/en-us/product/1970-ferrari-512-m-76906 In my next Speed Champions review, we will take a look at a type of car that has never been seen in LEGO before! Until then, may the downforce be with you.
- 7 replies
-
- speed champions
- ferrari
-
(and 3 more)
Tagged with:
-
Fiat Multipla will seek revenge on everyone who calls him ugly!! I made this as a joke, after building the regular version of Fiat Multipla I was thinking, this car looks like a frog... so I build the limbs, The most difficult part was stability, but I figure out the joy of balance, just to not slip I put rubbers on the feet. The Amphibious Fiat Multipla by Sérgio Batista, no Flickr The Amphibious Fiat Multipla by Sérgio Batista, no Flickr
-
I made this rat/hot rod from scratch, not an exact replica of any particular car, just inspired by some Hot Rods and Rat Rods around. Rat Rod SB35 by Sérgio Batista, no Flickr Rat Rod SB35 by Sérgio Batista, no Flickr
-
This is an Impala I made trying to recreate with Lego the one that Ice Cube drives on the music video "It Was a Good Day".This MOC had some challenges, making an articulated suspension to simulate several positions and support the height of the car.Also, the green mudguards were a pain in the megablocks to find, it was released only one part in just one set (Marvel Superheroes set).The chrome touch is made with the parts I bought from Chrome Block City.The Ice Cube's bandana, I paint in black one pirate bandana, then I draw by freehand with a Sakura pen and finally put some Tamyia clear gloss varnish. Ice Cube's Impala 64 - Lowrider by Sérgio Batista, no Flickr Ice Cube's Impala 64 by Sérgio Batista, no Flickr Ice Cube's Impala 64 - Lowrider by Sérgio Batista, no Flickr
-
Hi! Maybe you expect a Ferrari... Well, close enough My entry for the Festival of Mundanity, hosted by BrickNerd and The Lego Car Blog. Fiat Multipla is probably one of the most atrocious cars ever made, It is ugly and mundane at the same time. I made it in 7wide'ish and actually had fun building it. Hope you don´t like it! The Red Italian - Fiat Multipla by Sérgio Batista, no Flickr The Red Italian by Sérgio Batista, no Flickr
-

The beginning of the LEGO history (90th anniversary) MOC
jelletv posted a topic in Special LEGO Themes
This project I came up with is based on the house of Ole Kirk Kristiansen, the founder of the LEGO group that celebrates its 90th anniversary this year. I made several rooms in the house. The workroom contains various details such as his typewriter and various blueprints. Ole Kirk Christiansen's living room. Ole's woodworking shop. Several well-known wooden toy models. If you want you can support this project https://ideas.lego.com/s/p:ddb75bfdf7644f8386cb25501c7a685e -
Here is my latest stop-motion video
-
Hello Ferrari and Speed Champions fans, the Ferrari F40 (tipo F120) is a mid-engine, rear-wheel drive sports car engineered by Nicola Materazzi with styling by Pininfarina. It was built from 1987 to 1992, with the LM and GTE race car versions continuing production until 1994 and 1996 respectively. As the successor to the 288 GTO (also engineered by Materazzi), it was designed to celebrate Ferrari's 40th anniversary and was the last Ferrari automobile personally approved by Enzo Ferrari. At the time it was Ferrari's fastest, most powerful, and most expensive car for sale. Building instructions are available on the following links: https://rebrickable.com/mocs/MOC-99799/_TLG_/ferrari-f40 https://www.mocsmarket.com/lego-mocs/ferrari-f40-building-instructions/ It is a studless build in the new, 8 studs wide Speed Champions style. I wanted to create a sleek model which is as accurate as possible in this small scale. I prefer the brick built solutions to keep the flexibility of the used parts in further builds, and therefore only Ferrari logo stickers are used. (If you preferred a better shaping instead of a real rear side grill, then 2pcs of parts 61409 could replaced by 2pcs of tiles and some additional stickers, see the picture 3.) My intent was to keep the width-length-height ratio of the real car and this size makes it possible. The model contains lots of details: for example the emblematic front, hood , side and rear intakes, the narrow black line on the front and sides, the front turn signals, the side view mirrors etc... Maybe the most challenging one was the iconic rear side with the vehicle registration plate and the rear spoiler, here there is a half stud offset. I tried to fill every unnecessary gaps and therefore some tricky build techniques are used. The model has space for one minifigure. I suggest to use small or middle sized hair. Thanks for visiting, _TLG_ Ferrari F40 - instructions 1 by László Torma, on Flickr Ferrari F40 - instructions 2 by László Torma, on Flickr Ferrari F40 - instructions 3 by László Torma, on Flickr Ferrari F40 - instructions 4 by László Torma, on Flickr Ferrari F40 - instructions 5 by László Torma, on Flickr Ferrari F40 - instructions 6 by László Torma, on Flickr Ferrari F40 - instructions 7 by László Torma, on Flickr Ferrari F40 - instructions 8 by László Torma, on Flickr Ferrari F40 - instructions 9 by László Torma, on Flickr
- 24 replies
-
- supercar
- sports car
- (and 29 more)
-
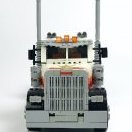
[MOC] Mack R series
LegoV94 posted a topic in LEGO Technic, Mindstorms, Model Team and Scale Modeling
Model of an American Mack truck with a container semi-trailer. The model uses small battery pack, sbrick, XL motor for driving and servo motor for steering. The truck and semi-trailer has a working suspension on all wheels, which you can see in the video. -
Forklift, Xl-motor for movement, l-motor for turning the wheels, two l-motors for lifting and tilting the boom. Instagram: https://www.instagram.com/legov94/
-
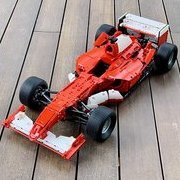
[MOC] Ferrari F40 1:10 Redux
lnteknik posted a topic in LEGO Technic, Mindstorms, Model Team and Scale Modeling
Ferrari F40The most iconic supercar from the edgy eighties. The last hardcore beast signed off on by Enzo. The absolutely definitive Ferrari. The legendFunctions- Working steering wheel- 5+R dogleg gearbox- Fake V8 working engine- Independent double wishbone suspension at all 4 wheels- Openable doors, front and rear clamshell- Manually operated pop-up headlights Design and InspirationThis creation is inspired by the fantastic work of @jorgeopesi from 7-8 years ago, reborn with contemporary Lego Technic pieces. I kept the gear shift mechanism of the original, and changed the gearbox to a modified version of @Rudivdk's 5+R manual transmission. Some exterior solutions also take reference from jorge's version, but everything else from steering, suspension setup to engine, body panels etc are my own designs. It's not a mod by any means, but hopefully a worthy remake. With the evolution of LEGO parts palette over the years, I have also managed to add more details to the model, such as: - cooling slots under the rear spoiler - exhaust manifold and a see-through rear grille - detailed interior and more representative racing bucket seats - detailed engine bay with all the bells and whistles (intercoolers, airboxes, etc) - as well as, the iconic line that runs across the entire car - also worth mentioning is the 3-piece rod hidden in the rear bumper that supports the rear clamshell when it's opened. Construction The car was originally built with parts from set 8145, 8070, and additional parts from my parts bin. However, 2x 42125 is also a great base, which provides 70% of the parts. The missing 30% is listed here. When making instructions, I have also tried to substitute expensive parts such as Red 14L soft axles, or Red 1x6 thin liftarms with more affordable solutions. The wheels used in the instruction are also from set 42125 to save cost, but if you want to use standard technic 56mm D wheels - part 15038, just need to use 7L liftarms instead of 6L as the rear wishbones. These wheels will stick out a bit and provide a slight rake, giving the car a more aggressive look. The wheels used in photos are third party/non-lego parts. They are great (provide a good offset between the front and rear wheel covers, making the rear wheels look "deeper") but perhaps not for the purists. You can send me a private message if you want to know where I get those wheels from, but note that I'm in no way affiliated with the seller. Neither can I guarantee the quality of the product nor seller's trustworthiness, so tread at your own risk. Instruction hereThe instructions booklet is 666-page long and contains 828 steps (talk about "Manifest" if you watch that show :D). You will find 11 modules and 10 assembly stages in between to combine the modules to form the final model. You can follow the instructions in the chronological order of the pages, or skip around, build all the modules first (in whichever order you like) and then follow the assembly steps, just like how real cars are built in the factory. Either way should bring you a enjoyable building experience. Thank you for reading this far. I hope you enjoy the write-up. Look forward to hearing your thoughts More pics here (bricksafe) Sneak peeks of my upcoming creations -
Lately I've been inspired by making flying cars, I had already made this taxi a few years ago in its "normal" mode I decided to give it an update with a lot of greebling, using only parts I already had without resorting to new purchases Inspirations from films like 5th element, Bladerunner and even Back to the future 2. the color scheme refers to the old taxis in Portugal, the taxi driver is a man with a sullen mustache, just like the taxi drivers in Lisbon Cyber Taxi 2067 by Sérgio Batista, no Flickr Cyber Taxi 2067 by Sérgio Batista, no Flickr Cyber Taxi 2067 by Sérgio Batista, no Flickr Cyber Taxi 2067 by Sérgio Batista, no Flickr Cyber Taxi 2067 by Sérgio Batista, no Flickr
-
Hello Skoda and Speed Champions fans, Skoda 105 is one of the iconic Eastern Bloc cars of my childhood. It was a rear-engined, rear-wheel drive small family car that was produced by Czechoslovakian car manufacturer AZNP in Mladá Boleslav, Czechoslovakia between 1976 and 1990. Engine sizes were 1.05 and 1.2 liters respectively. The color scheme of this model is based on my father's first car. Building instructions are available on the following links: https://rebrickable.com/mocs/MOC-93968/_TLG_/skoda-105/#details https://www.mocsmarket.com/lego-mocs/skoda-105-building-instructions/ KIT is available on MOCHUB: https://www.mochub.com/moc/skoda-105 It is a studless build in the original, 6 studs wide Speed Champions scale and fits perfectly to the new City style cars too. I have minimized the number of the stickers to keep the flexibility of the parts in further builds, therefore only two standard vehicle registration plate stickers are used. I wanted to build the model as accurate as possible in this small scale, therefore it contains lots of details: for example the front ligths, the front grill with the narrow chrome line and Skoda logo, the side view mirrors and the rear view mirrors, the door handles, the black rubber stripe on the sides etc... Maybe the most challenging one was the C pillar solution. I tried to fill every unnecessary gaps and therefore some tricky build techniques are used. The model has space for two minifigures: one on the front seat with small or middle sized hair (the rear view mirror assembly has to be removed in this case) and one on the rear seat without any hair. I prefer the model as it is shown on the pictures, but there are some modification possibilties: a) a rear windscreen can be added (there is a more detailed explanation in the last step), b) many of Skoda 105 cars has side view mirrors only on one side, c) on the real cars the color of the door handles and side view mirrors are sometimes black on the other ones they are chrome. Thanks for visiting, _TLG_ Skoda 105 - Instructions 1 by László Torma, on Flickr Skoda 105 - Instructions 2 by László Torma, on Flickr Skoda 105 - Instructions 3 by László Torma, on Flickr Skoda 105 - Instructions 4 by László Torma, on Flickr Skoda 105 - Instructions 5 by László Torma, on Flickr
-
Hello Lamborghini and Speed Champions fans, The Lamborghini Countach 2021: the supercar is reborn 50 years after the 1970s original. It is futuristic while also paying homage to the legendary 1971 design. The engine, a 12-cylinder hybrid with a staggering 769bhp, growls in a way only a 12 cylinder can do, while an electric motor adds another 34bhp to the output: a glimpse into the future of hybrid and fully electric Lamborghinis. Building instructions are available on the following link: https://rebrickable.com/mocs/MOC-93056/_TLG_/lamborghini-countach-2021 ( 20% off coupon on the first week: COUNTACH-FIRSTWEEK :) ) It is a studless model in the new, 8 studs wide Speed Champions style. I have minimized the use of stickers to keep the flexibility of the used parts in further builds, therefore only two ones are used: the Lamborghini logo and a solid black one for the narrow front grill. My intent was to keep the width-length-height ratio of the real car and this size makes it possible. I wanted to build the model as accurate as possible in this small scale, therefore it contains lots of details: for example the side grills, the front ligths, the front grills, the side view mirrors, the exhaust details etc... Maybe the most challenging one was the emblematic polygonal side opening. I tried to fill every unnecessary gaps and therefore some tricky build techniques are used. The model has space for one minifigure. I suggest to use small or middle sized hair. Thanks for visiting, _TLG_ Countach 2021 - Instructions 1 by László Torma, on Flickr Countach 2021 - Instructions 2 by László Torma, on Flickr Countach 2021 - Instructions 3 by László Torma, on Flickr Countach 2021 - Instructions 4 by László Torma, on Flickr Countach 2021 - Instructions 5 by László Torma, on Flickr Countach 2021 - Instructions 6 by László Torma, on Flickr Countach 2021 - Instructions 7 by László Torma, on Flickr
-
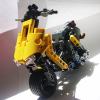
Stupidly Overpowered City Car
piterx posted a topic in LEGO Technic, Mindstorms, Model Team and Scale Modeling
Hi everyone! After building some bikes me and friend (who's gonna post his entry one of these days) challenged each other to make the smallest RC vehicle possible and why not, also make it ridiculously overpowered :) So I made this little city car, it has some brutal power given by the buggy motor connected with the fast output and geared up to 1.666. It should travel at around 10kmh but given the high center of mass, like a city car thrown at 160kmh as soon as you try to make a sharp turn it rolls over... wich I admit it's pretty fun! Indoors it performs crazy drifts and it's really enjoyable to drive around, probably geared 1:1 it would be even better for indoor usage. I hope you'll like it !!! Features:- 1 Buggy motor - 1 Buwizz Measures:19.3cm x 11.8cm x 8.1cm350g weight I'll post a video as soon as it stops raining like crazy as it is these days :D -
I'm not sure yet if I should spam my MOCs here, but maybe somebody will find it interesting :D


