Search the Community
Showing results for tags 'buwizz'.
Found 174 results
-

BuWizz and Powered Up
mudseason posted a topic in LEGO Technic, Mindstorms, Model Team and Scale Modeling
Hi All, title is already self explanatory. I know that it is possible to connect powered up motors to a buwizz using dedicated adapters. What about controlling a powered up servo with buwizz? Is that possible? I did I quick search but did not find anything so specific. Thanks. -

[MOD] Lifted and motorized 42110 Land Rover Defender
Zerobricks posted a topic in LEGO Technic, Mindstorms, Model Team and Scale Modeling
Here is my take on the motorization of the 42110. Basically the whole model was lifted to accomodate the bigger wheel, motors and BuWizzes. Model is powered by a total of 8 motors, 4L motors for RWD, 2L motors for FWD, one servo and one M motor. Total gear ratio is 1:3. It uses custom portal hubs in the front which have a pivot even closer than normal ones thanks to the new rims. Rear uses normal hubs and wheels, since they are sturdier. Axles use the original suspension's upper arms as mounting points along with a pair of 9L links for each axle. The original gearbox is connected to the rear drive, so it works normally. Steering is also connected to the original links, so steerign wheel and HOG also turn when steering Winch is motorized using an M motor. Video coming soon. -

Sbrick vs Buwizz
Newest_Tech320 posted a topic in LEGO Technic, Mindstorms, Model Team and Scale Modeling
Hi, Do u like Sbrick or Buwizz? -
Is Buwizz worth the price?
Newest_Tech320 posted a topic in LEGO Technic, Mindstorms, Model Team and Scale Modeling
Hi, I have 1 Buwizz and thinking of buying another or two more. Do you think Buwizz is worth it? -
Hi, Can you access the buwizz instructions page?
-

My new youtube channel about Technic Sets and MOCs
MotorizedBricks posted a topic in LEGO Technic, Mindstorms, Model Team and Scale Modeling
Hi everyone, I have many lego technics sets and thousands of lego bricks for making MOCs and MODs. Therefore, I would like to share and introduce my new channel on youtube. I would happy to share and help or ask help from you by touching your interests what I did. Please subscribe and keep watching my videos, I will upload at least one video every week. Many thanks in advance for watching, Keep building and happy bricking!! -
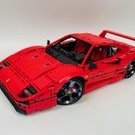
Dodge Viper ACR + Instructions
Lox Lego posted a topic in LEGO Technic, Mindstorms, Model Team and Scale Modeling
The American Club Racing (ACR) model was introduced in 1999, starting with the Viper GTS (Phase SR II). Exclusive 1 by lachlan cameron, on Flickr This model had suspension and engine enhancements focused on maximizing performance in road racing and autocross environments. Horsepower was bumped to 460 hp (370 kW) in these models, while torque increased to 500 lb·ft (678 N·m). Weight was reduced by over 50 pounds (23 kg) by stripping the interior and removing other non-essential items such as the fog lamps (replacing them with brake ducts). Dodge Viper ACR by lachlan cameron, on Flickr In an attempt to stay true to its heritage, I've left this beast without bells and whistles in the name of speed.It sport a front clam shell hood, opening rear trunk, and spring back doors. The real catch here is in the speed and options. Dodge Viper ACR by lachlan cameron, on Flickr This Viper packs 2x Buwizz 2.0 (with Ludicrous mode) that power this monster directly to 2x Buggy motors. The gearing is accessible and can be swapped for a higher or lower gear in minutes. Ratios avail: 1:1 and 1:1.7. This model also has many build options: 1. 1 or 2 buwizz / 1 or 2 Lipo / 1 or 2 Sbrick 2. 2 Buggy motor or 2 XL motor 3. Fully manual car (just remove the electronics 4. Swap out the engine on the fly for a new one! Dodge Viper ACR by lachlan cameron, on Flickr The Viper also has a rake to it that I also replicated. 1 stud off the ground at the front, 2.5 studs at the rear. Dodge Viper ACR- open hood by lachlan cameron, on Flickr Its been a pleasure playing with this car OUTDOORS (don't even think of play indoors, I smashed it over 10 times) and I hope you guys enjoy the video! Dodge Viper ACR by lachlan cameron, on Flickr Dodge Viper ACR by lachlan cameron, on Flickr Dodge Viper ACR - Overlay by lachlan cameron, on Flickr Flickr Album: https://flic.kr/s/aHsmeHa4rL Instagram: https://www.instagram.com/loxlego Crash compilation: Dodge Viper - Crashes by lachlan cameron, on Flickr -
BuWizz or SBrick?
Tarix819 posted a topic in LEGO Technic, Mindstorms, Model Team and Scale Modeling
I'm thinking of getting a Lego device that will give my models more power and allow me to control them outside and from long distance using my smartphone. As far as I am aware the best two options are BuWizz and SBrick, however I am not sure which option is best, as comparisons I have seen have never determined a clear winner. SBrick is way more affordable, more compact and seems to be popular in the Lego Technic community. I only learnt about BuWizz recently, it seems to generate an insane amount of power but it costs over twice as much as an SBrick and is bulkier, plus I already have 6 Battery Boxes and it would be a complete waste not using them. Of course they are both clearly better than the Official Lego PF IR Sensors I am currently using, which are god awful past a 2m range and are useless outside, however I would like to know people's thoughts, opinions and experiences to help me decide which is best value for money before I blow loads of cash on a toy. Currently I am leaning towards SBrick, but from what I've seen online, BuWizz looks like a viable option also. Cheers -

[MOC] RC Floor Racer with video instructions
CF 28 posted a topic in LEGO Technic, Mindstorms, Model Team and Scale Modeling
Hello All. This is my newest little creation. Intended to rip it up indoors on flat floors, which it does. Powered by one (off-brand) buggy motor and a buwizz 2.0. Has 4wd with open differentials front and rear, and solid axles front and rear. The lack of suspension allows for a robust chassis which handles the power delivery with no drama. Front tie rods can disconnect if you run into something but is otherwise very reliable, and fun to drive. -

[MOC] Ford Mustang Hoonicorn
Anto posted a topic in LEGO Technic, Mindstorms, Model Team and Scale Modeling
Here's a MOC on which I'm working since the end of the previous summer! After I have done the video of my DS3, I had the idea to do a new chassis with 4 wheel drive. I thought it would not be possible, but the first prototype was better than my DS3! Actually the MOC is not finished. The stickers are missing, and I'm continuing to develop the chassis (I'm adding a 4th L motor) Actually there are 1 L for the front, and 2 L for the rear. The great advantage of the 4WD is that it can take a great angle while turning, but it's always controllable. But, that can have an inconvenient: the understeering. For that, I did the same thing on the real RC drift cars: I added a free wheel. So when I do not accelerate, the front wheels are not braked and the car does not understeer. You can see this video on this video, done for BuWizz with Charbel. But this is one. It's the same thing, but there is only my car. The final gymkhana will be for the next summer, because that requires a lot of time, and with the school, I have not enough time at another moment of the year. -
 EDIT 08/22 - CURRENT STATE : Here is a truck I just made (well, it actually took me several days) while being confined. I don't like to take apart my sets on display to MOC so I had to do with just a bunch of spare part I had, hence the strange color scheme and some questionable building technics and aesthetic choices (for example, I didn't had anything to make the front radiator grill so i had to improvise...) I wanted to make an American style Truck, inspired by the 5571, 5591, 8285 and more recently 42078, and remote controlled so I can have a little fun with it. Please don't be to harsh, this is my first Technic MOC that didn't end at the prototype status. The original goal was to test my new Buwizz but I finally used only original Lego PF element, because I rather use a physical remote than a smartphone. It is powered by a L motor (with the drivetrain as follow : Motor---16T / 16T---20T / differential / 20T--20T / differential) ) and steered with a servo, with a decent speed and a good steering lock. The IR receiver and standard AA battery box are housed in the back of the cab, and the latest can slide up for replacement by tilting the foldable spoiler forward. The spoiler can also be folded all the way down to make the cabin roof flat. The doors can be opened and the hood can be lifted, even though there is no fake engine underneath because that's where I furst intended to put the Buwizz. (Actually there is still enough room for it so I could convert the truck to a Buwizz model and remove all the biggest section of the cab for a more lightweight truck. :-) I could also run an axle under the cabin to the engine compartment and run a fake engine from the exposed 16T gear... A lot of work, thoughts, trial and errors went into the building of this truck, so I hope you will enjoy it as much as I do. There is still A LOT room for improvement, but unfortunately I was limited by the parts I had. Almost all of my grey and black liftarms and technic connectors whereused in the process ! I am not entirely satisfied by the roof of the cabin in the IR receiver area, which is a bit messy, and I really wish I had DBG curved panel for the sides instead of LBG ones. And of course, I wish I could replace the ugly black plate at the front with a proper truck grill. I also have to add a fifth wheel, as it is not able to pull anything in this configuration. It should be easy anyway, as I have a lot of mounting option at the rear (the black panel is only there for aesthetic purpose). I just have to figure out something with the parts i have left... In the end I like very much how it turned out though, and I may consider a bricklink order to fix the aforementioned issues once the lock-down is over. In the mean time, any comment and suggestion for improvement is welcome ! :-) EDIT : now with a running fake engine !
 -

Driving ring pops out of clutch gear at high speed
astyanax posted a topic in LEGO Technic, Mindstorms, Model Team and Scale Modeling
Inspired by @Sariel's book I've been trying to incorporate a 2-speed transmission into a very high-speed car I'm building. Here's the essence of how it works: Now, please believe me when I say that, in the actual car, everything is extremely well braced -- it's impossible for gears to skip, and in fact they don't. The actual problem is this: using the fast gear, at very high acceleration -- I'm talking 2x BuWizz in Ludicrous mode -- the driving ring is pushed out of the clutch gear , even when the driving ring is held in place by a rotary catch which is itself extremely well braced. The result is lots of clicking and little movement. I can already hear some of you saying "You just shouldn't apply so much force to ABS plastic; of course it'll bend!" Nonetheless, I'd love to hear if you know of any super robust way to hold a driving ring firmly inside a clutch gear! -
[MOC] RC Karting (BuWizz)
Anto posted a topic in LEGO Technic, Mindstorms, Model Team and Scale Modeling
Hi! When I received my BuWizz, I wanted to make a fast RC model. It had to be very light, so a kart was good to make that. The mechanic is very simple. There are just some gears to turn the wheels at a high speed. As you can see, the driving is powered by two L motors and the steering by a servomotor. According to the tyres, this kart is very fast! -
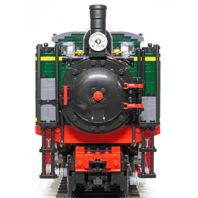
[MOC] Ferrovia Eritrea Gruppo R.202 0-4-0T in 1/22.5 - now with track video
Sven J posted a topic in LEGO Train Tech
Edit: New video here. Dear trainheads, Some time ago EB member @Plastic_Goth presented his digital model of Ferrovia Eritrea's Gruppo R.202 shunter. I immediately fell in love with that cute little prototype, and I knew I had to build a model myself, in slightly larger scale for 45 mm garden railway track. Well, here it is! The prototype was built in 1927 by Breda in Milan, Italy, for shunting service on the 950 mm narrow gauge lines in Eritrea (which was an Italian colony at that time). In total, eleven class R.202 engines were built; several lococomotives are still in operation today (the „R“ stands for „scartamento ridotto“, narrow gauge). My MOC represents a R.202 locomotive in ca. 1936, after the original lifting injectors (inside the cab) had been exchanged for non-lifting ones (below the cab), but before a new numbering scheme was introduced, dropping the „R“ in the class designation. The model is held in accurate 1/22.5 scale and driven by a single L-motor working on the second axle. It features front and rear lights (from Brickstuff; separately controllable for the left and right engine side) and a Seuthe no. 99 smoke generator. All funcions are powered and remote-controlled by a BuWizz 2.0. The rods and valve gear parts are 3D-printed parts of my own design. The model consists of approx. 1,400 parts and weighs just over 1 kg. Compared to my previous models, it is much easier to handle and maintain, due to its "small" size, but still has amazing pulling power (10 four-axle LGB cars are no problem). So I think it will become my standard "everyday" engine... And here are the pictures: Prototype data sheet (drawing not accurate and not to scale): While the fireman is carrying out a minor repair on the smokebox door, an administrative officer arrives in his brand new Fiat Topolino (modified design by Peter Blackert): Two tiny Italians... Some views of the cab interior. As the BuWizz is located in the position of the firebox, the roof and the boiler backhead can be removed for access to the power button and to the charging socket: The frame: Three weight bricks are installed inside the frame and boiler, thus increasing traction: The half-plate offset in radius between smokebox and boiler required some unusual (but surprisingly sturdy) SNOT-work. A video of the model on track will follow. For now, here is a short sequence of the engine on the roller test bed: More and high-resolution photos can be found in my Flickr album. Comments and criticism are most welcome. Thanks for your interest! Best regards, Sven -

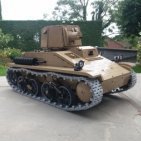
Tracked machine-gun Tank
Laurent14790 posted a topic in LEGO Technic, Mindstorms, Model Team and Scale Modeling
After reading several topics on Eurobricks, today, for the first time, I present an MOC on the forum. Do not hesitate to notify me if I made mistakes in my presentation. This MOC is a kind of tracked machine-gun Tank. It is powered by 2 BuWizz (one in the body, the other in the turret). Motorization: one RC per track with each a gearbox with 2 speeds. The two gearboxes are synchronized and controlled by a motor L. Orientation of the turret by motor M. Lifting of the "gun" by motor L. The firing mechanism uses 2 XL motors. Some pictures : Overview : Char Jaune Lego 001 by Laurent Lesellier, sur Flickr Char Jaune Lego 002 by Laurent Lesellier, sur Flickr Char Jaune Lego 001 by Laurent Lesellier, sur Flickr Char Jaune Lego 003 by Laurent Lesellier, sur Flickr The body : Char Jaune Lego 005 by Laurent Lesellier, sur Flickr Char Jaune Lego 006 by Laurent Lesellier, sur Flickr On-board ammunitions (105 rounds) At around 6 shots per second, the magazine empties in 17 seconds! it's very fast ! Char Jaune Lego 004 by Laurent Lesellier, sur Flickr Photo of a charger, there are 15 in the magazine: Char Jaune Lego 008 by Laurent Lesellier, sur Flickr For the video, you can watch the video on my wife's Facebook account. If you like it, you can like, comment and share! This will give me a few points for the contest organized by BuWizz. The subject of the competition is how to play with Lego during the lockdown due to the coronavirus! I propose an idea with playmobil! Do you like it? Thanks for reading. Do not hesitate to comment. -

Lego Technic Toyota Land Cruiser FJ70
maciej posted a topic in LEGO Technic, Mindstorms, Model Team and Scale Modeling
Hello to all, I am new here and wanted to share my very first creation with you. This is Toyota Land Cruiser FJ70 pick-up. I build it by using bricks from following sets 42000,42030,42042,42043. I took inspiration from RM8 creations but also in the past I was driving this car quite a lot in raw conditions and I have big sentiment related with this Toyota model. Pix and Video are not pro quality as this is my very first approach to build and share LEGO creation so please don't judge me too harshly form this point of view. I hope you will enjoy looking at this model. In the near future I have plan to make simple video how to build it. Under the below links you will find pix and video. https://www.flickr.com/gp/156725712@N06/bP6n4Q Below is video instruction for Lego Technic Toyota Land Cruiser FJ70 - body (part 2). Unfortunately due to file size restriction in my camera, there is missing small part of the video where is shown how to build roof and back side of the body. However this two missing bits are easy to reproduce based on the pix. For those who would like to built this body it can be also good opportunity to put a bit of own invention. -

[MOC] RC Nova futurecar (finished)
syclone posted a topic in LEGO Technic, Mindstorms, Model Team and Scale Modeling
Powered by BuWizz V1. Drive: 1x M-motor. Steering: 1x M-motor Video: WIP photos: -
Hi, i just built a muscle car inspired from the new LEGO Technic Set Dom‘s Dodge Charger 42111. I added some functions: fake V8 engine independent front suspension rear suspension Working steering wheel doors can be opened fully rc controlled with BuWizz servo for steering 2 x L-Motors for propulsion (transmission ratio: 2,77) That‘s all... Some more pics... short clip:
-
RC catamaran boat
9 fingers posted a topic in LEGO Technic, Mindstorms, Model Team and Scale Modeling
Hello Technic fans. Now its time to show you my work i made 2 years ago. it is a RC catamaran with 2 RC buggy motors and 1 servo motor for steering. 1 PF m motor is for fake engines. Thanx to Buwizz for briliant solution to make this work so god. some pictures. and the video. thanx for watching. best regards, Valter -
Hello i would like too present you my next truck an MAN TGS 8X8 The model features 8X8 drive via 2XL motors with 4 Speed gearbox which is shiftet via 1 M motor. Steering is done via 1 Servo motor. The model was build for good offroad performance and high power, it weights around 3kg. The maximum slope it can do was 60% which is 30°. It is also able too drive in the garden in the sand. The challenge was building a strong drive train with a 4 speed gearbox in the small space. The front axles are pendular as well as the rear, i testet the front even with springs but pendular worked for me better in the terrain. The model can even be driven with pf ir receveirs and battery box. The tipping is done via 1 L motor and a self build worm gear drive because a linear actuator was too big. This model is powerd by an buwizz which works great but also was challenging because i switcht mid building too it which meant i had too redo the gearbox many times because of the new power. If you got any questions feel free to ask
-

[TC17] Gator Mayhem
braker23 posted a topic in LEGO Technic, Mindstorms, Model Team and Scale Modeling
Howdy folks! Now this one has been a very fun build for me, as I never attempted to build a vehicle inspired by the Mad Max movie series, although I always wanted to. This was also a hell of an opportunity to use many of the odd parts that you simply cannot put on a normal vehicle, so I am thrilled to present to you, the frightening Gator Mayhem! As you can see, it's and odd blend between and alligator and a trial truck, thus it has 2 animal-specific functions (biting and hitting with the tail), 2 car-specific functions (driving and steering) and of course, 2 tank-specific functions (rotating and firing the turret). What I can tell you is that my two boys just love to play with it, shoot minifigures and eat them all, so I suppose my goal was reached. Functions-wise, I think it's pretty packed, as I managed to squeeze 6 motorized functions, a working V24 fake engine (two connected V12, placed diagonally), working steering wheel and fully openable doors, so you can exit the truck in a flash. This MOC took around 3 weeks to build, almost every day for 2-3 hours, so I can assure you that my dedication has grown a lot, but my wife's patience also reached a new level Technical specs & functions: - 4x4 Drive (XL motor) - Steering (L motor) - Open/close gator mouth (M motor) - Swipe gator tail left/right (M motor) - Rotating turret (M motor) - Firing the turret (M motor) - Turret capacity: 5 missiles - controlled by: 2 BuWizz bricks - a functional V24 fake engine - working steering wheel - openable doors - Length: 72 cm - Width: 30 cm - Height: 30 cm - Weight: 2.8 kg Official YouTube video, made for the [TC17] competition: First batch of photos I took in my kitchen/studio, enjoy the show! Second batch of photos were taken outside, in the most post-apocalyptic environment I could find nearby: As usual, for more detailed photos and many others, please check my Flickr album, below: https://www.flickr.com/photos/braker23/albums/72157713228122532/ Cheers and best of luck to all competitors! -
[TC17] FrankenBase
Zerobricks posted a topic in LEGO Technic, Mindstorms, Model Team and Scale Modeling
It has been years after the unspeakable and the survivers used whatever machinery they found to make a new start. The last bit of civilization was rebuilt in a form of the mobile base nicknamed the FrankenBase due to the nature of it's design. Frankenbase was assembled from the following leftovers: Buckets and bogies from a pair of tracked loaders Front frame, suspension and axles from a monster truck Command bridge and helipad from a stranded ship Crane and two containers were salvaged from a dried up port The base also features three support vehicles, a quick buggy, a small bulldozer and a helicopter: To propel the massive base, all wheels and trackes are driven and suspended: The suspension allow the massive vehicle to easily crawl over rough terrain: The track bogies can also steer, giving the FrankenBase a very tight steering radious: The only way to acces the abse is by lovering the ladder in front, which also serves as the ladder to acces the walkways surrounding the entire vehicle: The crane uses a special mechanism which locks onto containers in order to move them: The command deck is protected by nets and features controls: View of the backside with the crane raised: Some trivia about the model: The entire model took me around 2 weeks to build All functions are powered by 19 motors and controlled by 6 BuWizz bricks It measures over 130 cm long, 45 cm high and 40 cm wide The weight is estimated to be around 7 kilograms This is my second largest model built, first being the Go-kart It's one of my most eccentric builds ever The different colors are intentional, representing the chaotic nature of it's envoirment Size compared to the Liebherr: See the model in action the video: -
[TC17] Ugly Duckling
syclone posted a topic in LEGO Technic, Mindstorms, Model Team and Scale Modeling
Yo there. After complete lack of inspiration and miserable attempts at building came up with this. Probably will need some color randomization or something, otherwise getting there so far. Imo shall an apocalypsis start, gasoline would be real tough to find (diesel seems to be more omnivore) so electric buggy powered by a mini nuclear reactor mwahahahahah. Albeit getting uranium might be harder than fuel... or not, who knows. Pictures taken with smartphone as the camera is being repaired and camcorder doesn't take great pictures, sorry for of quality for now. Powered by BuWizz V1, twin Buggy Motors directly powering tumbler wheels from fastest output, front hockey spring rtc through m-motor. Rear winch through m-motor worm-8 teeth gearmesh and single pulley in the hook itself using mechanical advantage principle. Cya l8tr -
.thumb.png.ac42fe5bf808b68722d021abc3bc5691.png)
PU and PF hybrid... PROWLER
Aurorasaurus posted a topic in LEGO Technic, Mindstorms, Model Team and Scale Modeling
The idea with this is project is to get speed from buggy motors, and torque from PU XLs, which have a very convenient shape. Powering the hungry buggy motors from 2 buwizz units and the PU XLs from the big technic hub, which will be in the rear and controlling it with the buwizz app. Servo for steering, PU L for fake v8. Perfect car. I would enter it in the mad max contest but 2 things stop me. 1, I doubt I will finish in time and 2, I don’t have any real buggy motors and will be using fake ones. -
1:1 Scale BuWizz powered Motorized Go-kart
Zerobricks posted a topic in LEGO Technic, Mindstorms, Model Team and Scale Modeling
The go-kart is one my most ambitious projects. To build it, it took over 7000 Lego pieces, 32 L motors, 8 BuWizz bricks, one BuWizz app update and hundreds of man-hours. The final build, can easily drive a 60+kg person with the top speed of 4km/h. The story of the go-kart starts right after finishing the video shoot of pulling the train card with the heavy transporter. The heavy transporter showed me that Lego pieces have the needed strength to carry and transport the weight of a person, albeit in that case quite slowly. So I got an idea to create a carrier which would use a higher amount of motors than the heavy transporter and have a higher speed. Unlike the 24 small wheels the transporter used, the new model would only use 4 wheels based on the Technic Gear rack 11 x 11 Curved. Work first began on the wheels. They had to be capable of carrying a total weight of around 60 kilograms. When dealing with such heavy weights and forces, the only way to succeed is to distribute the load over a high amount of bricks. In this case the wheels were designed with multiple parallel rings, each carrying part of the weight: The rings would be stacked onto each other to form the finished wheel: Each wheel is powered by a total of 8 L motors through a gearbox. The original idea was to gear the 8 L motors up 3x times using a combination of 24 and 8 tooth gears. But after testing the wheels I soon realized that we will need a lower gear ratio, so a combination of 20 and 12 tooth gears was used to gear up the motors by a factor of 1,67. The resulting gearing gave each wheel a top speed of around 4 km/h The wheels were further optimized during testing to use clutch 20 tooth gears as the main weight-bearing wheels instead of the original 12 tooth gears. This change helped the wheels to spin more even and it allowed the load-carrying axle to be stationary, reducing wear and tear. Since each wheel used a total of 8 L motors, a total of two BuWizz bricks were needed to power each wheel. With the wheels finished, it was time to build the frame of the go-kart. The frame is based on two main pieces, a 1x15 Technic beam and 7x5 Technic frame. The 7x5 frames are crucial to the rigidity of the frame, while the beams connect them all together. Of course there were also thousands of pins used to attach everything together. With the help of Lego Digital Designer I created the first sketch of the go-kart's frame: With the virtual model created, I now had an estimate of the needed parts. With that information, I started looking for the cheapest deals on Bricklink, updating the digital model was I got along. Red beams turned out to be the cheapest solution, and we ended up ordering around 850 of them. Total number of parts ended up at around 7000-8000 with over half of them being pins. Once the ordered parts were received, it was time to build the massive model, which took several days: During the assembly process, the frame and model have been further improved and reinforced in order to carry my own weight without excessive bending. The wheel rims were covered with adhesive window rubber insulation to add grip: The rear axle was flipped 90 degrees in order to increase its rigidity and the whole kart was split into several modules for easy assembly and maintenance. In fact the whole cart can be taken apart to a couple of modules and assembled in less than 10 minutes. A couple of custom stickers and the Go-Cart was finished: With all the mechanical problems solved, it was time to turn attention to the control of the model. Since each wheel uses a total of 2 BuWizz bricks, the whole model used a total of 8 BuWizz bricks. This resulted in a problem with control, since Android based phones can connect to a maximum of 7 Bluetooth devices at once. We decided to try to use an Apple based device to see if we can connect to 8 BuWizz bricks at once. There were no issues, so a simple Iphone 5 was chosen for main controller. The phone was integrated into the steering wheel: The control device also had to compensate for the difference of motor speeds when taking a corner. Due to the load on the wheels, a simple sharp turn could cause them to fail if we would not slow the inner wheels down when turning. We needed a way for the BuWizz app to know that the wheels are being turned. This is where I came up with the idea to use the phone's own internal accelometer to detect the steering position. Since the phone turns along with the steering wheel, it always knows in which position of the steering wheel. We asked our app developer to add a simple gyroscopic command to the app, which we then used as an input for our tracked steer mixer. I experimented with different mixer steering ratios and in the end settling with the factor 0,1. The finished model was also duplicated in LDD, where the final piece count is around 7500 bricks: Now that our go-cart was fully functional, it was time to head outside to give it a final test run in the real world and the record the following video: Few weeks later the Go-kart was also driven by kids on the Brick Planet exhibition: All the long hours designing in LDD, building, rebuilding, fixing, optimizing, the blood, sweat and tears, they were all worth it when you see how happy kids are driving the Go-kart!