Search the Community
Showing results for tags 'ball bearing'.
Found 5 results
-
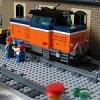
Ball bearing issues? How-to build a "sandwich" structure ball bearing bogie
Selander posted a topic in LEGO Train Tech
When starting to implement ball bearing into lego trains, I thought it would be a simple and straight-forward process. However, I soon came across various issues, so after some further work I now have an updated approach as can be studied in pictures and text below. h The content in this text is based on personal experiences and observations. Depending on the exact bill of materials, available tools and engineering skills, you may come to other conclusions. Still I hope some of my observations can be of help/guidance for you. Ball bearings – Why? -A fun technical challenge from an engineering point-of-view. -Benefit of lower rolling resistance (good for ever wider and heavier rolling stock). -Diversified bogie design and detailing, -TLG metal axle based train wheel sets are no longer in production. Technical challenges: -To incorporate precision manufactured BB:s and axles, with less precise lego bricks (tolerance-wise). -To find out an assembly method which can be repeated, with an even and satisfactory end result. How to: Let me run you through my prefered process, step-by-step, including some pictures (see above). -Start by building a bogie frame. For tolerance and alignment reasons, I use two technic liftarm thick, which are sandwiched between elements 30414, 11211 and/or 87087 depending on bogie version. Also sandwich these bricks between 2-n plates to get a solid unit. No bricks on axle positions. Note that I only use bricks with hollow studs inserted into liftarms (for mechnical stress reasons). -Firmly hold the drill with a pair of pliers (polygrip) and manually crank (rotate) the bogie around it, so you slowly let the drill go through both liftarms in the same operation. By doing this manually you remove a minimum of material, leaving a slim-fit for the BB. Drilling through both ensures a good alignment. -Insert metal axle through both BB:s.My ”China-axles” are ever so slightly deformed in each end from the cutting process, so I use a hammer and gently tap the axle end to get it through.Note that other manufacturers (Bricktracks?) seem to have smoother axle ends allowing insertion into BB:s without any tools, -Check that BB:s can slide sideways very easily on the steel axle. If needed, gently polish the axle surface with steel wool. It does not matter if the very end of steel axle is not perfect since that is inserted into the plastic train wheel. -Remove 2-n support plates, and assemble correct plates on top of 30414/11211/87087. -BB:s and axles shall be possible to be introduced into liftarms by hand. A small screwdriver may be of help to push each BB into the middle of each liftarm. Control again that axles slides freely sideways. (if not, try to polish further with metal wool). -Put on plastic train wheels. Bricktracks wheels sit firmly on the steel axle without any need for glueing. -Finish all detailing acc to your preferences. -If successful, bogie should roll with a minimum of friction. Notes to the above: -I use technic liftarms, but I dare assume long technic bricks also would be fine. Just remember the later will give a ½ stud offset. It is better to use one long element, than individual bricks for each BB, because of tolerances and risk for misalignment. -Be careful not to scratch or damage the axle surface. My conclusion is that a freely sliding axle is the best indicator of a good final result. -Since my holes are enlarged to 5,0mm, I do not use M2-washers (which are 5,0mm O,D) since I've seen washers sliding into the brick causing friction. -I have tried numerous ways of introducing BB:s into bricks without drilling. But regardless of assembly method, I have experienced problems with misalignment and occasionly stress cracks in bricks. It worked sometimes, but I never managed to get a safe and repeatable process. Hence my recommendation for drilling first.... Summary of key findings: -Use few and long elements, sandwiched to a solid assembly. -Drill a common through-hole. -Ensure axle slides freely in BB:s. Bill of Materials used: -China produced BB:s type MR52ZZ. -China produced cut steel axles, 2,0 x 40mm. -Technic liftarms thick, #32524 or 40490. -Bricktracks plastic train wheels. Tools used: -Hammer (depending on axle end …). -Pair of pliers (polygrip). -Drill 5,0mm, aimed for cutting metal. -Steel wool. (polishing of axles, if needed) -
 Hello, last year I presented here on Eurobricks a method to equip the LEGO train wheel holder with ball bearings. A disadvantage of that method (see here) was that it required to cut a small part of the wheel holder, thus you had to damage the rather expensive wheel holder. Even worse, removing the ball bearings after modification left you with a more or less useless LEGO piece, thus making it very difficult to sell these LEGO pieces in the future. Furthermore, the modification slightly added to the height of the wheel holder, i.e. the resulting holder was approximately half a plate higher than without modification. I came up with an improvement that does not require cutting the wheel holder and does not notably add to the height of the holder. It does require cutting of a 2L technic axle though, which I do not consider a big thing since these axles are really cheap: When inserting the red axle pieces into the holder, it is important to align them exactly as shown in the picture. When the assembly is complete, it is crucial to prevent the axle from touching the two clamps in the center of the holder. For some additional information, click on the picture above . For a comparison of the wheel holder with and without modification, see this video:
 -

8x8 ball / roller bearing
Sariel posted a topic in LEGO Technic, Mindstorms, Model Team and Scale Modeling
Here's a little concept following the release of new round tiles. I believe it can be useful wherever a small low-friction turntable capable of handling serious weight is needed. It can also be motorized as shown in the video, or alternatively you can put a vertical axle through its middle, just replace one of the 4x4 round bricks (upper or lower) with the variant with a pin hole. -

Thrust Ball Bearing
bartneck posted a topic in LEGO Technic, Mindstorms, Model Team and Scale Modeling
LEGO’s turn table has considerable friction and rotating a model at an exhibition for a whole day would ruin it. A thrust ball bearing is necessary to decrease the friction. I previously 3D printed a large bearing for my Unikitty. For this year’s exhibition I needed a smaller thrust ball bearing so I designed a new medium sized ball bearing. It includes liftarms to hold a worm wheel which results in a rotation ratio of 1:78. The 3D model is available from my website. I hope it helps you for your MOCs. -
Thrust Ball Bearing
bartneck posted a topic in LEGO Technic, Mindstorms, Model Team and Scale Modeling
Rotating a heavy construction is difficult with LEGO's turn table and previous solution for a ball bearing using the droid wheels remain awkward. Mounting the droid wheels is just difficult. They were never meant to be a ball bearing. So I fired up my 3D program and created a Thrust Ball Bearing. Luckily I could also 3D print the whole assembly. I hope this helps. Further details are available here.