Search the Community
Showing results for tags 'architecture'.
Found 375 results
-
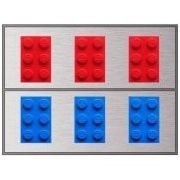
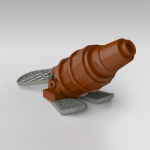
Hi everyone I'd like to present my latest MOC, a new modular building called Bricks & Blooms. I hope you like it. Bricks & Blooms is a modular Garden Centre built over 3 levels on a 32 x 32 base plate. in total it uses 2587 bricks. The facade is supposed to give the impression of being 2 buildings side by side but it is of course just one single building. The front to back measurement of the building is quite narrow, similar to Parisian restaurant. This is because I wanted to maintain plenty of space at the rear of the building for the main outside garden centre / plant sale area. THE MINIFIGURES I've included 6 mini figs and a cat with this MOC. Left to right they are: 2 customers (a father and his daughter), The garden centre shop keeper and gardener, the chef and the Aquatics shop assistant. THE GARDEN CENTRE AND GROUND LEVEL DETAILS The main garden centre area of the store is situated on the ground level. Outside on the street, I've included a tree, bench and lots of plants and flowers for sale. The garden centre also has a fruit and veg stall that sells it's produce directly to passers by on the street. Inside the shop I've included the cashier desk and more plants and gardening tools for sale including a little lawn mower side-build. Here is the interior of the fruit and veg stall that is accessed through a door at the back of the cashier desk. A door at the back of the shop leads out in to the main outdoor gardening area. Here I've included a large glass canopy covering rows of tables holding bedding plants. There are also more flowers, pots and other gardening products including a water feature. The stairs at the back of the building lead up to level 2. LEVEL 2 - CAFE/RESTAURANT No garden centre would be complete without its own cafe/restaurant. The cafe on level 2 has a fully equipped kitchen with serving desk and tables and chairs for the minifigs. There is also a small balcony in the cafe that looks out on to the street below. LEVEL 3 - AQUATICS Many garden centres here in the UK also have departments that specialise in pet fish and Aquatics. Bricks & Blooms is no exception and has it's own dedicated Aquatics section on level 3. The Cat below seems to have its eye on the goldfish. The door behind the desk leads out on to a small roof terrace area. FLOWER CART The model also includes a flower cart. THE FINISHED MODEL The picture below shows Bricks & Blooms combined with my other modulars and vehicle MOC's. Left to right they are. The Queen Bricktoria Convenience Store Brick Square Post Office Bricks & Blooms The Old Workhorse - Traction Engine LEGO IDEAS I have submitted Bricks & Blooms as a LEGO Ideas project. If you like the model I'd be really grateful if you'd be kind enough to head over to LEGO Ideas and give the model your votes. You can find the project at the following link. Many thanks! http://bit.ly/bricksblooms I hope you like my newest MOC and thanks very much for reading. As always, there are many more pics on my Flickr page and feel free to leave comments and let me know what you think.
-

[MOC][Instructions] The Lord Of The Rings Skyline Architecture
MOMAtteo79 posted a topic in LEGO Historic Themes
This is my recreation of Middle-Earth in the format of the Skyline Architecture Series. You can follow the journey of Frodo from the Shire to Mordor. Through Rivendell; The Mines of Moria; The Argonath; Helm's Deep; Minas Tirith towards The Black Gate of Mordor with Mount Doom the Barad-dûr and the Eye of Sauron. Total parts: 730 Measures: 47 x 12 x 28 studs 37.2 x 9.5 x 22.5 cm 14.6 x 3.7 x 3.9 inches More info and images here -
Hello everyone! First post on Eurobricks, though a longtime lurker. I created a Mustafar "Skyline" in Studio in the style of the Architecture skyline series. The skyline features the Klegger Corp Mining Facility, Darth Vader's castle (with a couple Easter eggs in the back), and an active volcano. My instagram page: @benbuildslego Lego Star Wars - Mustafar Skyline MOC by Jamin Ross, on Flickr Lego Star Wars - Mustafar Skyline MOC (Back) by Jamin Ross, on Flickr Lego Star Wars - Mustafar Skyline MOC (Top View) by Jamin Ross, on Flickr
-
The Magnolias on 10th --- The newest luxury development at Wasabi District! Some facts: -Over 10,000 pieces (I stopped counting at 10k) -6 32x32 baseplates -12 modules, including roofs. 9 out of 12 modules fully detailed (interior) -3 Stores: Five Guys, Godiva, 7-Eleven -The most difficult Wasabi District project ever! Check out the rest of my Flickr account for more pics! and follow @wooootles on Instagram to find some WIP/under construction pics! Thanks for checking it out!
-
Hi everyone, Here is my Fascist Building MOC. It is heavily based off a digital design of O Wingard's that I have compressed and simplified. Thanks for looking. Sheps.
-
[MOC][Instructions] Back to the Future Skyline Architecture
MOMAtteo79 posted a topic in LEGO Licensed
A worldwide cultural phenomenon and the highest-grossing film of 1985, Back to the Future launched one of the most successful franchises in Universal's history, but, most of all ... one of the most loved movie trilogies of all times. I recreated iconic scenes and the even more iconic vehicles in the format of the skyline architecture series: - 1955 - The Hill Valley Courthouse struck by lightning sends the DeLorean back to the future - 1985A - Marty Jumps off from the Biff Tannen's Pleasure Paradise Casino Hotel... onto the DeLorean - 1955 - Biff crashes into the manure truck outdside River Road Tunnel while Marty and Doc fly away - 1885 - The Locomotive 131 passes the Point of no Return, sends the DeLorean back to the future where the Clayton Ravine is the Eastwood Ravine - 1985 - The Delorean is destroyed and Doc flyes away with is family in the Time Train. more images and instructions link Total parts: 546 Measures: 47 x 9 x 11studs 38x 7 x 9 cm 15 x 2,8 x 3,7 inches -
Neuf-Brisach is a fortified town in France built from scratch by Vauban (his last work) around years 1700. The outside pattern is based on two octogonal fortifications. The inside pattern has an octogonal perimeter and most of the street are perpendicular to each others. The center of the city is a large squared "Place d'Armes" for military parades. In 2008, the "ville neuve" of Neuf-Brisach was listed as a UNESCO World Heritage Site, as part of the Fortifications of Vauban group. See : https://en.wikipedia.org/wiki/Neuf-Brisach This model is made with approx. 4000 parts. Enjoy ;) Neuf-Brisach_center_1 by Daniel Stoeffler, on Flickr Neuf-Brisach_complete by Daniel Stoeffler, on Flickr The complete Filckr Album :
-
Architecture style version of the Interlace Condominium in Singapore ( https://www.archdaily.com/627887/the-interlace-oma-2 ) which won World Building of the Year 2015 at World Architecture Festival. The scale is around 1:800 and approximately 3800 parts have been used. Interlace_AVG by Daniel Stoeffler, on Flickr Interlace_AV by Daniel Stoeffler, on Flickr All pictures : https://www.flickr.com/photos/77709542@N06/albums/72157673455650747 Enjoy
-
This creation is ispired by the Star Wars universe and condensed in the LEGO format of a Skyline Architecture set. There are a lot of scenes, locations and vehicles recreated from the first two trilogies. If you can't spot them all there is a list in the following link. Instructions There are more than 790 pieces so it's jam packed :) Dimensions 792 pieces cm 37.5x 10 x 19 inch 15 x 4 x 7.5 studs 47 x 12.5 x 23.5 weight 388 gr / 13.7 oz The vehicles design have been inspired by advent calendars and other creations in microscale I found around the web. Most (if not all) of them needed to be reduced in size to fit the Skyline or adapted to be attached firmly and integrated in the little scenes that have been recreated. Hope you like it! Let me know what you think about it :) P.S. I know that maybe one for trilogy would be better or even one for movie You can find more images on my flickr page
-
This is my creation of Westeros where the epic fantasy saga “A Song of Ice and Fire” by George R. R. Martin and the HBO show “Game Of Thrones” mainly take place. The project fits in the Architecture Skyline theme. Hope you like it, any constructive comments and suggestions are welcome. More photos and instructions I recreated six of the most important locations of the show, going from south to north: Sunspear – The seat of House Martell and the capital of Dorne King's Landing – The capital of the Seven Kingdoms Pyke – The seat of House Greyjoy The Twins – The seat of House Frey Winterfell – The seat of House Stark, is considered to be the capital of the North The Wall – The massive barrier of mostly ice stretching across the northern border of the Seven Kingdoms, defending the realm from the wildlings who live beyond Total parts: 442 Measures: 44 x 8 x 10 studs 35,5 x 7 x 8 cm 14 2,8 3,2 inches p.s. hope this section of the forum is correct :)
-
Viva Las Vegas! I haven't bought a LEGO set in quite awhile, so I went into the NYC LEGO Store while I was home just for a look around to see the new sets. I haven't really been paying attention to the news coming out, besides the beautiful Cloud City that was on display. But I digress, I was attracted to the Architecture Line wall where some sets were on display. I couldn't help but buy the new Las Vegas set even though I went into the store not intending on buying anything. I guess I just have a fondness for Vegas and all the colorful and interesting buildings that are there. I haven't been to Vegas for a couple years, but I'd always like to go back. Theme: Architecture Year: 2018 Pieces: 501 Prices: £34.99, $39.99, €39.99 Here's the front of the box. Vegas is very flashy and this set picks some pretty good landmarks of Vegas, following in the tradition of other Skyline sets. The back of the box shows what each landmark is. I've personally never heard of the Fremont Street Experience. All the others I've been to or seen. Here's the first page of the instruction book. It's a really nicely bound book like the other Architecture sets. Each page gives a really nice description of each of the landmarks included in the set. It's absolutely important to include the LLC after the Bellagio. I'll reference that again at the end in regards to something else. Every page of the book has a quote about Las Vegas from someone. I'm not sure who Jeff Maguire is, personally. Google says he's a screenwriter. Isn't this true? There's a couple other quotes as well. The booklet also includes French and Spanish translations for what was in English at the start. Thankfully this is printed piece. It's great! Perhaps it's on a clear tile to make it seem like the sign is free standing? I've never seen this piece before. I'm not sure if it's new because I've been out of the loop on new sets for awhile, but it's still an interesting piece. Not sure what else it would be used for beyond its use which you'll see later. The full piece layout. I know you're not supposed to build LEGO sets on the carpet, but doing so brought the child out in me for only a moment. There's a lot of clear and darker-clear tiles included. Now it's time to begin construction! Here's the base of Las Vegas. I bet you didn't know that Vegas was built on blue and yellow! Every once in awhile there will be a fun little blurb about something you're building. At the moment, you're supposed to be building the Freemont Casino and Street Experience. Here's the Freemont Experience completed. It's apparently a mall from what I can understand from the instruction booklet, and like everywhere in Vegas (even the airport) there's a casino in it. Now it's time to build the Luxor... The other half of the Luxor pyramid doesn't exist. I understand why - it would make the set stick out further in the back. It already sticks out because of the front of the pyramid and the back of the Bellagio. Here's the pyramid on the base. When you add more buildings to the base, it'll become less obvious that the pyramid is cut in half behind. I really like the use of the Pharaoh's headpiece for the Luxor Sphinx. Could it have been improved by a printed face on the head? I'm not sure, if they printed an ugly sphinx face it would have made it an eyesore. I think they did the right thing with a blank head. Now it's time to build the Stratosphere Observation Tower. While to me this isn't the most notable Vegas landmark, I believe it's the tallest structure in Vegas and it's the tallest freestanding observation tower in the United States. Therefore, it's understandable why it made it into the set as a part of Vegas' skyline. The way that the Stratosphere fits into the base is really clever, and it's not the last time we'll see it. The yellow pole bit goes through the propeller bit and goes into the yellow. Here's how it looks when it's placed down. You continuously improve the area around the Wynn with foliage pieces. You think you're about to start on the Wynn several times and then all of a sudden you're doing some other landmark. True to its size in real life, the Stratosphere is tall. It's clever that they use those bendy Technic looking parts for the curves of the tower. It seems that the Stratosphere has turned to the dark side as well. Luckily as we'll see later, the Bellagio is on the light side of the Force. After several false starts on the Wynn Hotel, it's now finally time to build it. Interesting that it goes at a curve. The rest of the hotel is built on a curve too. Building this was a bit of a slough. The entire thing is built of one piece bits and three piece bits so it can end up curving when you put it on the base. It's worth it though once it's placed on the base piece. The curve is a very nice touch. I don't know what this is supposed to be for the life of me. A sign for the hotel maybe? Maybe a little tree would've been better as a nod to the palm trees that line Las Vegas Boulevard? Even the page for the Wynn in the booklet where it includes its description has a palm tree in front of it. Personally when I went to Vegas I never went to the Wynn either, so if someone who frequents Vegas is reading, please leave a comment on what you think this is supposed to be. Here's the start of the penultimate landmark on the Vegas Strip - The Bellagio Hotel. If you thought that the Wynn was an ache using small pieces, you haven't seen anything yet. Once again, the designers used a clever way to put one side of the Bellagio in. Like the Stratosphere, the Bellagio's white pole goes into the one by two open piece that you see. Here's the first wing put in. As I said, now that more buildings have been added to the base, it's very tough to tell that the Luxor Pyramid is halved. The rear and center of the hotel are in, last up is another build of the wing. Make sure you note all the tiny 1x1 pieces. And that's the Bellagio done, with the Las Vegas tile in front of it. Once again, very appreciated that it's a printed tile. I've noticed that the other word tiles that I've seen in other Architecture lines are printed too. Not sure if this is the case for all of them, but it's much appreciated because for the life of me I cannot handle stickers. Thank the Gambling Gods that there's no sticker sheet! Here's the completed set all done! The final monument is the Las Vegas sign that you can see all the way at the end next to the Bellagio. Unless you're really looking up close the sign isn't that emphasized. Nevertheless, the whole set looks very nice! Those clear pieces with a bit on it that I highlighted earlier are used for the Bellagio's fountains along with some lightsaber blades. The Bellagio's fountains are beautiful. When I visited, it really stuck out to me. It's also very famously seen at the end of the film Ocean's Eleven. I might have made fun of building the set being a slough when using all those 1x1 pieces to built that you could see in the piece layout above and in the close up pictures, but this was an enjoyable build altogether especially for my first LEGO purchase in several years. So, what do I think of the set? It's just my opinion but I really like it. Some of the buildings used might not be the most iconic, at least to me. I think instead of the Wynn Hotel and Freemont Center, they could've included maybe Excalibur (the castle one), New York, New York, Caesar's Palace, the Venetian, Treasure Island or Mandalay Bay. Even the Paris hotel. Obviously all of those couldn't have been included, because Skylines sets can only be so large. I can understand the Venetian being excluded because of the Venice Skyline set and the Paris hotel because there's an Eiffel Tower Architecture set, as well as New York, New York because that's a Skylines set too. I think Excalibur with it's multiple and colorful castles, Treasure Island or Mandalay Bay with the pirate ship and volcano out front could have been good additions instead of the Wynn and Freemont. The inclusion of the Luxor and the Bellagio were smart ideas though. Perhaps though they couldn't get the rights somehow to include some of those hotels that I mentioned? Back earlier I mentioned that they call the Bellagio, "Bellagio Hotel LLC". These buildings are of course privately owned and most are not "landmarks" in the same way that other buildings in the Skylines sets are. Nevertheless, I think the set itself is pretty good. Most architecture sets are a bit overpriced, yes, but for $40 it's pretty good. I said that some of the buildings used weren't the most iconic, but all the buildings look really nice and portray a great skyline. The Bellagio's fountain is really nicely done as well, I'm glad they were able to get the shooting water effect. I think I'd buy a Bellagio only Architecture set. Even with the Stratosphere and Wynn, that are much larger, the Bellagio catches your eye. Poor Luxor looks like it's shoved in, but it's a great inclusion because that's an iconic part of the Vegas Strip as well. Altogether, I give the set an 8.5/10! I highly recommend it. It was between Vegas and the other latest Skylines set Shanghai, which does look very nice, but I think I made the right decision. This is only my second review of a LEGO set. Hopefully I did a good job and hopefully there's no review of the set waiting to be made public.If you'd like more pictures of this beautiful set, just ask!
-
Hi everybody! I've decided to start sharing a few ideas and tips for building some of my own creations - starting with this minifig-scale drinking fountain. Why not have a go?! Uses less than 30 pcs.... https://flic.kr/s/aHsmqDoDnP (click this link, not the pic, for full instruction pics)
-
The concert's on, come have a listen! Disco 2000 Vinyl Store is my (I think) ninth modular and the closure of the A Summer in Tuscany - Klee Corner - Disco 2000 trilogy. I was dying to do a new corner building, mainly for three reasons: First, Lego's doing one this year, so I figured... why not? Second, because I hadn't done a pure 32x32 corner building since Sweets & Co., almost a year and a half ago! And third, because I wanted to. Without further ado.... It may not be apparent at first glance, but this modular has easily been the most time-costing and hardest modular to build. The ground floor was built up fairly quickly between May and June 2018, but creating something worthy on top is what took me all summer to figure out. So the model began on steady wheels. The brightly-coloured "boxes" on the ground floor take direct inspiration from both my own Klee Corner (the pizzeria had a similar idea) and the London Undergound. In fact, the dark red ground floor used to be an entrance to an undergound station that was closed down some years ago that has now been transformed into a state-of-the-art vinyl store. The dark red ground floor is almost a copy of those entrances that can be found in the Tube's Northern Line, covered in those beautiful blood-coloured tiles. Even in my Lego interpretation, I was able to add the beautiful sand blue lights. Outside there's a sign, "Disco 2000", it says. The old-fashined font and style of the sign is totally on purpose. Wait, there's people singing and dancing on the street... A paparazzi on the roof of the dark green glass box... Is he famous or something? Both the white windows of the tube entrance and the dark green windows are lying on their sides. In the case of the green ones, it's not quite so obvious, so it's pretty cool. There's some albums outside, which (if you can guess which they are you're a real god), but I'll talk about architecture first. The Architecture: Architecturally speaking, this model is very interesting. Just like in Klee Corner, this has three different buildings onto a single baseplate. The advantage being, of course, that I have two full façades to split them up. The final building is almost colour-coded. Every part of the build has a colour associated to it. The central and most important part of the building, kind of the "eye" of the building, is constructed using a similar method to the one I used for the façade of the lounge on Klee Corner, only this time using a 2-stud-wide pillar going up rather than a 1-stud-wide one. There were so many different iterations for the central part, even one being sort of a peacock-coloured flimsy spaghetti (maybe at building 8 out of the 15 built). I got that bug of wanting this building to do so many things at the same time that I had to chop down things that I'd done which no longer fitted the image I chased. The final result is way simpler than some previous ones and has a lovely Belle Epoque feel to it. This final iteration is inspired by the gorgeous entrances of the Paris Metro (metro entrance over underground entrance, that's kind of hilarious ). I retook one iteration of Klee Corner for the shape of the roof, so it has a perfect triangular balance with the two side pieces. The Iron Horse+Klee Corner+Paris Metro, I think the result's pretty cool! I had already done the first render when I realised the façade needed some more dynamism. Initially, the windows were totally aligned. I then changed that static feel by breaking the lines and making them follow the curvature of the escaling roof. I love the double curve that the escalating windows and the curvature of the building itself have. creator saying stupid stuff. The brown building on the right scared me a little bit, as I'd never been able to pull off a good dark building, brown, for instance. Dark Orange, when rendered in Pov-Ray, though has this chocolate colour which is just delightful. In fact, this side building was not part of the plan first, as a whole building covered the whole "London undergound" ground floor. Then, for quite a while I had a cool texture for a brick wall that was just six studs wide which helped me figure out the measurements for the central building. That idea stuck, but in the end, due to the central building being shrinked, this brown building grew. I gave it some windows inspired by those of a school that I walk past every day and the greatest of rooflines. You really have to look at this: there's pieces looking in four different directions. The right way up, upside down and to both sides! The white/blue/yellow building on the left has a bit less of a tumultuous story to it. It began as a version of the Met Breuer, as the central building was to be something along the lines of a Gehry work. Once I'd settled for a much more colourful design on the other two buildings (after a looooong while), that grey thing looked as terrible as a stain on a red dress. Therefore, I reused on of the ideas for the central building for this side one, adapted some earlier window designs, changed the colours, added the sign, and voilà! There it is! The Interiors: Cross the gates to the awesomeness of the world of music. Because this was done in LDD, I couldn't build those racks full of vinyls, so instead I covered an entire wall of the best-selling vinyls. Note: All the covers are Lego interpretations of real albums! In fact, there's the entire discographies of two bands! Have a guess! The pattern on the floor, funnily enough comes from a "Where's Wally?" book which had a similar one. There's turntables and hanging vinyls on the window shop. On the opposite side, there's a nice Dalí-inspired coach with... again the same special guest!? Now, that can't be a coincidence, can it? The floor above has a magnificent concert stage for artists to play. I really like the atmosphere I captured in this area. I can easily imagine a songwriter playing his/her songs on that stage, as the city lights shine bright behind the sand green building. There's a small bar for guests to take a drink as the concert's on. The room's, though, not big enough for all the audience, so some of those left outside have to climb outside the window and listen from there. Be careful! The interior is built in a Brick Bank kind of way, all the different buildings share one same interior. Finally, the top floor is... A music shop! Couldn't be anything else, could it? 1 Assembly Square can start to tremble as there's a new neighbour next doors with much better instruments and at a better price. The widest range of guitars in all the imaginable colours and shapes, keyboards, amps, synths, drums and pianos. They say the owner of the Magic Shop built this drum kit and his grandchildren have put it on sale. They also say that both pianos, those of Magic Shop and Klee Corner were bought here and that's why they don't have one on stock right now. This drum kit, they say, is so loud that it was able to distort time and make the owner of Magic Shop live over 170 years. Maybe it was his potions what kept him alive. Again, who's that guy? He's everywhere! One Last Image: Disco 2000 Vinyl Store, surrounded by its two new friends, A Summer in Tuscany and Klee Corner. I think that Disco 2000 may even look better surrounded by other models than alone, unlike the other two, which definitely look better alone. Hope you like this modular! Pau
-
This...is not finished yet. I have yet to make the lobby floor, and create the antenna tower. For now I'm fairly stuck at the lowermost and uppermost areas of both the Studio Center (smaller building) and Broadcast Center (larger building). I also think it looks far too slab-sided to work in a realistic setting. I have ideas (like grafting chunks of the building), but what else can you give me?
-
WP_20160817_007 WP_20160817_003 WP_20160817_022 WP_20160817_023 WP_20160817_037 WP_20160817_049 WP_20160817_060 WP_20160817_062 Hi all :) Here is a project we completed in 2016, the Cathedral of our own town in the northern part of Italy. Nowadays, we're working on the adjacent square, with the goal to complete it in a few years. We will be posting updates very soon. As for the MOC itself, we chose a 1:75 scale, so that it could be populated with minifigs, without being too huge and expensive. The Cathedral consists of about 9600 bricks. Some techniques were inspired by others' works, while some were developed for the purpose of maintaining the most possible similarity to the real Cathedral. Hope you will enjoy! Every suggestion is welcome! FBros
-
Magical. That's what the House of the Five Senses is to me. [MOC] House of the Five Senses by Bert Van Raemdonck, on Flickr The House of the Five Senses is the entrance to the Efteling theme park, which I have the fondest memories of. I still try to trick my parents into taking me there. We never visited Disneyland or even Legoland () even though I'm a big fan. But still, that was never a problem to me because we would often visit the Efteling, which is such a magical, whimsical, fun and genuine place that it totally made up for not visiting those other theme parks. The mere sight of the Efteling's entrance therefore gives me warm feelings. That made it the perfect fit for the latest (and last) contest on Rebrick, "Architecture faves", which called on builders to recreate a place close to their hearts in Architecture style. That and the fact that it's just a super interesting structure to recreate with a fascinating story: [MOC] House of the Five Senses - Everything you need to know by Bert Van Raemdonck, on Flickr Its distinct visual style and defining compound curves made it very challenging to replicate in bricks though, especially at the Architecture scale. My first instinct was to use many bows, cylinders and cones. Turns out that there is a severe lack of cone pieces in reddish brown (and it's only one single set which provides the brown carrots that work perfectly as the peaks...). I had to resort to using slopes and flat parts, and in the end I'm very glad I had to. Using bow pieces would have been a mistake as the main shape of the surface has a concave surface, while the concave bows would have destroyed the flow of that surface. Moreover, it would have been impossible to hide every single half stud lip of a brick or to align everything perfectly, so the angular bricks make those features look more intentional and part of the creation. So strangely, using slopes instead of bows actually results in a visually smoother build and also gives strong, crisp edges where they need to be. [MOC] House of the Five Senses - Dragon Perspective by Bert Van Raemdonck, on Flickr The downside was that I had to create the surface out of a multitude of small pieces at just the right angle instead of using bigger pieces with inherent curvature. That meant I had to find a lot of compact ways to connect things at funny angles and do my best to fill up all gaps. New parts like all the 1x1 pieces with bars in different configurations were absolute life savers to get it to work. Without them, it also wouldn't have been possible to connect the triangular panels that were the only right part for the job in several places. The disadvantage was that all of the complex connections needed a lot of tweaking just to get the part not to collide with others. This being built with Lego Digital Designer, you can understand the struggle of taking half an hour just to line all of the parts up, just to come to the conclusion that it sticks out too much and you have to figure out a completely new solution, or that the collision box of the part is ill defined so it refuses to put the part in place even though there's no collision in real life... Sure, building digitally has a lot of advantages (and no, I didn't use part-colour combos that don't exist as far as I know), but there are some definite disadvantages like spending ages on lining up parts, wishing you could use the illegal connections everybody uses or struggling to understand compled 3D orientations on a screen... Anyway, the small rant being over , believe it or not, in the end I managed to create the building entirely with legal connections as far as LDD is concerned. [MOC] House of the Five Senses - Leaving perspective... by Bert Van Raemdonck, on Flickr In the end, I'm very happy with the final appearance of the building on its own and the fact that it matches the original building quite closely (look here for some excellent reference pictures). I'm especially happy that I took the extra trouble to angle the four peaks of the main part of the building which makes it both accurate and gives it a very dynamic look for a static piece of architecture. To complement the spiky look of the building, I opted for a presentation on an unconventional base placed at a 45 degree angle which emphasized its corners. It has the extra advantage of representing the triangular square (now that's a funny turn of phrase ) in front of the real building, which features a fishbone pattern in the floor which I tried to replicate with the tiles (until I realized I totally missed the point of the pattern, but it still looked good enough ). The very new 2x2 triangular tiles in the end enabled my vision of an angled base, but sadly I had to use some loose parts to fill in some funny gaps. Still, I think it was totally worth it for the presentation. Finally, it was very fun to add all of the little elements like the trees, hedges, lightposts and flowers that breathe some life and colour into the scene like the seasoning in a dish. [MOC] House of the Five Senses - Group perspective by Bert Van Raemdonck, on Flickr In the end, I'm very happy with the visual result. Also with the fact that I pushed myself to tackle such a challenging topic and persisted through the entire building process which took an entire month even though the model only counts eight to nine hundred pieces (I often went days with only placing ten bricks or something like that...), because through it I learned some new techniques and part combinations (triangular flag element + 1x1 round place with bar at the bottom = total win!) which will certainly be handy in the future. And what made it truly special was the feedback I got. I has already been very fun to see Efteling fans react to my model. And I am very grateful that the judges of the Rebrick competition liked it enough to designate me as a runner up winner... The House of the Five Senses certainly has worked his magic on me once more! If it only puts a little bit more magic on your day as well, that'd be just perfect. So I hope you enjoy it, and don't forget to keep your eyes open to see magical things! ____________ So, I mentioned this was built with LDD, which means that I can also easily share the file with you, just in case you're interested in the techniques or would like to try to build your own. As I said, all the parts (at least the most important ones I checked) are available in the colours I used, and everything is connected, although I don't promise it will be a creation you can swoosh around - if that is something you'd want to do with a building. However, the design presented in the renders isn't horribly practical. The base, for example, would take in more depth than needed on a shelf, limiting the display options. The angled base also requires some loose parts and the new 2x2 triangular tile in grey, which have only appeared in the roller coaster set so are on the rare side. That's why I've also designed a version with a rectangular base, which should be a lot easier to build and manage in real life. It doesn't have the tirangular square in front, but it does have more vegetation in a corner. I also got rid of the loose white jumper plates at the base of the back tower. I couldn't find a solution during the time frame of the contest, but after a lot of thinking I've now designed an alternative with car doors which are all firmly attached. Both versions of the model are included in the file below, so you can check out the one that suits you best. Have fun with it, and if somebody does succeed in building it in real life, be sure to send me a picture, and don't hesitate to ask questions because I still have some designer notes! The LDD file: https://bricksafe.com/files/BEAVeR/digital-models/efteling_buildable.lxf
-
Hi everyone. This is my entry for the Architecture Faves contest, the final contest on Rebrick. Here are some reference images of the real castle:
-

[MOC] Bangladesh Parliament by Louis Kahn
J and J LEGO Creations posted a topic in Special LEGO Themes
Hi, I'm a noob here, living in Bangladesh. I've created a few versions of the monumental Bangladeshi Parliament building, designed by Louis Kahn, one of the greatest architects of the 20th Century and a master of the Brutalism style. Its walls use unusual geometric shapes that allow for a complex interplay of light inside. The artificial lake, from which the building appears to rise, was made to recall the riverine beauty of Bangladesh. The overall building is a rough octagon, though not equilateral(!). Inside, the central structure is a regular hexakaidecagon (16 sides), which goes down to a regular octagon. Being a beginner, I just couldn't figure out how to resolve these irregularities. The solution was to leave out the base plate and roof altogether while simplifying the hexakaidecagon. Oh, well. This MOC is about 8,000 pieces. It was a lot of fun figuring out all the internal windows, circles, and triangles. It's still an ongoing project, but has reached a pretty good stage of completion that I can show it off. JS Trophy Size South Side by J&J Lego Creations, on Flickr The south face and main entrance. LEGO doesn't make a 4x4 Macaroni plate (only tiles and bricks) -- why not? So I'm stuck with the awkward gaps at the top of the pillars where I need them to be hollow. JS Trophy Size North Side by J&J Lego Creations, on Flickr The north (Presidential) face. Inside are stairwells framed within large circles, at oblique angles. JS Trophy Size North Side Detail by J&J Lego Creations, on Flickr Detail inside the Presidental face of the stairwells. Comparison_Sangshad_inside by J&J Lego Creations, on Flickr Comparison inside the courtyard separating the external and internal buildings. Interior window. JS Trophy Size Qibla by J&J Lego Creations, on Flickr Mosque inside the pillars, with qibla visible. JS Trophy Size Top by J&J Lego Creations, on Flickr Inner (Assembly) building. The original is a hexakaidecagon resolving to an octagon. I kept it octagonal throughout. The seating for the members of parliament can be seen below. JS Trophy Size Assembly Hall by J&J Lego Creations, on Flickr The Assembly building opens up to show the parliament seating and the Library on the bottom floor. Interior window designs can also be seen. JS Trophy Size Library by J&J Lego Creations, on Flickr Library with the famous central column - the only column in the whole building. Thanks for your support! I would certainly appreciate constructive feedback from better builders than myself. -

[MOC] The Hungarian Parliament in 1:650 Scale
Lamborghini Waffle Sauce posted a topic in Special LEGO Themes
For the Architecture Faves contest on LEGO Rebrick, I have built the Hungarian Parliament building in Budapest. It is a building I have built many times at a smaller scale, but this time I decided to build it in 1:650 scale to focus on the many details that this building offers. Constructed in 1896 and finished in 1904, the Parliament building is Budapest's most visited landmark, and Hungary's most iconic building. The architecture is an indicator of Hungary's numerous artistic and aesthetic influences from all corners of Europe. The majority of the building utilizes gothic revival style influenced by the cathedrals of Western Europe, which is shown in the arches, columns, and spires. The iconic red dome and the rooftops are influenced by renaissance revival style, which is a staple of architecture in Southern Europe, which has had a large influence on Hungary's history. The building sits on the Eastern embankment of the the Danube river (or the Pest side) and can be viewed from the other side and the many hills that are on the Buda side, which make up almost half the city. Being the tallest building in the city (along with St. Stephen's cathedral, both at 96 meters tall), the red dome of the Parliament can be seen from very far away. The side of the Parliament facing away from the river is Kossúth Lajos square, with a plaza, fields with trees and flowers, and two monuments. Being in 1:650 scale, the model (with the base) is 59 studs wide, 55 studs long, and 23 studs or 20 stacked bricks tall. That's 47cm wide, 44cm long, and 19cm tall. Being a medium-sized model, it still consists of over 5000 bricks. My goal is to build Budapest's other landmarks in this scale, and also connect them by building parts of central Budapest. More pictures in the flickr album, as well as a cross-section of the building technique used to build the dome. -
The city I'm currently working on needed a proper structure to complete its monumental street, passing through modular buildings, a triumphal arch and around a central square. I thought a church, with a St Peter's Basilica styled columnade, could work well; in addition I used the world renowned Florence Duomo (which I actually built thanks to dear friends in my national LUG) as an inspiration for its plan. As usual, instructions are available for purchase. Hope you like it!
-
MOC: Osterfeld comprehensive school - Architecture style
Sven J posted a topic in Special LEGO Themes
Dear AFOLs, for once I have left my usual train theme and tried something different – I designed and built a model of my working place, the largest school in my home town. In fact, the model is intended as a farewell gift for a dear colleague, for she leaves to face new tasks. It is in approximate 1:625 scale, consists of ca. 1.500 parts and is built on a 48x48 base plate. Here are the pictures: Higher resolution images are available on my Bricksafe account. Thanks for stopping by! Sven -
Hello Everyone, this is my first post here, so apologies if I made any mistakes! I was going to post this model on Lego Ideas, but (not surprisingly) Game of Thrones is not suitable content for them, so I decided to post it here and see what you guys think. This is a (not so small) scale model of the castle of Winterfell from George R. R. Martin's epic fantasy novel series A Song of Ice and Fire, and more specifically, a model of the castle as it appeared in HBO's award winning tv series Game of Thrones. In the series, Winterfell acts, (most of the time) as the home of house Stark, one of the main noble families in the fictional land of Westeros. Winterfell is seen often throughout the series, and stood out to me among all the other places in Westeros, not just because of its prominent role, but because of its unique design and architecture. Many of the castles we see in movies and on tv look amazing, with their numerous gold turrets, towers, large windows, and vast balconies, but all these features make the castles relatively unrealistic in an actual medieval setting. It is because Winterfell lacks these common features on fictional castles that it stood out to me so much. In the real medieval era, most castles were not very opulent, and had pretty plain, utilitarian exteriors. If you think about this, it makes quite a bit of sense, as putting all your wealth on the outside of your castle meant it could be damaged or stolen if you are attacked. I know, I know, most fantasy tv shows and movies aren't going for historical accuracy, including Game of Thrones, (I love seeing dragons flying around as much as the next guy) but that doesn't mean I can't appreciate when the creators do make things look as though they actually might in the given time period. I based this model off of the scale desktop model of Winterfell you can buy online (just search google for: Winterfell sculpture, and you'll see a few pages with it), and it includes all the main features of the castle, including the Winterfell Godswood, with the Weirwood tree and broken tower. I am quite pleased with the way the Weirwood tree turned out, its a new design that I haven't used before, maybe some of you have, but I hadn't, and so was quite pleased when I came up with it. Despite my best efforts, this is a large model, measuring approximately 2 feet by 1 foot, and comprised of 3046 pieces. If any of you want to build the model, a link at the bottom of this description will bring you to a folder with the full size images of the model, a bricklink parts list, a .io model file for the Stud.io lego design program (my personal favorite), and a .ldr model file for use with Ldraw. I do not have a .lxf file for use in Lego Digital Designer, as this model uses some newer bricks not in that program, so I apologize for not being able to offer that to those of you who use LDD. If you do build the model, please send me some pictures of it! As with my Hogwarts model, I don't have enough pieces to actually build it, so it would be awesome to see a real model if any of you are more fortunate with your LEGO collections than I am :). Also, feel free to share this with anyone you want and post images of it, as long as you remember to give credit to me as the model's creator, and provide a link back to this post. I will most likely be posting this model on Rebrickable as well, but I need to create instructions for it before I can do that, and that's the boring part of model making, so I'm procrastinating it :), A link to my Rebrickable page where you will eventually be able to find it will be posted beneath this description as well. And finally, here is the link to that folder with all the files mentioned above: https://drive.google.com/drive/folders/1pb0hN4USgPyKzkSvDyXeKFhb4Nkczwxq?usp=sharing and to my Rebrickable MOCs page: https://rebrickable.com/users/EthanBrossard/mocs/ and here are the images! winterfell lego with logo3 small by Ethan Brossard, on Flickr winterfell lego #0 small by Ethan Brossard, on Flickr winterfell lego #1 small by Ethan Brossard, on Flickr winterfell lego #2 small by Ethan Brossard, on Flickr winterfell lego #3 small by Ethan Brossard, on Flickr winterfell lego #4 small by Ethan Brossard, on Flickr winterfell lego #5 small by Ethan Brossard, on Flickr winterfell lego #6 small by Ethan Brossard, on Flickr winterfell lego #7 small by Ethan Brossard, on Flickr winterfell lego #8 small by Ethan Brossard, on Flickr winterfell lego #9 small by Ethan Brossard, on Flickr winterfell lego #10 small by Ethan Brossard, on Flickr winterfell lego #11 small by Ethan Brossard, on Flickr winterfell lego #12 small by Ethan Brossard, on Flickr winterfell lego #13 small by Ethan Brossard, on Flickr winterfell lego #14 small by Ethan Brossard, on Flickr winterfell lego #15 small by Ethan Brossard, on Flickr winterfell lego #16 small by Ethan Brossard, on Flickr winterfell lego #17 small by Ethan Brossard, on Flickr winterfell lego - winter small by Ethan Brossard, on Flickr Thank you in advance for any feedback/advice! Ethan
-
Hi there, I wondered if someone could help, I'm trying to find some Architect men Minifigures and have been searching high and low but can't seem to find any anywhere. I've just made one up on MINIFIGS.ME but it's cost around £17 with delivery. I actually need around 50 of these minifigures as it's for my daughters uni project. Does anyone have any suggestions on suppliers or websites I could speak to please? Many thanks
-
Hi everyone! Pembroke College, founded in 1624 is one of the colleges of the University of Oxford. In terms of architecture, it's fairly average in the city of the dreaming spires, but I have a lot of happy memories in this place. This is actually only about half of the college! There is a row of houses and a gated-off street immediately to the north, and a new build across a bridge to the south, but that would have made the whole thing too wonky for my liking. Did you know that Professor X went to Pembroke? Compare the view above with this panel from Uncanny X-Men #389. From above you can see better the geometry involved in this project. In all it took me around 45 hours, not counting rendering time. I used Bluerender. Thanks for looking!
-
Hi, everyone! I'm an American AFOL living in Bangladesh. My brother (in the USA) and I played with LEGOs since we were kids, but it was only in recent years that we've picked up the hobby in a serious way. And its been great to share the fun with my kids. Interests are in Architecture, engineering, nano-scale builds, Star Wars, and LEGO Ideas. Bro and I have both done some MOCs and hope to start posting them soon, once we feel they are up to the level. It's pretty danged hard to get LEGO in Bangladesh. There are only a few stores carrying the real thing, with limited stock, and at outrageous prices. So it takes waiting until a trip to the US, Bangkok or Dubai to pick up the really fun stuff. When I started building, I had to buy multiples of random sets just to get those 1 or 2 parts I needed. Now I've moved up in the world to binge-buying on Bricklink before a trip back to the States. I look forward to connecting with other AFOLs around the world, and especially in BD and Asia. And to connecting with those here interested in Architecture. Me at my desk. Yes, I have green hair.