Search the Community
Showing results for tags 'X-wing'.
Found 94 results
-
Update: The finished MOD along with instructions and parts list, all on Rebrickable, with new photos to follow... https://rebrickable.com/mocs/MOC-36569/ron_mcphatty/red-5-x-wing-t-65-set-75218-mod Thanks for your help guys! Original post- My kids bought me the new X-Wing for Christmas, they’re the best! I’ve wanted one in Lego form since I was a kid and hung on to the idea of a new set since I got back into Lego five years ago. Initially I was disappointed with how this set looked due to that ugly lever on top and similarities to Poe’s X-Wing. However, I recently saw a friend’s set and between us we worked out a few easy mods to improve things on a budget. Starting at the front we added a few plates to the nose to combat how flat the top looks, then added dishes and pins to the laser tips, also replacing the blue pins inside the roots with with black pins plus 4L lightsaber bars to reduce wobble. We added landing gear and a couple of modified plates either side of R2 to box him in. Most significantly took part of the S-Fool lever off and added a removable lid with some detail. I was thinking of adding internal gears connecting to a handle at the back but I really like that rear greebling so for now the lid comes off to to open and close the S-Foils. (Edit: I also added the extra cylinder length to the engines, thanks to Richpepperell for the design and Jerac for the suggestion) Bricklinking the extra parts costed about £6 including delivery, the skids for the landing gear weren’t common but cheap enough as used parts. Hope you like it and happy modding in 2019!
-
This is a MOC of the T-70 X-Wing from the Resistance, in both Poe Dameron's Black Leader (black and orange) and the generic fighter version (blue and grey). This MOC has been inspired not only on one but by several others creations i've found on the internet. Though i've combined several elements from these builds, most of the design is mine. Anyone willing to build this MOC or to know more about it please contact me through the comments. The main pages about this MOC are on the following links: https://bricksafe.com/pages/marcanadell4/t-70-x-wing I might post other low-resolution images in the replies. The Stud.io rendered images are can be seen and downloaded on the links that I've given in the description.
-
Here is my Let's Build for the upcoming (08/2018) #75218 X-Wing Starfighter. Enjoy!
-
Hey Eurobricks, First time poster but I wanted to share the my custom T-65 X-wing I have been working on for the past while. Flickr album: https://flic.kr/s/aHskC2ymYh LDD File: https://drive.google.com/open?id=1H2r8EemynUHE9wV_Q0ILHjciZeTAJIOq Part Count: 1056 Length: 34.5 cm, 13.6 inches, 43 studs. Width: 39 cm, 15.4 inches, 49 studs Height: 13 cm, 5.2 inches, 16 studs Bit of Background: I have loved the X-wing since I first saw the movies, and it was the first MOC I ever completed as a kid. Now as an AFOL I was recently able to block out some time for building a MOC and I wanted to update my first X-wing from many years ago. LEGO's versions have been solid, but the more I examined them the more I wanted to design my own that more closely matched the shape of the OT movie props. I was inspired by the amazing MOC X-wings I have seen created by many folks, including Gray Mouser, Inthert, Psiaki, cehnot, and dmaclego. My Objectives: Model building focused on three key components. Overall I wanted to make an X-wing that was relatively accurate to the source props but also very sturdy and still possessed important play features. 1) My first goal was to provide structural stability to allow for maximum swooshibillity. I will be the first to admit my MOC doesn't capture some aspects of the shape perfectly like others have done, but I wanted to focus on using a Technic solution to build a hull and wings that were very strong. I designed a custom skeleton using Technic beams and bricks across across the entire ship so the model can actually take a short fall without exploding entirely. :) 2) My second goals was to capture the proper shape with the heptagonal fuselage, proper angles and correct length and width proportions. Using the original model and screen grabs from the films as a base, I also drew inspiration from the great models of Gray Mouser, Inthert, Psiaki, cehnot, and dmaclego. I used hinge plates and Technic large ball bearings to achieve the slanted heptagonal shape and these were attached the rigid skeleton to maintain structure/swooshibility. It also means I can hold the model by the nose :) Here is a stress test swooshing videos. Two more are on the Flickr album. 3) Building working 'play' features such as retractable landing gear, removable R2 unit and opening s-foils. Since this was going to be for swooshing and not just display I wanted to incorporate the action features that were present in the official LEGO sets. The first was fitting an entire R2 unit behind the cockpit, legs and all. Fortunately, the skeleton allowed for a large space bind the cockpit and I used hinged panels around the R2 unit so the entire droid (legs and all) can be removed and inserted easily. I also made retractable landing gear a part of the rear engines and the front fuselage. Again the landing gear don't look quite as pretty as a display set, but I prefer the play-ability aspect myself. :) The s-foils can also be opened with a knob on the rear or a switch on the top of the craft. There is also an option to use a knob on the top of the fuselage, but I think the top knob would stick out too much. Just for fun here are the past two iterations of my MOC, from many moons ago I would love to hear thoughts about what others think of the model and I would be happy to answer questions or provide my LDD file, too! Thanks!
-
I started building this last summer, but never was able to take pictures of it. When I finally did, I revealed it on AFOLs of Facebook to much fanfare, but I thought I would share it here as well. First picture is an angle shot. It is a modified 9493. I extended the nose, modified cockpit and engines. But I used that set as a starting point, then changed things as it came along. Neo Classic Space X-Wing by TheLegoDr, on Flickr This is a rear shot of the engines. Neo Classic Space X-Wing by TheLegoDr, on Flickr Cockpit area. Added some extra decals so Benny knows his surroundings better. Neo Classic Space X-Wing by TheLegoDr, on Flickr With s-foils in attack position. Front view. Neo Classic Space X-Wing by TheLegoDr, on Flickr Side view. I think this is one of my favorite angles. Neo Classic Space X-Wing by TheLegoDr, on Flickr Rear view. Neo Classic Space X-Wing by TheLegoDr, on Flickr I know I've seen many classic space inspired X-Wings, but I liked doing it myself as well. It was a big hit at the few local LEGO shows I've taken it to. I have since built a 48x48 landing pad similar to the 928 landing pad, but no pictures taken yet. I have also built a classic space Y-Wing and currently working on another station/landing area for an A-Wing. Anyway, let me know what you think. Plus, any critiques. I'm new to classic space inspired builds. I don't have a lot of these colors, so it is all new purchases for me, so I don't always have the greebling needed. I have given thought to going back and smoothing out the wings better and exposing less studs.
-
Hi Everyone, My first post here. I have been working on a lego star wars mini ship set for awhile now and thought i'd share it with everyone here. The ships are primarily built to play with my 2 boys (4 and 1.5) so they have to be extra durable. I do my best to get sizing as close to same scale for all the ships as I can. I have a few more ships as well you can check on my Flickr page. There are many more photos of each of the individual ships but wanted to post a fun little render I was playing around with here. I also have instructions on some of the ships and am working on a build-guide for the falcon. Flickr Gallery: https://www.flickr.com/photos/159419138@N03/with/39595199135/
-
Here I want to present you my newest MOC a X-Wing Fighter in Midi-scale. More photos on Flickr album Download the buildings instructions: - for LDD : HERE - for Stud.io : HERE Version 2 form my X-Wing with the monochrome version. My diorama.
-
An alternate version of the X-Wing. It's been in my head a while. Finally had time to get it out. Done in New Republic colors, with a Resistance/Rebel alternate coloration. Enjoy!
-
Hey there, After seeing TLJ I made a quick MOD to Poe's X-Wing to include the booster he has on his ship. Poe's X-Wing Booster by Dosenbrot!, auf Flickr Poe's X-Wing Booster 2 by Dosenbrot!, auf Flickr Poe's X-Wing Booster Assembly by Dosenbrot!, auf Flickr
-
Hope you like it!!!
-
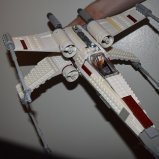
This will begin to make things right (or maybe not -- you have to find out). Here is my 8th RA review ready to take off, 75149: Resistance X-Wing Fighter. Overview Name: 75149: Resistance X-Wing Fighter Theme: Star Wars / The Force Awakens Year: 2016 (2H) Pieces: 739 Minifigures: 3 (+1 astromech droid) Price: USD 79.99 / EUR 89.99 / GBP 84.99 / SGD 179.90 / MYR 449.90 Resources: Brickset and Bricklink Introduction Whenever I tell people that I like Star Wars, it's hard not to blurt out Millenium Falcon or X-Wing because it is almost impossible to not know what an X-Wing is unless you are living under a rock. The shape of the starfighter always gives it away. According to Star Wars databank, the Incom T-70, most commonly known as X-wing, is the latest incarnation of a classic design and the signature combat craft of the Resistance’s Starfighter Corps. It is faster than the Alliance-era T-65s which makes Resistance X-wings manoeuvrable enough to engage TIE fighters in dogfights, but powerful enough to take down capital ships. As for the official dimension, we only know that it's official length in-universe is 12.48m. Now, I shall dispense all pleasantries so that we can scrutinise the box and all its contents. As described in the official set description, Lor San Tekka is being attacked by a Flametrooper. Poe is supposed to help him fight against the bad guy but it looks like Poe Dameron is targeting Lor San Tekka with the flick missile instead. Just look at the missile trajectory. Even the stud shooter won't hit the Flametrooper. Thankfully the back panel of the box shows Poe directly engaging the Flametrooper with his blaster. He also carries a fire extinguisher to put off the fire this Flametrooper started. As with any LEGO sets, the back panel shows off the play features of the set. The side panels show the minifigures included. LEGO does not count astromech droids as minifigures because they are obviously not minifigures but I think Bricklink and Brickset count them as minifigure for the sake of convenience. Therefore, in the official description you'll see that LEGO describes the set having only 3 minifigures but in Bricklink and Brickset you'll see they count astromech droids as minifigure. Most people will remember that this set was released after Poe's X-Wing Fighter with only 10-month lag in between. The build is 99% identical except the price of the Resistance X-Wing is a little bit higher. To justify this, apart from adding a few more bricks, the box size of set 75149 was also made slightly bigger. I refuse to think that the marketing team believes they can convince the buyers it's worth the extra price margin just by changing the size of the box. I think LEGO enthusiasts are way smarter than that. Build Moving on, inside the box, there are 5 numbered bags, and 1 plastic bag without a number that contains an instruction manual and a sticker sheet. As with my every other review, I will not put on stickers on this set. Unboxing content Sticker sheet I won't elaborate the detail of the sticker sheet because you'll see towards the end that you really don't need the stickers on this set because the set looks just as nice without it. Instruction Manual The instruction manual is quite big. It has the same width as A4 size paper and just a couple of centimeters shorter in length. I noticed that the quality of the perfect binding (adhesive binding) used in the manual is far from perfect. Look at the picture below. There are some pages that are quite difficult to unfold completely. You can force unfolding the pages but you risk damaging the bindings. I reviewed the First Order Transport which is an older Star Wars set. Its instruction manual didn't have this issue even though the binding technique used is the same. Maybe I'm just splitting hairs here but that's something I observed. Bag #1 contents Somehow when I took the picture below, I forgot to include the brick separator. As seen in the earlier photo, the brick separator was inside bag #1. It also contains Lor San Tekka and FO Flametrooper. I'll skip the minifigures for now as I will dedicate a section for that later. One of the outputs of the first bag is a small build -- a moisture vapourator with 2 crates. The fire elements suggest that the damage was done by the Flametrooper. As the moisture vapourator is on a hinge, you can also tilt it down like it has already been destroyed due to attack. Here's another angle of the small build. The rest of the bricks went to the build of the inner core of X-Wing frame which includes the inner mechanism that makes the S-foils open and close. Bag #2 contents In the middle of building bag #2, I thought that I was making chopsticks. Apparently it is the exact same technique used in 9493 X-Wing so this is not new. Bag #3 contents After completing bag #3, the cockpit is already fully built. The new cockpit window is a great addition but it is still not fully accurate simply because the side should be angled a bit. Not complaining, just saying. Bag #4 contents Bag #4 adds the left wing. Now it is starting to look like the X-Wing that we are all familiar. The bag also contains BB8 and Poe Dameron with both his white/blue helmet and hairpiece. Bag #5 contents Finally, bag #5 completes the build with the addition of right wing as well as the 4 thrust engines. Below is the cruise mode of Resistance X-Wing with the S-foils closed. Side note: there is a little bit of slack on the lower wings because I did not put two rubber bands on the wings. Cruise mode Below is the Attack mode of Resistance X-Wing with its S-foils open. This is done by twisting the black knob or what LEGO calls "Technic angular wheel" on top. Attack mode Front view The front view is just gorgeous. I purposely removed the flick missiles because it is entirely optional. I think it looks great without it. When you load the flick missiles while swooshing the X-Wing there is a tendency to flick it by accident. Stray missiles will just launch when touched by mistake, so either the kids lose the missiles or hurt someone -- totally not recommended for younger kids. Back view Showing the back of the Resistance X-Wing the blue rubber bands looks quite obvious. Not as bad as 75102 Poe's X-wing Fighter but the blue rubber bands could have been just black to conceal its presence more easily. Side view Bottom view With all the anti-studs underneath, it makes you wonder why even bother attaching the bottom wings upside down. Frankly, no one will enjoy looking at this angle. I've seen modifications to replace the wings so that the studs are on top instead of at the bottom to get a more consistent look when viewed from the top. Going back to the blue rubber bands, when you replace them with black hair rubber bands, it really looks more presentable and less obvious. If you do this minor adjustment, apart from the bottom view, all angles will be camera friendly. Here's the bonus part. Let's talk about scale. I put the microfighter Resistance T-70 next to the system-scale T-70 just for fun. Comparing the in-universe length of T-70 at 12.48m with the length of the system scale T-70 at 37cm, the scale used in this set is 1:34. If you consider that a minifig is 5 feet human, then the scale must be 1:38. In that case, the length of the T-70 should be 33cm only. If you consider that a minifig is 6 feet human, then the scale must be 1:44. In that case, the length of the T-70 should be only 27.7cm only If you consider that 3 studs = 1 meter then the scale must be 1:42 so the length of the T-70 should be only 29.7cm. Either way, the Resistance X-Wing is slightly bigger than it should be. However, I don't mind this because I think the system scale is quite close to minifig scale even with the limitation of the LEGO system. Just look at the chibi version of X-Wing. At 8cm long, the scale works out to be 1:156 and it looks okay albeit totally out of proportion. Parts Surprisingly, the parts used in X-Wing is quite common. Except for the cockpit canopy, the rest are easily available from Bricklink. This makes it easy to make different variants of X-Wing. Here are some of the notable parts: Sand Blue Slope 45 2 x 1 with 2/3 Cutout is not common. It only came out in 4 sets. The Blue hinge plate only came out in 4 sets too. The shovel is very common in City but it does not normally appear in Star Wars. This is the 5th time it appeared in any Star Wars sets. The printed tile 2X2 "No.231" (element 6078936) came out in Sandcrawler first and it's the first time it was reused. That's all. Like I mentioned, there is no spectacular LEGO element in this set. Of course, I need to show spare parts left after building the entire set. Minifigures The line up of minifigures are quite modest in this set with Poe Dameron with a subtle smile and jacket, the ubiquitous BB-8, a slightly happy Lor San Tekka who enjoyed as much as 1:45 minutes screentime in the movie (same duration as Captain Phasma), and a lonesome First Order Flametrooper. Here's the view of the minifigures' back. I am not really sure where is BB-8's back because he is a spheroid. Below is how they look without any accessory and hairpiece/helmet. Surprise! Angry clone trooper face again. Without the hairpiece and helmet, we see the dual face printed. Poe has a serious but slightly worried look while Lor San Tekka has "I am doomed" face. Poe Dameron comes with a different helmet -- the one that he wore in Jakku before being captured by the First Order. Below is the comparison of Poe's helmet against the helmet of Temmin "Snap" Wexley: On the right side of the helmet, Poe's helmet has roæhal written while Temmin's helmet has popsæboo written in Aurebesh. If you know the meaning of these words, do let me know. I can't find any information what's the significance of this Blue Squadron(?) helmet. We know that Poe has a black helmet because he is the Black Squadron leader so perhaps the other helmet is the older version before he eventually became the Black leader? You have to hide. You need to leave. Conclusion I still enjoyed putting together all the pieces needed for Resistance X-Wing even though it is almost a copy of Poe's X-Wing. One may ask why TLG released 2 X-Wings back-to-back. In my opinion, the marketing genius in TLG sees the opportunity to capitalise on diorama builders who wants to build multiple copies of X-Wings. If the LEGO Star Wars team designed only Poe's X-Wing then there will be opportunity cost as there are more blue and grey T-70 X-Wing in The Force Awakens. Making a diorama of many black T-70 X-Wing is not acceptable. Frankly, I like this regular Resistance X-Wing version more than Poe's black X-Wing. Sometimes that moment when you wish you could run and hide is when you find you need a new hyperdrive. I have a bad feeling about this Review summary Playability: 9/10 - It is an X-Wing. It's fun and easy to swoosh around. The small moisture vapourator build allow kids to re-enact the scene in TFA Design / Building Experience: 9/10 - I enjoyed the same old build and techniques used. New owners of X-Wing will enjoy building it. Minifigures: 8/10 - Lor San Tekka is the minifigure-of-interest in this set. Poe's blue squadron helmet is a cool addition. Getting another BB-8 is also welcome. Price / Value for money: 8/10 - I feel that I could have scored this a little higher if the price stayed the same as Poe's black X-Wing Overall: 8.75/10 - This could have been a solid 9 but with a slightly higher price I have to slightly reduce the rating. Apart from that, a great set to play or collect. Thanks for reading. As always, wubba lubba dub dub.
-
Here is my take on the iconic X-wing. Lots of builders have been bringing out some incredible models, and I decided to hop on the X-wing train and see if I can bring something interesting to the table. The objective of the project: To build the perfect minifig scale X-wing and make it look like a mini UCS X-wing, not because I'm a genius, but because I'll be using the best design ideas inspired by the best X-wing builders out there. The design guidelines: Accuracy in overall shape, scale and proportions. Convincingly accurate color scheme. Abundance of details. Sturdiness. Working S-foil mechanism. Modularity and easy assembly. Using the new windscreen. Detailed cockpit. Convenient R2 slot. Storage compartment. LEGO Star Wars - T-65 X-Wing 0 4K by Khaled Yousef, on Flickr LEGO Star Wars - T-65 X-Wing 1 4K by Khaled Yousef, on Flickr LEGO Star Wars - T-65 X-Wing 3 4K by Khaled Yousef, on Flickr LEGO Star Wars - T-65 X-Wing 4 4K by Khaled Yousef, on Flickr LEGO Star Wars - T-65 X-Wing 5 4K by Khaled Yousef, on Flickr LEGO Star Wars - T-65 X-Wing 6 4K by Khaled Yousef, on Flickr LEGO Star Wars - T-65 X-Wing 7 4K by Khaled Yousef, on Flickr The build: The ILM model used in the CGI work is dirty white, while the life size model leans towards grey, so you pick the one you prefer; there is no definitive answer to that question. I chose white because the X-wing is a lot lighter than the Falcon, and the Falcon is definitely grey, so there is no other choice in LEGO except white. I tried however to darken the overall tone a bit by using grey and tan parts whenever possible to give it the battle scarred look. I used red and dark red for marking to give it a dirty look while at the same time be able to use the original Red Five striped 1*4 tile on the wings. An all dark red markings would just make it look dark not dirty; dirty is more accurate. I found that L-DI-EGO's and Inthert’s idea to use the 12*3, 4*2 & 3*3 wedge-plated to illustrate the nose to be the perfect solution. I just wish LEGO would make a 6*2 wedge plate so I could use it instead of the 4*2. I also think Inthert is the best builder to incorporate this idea to achieve the perfect overall shape. I had to use the new windscreen because it's just gorgeous. The only problem with it is that it ends in 4 studs and doesn't taper inwards; it should taper inwards to 3 studs to fit seamlessly into the wedge plates of the nose. This caused a slight unavoidable gap between the wedge plates and the top of the nose. I’m working to fix this issue. The build of the body is sturdy enough, and the wings are removable for easy maintenance of the s-foil mechanism and for easy storage. Psiaki was the first to inspire me to think outside of the box when it comes to designing the X-wing body; he was the first to use SNOT techniques, modularity and angled plates to make a more accurate overall shape for his X-wing than the official set. The nose tip is a new design, I hope I managed to make it look as smooth as it should. I used LEGO's S-foil mechanism with rubber bands, it's the best and most professional one to use, it opens easily with a twist of the top 2*2 round plate and snaps right back perfectly. I improved on LEGO's design by concealing the rubber bands so it won't look stupid. I consider this model to be a work-in-progress, so any ideas to improve on this design would be much appreciated. I intend to improve the S-foil mechanism by connecting the opposite wings to achieve more balance while keeping the core rubber band system, which is tough considering the tight space I have. I also want to add retractable landing gear inside the engines and the nose without compromising the shape or the integrity of the structure. I hope I've succeeded in building a better and more accurate X-wing, worthy enough of the 40th anniversary celebration this year, bringing together the best ideas of the best builders out there with professional techniques from the official sets and some personal ideas of mine to make it look like the perfect minifig-scale X-wing. I wanted to take more time to improve on this model, but I don't want to cause delay to my next MOC, which is going to be my best work ever, so I think I'll move on immediately to my next MOC, which will be "on the way at the speed of light".
-
hello! At the start of last month I began work on by next project, which is a minifig-scaled model of the "red 5" x-wing that Luke flies in the death star assault. So far I've completed most of the wings and have also done some of the rear fuselage. project album on flickr: https://www.flickr.com/photos/atlaser/sets/72157676216434583 stage 1: https://www.flickr.com/photos/atlaser/31819163993/in/dateposted/ stage 2: https://www.flickr.com/photos/atlaser/32763745095/in/photostream/ description from flickr: Problem. I am trying my best to make this as proportionally accurate as is possible with lego. Fortunately, using my scale (4 studs = metre, meaning a projected length of 50 studs), the 4-wide cylinder intake piece and 4-wide half cylinder are basicall the perfect size for the engines. Using a top down image of the ILM red 3 studio model the engine width is about 8% of the total length of the model, from nosetip to exhaust. So that is a good basis for the size of the rest of the wings : 6 studs wide from front to back at the laser cannon mounts, and it's already been established by other builders that the 4x2 wedge plate is also almost perfect for the angle of the back of the wings. My main issue with this currently is that the distance between the interior edges of the engine half cylinders is too great. As shown in the photo it is currently a 9 stud gap between them, and if I built a fuselage to fill this gap, it would be much too wide. Using other reference that I've been gathering, the distance between the interior edges of the engines seems to be close to 2 times the diameter of the engines. Meaning it needs to be 8 studs wide. This is really difficult to achieve because the scissor mechanism I have built (which is derivative of mike psiaki's click-hinge scissor but more compact, and using finger hinges so that each wing shuts flush instead of 0.5 studs apart) is based on a central shaft which is 1 stud wide, with the arms of each scissor measuring 4 studs from that shaft to the edge of the engines. Somehow I am going to have to reduce the gap by 0.5 studs on either side. I don't think using a 1x2 technic brick with a centre hole is an option so I will try shifting each engine assembly 0.5 studs inward with jumpers first. stage 3: https://www.flickr.com/photos/atlaser/32839077375/in/photostream/ description from flickr: two steps forward and two steps backward. I fixed the proportions issue from the last shot, but at the cost of the strong scissor mechanism i had before that forced a 9 or 7 stud gap. The new scissor is made out of technic liftarms, but the impossible problem is that to have a gap of 0 LDU between each wing when closed, i had to use part 32530. I just can't figure out how to make a strong connection between that part (on its sides so that the antistuds point directly toward the cannons) and the wing assemblies. I can't lock it in, at the moment they are just attached with snot bricks. It's strong enough to stay attached with minimal drooping, but nowhere near as tough as the previous one. I'm not sure whether to persevere with the old one and make it 8 wide somehow, or move onto the fuselage and concede some fragility. This is the third major overhaul of the wings (first: made 6 long at the tips instead of 5, second: finger hinge scissor mech, third: this technic iteration. You can see the old mechanism in the background with the orange hose through it. I really liked that, simple, compact and strong but egh, it's too wide. The bottom engines have open landing gear doors. I have one set of parts to have the doors open and gear down, and another set of parts (identical to the coverings on the top two wings) for flight mode. I didn't bother with having them retract, and as dmaclego pointed out having the gear fold into the engines does't really make sense. stage 4: https://www.flickr.com/photos/atlaser/32469801403/in/photostream/ description from flickr: I have started on the fuselage. Before that, I decided that I wanted to include a gearbox and gear mechanism for the wings to open and close. Doing it manually is easier but i thought what the hell. I probably have less technic skills than a 5 year old so I decided to reverse engineer dmaclego's creation (see herehttps://www.flickr.com/photos/dmaclego/27832343200/in/album-72157669369597202/For the fuselage, I'm trying to see if it's possible for me to have all 9 surfaces included on my model, at the rear. Currently I have the top 5 attached, the main headache is figuring out how to get the bottom 2 surfaces attached (see here http://www.modelermagic.com/wordpress/wp-content/uploads/2009/01/kg-lucasfilm_archived-red3-reference-029.jpg). for the greebling, it's not reall proportioned properly, but I'm trying to include the main details. The rectangular box thing with the circular greebly thing is there, but is a bit too wide. (i also realised after I had already built that section that the circular greebly thing should have the edge part pointing down - i believe this was a unique feature of the red 5 ilm model, but i can't see a way to fix that. you can also see that I got some new parts in so the overall look has improved. I'm quite pleased with how the small "used-universe" colour details have turned out. I think the sand blue, dark orange and other colours adds a lot of character to what would otherwise be a boring, gray mass. (as an aside, those parts also arrived with the final pieces needed to finish the T-70 x-wing, so hopefully I wll be able to properly photograph that soon). And i'm satisfied with the choice to make it gray now - under strong lighting, the LBG plastic has that off white look that the film models did. Still a little bit too dark, but much better than lego-white in my opinion. another thing - for anyone reading this and looking at my photostream - do you like seeing WIP images like this while I'm building something? if you do, please let me know and I'll be glad to post more frequent updates! as always, comments, critique, etc. are very welcome! -------------- as I said, comments, criticism, suggestions, questions, etc. etc. are always welcome. As a make progress i'll continue posting updates to the project until it's finished!
-
This started out as a 9493 that I picked up second hand, but complete. I was surprised how crude it looked after more recent sets, so I began tweaking it here and there, and then it just sort of got out of hand, and I don't think there are two bricks of the original set still in their original configuration! I'm not a quick MOCer by any standards, I tend to come back to things and tweak a bit, rummage through the spares, get inspired by others builds etc. There are plenty of things I could have done for greater accuracy, but I wanted it to be a tough build, and whilst there are techniques that would allow the shaping to be more screen accurate, they tend to be quite fragile, which is a compromise I was unwilling to make. Anyways, on with the pics The wings open and close in much the same way as in the originally set, though much of the mechanism has been messed about with and changed. The knob for opening has been relocated to the rear, and the rubber bands have been made a little more discrete, though I think if any further development on this happens, i may ditch it and revert to the wing mechanism used by many other x-wing MOCs. Tried to get the shaping on the underside as close as possible without it being too fragile, I think the shape is ok, but the slope section could do with being a little more secure. It doesn't fall off, but it's only connected at the rear. The gap in the underside is to accept the stand which is designed to hold the ship at an angle so it looks a little more dynamic. So yeah, it's not finished, I keep doing things to it when I find different or better solutions to things. I feel the rear of the fuselage might be a stud too long, so that's something I might look into. The greebling could be more accurate, but that's not a major worry. I realise the shaping is a little more rounded than some, but it's also a little less "studdy" too. I'd like to incorporate some landing gear but at this point I wanted to make sure it looked right, and the stand makes gear less vital for display. Overall I'm quite happy with it, but I'm also open for suggestions on improvements.
-

[SoNE Ep. XIII - Freebuild 13.1] Hung Up on Commenor
goatman461 posted a topic in Nar Eurbrikka Archive
That ISB cruiser could not have been there for me. I've spent months setting up this bounty through Rebel back channels and getting Zaz Sikari to Commenor for some payback. But that ISB cruiser was waiting for me... or something else... X-Wing Crash 1 by Ryan McBryde, on Flickr Kirana... it was just a matter of time before he lost favor with the factions of the ISB trying to kill me. If it was a planned out hit, scout crews will be ready to examine the crash sites... AT-ST front by Ryan McBryde, on Flickr Time to move. I've got a lot of catching up to do if I'm going to take care of Zaz... Story continues here -
Hello everyone ! I am very excited to show you a MOC that i've been working for a while and that i really wanted to show you, my new and improved X-Wing. Now i know there's been a... X-Wing fattigue (for lack of a better term) here, and with such great models as Inthert's or Maciej Szymansk's, i knew i had to live up to those standards, weather or not i did it's up to you, so since i knew i couldn't do this alone so i asked for help from LiLmeFromDaFuture, Kit Bricksto and Inthert to help me out with this model, the result.. what i consider a decent (at best) representation of the iconic ship. Now, my main goals with this was to use the new windshield piece and to make it look organic into the model itself, i also wanted to give the nose a nicer/smoother look and to give it that nice angle from the nose to the windshield, to keep it as smooth as posible (since i prefer that style of builds), give it the right proportions, keep it minifig scale and to give it the hexagonal shape that the X-Wing it's known for. My all time favorite color scheme for the X-Wing is Luke's so i wanted to get as close as i could to that specific set of colors with my model and throwing some random tan & light bluish gray, some old darker and slightly discoloured pieces,along with newer ones to show wear One mayor thing that was missing from my previous one was a proper targeting monitor, so i made sure to include it this time around, one thing that's easier to note in this pic is the fact that i tried to hide the technic as much as i could, it aint perfect yet but it does the job for the time being. One big improvement was the back of the fighter, you can see that the main body looks waaay better now and i added some extra greebles there just for the heck of it. And one of the sections i'm the most happiest of it were the 2x2 round brick/mechanism activator is, i used hinge bricks and plates along with tiles to give it that nice outline on the back while keeping the shape, that's an idea that Kit and Inthert gave me and i cannot thank them enought for that. I think this picture (the trench run pic as i like to call it) shows the new nose in all it's glory. And that's pretty much it guys thanks for taking the time to read this, oh wait there's more actually heh, the last time i uploaded a X-Wing quite some people wanted instructions for it, but i didn't make any because that model wasn't the most stable, however i designed this one to be quite sturdy (it's not as solid as a LEGO set but it should do, it's ment to be a display piece anyways) so i'm very happy to announce that for anyone that woul like to build this... well now you can, i made a full PDF file with the actual instructions and some further stuff you need to know about this. The X-Wing that's on those instructions is a blank looking one (what i mean by that it's that it's mostly if not fully white and with complete red marks) so you can come up with your own color scheme, it can be a Black X-Wing, a member of the Rogue Squadron or even one of the new cool gray X-Wing squads that will be on Rogue One the choice is up to you. Because it took quite a while to develop this unfortunally the instructions do have a cost they're only $6.50, this can help me develop and fund more awesome builds like this but i'm willing to lower the price if i see that enought of you think it's too high. You can find the instructions here: http://www.ebay.com/itm/LEGO-Star-Wars-Custom-X-Wing-Fighter-Instructions-/222292473912? And they will be on the Bricklink MOC page soon ! (i'll post the link when they go up) Sorry for that huge plug, and thanks again for taking the time to read this, i hope you all like this as much as i do, and huuuugee thanks to Kit,LiL & Inthert for their help Have a great day and May the force be with you ! -Prime
-
All black rebrick/mod of the 10240-1 UCS set. 10240-B1 Black One X-Wing Starfighter UCS by nixtron1, on Flickr
-
Although this has been up on Flickr for a good while now, I thought I might as well share it here too :) This is my version of Poe's T-70 from The Force Awakens (but of course you already knew that :P) The model features the all important S-foils, opening cockpit, functional landing gear and a working droid lift for BB-8 Poe’s T-70 X wing (1) by Inthert, on Flickr Poe’s T-70 X wing (8) by Inthert, on Flickr Poe’s T-70 X wing (9) by Inthert, on Flickr Instructions, more information and pictures are available on my Flickr page and even more pictures are now up on Brickshelf. Following a conversation on Flickr, I now appreciate that the forward fuselage isn't quite right for a T-70, this is something I'm planning on modifying when I get the time. Any other suggestions or comments are very welcome!
-
I glanced nervously at the proton torpedos sat in the repulsor kart. Helping to unload them from the snub fighter had terrified me, despite assurances that they were safe. The rebel forces were still scattered around the outer rim. I don't even know the name of the place where we were temporarily based, but I doubt it was anywhere that I would have heard of anyway. Us ground troops were protected by four X-Wings, the ony survivors remaining from Night Hawk squadron. When news arrived from command that an astromech had been compromised, the fighters were all grounded until they could be checked out. This left everyone very nervous and anybody who had ever held a hydrospanner before was volunteered to help out. My previous life as a mechanic (http://www.eurobrick...howtopic=100455) meant that I was the only one qualified to help the flight crews. After removing the R2 unit (which Rax did not look happy about having to guard, until the techs could check it over and then wipe its memory) from its socket, and unloading the torpedos, I had helped the Mon Cal head mechanic to check the ship for signs of sabotage. We were instructed to make sure it was safe to fly and keep an eye out for any clues if it had been tampered with. An old R1 unit had been brought out of storage to help with diagnostics. Ours was the first X-Wing to be cleared for duty, and we were all relieved to have our air cover back in action... Thanks for looking
-
See the rest of the story: Season 1 Season 2 MKJoshA, Kale, are you there? Yes, we're here. Hold on, your picture isn't coming through right. Ah, there we go. My color balance was off. I need you two to go to Tatooine and investigate the X-wing that fired on Luke to see if we can learn anything more about this saboteur. PLEASE NOTE! The following picture is the "First Picture" for my contest entry and it includes the seed part. The previous pictures were for story sake and should not be counted in the entry. "You there," asked Josh, "droids. What can you tell us about this X-wing?" "Oh my!" responded the protocal droid. "I'm afraid there has been obvious signs of tampering." "The technicians are still dismantlement the circuitry," he continued. "But it seems that certain parts were used that are only manufactured on Coruscant" he finished. "Thank you for the information," said Josh. "Now let's finish the investigation of the circuitry and see if we can flesh out any more details." OoC: Yes, I have gone to the darkside and I have converted to fleshies. I made this decision after chatting with Rogue Angel at Brickworld, Chicago. Every other kind of build of mine will continue to use yellows, but it just makes sense to use fleshies in my Star Wars builds now. I had no idea LucasLaughing was going to do the same thing! I'm really happy with the heads I found to replace my character's old yellow heads. My character is Will Turner's and Kale's is Superman/Hyperion's. Let me know what you think!
-
Greetings, Today I have decided to create one of the most sought after SW sets that hasn't happened. You've read the title so you know of course it is a Yavin Base MOC. This is actually my second go at making this, my first attempt (which can be found here.), is very poorly executed with multiple design flaws that are too far from creative liberties, and very poor support. Now I have ditched the exterior, made it entirely interior based for improved playability (and difficulty to recreate the exterior correctly), made lots of braces going through the floor, put various triangle brackets and braces in the walls, made it a two-part modular build, and I gave it a final minutes of the battle tension as the theme (very clear with the placement of the minifigs). Briefing Room (Note: The 6x6 flat tile will be white w/ a cutout of DS plans on a black sticker) War Room T-65 X-Wing in Hanger Rear T-65 X-Wing in Hanger Front Arm w/ Rotating Droid Magnet (No Droid For Use) Fuel Tank w/ Refueling Hose How To Separate/Reconnect War Room to Briefing Room. [There are color and print problems as usual with just the minifigs and X-Wing (mod of unreleased Yavin set version for now)]. Hope you liked it. Yavin Base Command Center.lxf
-
[spoilers for the X-Wing series and Courtship of Princes Leia] The TIE Raptor or TIE/rpt was a starfighter design used by Warlord Zsinj's Empire during his reign from the Battle of Endor until his final defeat at the hands of the Hapan Royal Navy. A fast and manouverable design, it was not a regular SFS product like other TIE models, but was produced from Sienar components at the shipyards of Zsinj's hideout - Rancor Base - over Dathomir. Raptors are known to have participated in the battles of Vahaba and Selaggis, and were most likely used in many other missions and engagements, since Zsinj's elite troopers (also named Raptors) used them for space combat. The TIE/rpt was equipped with 4 laser cannons and 2 concussion missile launchers, but like most TIE models, lacked shielding, though some prototypes were produced. I admit my design is far from perfect, but I hope you still enjoy seeing my take on the Raptor. Pictures can be found on my Flickr page: Technical data and history of the TIE Raptor: http://starwars.wikia.com/wiki/TIE/rpt_starfighter You can learn more about Zsinj here: http://www.starwars.com/news/the-imperial-warlords-despoilers-of-an-empire-part-1 http://starwars.wikia.com/wiki/Zsinj
-
I was asked to upload the LXF. file for the latest version of my T-70 X-Wing MOC. And without further ado, here it is! I can't seem to attach images for whatever reason, so you can find them here. T-70 X-Wing #3.lxf
-
For this build I wanted to combine the classical Ralph McQuarrie desgin with some dieselpunk aesthetics from the 1930s and 40s, giving it an elegantly curved and streamlined look. Just think of the wind-tunnel designed cars and trains – and of course airplanes – of that era. It was also pretty clear to me from the beginning that the only possible colour this fighter can have is red. It just works so well with emphasizing its lines and gives the whole build a vibrant dynamic I wouldn’t have gotten in – say white or grey really. Oh, and my affinity for the biplanes of the great war played quite a role too. So see it as the Red Baron in space basically! I see the landing gear as provisional, so it can be easier put on display (and to make it easier to find a place to land^^) I really want to make it more elegant, while not sacrificing its stability. Sadly there isn't really much space where it is - but I'm sure there will be a decent solution coming up Anyway, apart from that I am very happy with it. It is stury and very swooshable and is a nice display piece For more pictures and musings about its design and stuff feel free to visit my blog!
-
Hello guys , I am currently working on an X-Wing moc. The focus is to get it as close to the movie version as possible ( while strictly keeping it minifig-scaled ) , without caring about action-features , play value/"swooshability" etc . While waiting for a couple of Bricklink orders , I decided to post some WIP photos of what I have so far . Do have in mind that many of the parts' colours are substitutes while waiting for the correct coloured ones ( such as the brown nose and every white piece in there ) . Lastly , I 've decided to go with light bluish grey and not white for the main colour . I know this debate has been going on forever , and fully respect the people who want it white , but for me light bluish grey not only represents the actual colour a bit better , but also provides that battle damaged - real world and not CGI feel that I love about the original trilogy ( it's a real, living world , with real vehicles and that sets it apart as the best in the sci-fi genre , imo at least ). Anyway , enough indirect prequel shots fired , here are some pictures , please share your opinions and/or suggestions (sorry about the medium-low level quality , a friend borrowed my camera so I had to make do with my phone ) . There's also and LDD file I made which I'm attaching , it's not quite the whole thing , it's more of a sketch-up of how it's going to look without caring about how everything will connect ( as it is better to find that out when physically building it , when illegal and unorthodox connection techniques can be used ) , so have a look there , as there's much more than I've shown built in the photos above ( almost the whole thing , or at least the first version of it ) . Finally , note that there's going to be a "88295" part (http://www.bricklink...colorID=66&in=A) stuck on the "85861" parts on each of the four laser-canons , they're just not available in LDD so I couldn't show it there . Please share your opinion , recommendation or any other type of feedback guys , I really need it and will truly appreciate it . Thanks for looking !