Search the Community
Showing results for tags 'WIp'.
Found 313 results
-

[WIP] Articulated Tracked Dumper
JLiu15 posted a topic in LEGO Technic, Mindstorms, Model Team and Scale Modeling
Hey guys, here's a rather simple project I recently started. I wanted to build something that's highly playable and not too complex, so I decided to do a tracked vehicle of some sort. However, this one will be unique in that steering is not done by tank drive, or by traditional steering. It's by an articulation joint like a front loader. This model will have all-track drive, articulated steering, and a pneumatically tipped bed. The bed will be on the rear module, which will contain no motors. All motorization is done on the front module and the only things passing through the articulation joint/turntable are the drive axle and pneumatic hoses. Propulsion is done by a single L motor above the front differential, steering is done by a M motor that controls 2 linkages going in opposite directions with worm gears, and the pneumatics are controlled by a M motor that simultaneously drives a 6L pump and Sariel's autovalve. The mechanical elements do take up plenty of room in the front module, but once the bodywork is in place most of it should be concealed. My main purpose in building this MOC is to find an opportunity to really use dark azure Technic pieces. My Grapple Truck I6 and my current WIP Red Beryl X were both started with the intent of using dark azure pieces, but both times I was faced with a limited collection of them. I've recently ordered some extra dark azure pieces off Bricklink, and considering a cab on a model this size shouldn't really use that much pieces I think this finally be my first dark azure MOC. If you guys have any suggestions for me, please let me know. Photos: -
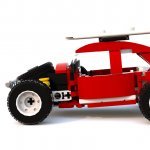
[WIP] Red Beryl X (AWD Supercar)
JLiu15 posted a topic in LEGO Technic, Mindstorms, Model Team and Scale Modeling
Hey guys, here's a project I've recently started working on. It's been a while since I built anything as I've been quite busy for the past couple months. Anyways, this will be a supercar project. My 4th supercar so far, hence the name "Supercar IV". To be honest I've run out of creative names after giving "Red Beryl GT" to my BrickFair 2018 MOC, so I'm happy to take suggestions if any of you have a better name in mind. From the photos below this may seem like a mere rebuild of my Red Beryl GT, but this MOC comes with several upgrades: A 4WD drive system A 4-speed gearbox, controlled remotely This will be my first supercar to contain such features, and if everything turns out well this could be my most mechanically advanced supercar MOC up to date. The presence of a 4WD system makes it easy to install a 4-speed gearbox, as I took advantage of the two gears of different sizes on the old differential serving as a central differential. I wished that I was able to make the shifting mechanism smaller or use a stepper mechanism for it, but a stepper mechanism is a bit too big and complex to fit in the available space and there is too much structure around the gearbox to make the shifting mechanism any smaller. Although the mechanism appears obstructive as of now, building seats and a roof over it should help conceal it. I am also planning on installing Brickstuff LEDs to this MOC, as well as potentially adding a 4th motorized functions (such as motorized doors or a motorized rear wing). If you guys have any suggestions for me, please let me know. EDIT: I've decided to name the MOC "Red Beryl X", as it's essentially an upgraded sequel to my Red Beryl GT. Photos: -

[WIP] 42043S (RC Arocs 3245 with SBrick)
Sphexish posted a topic in LEGO Technic, Mindstorms, Model Team and Scale Modeling
Greetings! After coming out of my Dark Ages and tackling both the excellent Ultimate 8043 & 42009 (see below) designed by Jurgen Krooshoop, I was hungry for another Lego Technic challenge. But I felt rather lost at this point: without a large collection of loose Technic pieces at my beck and call, motorized MOCs which weren't heavily based on existing Lego sets would require some hefty Bricklink investments from my part. Fortunately, a fifteen-percent-off-everything anniversary sale at a local toy store with an expansive Lego section made the choice for my next project a lot simpler: they had the 42043 Arocs set that had already been calling out to my wallet since way back in oh-fifteen. They also had a certain little gizmo called an SBrick in stock, which I had heard quite a few things about. My previous builds had involved standard PF receivers and remotes, so it seemed like an interesting new challenge to incorporate this new-fangled blue-toothed thing-a-ma-jig into my already-slightly-more-challenging attempt at "RC-afying" the Mercedes. I'm already a little way into the project, but I've already made a few false starts and moronic missteps, so I figured it might be educational for others to document my frantic flailing about experiences, so that they might avoid my (myriad) mistakes. The first thing I did, of course, was to order the necessary PF components: a Servo Motor, an L-Motor, an 20cm extension cable, and a couple of PF lights. In hindsight, this already turned out to be my first mistake: I hadn't done my research properly and hadn't realized that the SBrick requires an extension cable to be hooked up to a battery box. This meant I was probably going to be one cable short, since I didn't think the cable for the L-motor used for drive would reach. While I waited for these crucial parts to be delivered, I began preliminary work on the Arocs proper. After completing most of bags 1 to 3, I had three loosely connected main sections of the truck - the cabin housing the 6-cilinder engine and the L-motor that came with the set, the gearbox with the outriggers, and the rear section with the dumping bed and the differentials. In my mind, I could already see a problem arising: there was a drivetrain going from the rear wheels all the way to the engine in the front of the truck, which would obviously make the pistons move as you move the truck along. I already guessed I would be severing this connection by remove the driveshaft with the CV joint and attaching an L-motor in the center somewhere. Which would render the engine, the drivetrain, etc. utterly useless. This was not acceptable - not in the last place because my kids had unanimously decided that seeing the pistons in my 42009 mobile crane move was officially The Coolest Thing Ever™. So I fiddled about a bit before connection these three main sections, and eventually came up with this: Might be a bit hard to see, but... Basically, I placed an additional small gear directly in-between the L-motor and the gearbox, which allows it to power the axles and gears connected to the piston engine when in use. So, it wouldn't be connected to the drive anymore, but at least there could be some motorized eye-candy when one swung back the cabin and fired up the main engine. It wasn't long before my motors and such arrived, so the first I tried to accomplish was to connect the L-motor for the drive somewhere. One nifty solution I'd found involved replacing the engine in the front and using the long drive-train to power the rear wheels -- a technique I thoroughly rejected for several reasons: It seemed inefficient, and COOLEST. THING. EVER. So I figured I'd just bolt the bloody thing directly to the rear diff, as I'd also seen in this fascinating and classically scored tutorial vid by RC-master PPUNG daddy: It didn't sit right with me to just attach the motor with two pins like that though, so I have attempted to support it a little bit better without messing up the way the rear suspension works too much. Right now, it looks something like this: Not exactly perfect, but it seems to work well enough, even when I give the suspension a bit of a work-out. Next came the steering. My first attempt was based on this extremely helpful Youtube video by yu shine: Basically, this involved just connecting the Servo directly to the standard HOG steering mechanism for the Arocs, just below the two orange lights-slash-knobs at the top which you're supposed to turn. It seemed the most simple and elegant and -- being but a simple soul -- this naturally appealed to me greatly. It also didn't require the purchase of any additional parts, and left the mechanically unique way the steering on the Arocs model works intact. At this point I was able to put together a sort of prototype for the RC driving, by dangling the SBrick from the battery box and just hooking everything up in a makeshift manner. After installing the app, setting up the official 42043S profile, and playing around with my handiwork for a bit, I discovered the following issues: The L-motor was supplying quite a bit of power, making the truck actually pretty hard to control. Of course, there was a lot of weight left to be added at this point, so I was willing to reserve judgement for the time being, but given that my kids no doubt want to play around with this thing as well it'd be nice if I could prevent them from semi-accidentally ramming a massive Lego vehicle into, well, practically everything. Not sure how I could address though, other than from the software side. Placing the Servo motor where it was, behind the battery box, didn't actually fit all that well. The battery box itself actually pushed up against the servo when inserted, bending it back by at least a stud, which also frustrated my attempts to secure it in place a bit further. The steering was a bit... inadequate. The problems regarding the steering I recalled Sariel already mentioning in were only exacerbated here. It felt imprecise and rather unresponsive, and it didn't help that there was quite a bit of play in the wheels even with the Servo hooked up, meaning they weren't necessarily centered even when it was. So in the end, I stripped the away the steering mechanism and the wheels up front until I was left with this: After that, I decided to pony up and order the parts which -- after careful visual inspection of PPung's tutorial -- I figured I'd still need to mount the servo at the bottom, between the two sets of front wheels. So, mostly a set of gear racks and gears, in addition to some beams and various connectors used for bracing. This also gave me the chance to simultaneously order an extra extension cable from the same supplier, since it was pretty clear I was going to be needing it if I wanted to have any hope of hooking up the drive motor to the SBrick up front. And now, we wait... Although, to pass the time, I busied myself with rebuilding the back of the cabin, which I had previously taken apart to place the servo motor. I didn't need all the gears used for the steering mechanism, of course, and I figured I'd be better off trying to mount the SBrick in this space instead. For the moment, I came up with the following: I did notice the two black Technic pins still sticking out back there, and peeking ahead in the manual revealed that these will be used to help brace the pneumatic crane, once the time comes to attach that beast. As far as I can tell, that should still be possible even with the SBrick where it is, but no doubt I'll have screwed up somehow. We'll find out in the next update, hopefully! (Assuming, quite optimistically, that there is actual interest in such a thing. ) -
Here's my latest project, Teenage Mutant Ninja Turtle WIP...It's a modular build in a 2x6 baseplate layout (48x48) that breaks down into 3 sections. There's a subway with an NYC passenger train in between the sewer lair and New York City. From the city sidewalk there's 2 sewer grates that connect to the turtle lair and training weapons with power functions in the lair for playability. Lots of LED lights throughout. I've been working on this build since September of last year and hope to finish in April.. LEGO WIP Teenage Mutant Ninja Turtle Sewer Lair by Ben Pitchford, on Flickr LEGO WIP Teenage Mutant Ninja Turtle Sewer Lair by Ben Pitchford, on Flickr Lego Wip Diorama by Ben Pitchford, on Flickr Lego Wip by Ben Pitchford, on Flickr Lego Wip by Ben Pitchford, on Flickr My Flickr Page: https://www.flickr.com/photos/127491317@N08/with/44971238321/
-

[MOC] [WIP] Huge Teenage Mutant Ninja Turtle Lair-City-Subway-Sewer
Ben Pitchford posted a topic in LEGO Licensed
Hey Eurobricks! I'm working on another large scale build but thought I'd update along the way...still finishing the subway then onto the streets and city buildings. Enjoy and feel free to critique! Lego Wip by Ben Pitchford, on Flickr Lego Wip by Ben Pitchford, on Flickr Lego Wip Diorama by Ben Pitchford, on Flickr LEGO WIP Teenage Mutant Ninja Turtle Sewer Lair by Ben Pitchford, on Flickr My Flickr page: https://www.flickr.com/photos/127491317@N08/ -
[WIP] Tractor International 6388 and implements
Sjoemie himself posted a topic in LEGO Technic, Mindstorms, Model Team and Scale Modeling
Below some pictures of a WIP i'm working on. Plan is to make it fully working with rc pf. This means, forward-reverse, left-right, working PTO, and rear hitch. This is my first ever MOC using pf, rc and studless building. You might say i'm kind of a 'old school' Technic builder. Hope you enjoy, comments and questions are welcome. -
I really liked Nexo Knights, and I really liked all the little nods towards older castle themes without established locations potentially taking place in its world. So, I decided to try and create a Nexo Knights-refurbished version of two classic sets from the Fright Knights using LDD: Witch's Magic Manor & Night Lord's Castle, albeit combined into one, so that the Magic Manor serves as a sort of hideout/base under the Night Lord's Castle. The bit that I am currently stuck on is a suitable castle gate. The simple wooden doors of the official Knighton Castle set looked a bit weird, and as such I am trying to create a more sci-fi looking portcullis structure or portcullis alternative, in tr. neon orange of course. So far, I have tried using a bunch of 30064 stud/stick pieces (difficult to create a suitably sized structure without running into difficulty connecting the two sets of bars into a structure that can move as a single piece), the large sword pieces from Clay's mechsuit (as with the original use, strange-looking due to the lack of depth combined with the pattern and width) and finally the 4218 rolling gate pieces (serviceable, except the only source of these in tr. neon orange is over two decades old, and I'd like to actually be able to build this thing in real life at some point). If anyone has any recommendations, I'd be glad to hear them.
-
New build still a WIP, but happy now with the shaping, just need to finalise the internals and doors, let me know what you think.
-

[WIP] [MOC] Flatbed Crane truck
ThePowder posted a topic in LEGO Technic, Mindstorms, Model Team and Scale Modeling
Hey everyone, first post here and kinda of a new to tecnhic. So, keeping things short, I started work on a "Flatbed crane truck", and I would like to hear some suggestions about it. I am thinking on adding a small crane to the back of it keeping its open area. I am having some difficulties with the steering sistem and where to put the "fake motors". I left some photos on imgur, go check it out. https://imgur.com/a/91796Xe Thanks in advance. -
[WIP] Grapple Truck I6
JLiu15 posted a topic in LEGO Technic, Mindstorms, Model Team and Scale Modeling
Hey guys, here's another post-BrickFair MOC I have planned that has an interesting backstory: While working on the CLAAS Challenger 95E I decided to make a crane attachment for it like the 42054. Of course, I wanted to make it much better as the 42054's crane didn't seem too appealing to me. Unfortunately, the crane ended up being way too big because I wasn't paying attention to the scale I was building at. I even put a directional gearbox beneath it to control two crane functions. The end result was something very similar to the 42054's crane attachment but ended up way out of proportion to the tractor itself, and I unfortunately had to scratch that idea. But something about this crane stands out to me so much (despite it being essentially another 9397) that I hated to get rid of it, which ultimately led me to propose another MOC. A grapple truck was something I've wanted to make since my early days of MOCs - I've made one back in 2014 but this one will, of course, be much more streamlined and realistic. I don't plan on giving it remote control (as I don't want to deal with wire organizing) but instead a single motor (either M motor or L motor) to drive a distribution gearbox that will control various functions. This would also be a good opportunity for me to use dark azure pieces, as I plan on making the cab that color. As of right now, I have the crane arm completed, but here's my tentative list of features: Single PF M or L motor, driving a distribution gearbox that would control: Outriggers (using Arocs gear racks/brackets) Turntable Boom elevation 2nd part of boom (whatever that part controlled by the small LA is called) Other manual functions would include: Extension Grabber (I'll probably replace it with something better - perhaps 42006's claw?) Basic features/functions would be: 2 rear axles connected to straight-4 piston engine underneath the cabin (double rear wheels, of course) HoG steering Tilting cabin (to reveal engine) Like the other MOC I recently started, I'll probably wait until after BrickFair to really work on it when I'll have all my pieces available after I take apart my BrickFair MOCs. If you guys have any suggestions for me, let me know in the comments. Anyways, here's some pics of that crane: -

[MOC/WIP] Mini cooper
Chilli posted a topic in LEGO Technic, Mindstorms, Model Team and Scale Modeling
Still gotta add in motors and stuff, they are being used in my other moc right now. I also need to add more details to make it look more like a rally car. Its 9v battery is stored in the hood. Constructive criticism is appreciated! -
[WIP] CLAAS Challenger 95E
JLiu15 posted a topic in LEGO Technic, Mindstorms, Model Team and Scale Modeling
Hey guys, here's a third model I'm making for BrickFair Virginia this year. I know the event's just weeks away but since I found myself way ahead of schedule I thought why not make a third MOC. It is, of course, going to be much simpler than my other BrickFair MOCs, but I have a feeling this build's gonna be interesting: UPDATE: I'm not bringing this MOC to BrickFair as it is likely going to place a strain on my already limited amount of necessary parts. There's no way I'll get this done in 10 days without making a ton of compromises, so I'm waiting until after BrickFair so I can make it better. I already have a good amount of this MOC done at this point - the entire chassis is pretty much together. The functions will include: Tank drive with a single Medium motor per track, geared down 3:1 Straight-4 piston engine Rear power take-off manually raised/lowered rear attachment The entire model only contains 3 motors, 2 driving the model with the third one driving the rear PTO as well as the fake engine. Note that the battery box and IR receiver are probably not in their final locations yet - I just attached them to the chassis at seemingly reasonable points to avoid a mess of wires while working on the model. I also realize the rear attachment is way too long so I'll definitely look at that part a second time. I'll also make at least one attachment for this tractor - either a mower or a crane like the 42054. If you guys have any suggestions for me, please let me know. Photos: -
Hey guys, here's a project I've been working on for the past couple of weeks. It will be my second MOC to BrickFair Virginia this summer, along with my Kenworth T600 that I just finished. This MOC will be a sequel to my V6 Supercar from 2017. As you can see the V8 piston engine is already in place. It will, of course, be a mid-engine supercar, with the engine clearly visible from the rear window. It is going to be a motorized MOC, as seen by the two L motors already in place. It will also include SBrick control, although I don't plan on motorizing anything other than drive and steering as it could make things more complicated. At this point the rear of the chassis is pretty much complete, with two L motors connected to a 2-speed gearbox that will be controlled manually. The gearbox's output bypasses the engine via u-joints and connects to the rear differential, while the engine is connected directly to the drive motors via a gear train behind the rear axle. As of right now, my plans for this MOC include: Red body with black roof Red rims with low-profile tires Full independent suspension Servo steering SBrick control Obviously, with less than two months to build this MOC, the building process will go pretty fast. Also because this is a more straightforward build than the Kenworth, I might not do as many WIP updates but the updates will cover more progress. Photos:
-
Well, i was proud of it at the time, but i feel now that my ISD isn't sufficient enough. Numerous add ons and additions have made the model a bit unstable and the inaccuracies need to be addressed. The main issue however is the disproportional build! The bridge is too large and wide compared to the rest of the body, and it lacks the correct amount of hangers and indents in the panels. This is all a result of me following along the structure of set 6211, which focused on an interior, messing up the proportions. I talk about it in the original post: Now however i start from scratch, and you guys get to follow on and give out suggestions! It starts now with the gathering of extra parts and deconstructing the original destroyer. The plan is to make it bigger, more sturdy and more accurate. Got to gather up all available reference material for this beast... Last photo of it intact. Major sections now removed. I plan to keep the bridge the same, perhaps with some slight corrections. However the rest needs to be broken up and sorted... Now people can see the frame of the build, and the messy interior...
-
[WIP] Tatra 6x6 midscale
Teo LEGO Technic posted a topic in LEGO Technic, Mindstorms, Model Team and Scale Modeling
Hey guys! I'm going to try something I haven't so far - a WIP thread for my new tatra 6x6 truck. I'd love to hear all the advice you guys have along the way! The idea is to make a pretty small truck with servo steering and two L-motors, one powering each side to eliminate the need for differentials. Each half axle will be suspended by its own spring. I've already come up with a front axle that I'm happy with. It's solid, good ground clearance, good steering precision despite smaller steering radius, and it's just the right side. If it's not too tall, which I'll have to figure out, the plan is to stick the servo motor vertically right onto the 8-tooth gear, which will give it excellent precision. Another gearing, if I put the servo on its side, would multiply play in the steering system. What do you guys think? IMG_6551 by Teo's Technic, on Flickr tatra-t815-7m0r39-29-306-6x6-2014 by Teo's Technic, on Flickr e4aae418a365981d46bcd6c97723a542 by Teo's Technic, on Flickr 1998_Tatra_T815_7_6x6_military_truck_trucks_q_1600x1200 by Teo's Technic, on Flickr Here are what it will scale like. The 8x8 blueprint I will use for the front view scaling, which I couldn't find for a 6x6 -

[WIP] Lexus LC500
StudRobotics posted a topic in LEGO Technic, Mindstorms, Model Team and Scale Modeling
Here is a quick summary of a previous post. Right now I'm planning on a new project and I could use some help. It's a 1:8 scale model of Lexus' LC coupe powered by Lego Mindstorms EV3. Currently, I have the rear axle built off the instructions from the Porsche 911 GT3 RS set. I also made the engine for the LC500 on Lego Digital Designer and I am wondering if it is good enough to buy the pieces for it on BrickLink. I also want to add the following features: Four or six-speed paddle-shift transmission Retractable spoiler Detailed interior Fake V8 engine (but I would like to achieve moving pistons) Full independent suspension I would welcome some helpful comments about the V8 engine, axles, and the gearbox I planned to use before I order pieces on BL. Thank you. -
[WIP] Kenworth T600
JLiu15 posted a topic in LEGO Technic, Mindstorms, Model Team and Scale Modeling
Hey guys, here's another project I've been working on alongside the Monster Bike. This is going to be a much bigger project, and will very likely be my first MOC going to BrickFair VA in August. It will be a truck and trailer MOC - the trailer will have several motorized functions and a pneumatic crane, and the truck will contain no electronic components - it will be all about the details, just like the 42078, and it will be built at a similar scale. At this point I have finished the distribution gearbox that will control all the motorized and pneumatic functions. The gearbox is set up similar to that of the 8110 (or 42070) - the "main" side will determine whether the motor drives the pneumatic compressor or the 2 motorized functions, and the "dependent" side will determine which of the two motorized functions the motor will drive. The motor is only connected to the main side, as the dependent side requires the main side to direct drive to it. As for the truck, I'm planning on a Kenworth T600 in black. The trailer will have a platform made of 5x11 panels in light bluish gray. The functions of the trailer will be: (This plan is tentative) Motorized functions: Trailer stabilizers Crane rotation (will have a worm gear somewhere in the gear train as this prevents manual rotation) Pneumatic Functions: (all will be on the crane arm) Elevation Second Section Extension (if space allows) Grabber If you have any suggestions, let me know in the comments below. Photos: -
I've started work on the 0-6-6-0 Tank and tender steam locomotive that I was planning, and the first part is complete, in other words, the chasis is sorted. Attaching both sets of driving wheels was quite hard, considering it's going to be a 0-6-6-0 Mallet tank and tender (I believe Blanche of the Ffestiniog Railway is a good example of a tank and tender locomotive). And yes, the finished locomotive will be powered via PF in the tender. At least the basics are done. This is still a Work In Progress. Advice is appreciated.
-
.thumb.gif.ad7c8d88b264ee812194946c07404504.gif)
[WIP] Miniform - a brick-based platformer game! - Currently On Hold... :(
mocbuild101 posted a topic in LEGO Media and Gaming
Miniform - A game about a minifigure that got lost on a very strange construction site... Latest version: https://bricksafe.com/files/mocbuild101/my-games/miniform/Miniform_v0.0.7.0.exe Previous version: https://bricksafe.com/files/mocbuild101/my-games/miniform/Miniform_v0.0.6.0.exe Controls: Left = player moves left. Right = player moves right. Space = player jumps. Down = player sits down. Backspace = pause game. Escape = quit game. R = restart level. Main programs I'm using: MLCad - for creating the models used in the game. GIMP - for graphics editing and converting. GDevelop - the main game engine and compiler. (though I think I might change to Unity) Things to add in future updates: A proper level. Game start/exit screens. Adjustable game controls. More types of bricks. (slopes, etc.) Background music. Have fun! Update history: -

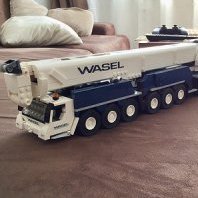
[WIP] Five-axle mobile crane (inspired by Liebherr LTM1200)
Erik Leppen posted a topic in LEGO Technic, Mindstorms, Model Team and Scale Modeling
Since the beginning of my AFOL-hood, I have been a crane guy, with many mobile cranes built in the past. Now, during the more recent years I tried to diversify, partly thanks to competitions like those on Eurobricks, and built various other vehicles. I think it's time to see if I haven't unlearned how to build a crane :) So, the goal. I aim for a five-axle crane in the same scale of 42009. I think five axles is a perfect balance: enough to be imposing, but not so much it becomes awkward :) I use the Liebherr LTM1200 as a source of inspiration. The extra space between axle 3 and 4 gives me some extra leeway, but I also find it to look better. This image is from the Liebherr folder; I drew a grid over it with 8 studs for the wheels, and some markings in red. Most functions will be manual. Not sure if I can even get a motor in, but I will try. But there is one function I really want: suspension. I think it just looks cool to have a multi-axle vehicle with suspension on all wheels, and it makes my model less of a 42009-clone. To do this, some other functions will have to be dropped, like the motorized double-acting outriggers. This is the progress so far. Each axle is a fixed unit that is connected to the frame by two shocks and two ball joints. As vertical space is limited and Lego suspensions always tend to become taller than desired, I had to find a way to create a sturdy frame, so I went for studded Technic bricks. This makes the frame very strong. Also I think it's a nice deviation from all-studless building :) (This will principally be a studless model, don't worry.) Then, the steering. If you ever want to add and connect the steering to so many suspended axles, let me warn you: it's not fun. Every axle needs two U-joints. I just ran an axle with lots of U-joints (at least 6) through the entire thing. Not optimal, but it works. The outrigger housing is a real pain to work around. Steering angles per axle are varied the 42009 way: by having different steering arm lengths. The ratios are 100% : 50% : 0% : -67% : -100%, or, in easier numbers: 1/2 : 1/4 : 0 : -1/3 : -1/2, where the denominator is the length of the steering arm. Axle 3 is the only axle connected to the fake engine. Speaking of which, there's hardly any room left for that! So I decided I will add a boxer engine (which is lower), and it will still have to stick out one stud above the roof of the cabin. So be it. Driving the fake engine will be a challenge by itself too, because the unwieldy geartrain for the front axle's steering is in the way. I will have to sacrifice a lot of ground clearance for the driving axle. Next up: add the fake engine, add the outriggers, lay out the measurements of the cabin, and see if I can get the first boom segment in place. One note about colors. It will not be yellow. I just don't want to add another yellow crane, but I'm still in doubt about color options. I love trying out weird color combos as you might know, but the boom will probably be white, because of the panels I have (thanks to 42025). So I will probably do a multicolor scheme where white and black/gray are combined with one or two non-grayscale colors. I love to hear what you think of the first take :) -
Here's a modular that is currently a work in progress. Still a lot of work to do on floor 2 and 3 but just looking for any finishing touches people could recommend for the bar portion. I do plan on swapping out my breakaway wall to be dark tan so it won't feel so industrial. Thanks in advance! 20170727_003951 by David Kerkes, on Flickr 20170801_004905 by David Kerkes, on Flickr 20170730_001243 by David Kerkes, on Flickr 20170801_004022 by David Kerkes, on Flickr 20170801_004944 by David Kerkes, on Flickr
-
[WIP] Foremost Delta Wheeled Carrier (offroad 3-axle crane truck)
Erik Leppen posted a topic in LEGO Technic, Mindstorms, Model Team and Scale Modeling
Afte the success of the Jaguar XJR19 Le Mans prototype (of which I will still to the photos of the complete model, and instructions) I decided to do a new WIP. Again it's a model I've prototyped over the last month and will now do the second, hopefully better buildup. And again, I will use a photo of an existing vehicle as my inspiration, but it won't be an exact scale model. I use the photo as inspiration and will deviate where needed for the functions (and it will be needed, because i want a 4-function switch box similar to 8258). It's this truck. It's called Foremost Delta 3 Wheeled Carrier and it seems to come in several configurations, one of which has the crane below. On this picture, it's not finished, because outriggers seem to be missing. Several other pictures of the same model show that it has one set of outriggers near the crane. My other source of inspiration will be set 42070. I want to make something with a similar size, which will be in a way "my own take on that set's theme", i.e. "off-road truck with crane". (That's all I will use from that set). So I'm thinking of something in the range of about 2000 pieces. (In practice though, it will always turn out to be more.) Another thing: the colors will be very different. My first prototype was obediently yellow, but when I arrived at the cabin I wanted to deviate a bit, so I threw some less-used colors in the mix, and went for Dark Turquoise with Black for the cabin, and consequently also for the crane and bed. The chassis will be Dark Gray and for the body I am torn between Yellow and Red (main reason being the colored axles I want to use, for example for the ladders). I will be copying the crane from 8258 (with different colors), because that one seems perfect for the scale and type. But everything else will be different. I will be using Tumbler wheels. The profile is not exact but the shape and size seems fine. Also, currently I have only 4, so I will temporarily be using someting else for the front (interestingly, the Porsche wheels have the same diameter and width). I started with two important modules: The one on the left is the 4-function gearbox and crane base, and the one on the right is the rear axle unit. What I like personally is how a 4-way gearbox and outriggers using the new gear rack pieces introduced in 42043 fit in a pretty compact module. Here's the gearbox unit from below. The dark-gray axle joiner is the motor input. I plan on using my newly acquired L-motor. Here's the rear-axles module: Each axle is mounted on two 1x5 suspension arms and two 1x6 links. These 4 keep the axle in place and nicely horizontal. The free ball-sockets near each wheel will connect to the springs. Also, as you see, with the parts used, doing this part in dark-gray seems impossible... Of course, the 15L beams will be replaced by the chassis. It will be a challenge to get this strong though, because the gearbox module has some gears in the way, so little room to connect things firmly. The functions I want to have: Manual steer and drive (so no RC) Electric crane rotation Electric crane first boom element Electric crane second boom element Electric outrigger horizontal deployment Manual outrigger vertical deployment (similar to many sets) Suspension It's not as impressive as 42070's six electric functions in three modes and four nice large-range outriggers, but instead of that, this will have suspension. Next up will be connecting the two modules, and doing the front axle and steering modules. -
[WIP] Lexus LC500 EV3 1:8
StudRobotics posted a topic in LEGO Technic, Mindstorms, Model Team and Scale Modeling
This is my first WIP post on EuroBricks where I will show my progress on my newest build, an EV3-powered 1:8 replica of Lexus' newest flagship coupe, the LC500. The car will most likely be a combination of both the standard and the V6 hybrid LC, but it will have a V8. The body will also be orange. Here's a photo I found of an LC that looks a lot like the one I am shooting for. Features I'm planning to add: Four or six-speed paddle-shift transmission Retractable spoiler Detailed interior Fake V8 engine (but I would like to achieve moving pistons) Full independent suspension All I built so far was the rear axle for the LC. It's exactly like the one in the Porsche 911 GT3 RS set but more reinforced. I also made the V8 engine using Lego Digital Designer. I plan to build the paddle-shifting mechanism used in Didumos' Ultimately Playable Porsche 911 GT3 RS (the one with the tilted wheel) and pair it up with a gearbox. I currently am having trouble whether to motorize his gearbox with the EV3 motors or to pick a different one with less gears and friction. I also am having a little bit of trouble finding the right front axle, though I like the one that Didumos put his Porsche because of the fact that is has two shocks for each wheel. However, I find it very difficult to fit the V8 engine in the middle since the axle is made for a rear-engine car. Here's a poorly drawn render I made of what I'm trying to achieve with the front axle. And here's the chassis in the real LC and the measurements for the LC Lego model. Overall, I'm excited about the build. I would welcome some helpful comments about the V8 engine, axles, and the gearbox I planned to use before I order pieces on BL. Once I start working on the body and aesthetics, I would appreciate some input with that as well. I can also give you the download for the .lxf file of the engine if you'd like to check it out. I look forward to replying to your comments and sharing my progress. Thank you. -
[WIP] Orange Motorbike
JLiu15 posted a topic in LEGO Technic, Mindstorms, Model Team and Scale Modeling
Hey guys, here's a new MOC I've just started making. It's going to be a motorcycle, and so far I've completed its rear wheel module, with the drive motors already in place. It will feature: Drive, with the 2 L motors, geared 1:1 Steering, which will be controlled by a M motor The final design will be similar to something like the Batpod, with the front wheel far in front of the chassis. This means steering will probably end up like that of a wheel loader, where the vehicle turns on an articulated joint (hopefully that makes sense). The front wheel module will be attached to the chassis via 2 large turntables, and the bike will steer simply by transferring gear drive to the turntables. (The steering motor will be geared down of course to ensure stability) Rear suspension The entire model will be, of course, controlled by SBrick. A rechargeable battery will power it in order to reduce weight. I'm making this MOC to give some out-of-the-ordinary applications for the Claas tires, which, in this case, is using them on a bike. I also think that my first remote controlled bike MOC (the Stealth Bike from 2016) was not so great, so I'm making a second bike to see if I can make it perform better The video will be, of course, filmed outdoors. This MOC is, of course, going to be pretty simple. But I'm already making plans for my BrickFair VA 2018 MOCs, one of which is already underway. If you have any suggestions, let me know in the comments below. Photos: -
Hi everyone I'm new to Eurobricks and I want to show you my [WIP]-moc of a german BR 01 513 steam locomotive. This is my first moc and I have spent 6 month until now to create it. As I'm not a train specialist there might be a lot of mistakes and missed details :) The scale is something around 1:42 and for now 1300 PCS are used. A power functions train engine is located in the tender. The whole model is able to run on small lego curves but there's still much work to do to make it look smooth. Please let me know what you think. Any constructive feedback is welcome:) Cheers Chris Hallo an Alle, ich bin neu hier und möchte kurz mein [WIP]-Modell einer BR 01 513 vorstellen. Dies ist mein erster Moc-Versuch und es fehlt noch Einiges, aber ich dachte mir ich hole mir mal etwas Feedback und Verbesserungsvorschläge. Die Arbeit an diesem Model begann vor etwa 6 Monaten. Gleich vorweg: Ich bin kein Spezialist in Sachen Eisenbahn, weshalb bestimmt einige Fehler dabei sind. Auch ob die 01 513 in dieser Konfiguration mit Öl-Tender und der Seitenverkleidung so existiert hat, weiß ich ehrlich gesagt nicht.:) Der Modellbauhersteller Beckmann hat (hatte?) zumindest eine solche Lok in seinem Sortiment... Das Ganze ist etwa in 1:42 und umfasst bislang 1300 Steine. Im Tender sind ein Power Functions Zugmotor und ein Empfänger untergebracht. Die Lok kann momentan auf den kleinen Radien fahren, allerdings sieht es noch etwas holprig aus. Über konstruktives Feedback würde ich mich sehr freuen. Einen schönen Sonntag für Euch Chris